Practice settings: charting
Access Charting Practice Settings
- Go to Practice > Practice Settings > Charting
Code Exclusions
You can configure codes in a range to not require re-validation or re-consent when a treatment is modified on the same site within that range.
- For example, I chart a D2140 (1 surface amalgam) on 3O, receive consent, and need to change the code to a D2150 (2 surface amalgam) on 3MO.
- A code exclusion rule from D2140-D2150 means the system won't require a a new treatment consent when I update the procedure code and surfaces on tooth 3.
Re-consent exclusions only apply to treatment consents, not informed consents.
- Go to Practice > Practice Settings > Charting > Code Exclusions
- Select Add Code Exclusions
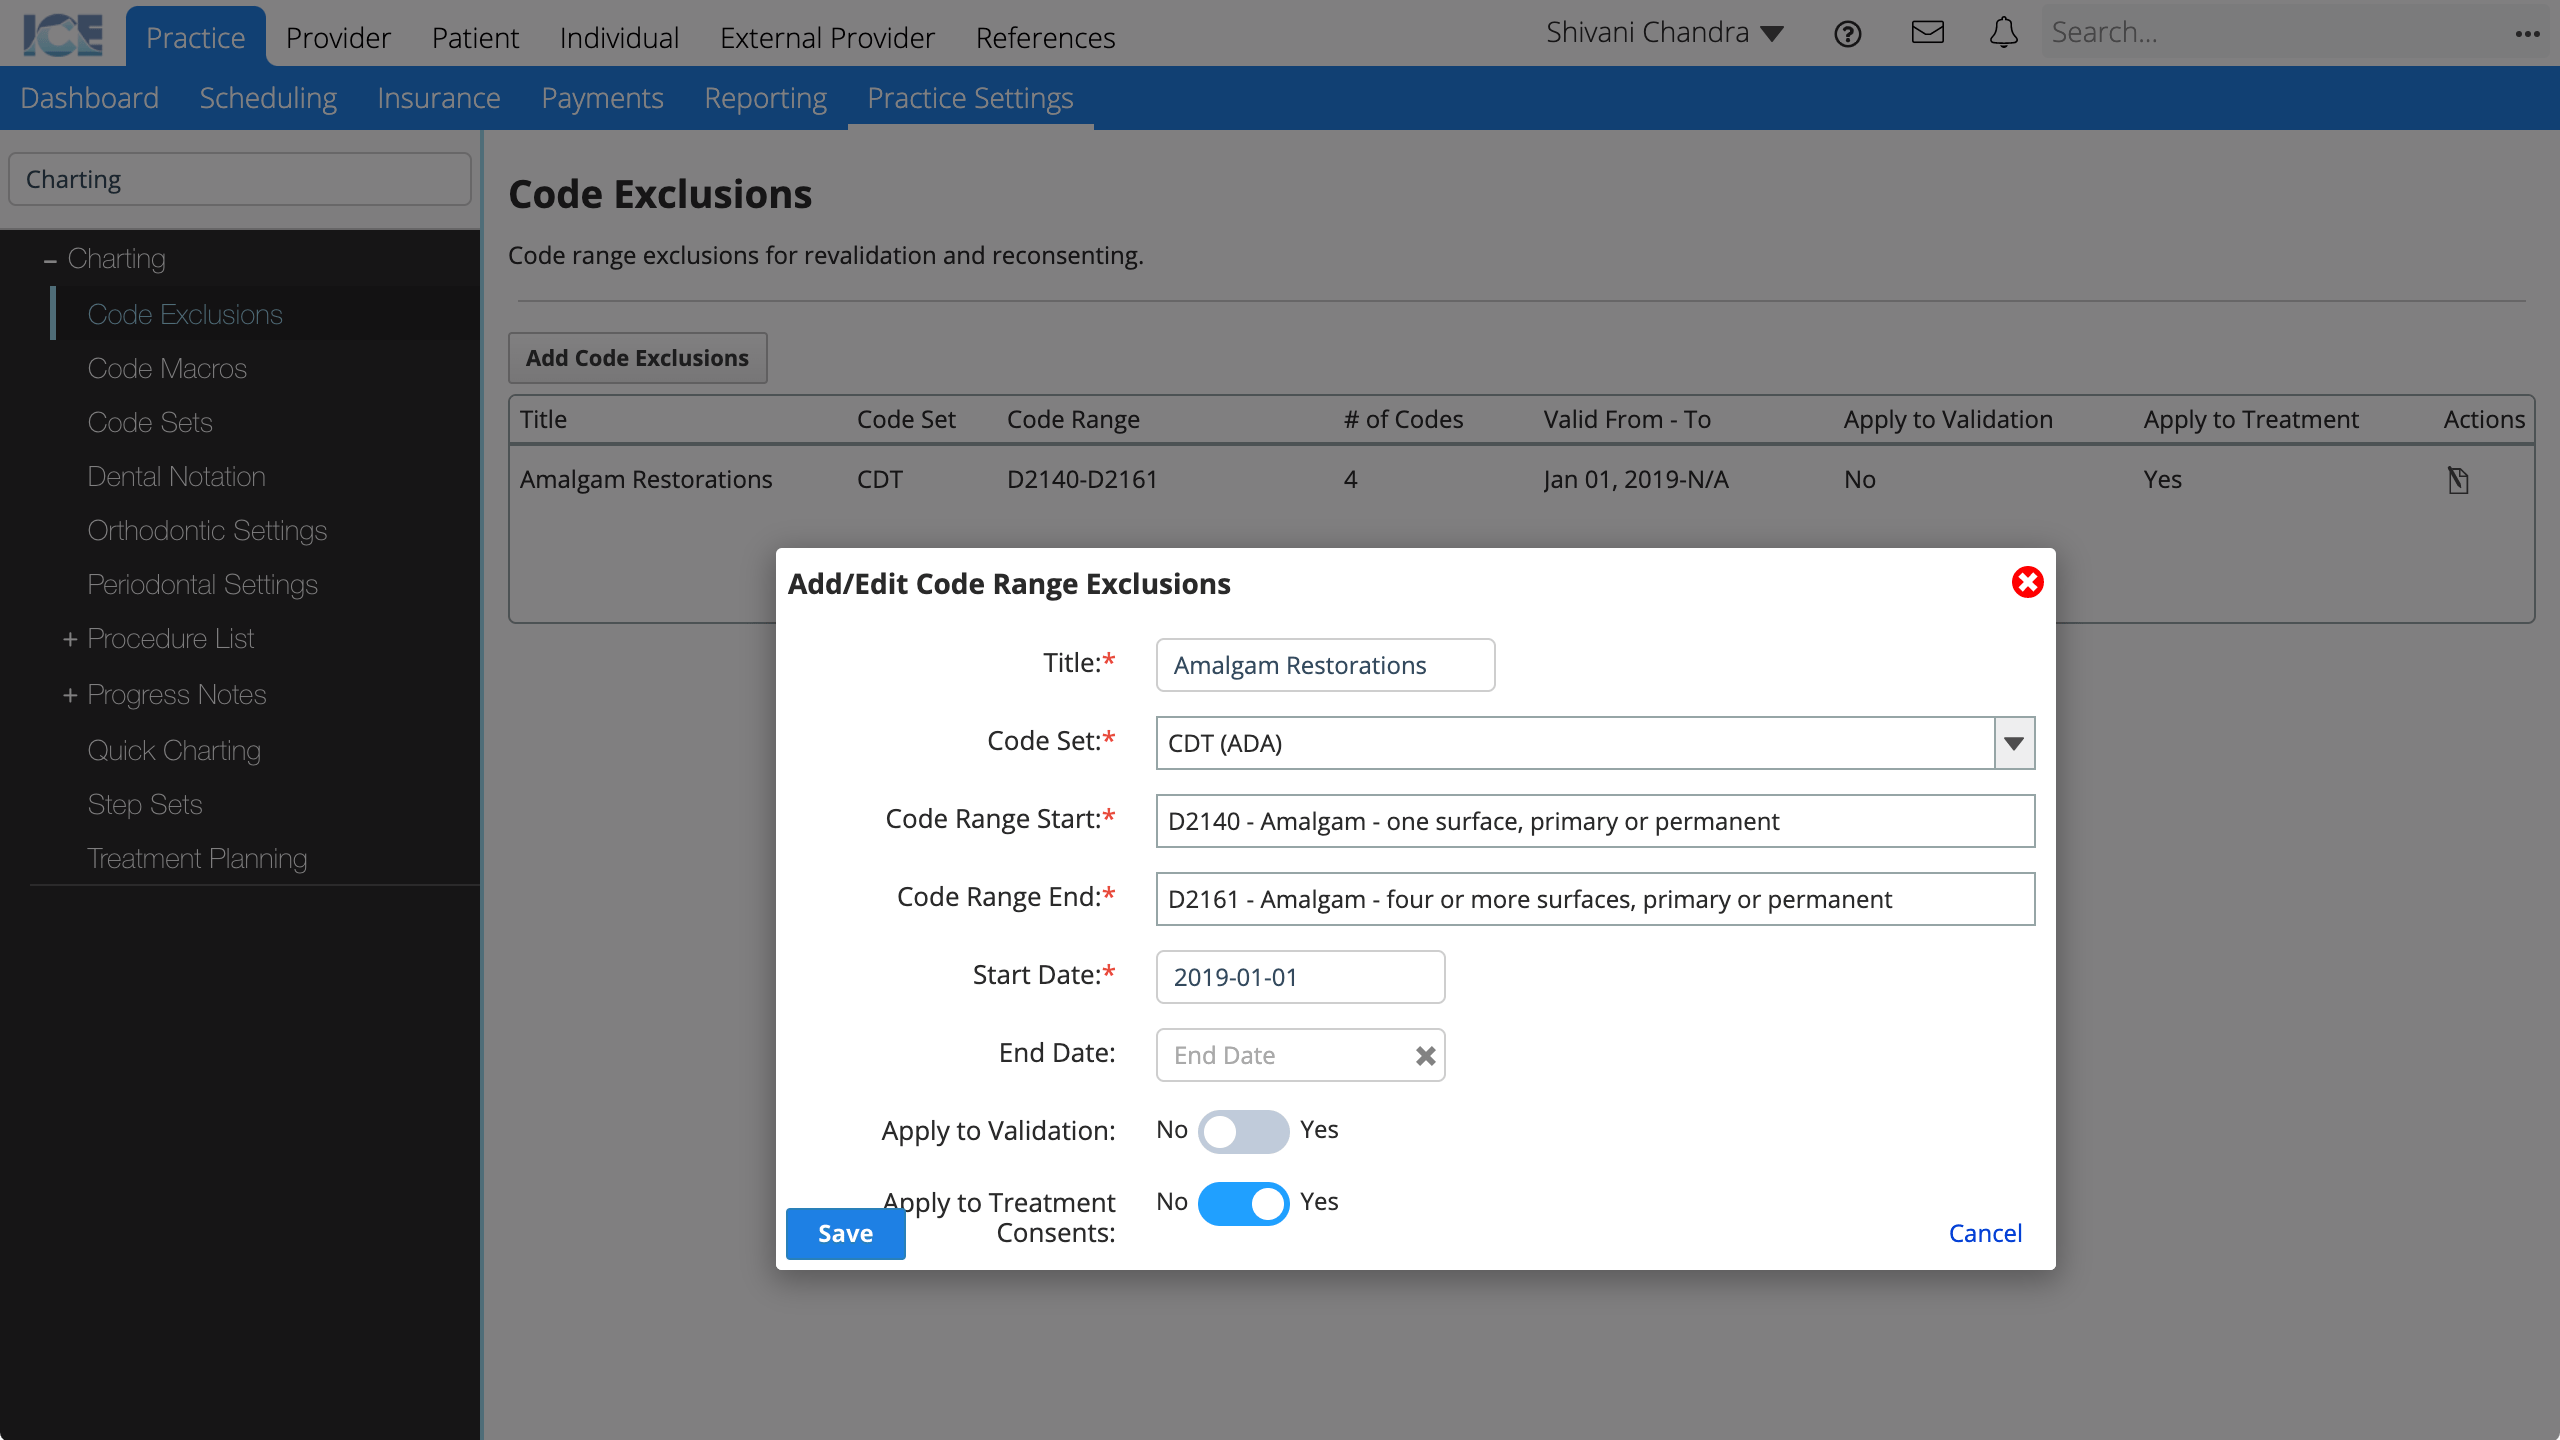
- Complete the required fields
- Title: The title that appears in the Code Exclusions table in Practice Settings.
- Code Set: What code set has the excluded codes?
- Code Range Start: What code is the first in the exclusion range?
- Code Range End: What code is the last in the exclusion range?
- Start Date: After this date the exclusion is applied to all matching codes.
- End Date: After this date the exclusion no long applies, but appears for historical entries.
- Apply to Validation: Is this exclusion for re-validation?
- Apply to Treatment Consents: Is this exclusion for re-consenting to treatment consents?
- Select Save
To learn how to configure which codes require consent, see "Edit Procedure Code Consent and Diagnosis Requirements".
Code Macros
A code macro is a way to add multiple related procedure codes to a patient at one time by choosing a single code macro.
Code macros appear in procedure search. In search results they show the macro's Display Code and Description defined in Practice Settings.
- Go to Practice > Practice Settings > Charting > Code Macros
- Select Add Code Macro
- Enter a Display Code and Description
- Select Add Procedure to Macro
- On the right, search and select a procedure code to add to the macro
- Optional: Select a default tooth/area
- Repeat steps 4-6 to add additional codes to the macro
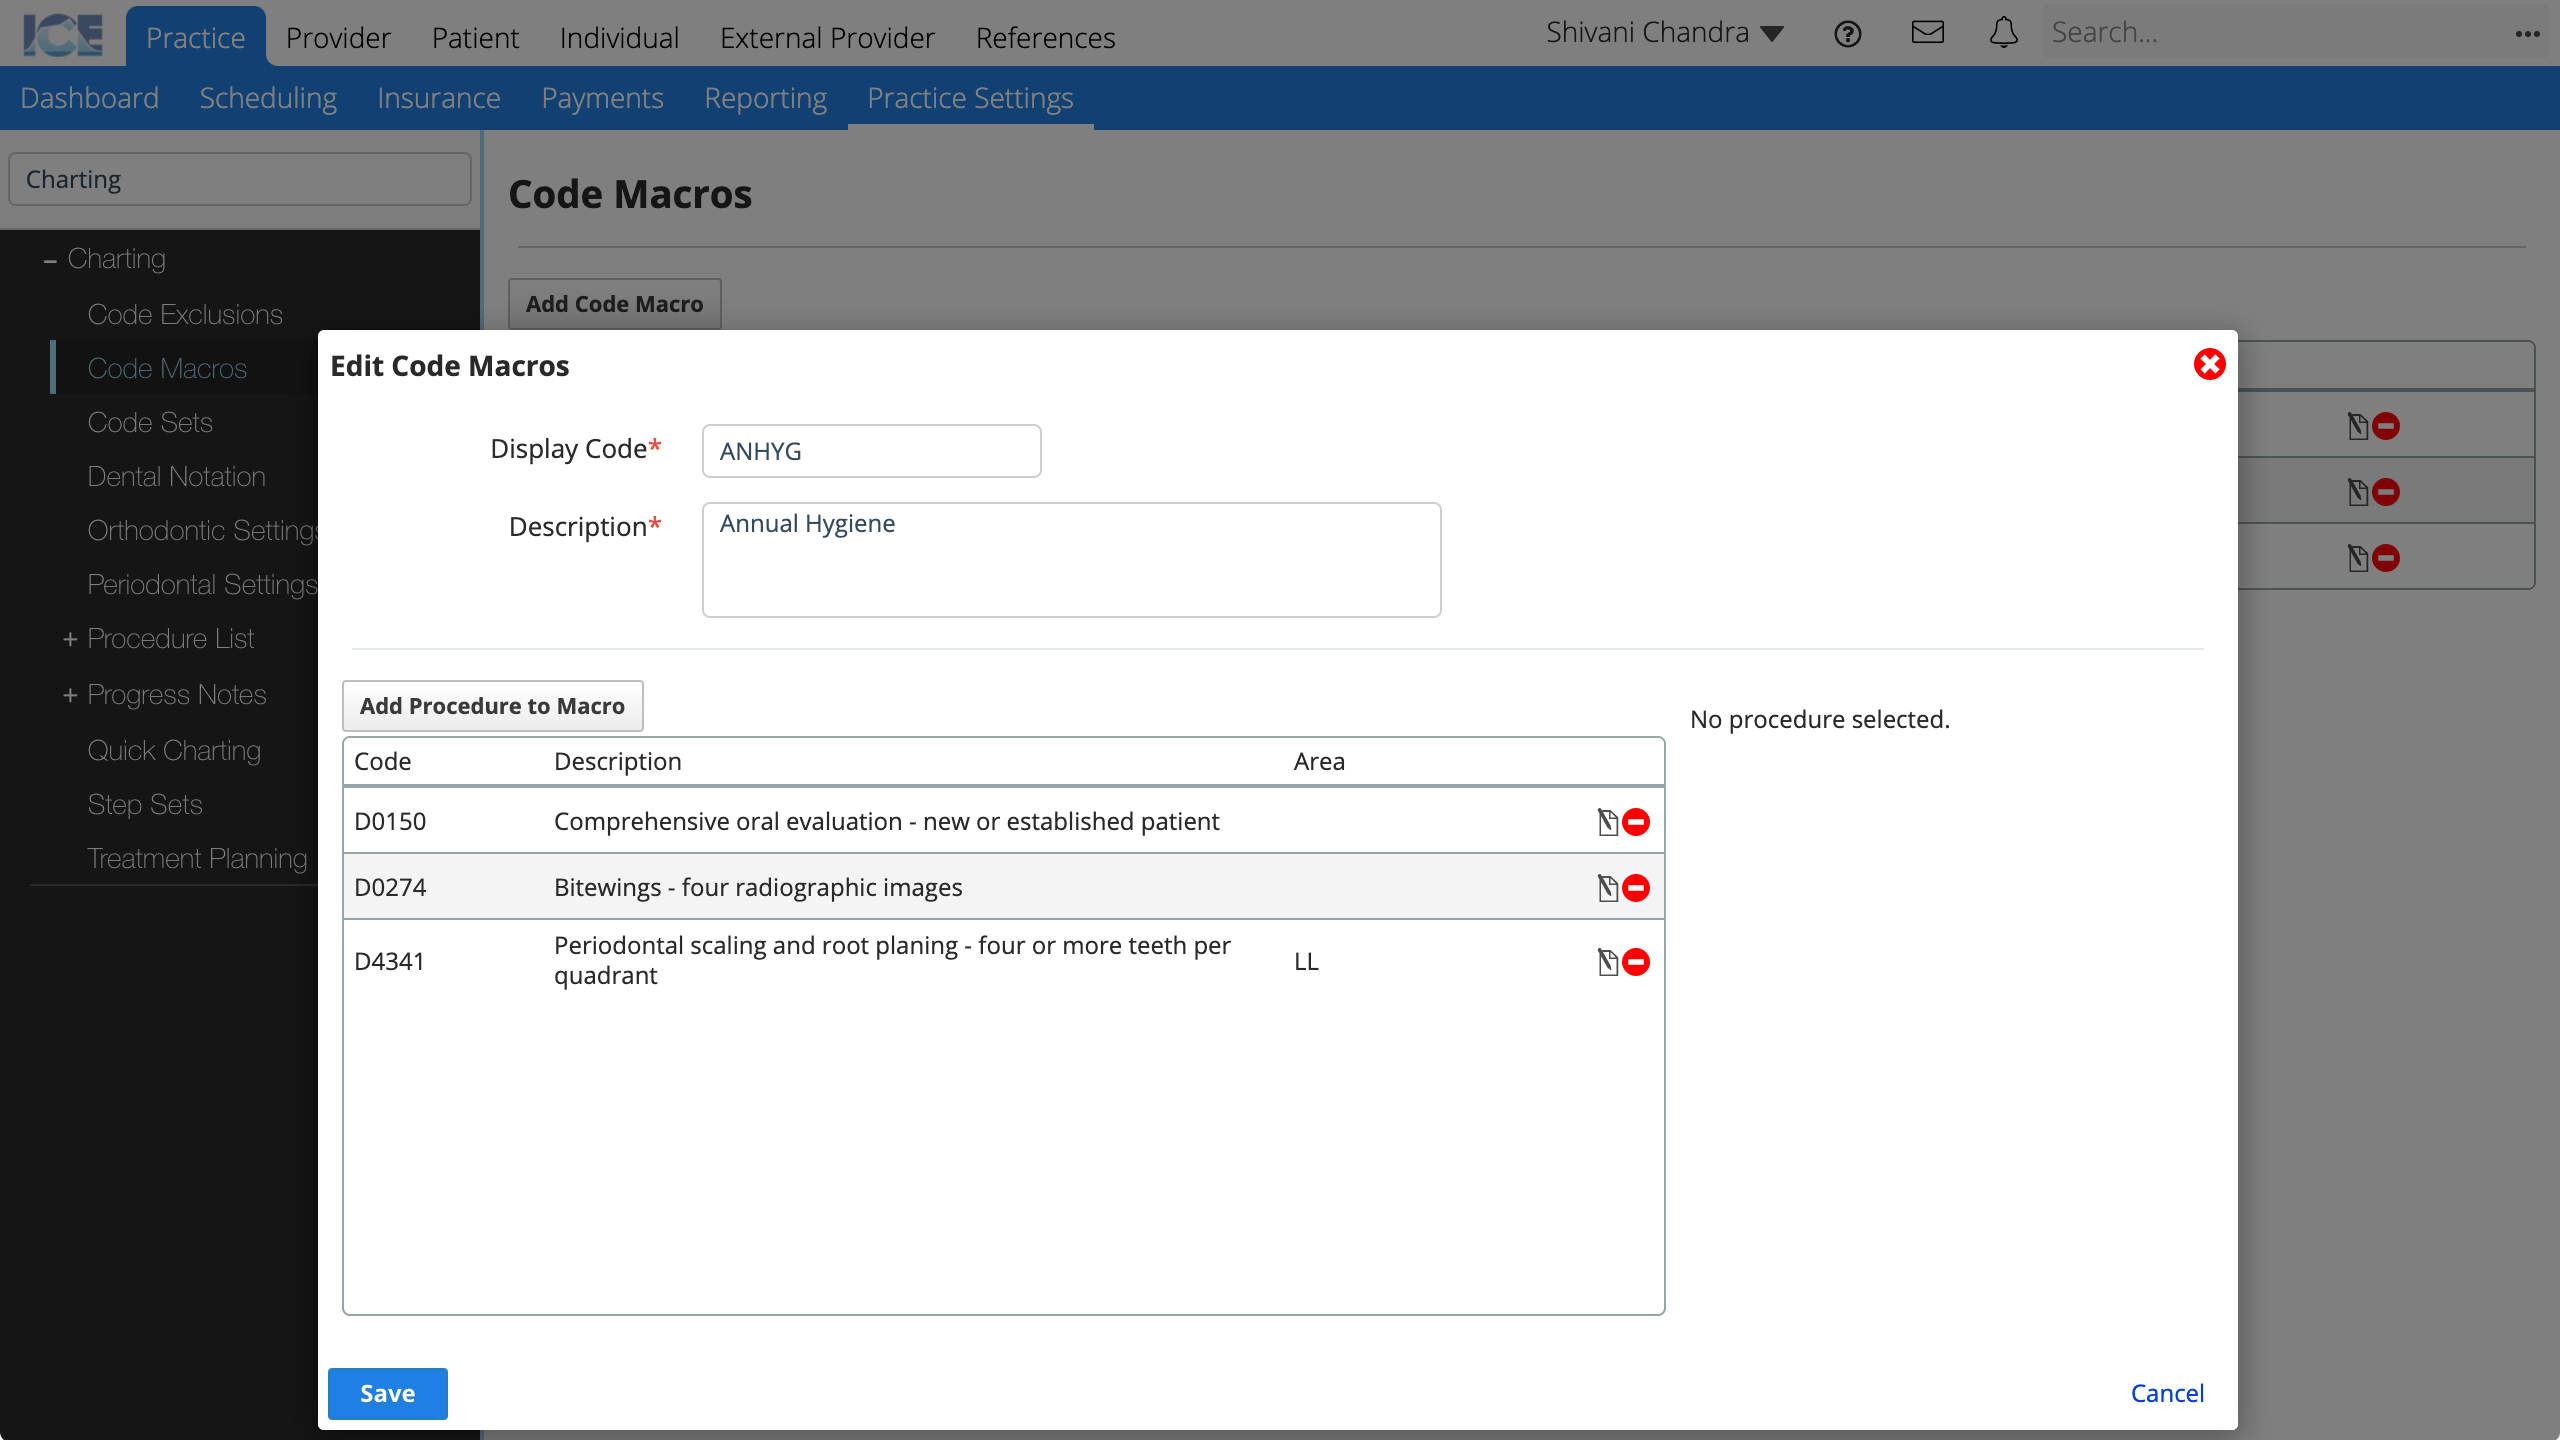
- To remove a procedure from the macro, select

- To edit the details of a procedure in the macro, select

- Select Save to save your changes
To edit an existing code macro, select ![]() from the main Code Macros table.
from the main Code Macros table.
Code Sets
Choose which of the ICE Health Systems default code sets to use in your practice.
A practice can also create custom code sets in order to create their own finding or procedure codes.
These custom codes can be mapped to existing codes in order to make use of the existing code's visual representation on the odontogram or for insurance billing purposes.
| Default Code Sets | Type | Description |
|---|---|---|
| Caries Classification (CAR) | Findings | Allows for the special identification of caries for consistency and excellence in research. When Caries Classification is enabled, other caries codes in the SNO-DDS set are hidden to ensure the proper caries codes are selected. |
| SNO DDS (SNO) | Findings | A standardized dental diagnostic terminology that has been developed by dental domain experts. Each selectable term has ICD-10 codes associated that will support research and insurance claim processes. |
| ICD-10-CM (ICD) | Findings | The International Statistical Classification of Diseases and Related Health Problems' medical classification codes. |
| CDT ADA (CDT) | Procedures | The American Dental Association's procedure codes. |
Select Code Sets to Use in Your Practice
Select the Code Sets that you would like to use in your practice.
- Primary code sets are included in simple and advanced search results.
- Secondary code sets are only included in advanced search results.
Search results are grouped by code set. Use the arrows to reorder code sets here. This defines which sets appear at the top of the results.
- Go to Practice > Practice Settings > Charting > Code Sets
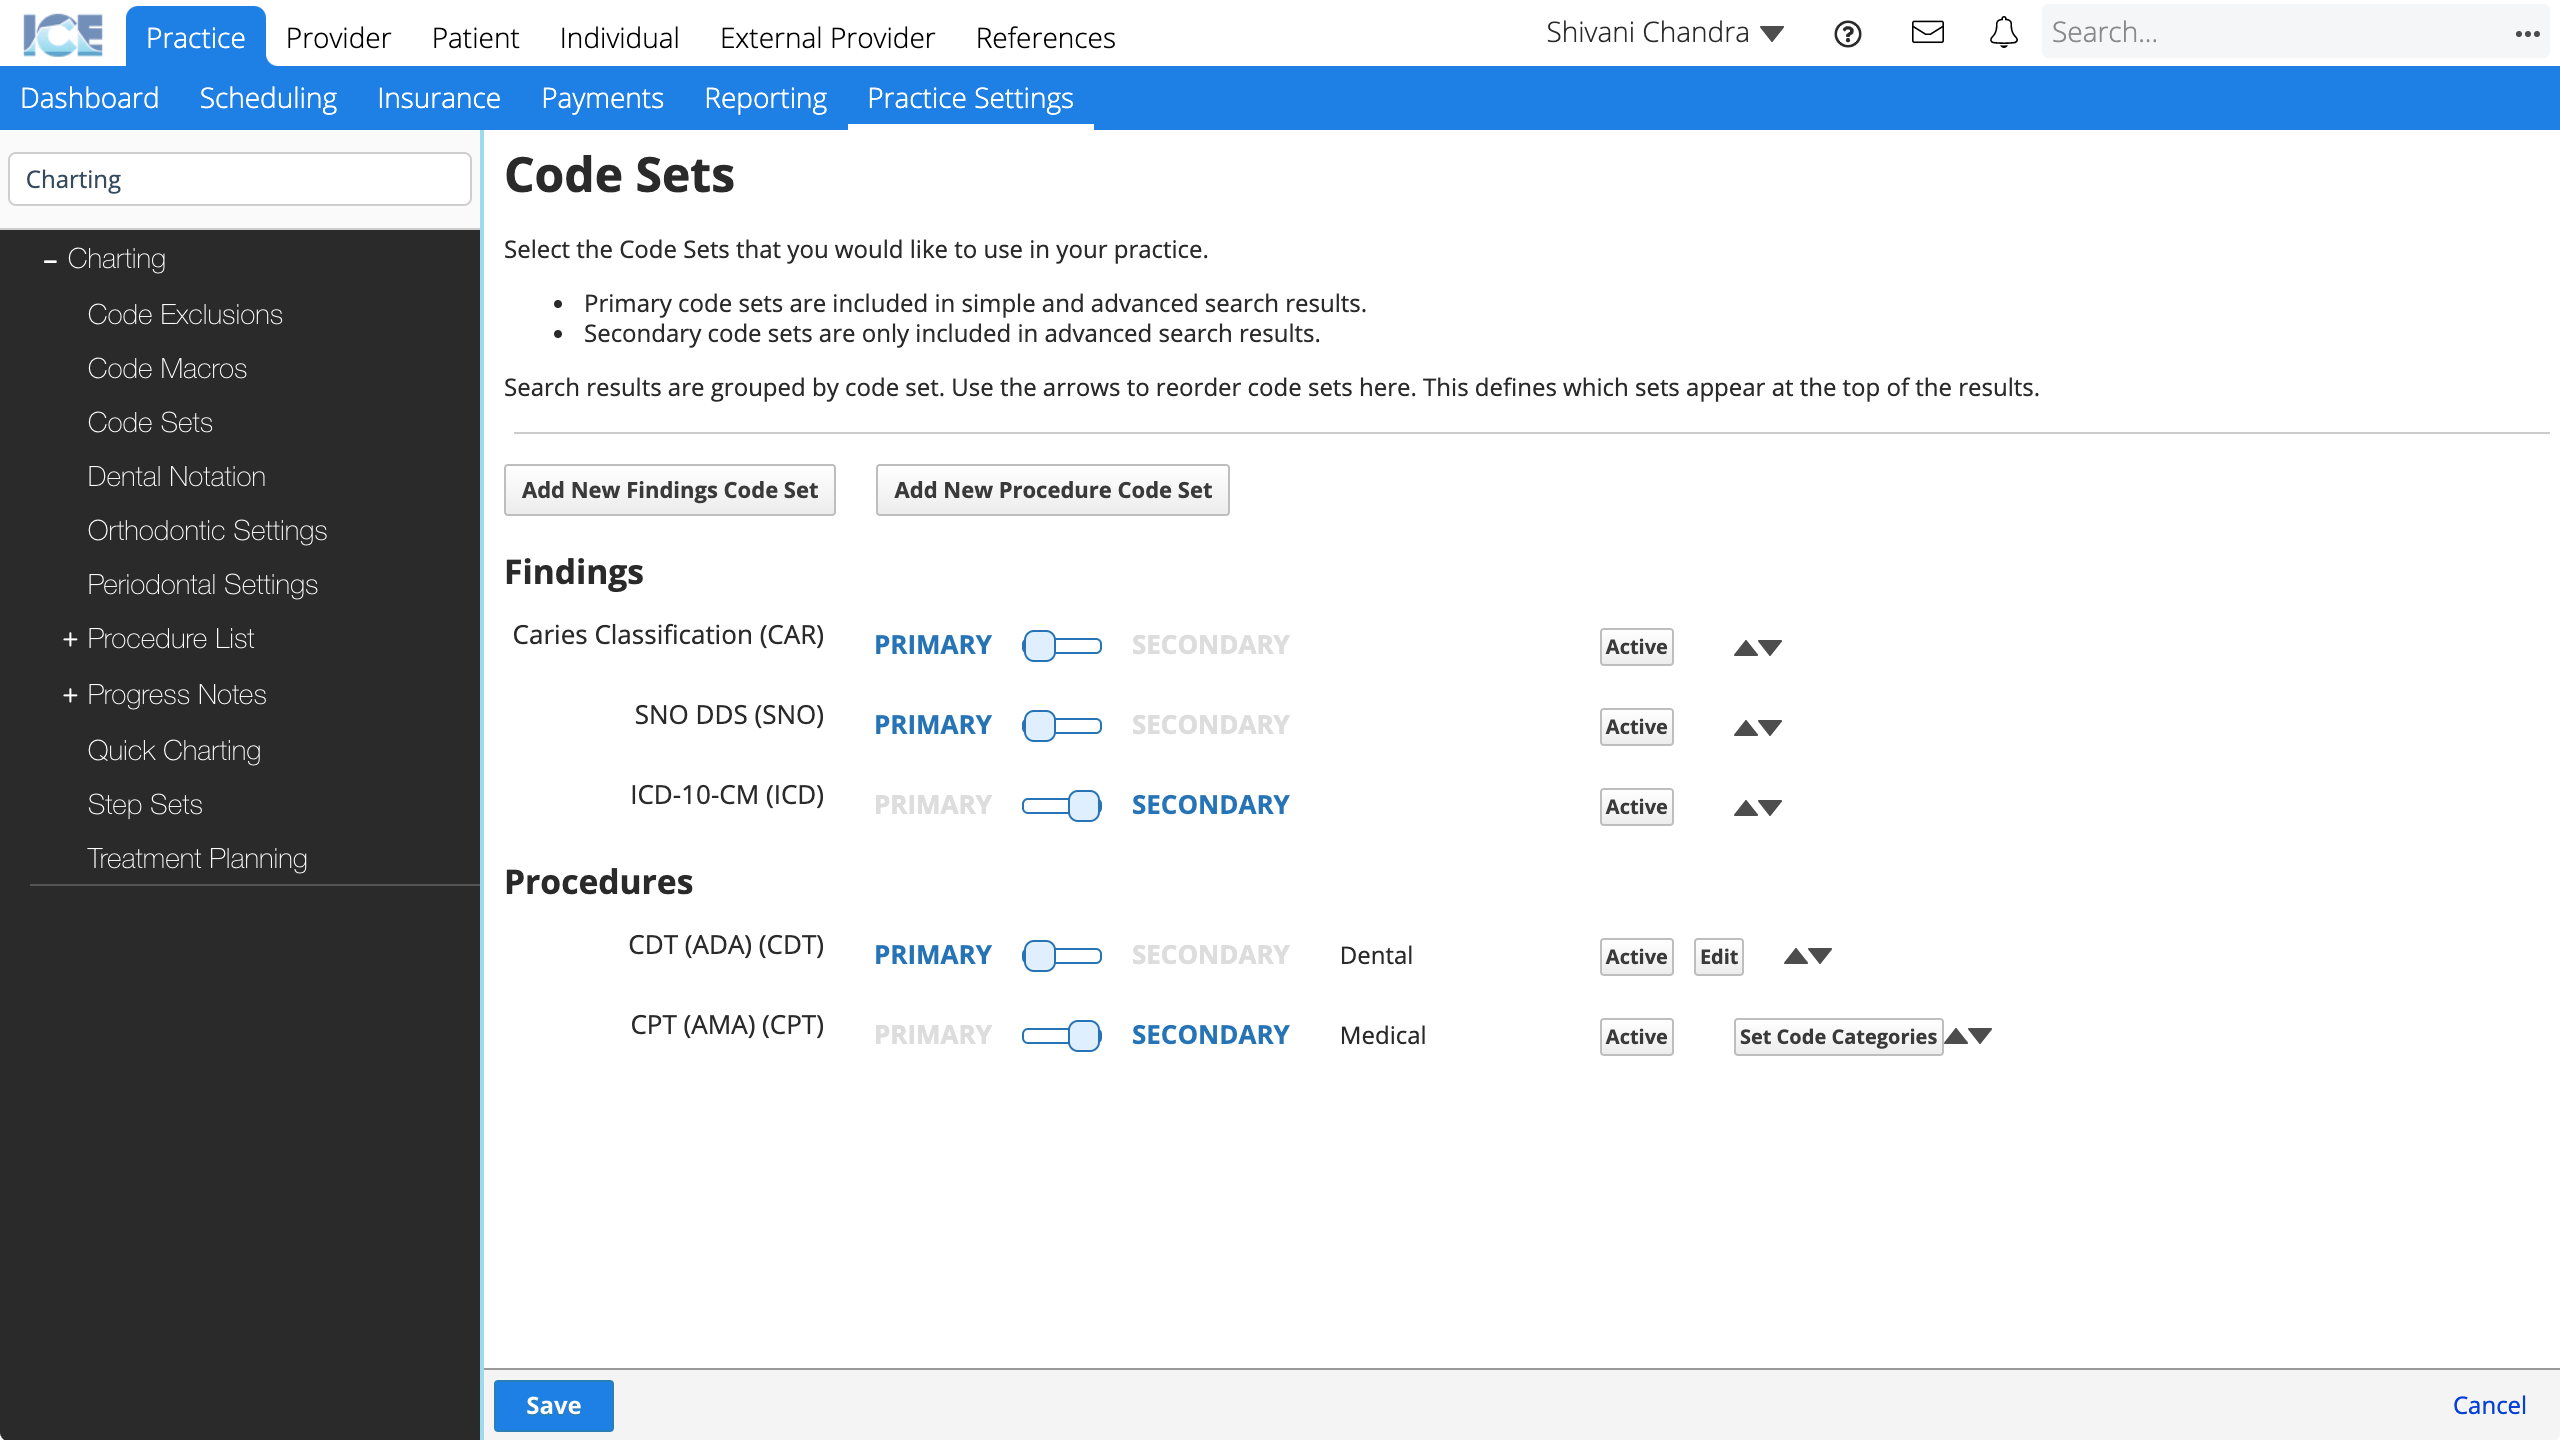
- Toggle the code sets that you would like to use in your practice to Active
- Select

 to reorder the code sets
 - Toggle the sets you would like to be Primary
- Select Save to save your changes
- Select Cancel to discard your changes.
Edit Procedure Code Consent and Diagnosis Requirements
Configure which procedures in a code set require:
- A completed treatment consent form.
- A completed informed consent form.
- An associated diagnostic code.
If a procedure requires consent or a diagnostic code, the requirements popover in charting will display a red ! until all requirements are met.
To learn more about requirements in treatment planning, see Navigate treatment planning.
- Select Edit to the right of the code set containing the procedure you want to configure
- Find the procedure in the list
- Use the browser's Find command to help.
- Select or deselect the available checkboxes
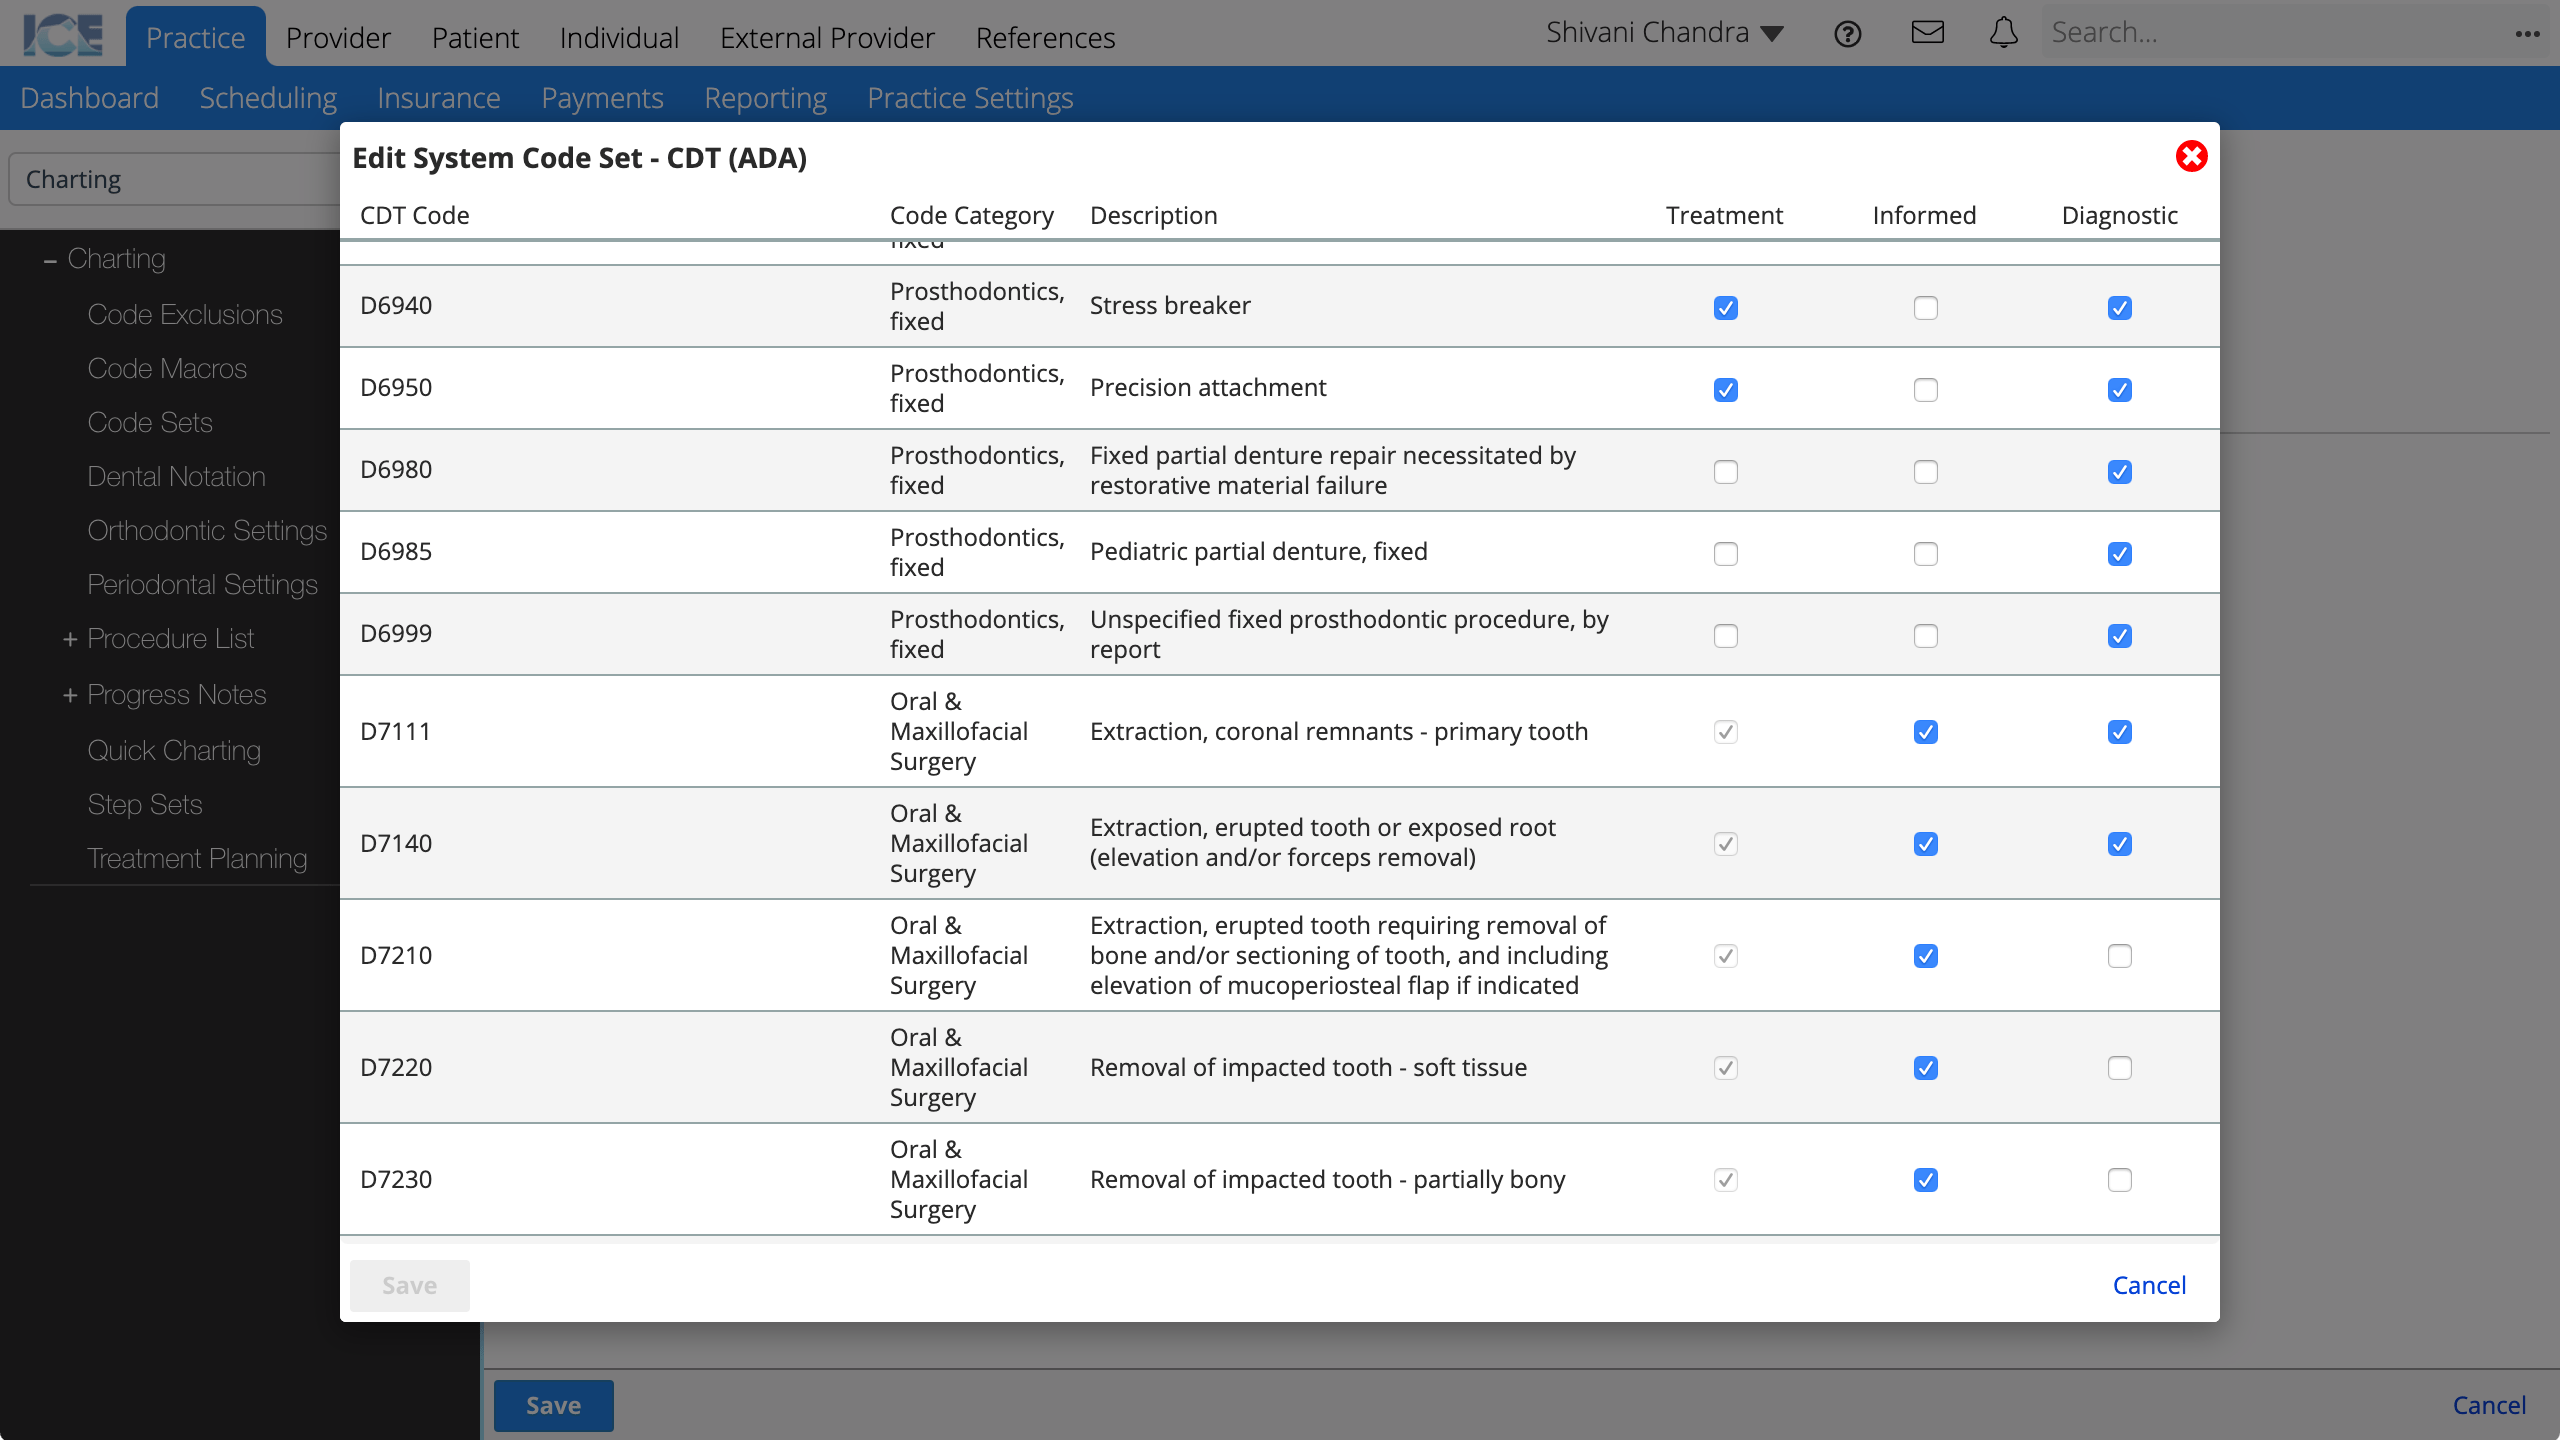
- Treatment: If selected, this treatment requires a treatment consent.
- Informed: If selected, this treatment requires an informed consent.
- Diagnostic: If selected, this treatment must be associated with a diagnostic code in treatment planning.
- Select Save to save your changes
- Select Cancel to discard your changes.
Add a New Custom Code Set
Create a new code set that will allow custom codes to be used when entering either findings or procedures.
- Depending on whether your custom codes will be used for Findings or Procedures select:
Add New Findings Code Set
or
Add New Procedure Code Set - Add a Code Set Name and a three letter or number abbreviation

- Procedure code sets only: Toggle the Type to either dental or medical
- Select Save
Add New Custom Code to a Custom Code Set
After you create a custom code set you can add custom codes to it.
Custom Codes can optionally be mapped to an existing code. This is done in order to define how the custom code is displayed on the odontogram or for insurance billing purposes.
- Go to Practice > Practice Settings > Charting > Code Sets
- Select Edit to the right of the custom code set where you want to add a code
- Select Add New Custom Code

- Confirm whether or not you want to map to an existing code
- Choose not to map the your new custom code to an existing code by toggling Type to No Mapping.
- If you're mapping to an existing code, search for the code using the Mapped Code field
- Enter a Code and Description that will appear in Charting and Financials for your custom code
- Choose a Start Date
- Choose an End Date if this code set is no longer in use
- Select OK
- Repeat as necessary in order to add additional codes
- Once you're finished adding custom codes, select Save
- Please note that custom codes cannot be deleted once they're added. However, in order to make an individual code inactive you can set an end date for it.
Any custom CDT code that does link to a regular CDT code will inherit the same requirements for treatment consent, informed consent and diagnostic code.
Any custom CDT code that does not link to a CDT code can define its own requirements for treatment consent, informed consent and diagnostic code.
Delete Code Sets
A code set can only be deleted if no custom codes have been added to it.
- Go to Practice > Practice Settings > Charting > Code Sets
- Select Delete to the right of the code set
- Select Save
Dental Notation
Change your practice's default dental notation.
Individual providers can customize which notation they use in their Provider > Profile > Account settings.
- Go to Practice > Practice Settings > Charting > Dental Notation
- Select your preferred dental notation from the drop-down menu
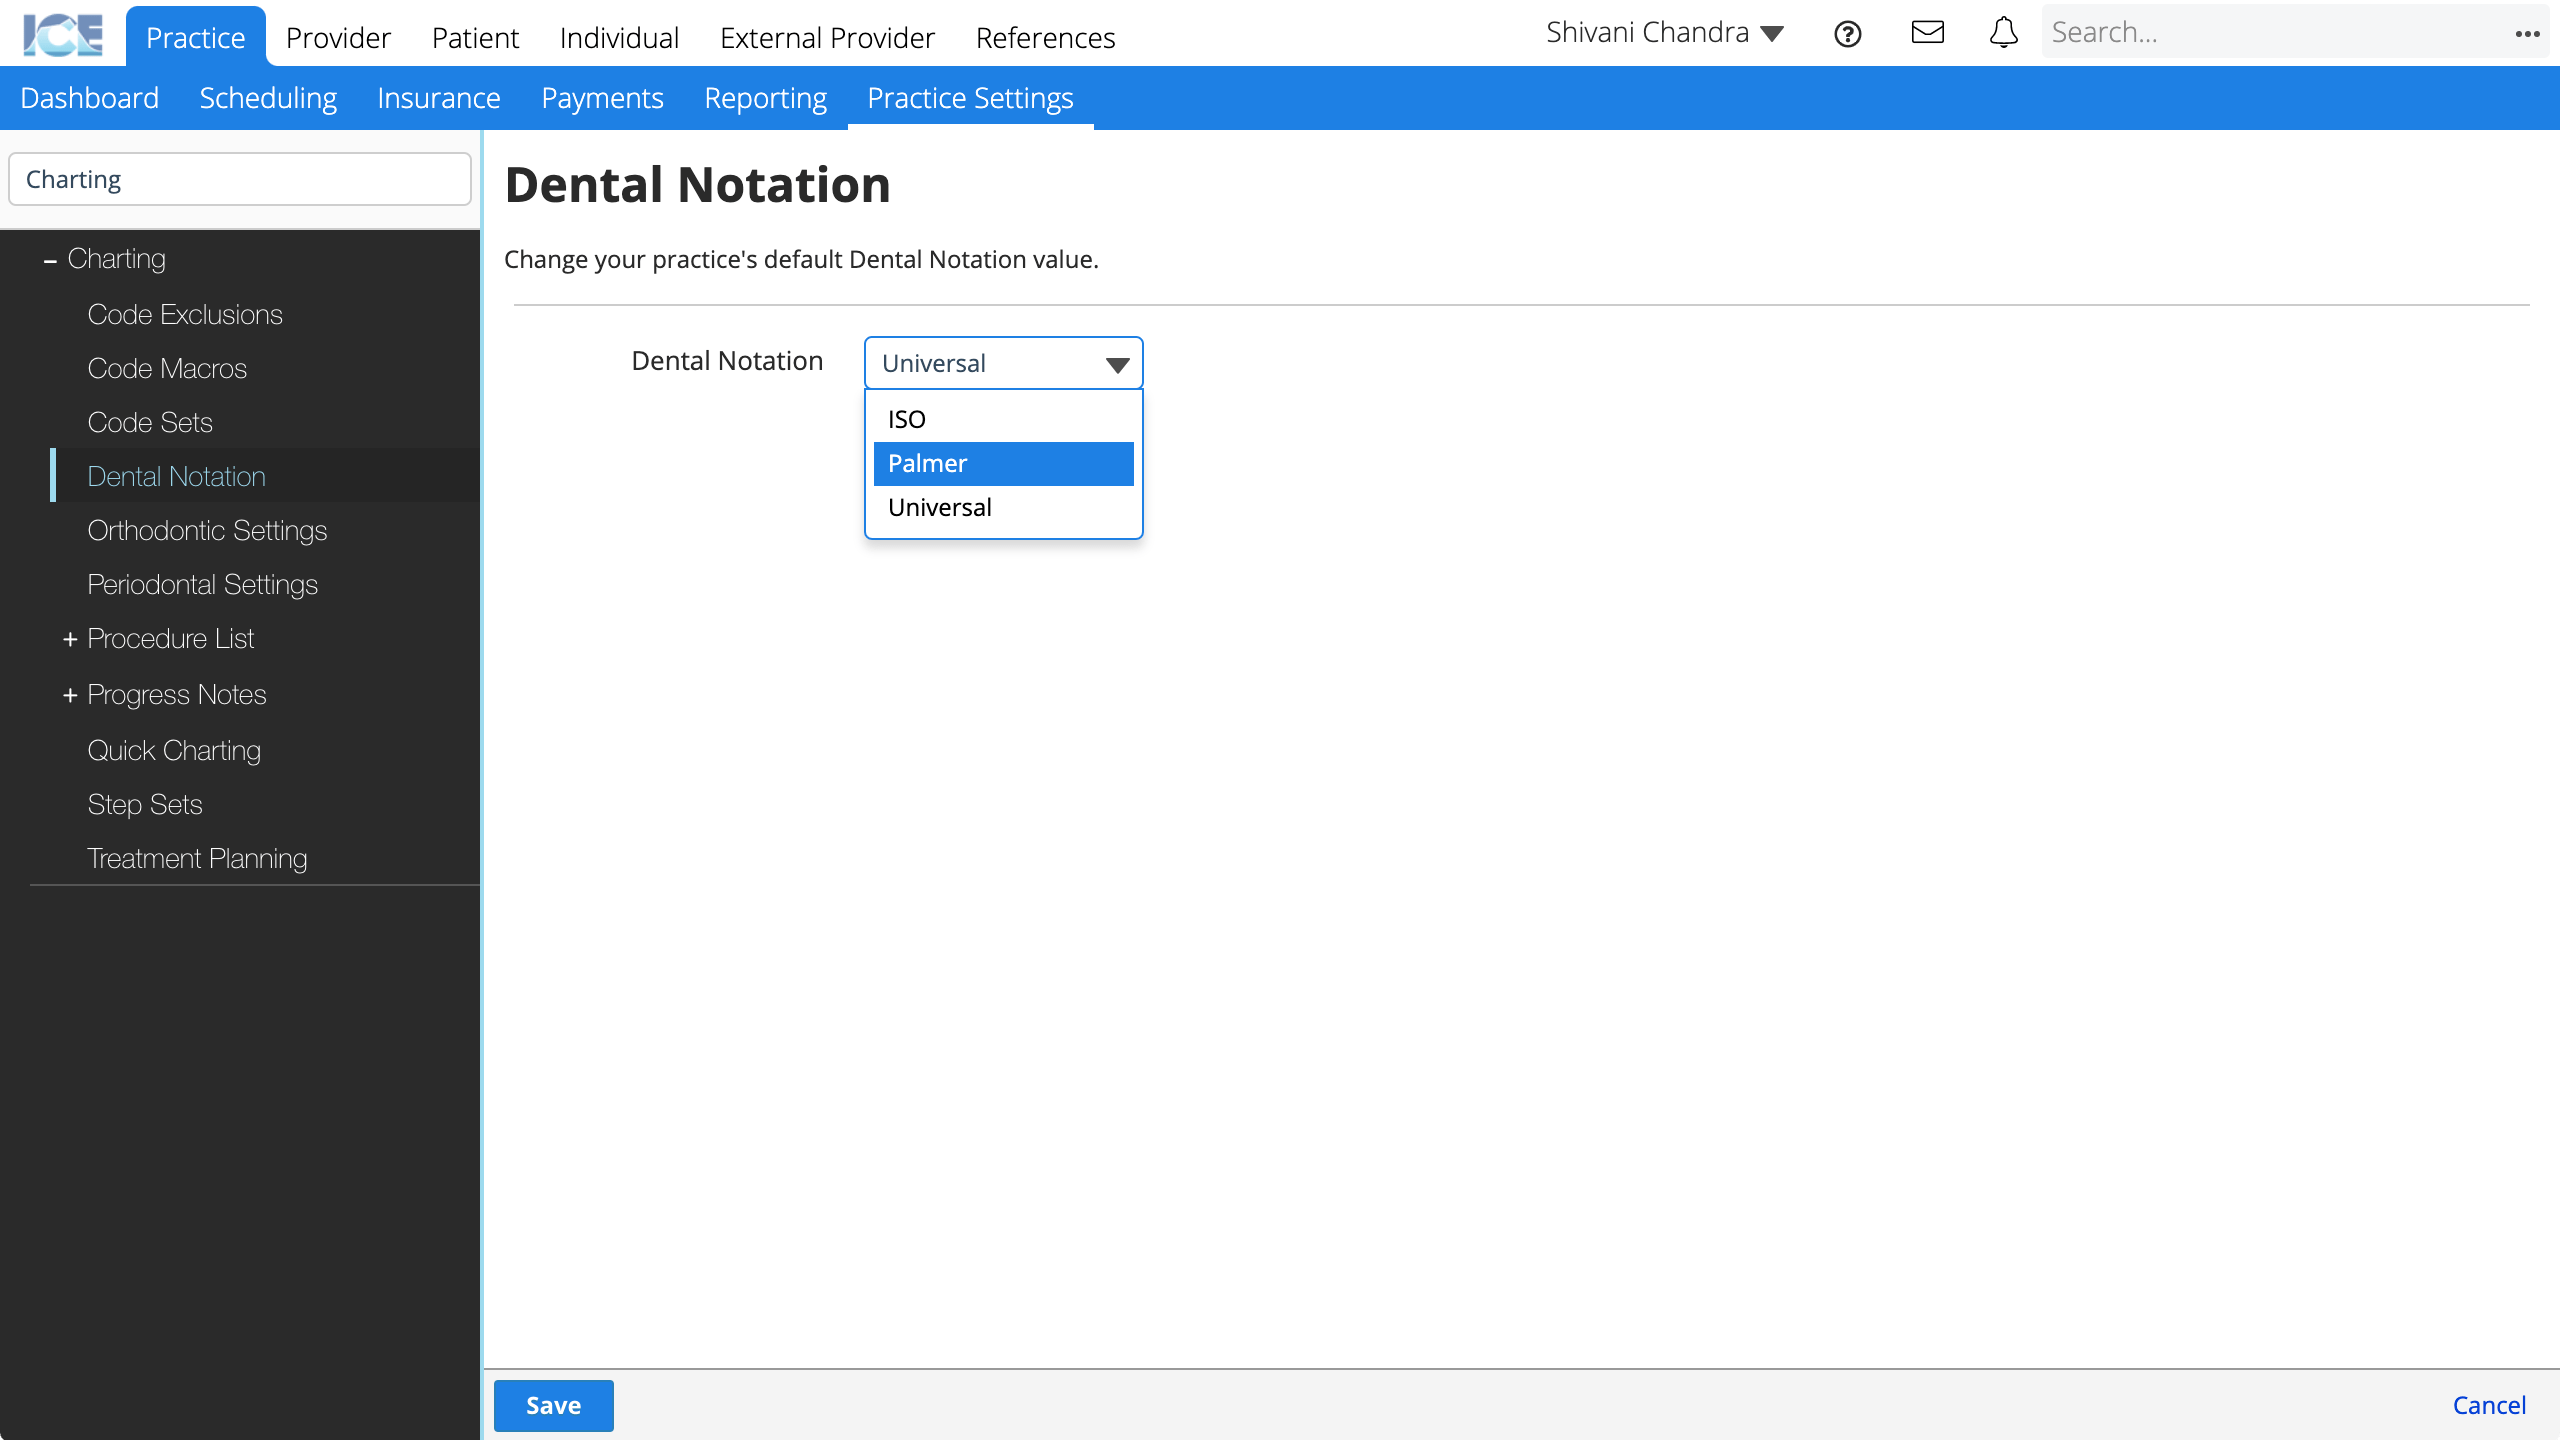
- Select Save
Orthodontic Settings
Once a new treatment phase has been added and saved, you can use it when creating an orthodontic treatment plan.
- Go to Practice > Practice Settings > Charting > Orthodontic Settings
- Choose Add Treatment Phase
- Complete the required fields
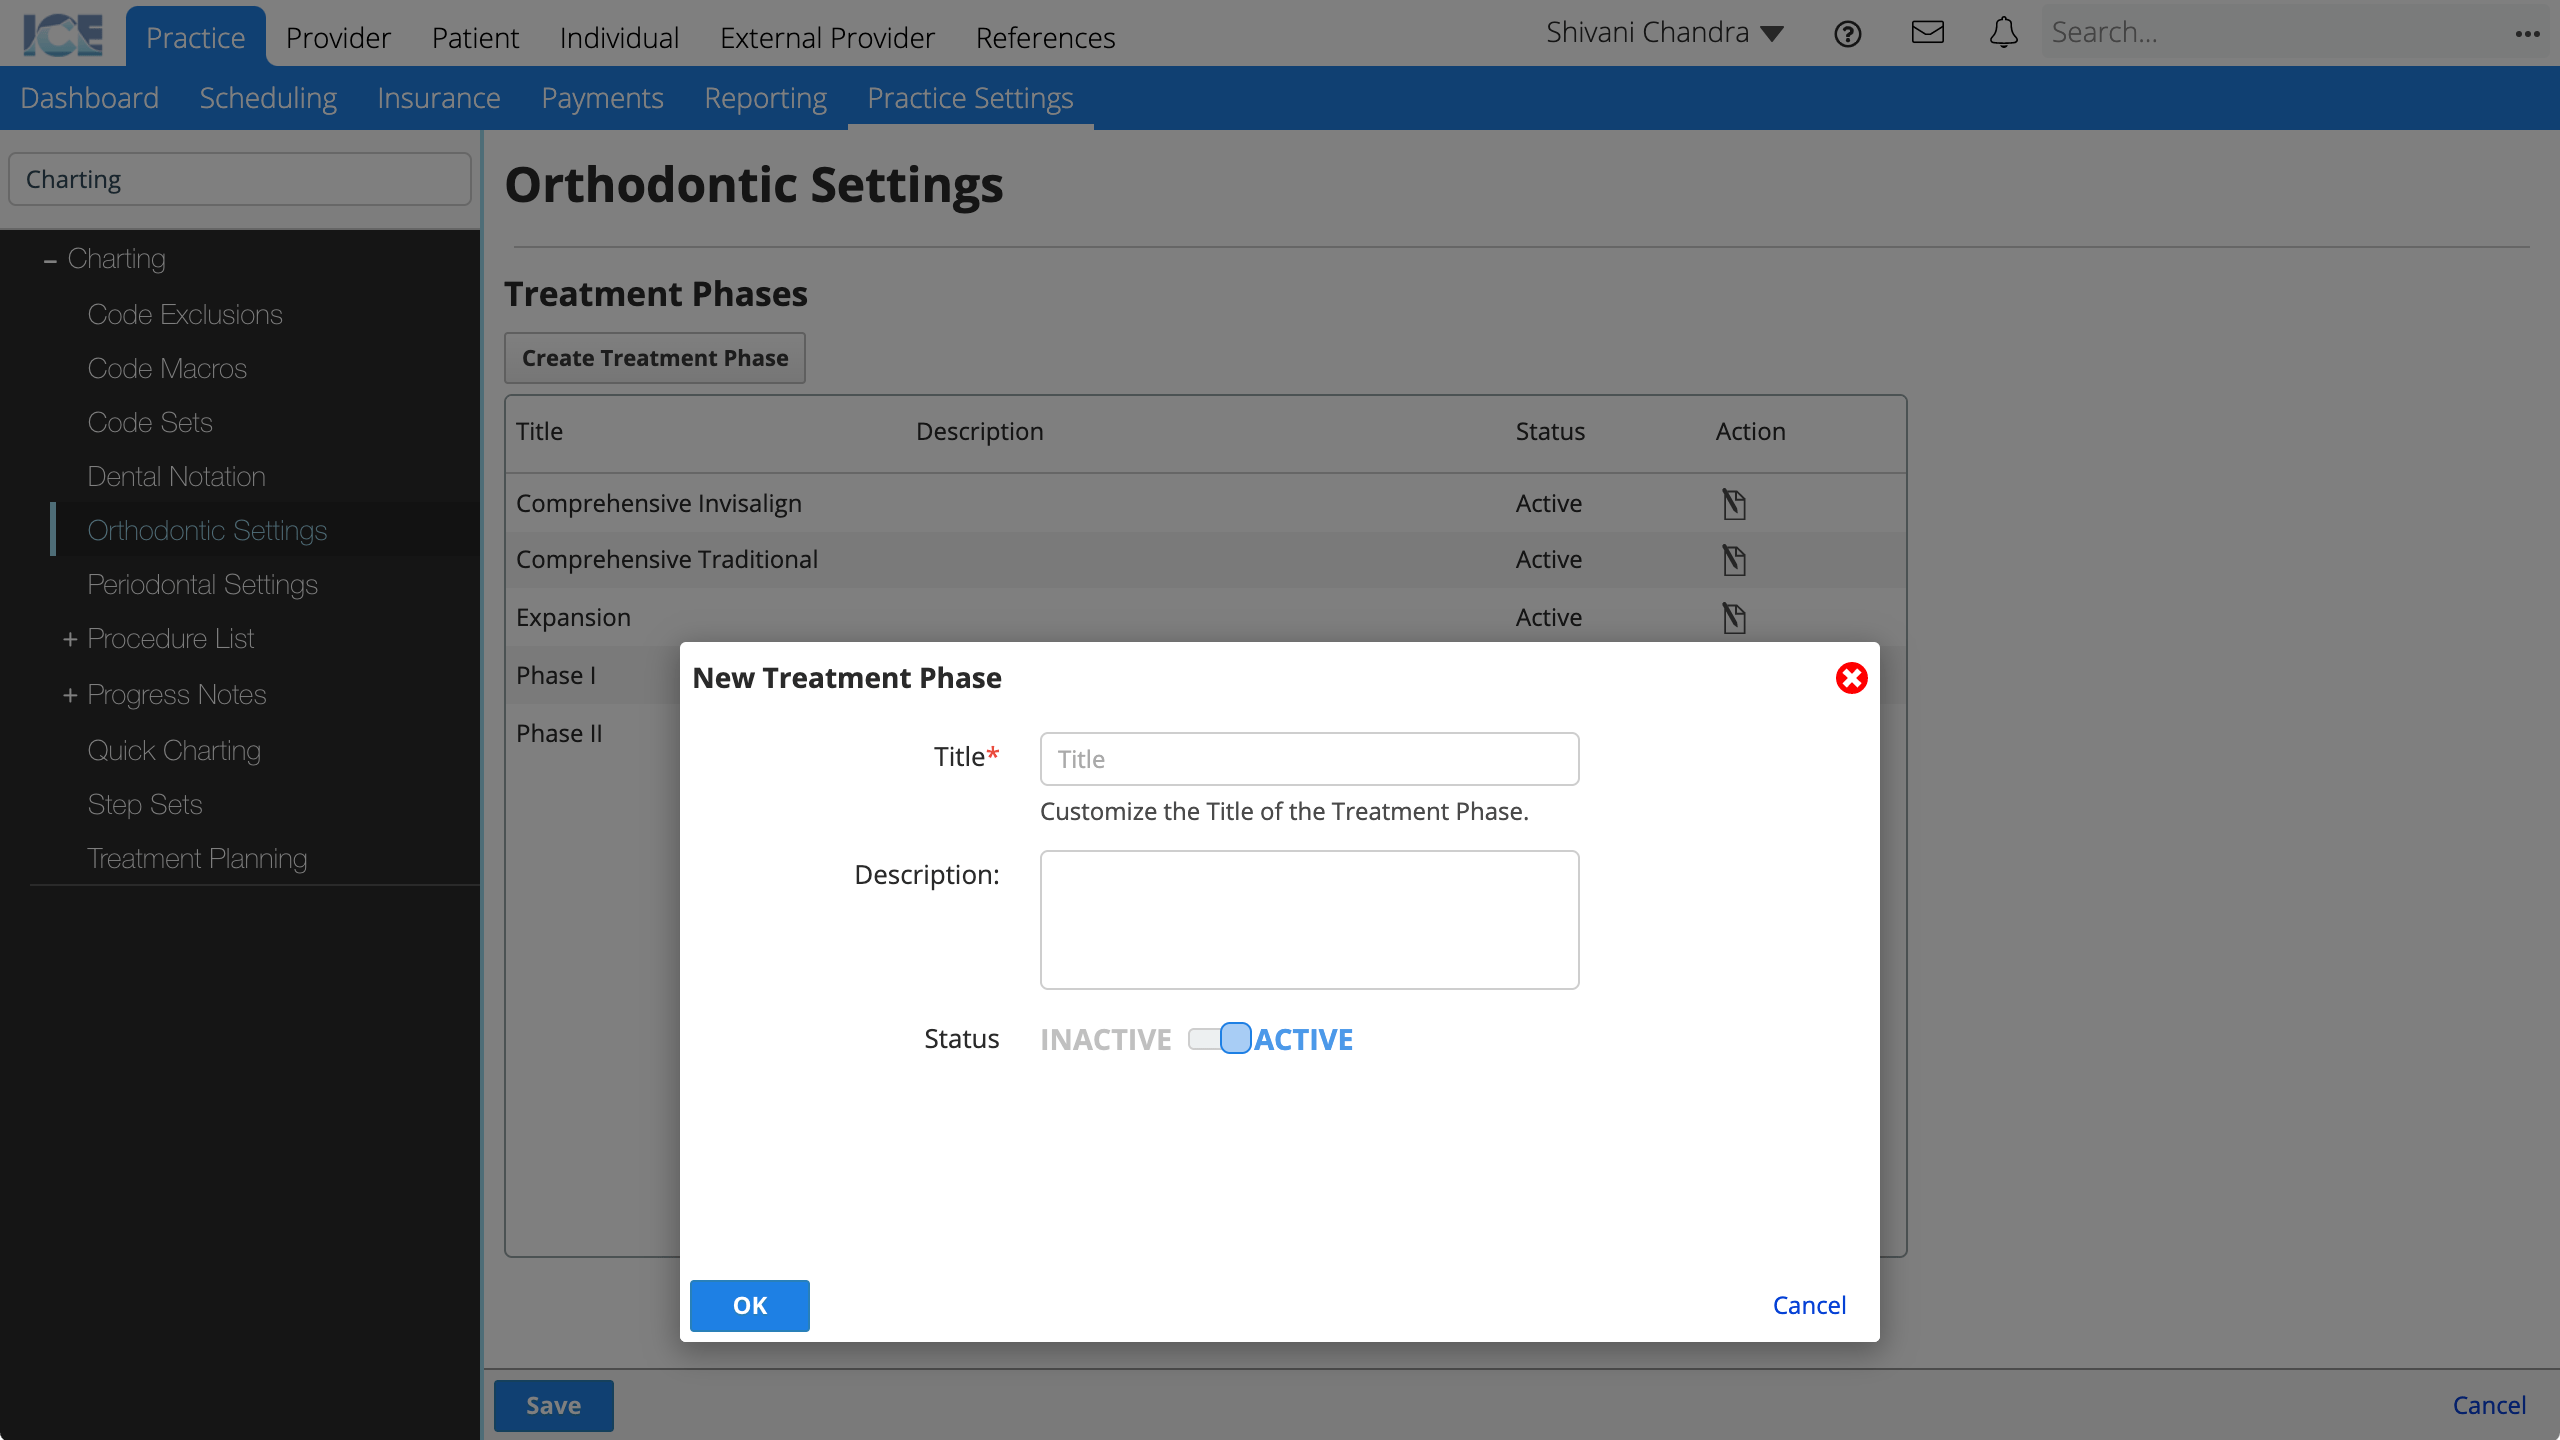
- Title: The name that appears in the treatment phase drop-down menu when creating an orthodontic treatment plan.
- Description: A longer description that only appears here in Practice Settings.
- Status: Active phases appear for use in the system. Inactive phases cannot be used, but appear in historical references.
- Choose OK to create the new treatment phase
- Repeat as necessary
- Select Save to save your changes
To edit an existing phase, select ![]() in the Action column.
in the Action column.
Periodontal Settings
You can define the default periodontal tab order for your practice and define a threshold for when pocket depth values turn red.
To customize the periodontal tab order for an individual provider, go to that provider's account profile.
- Go to Practice > Practice Settings > Charting > Periodontal Settings
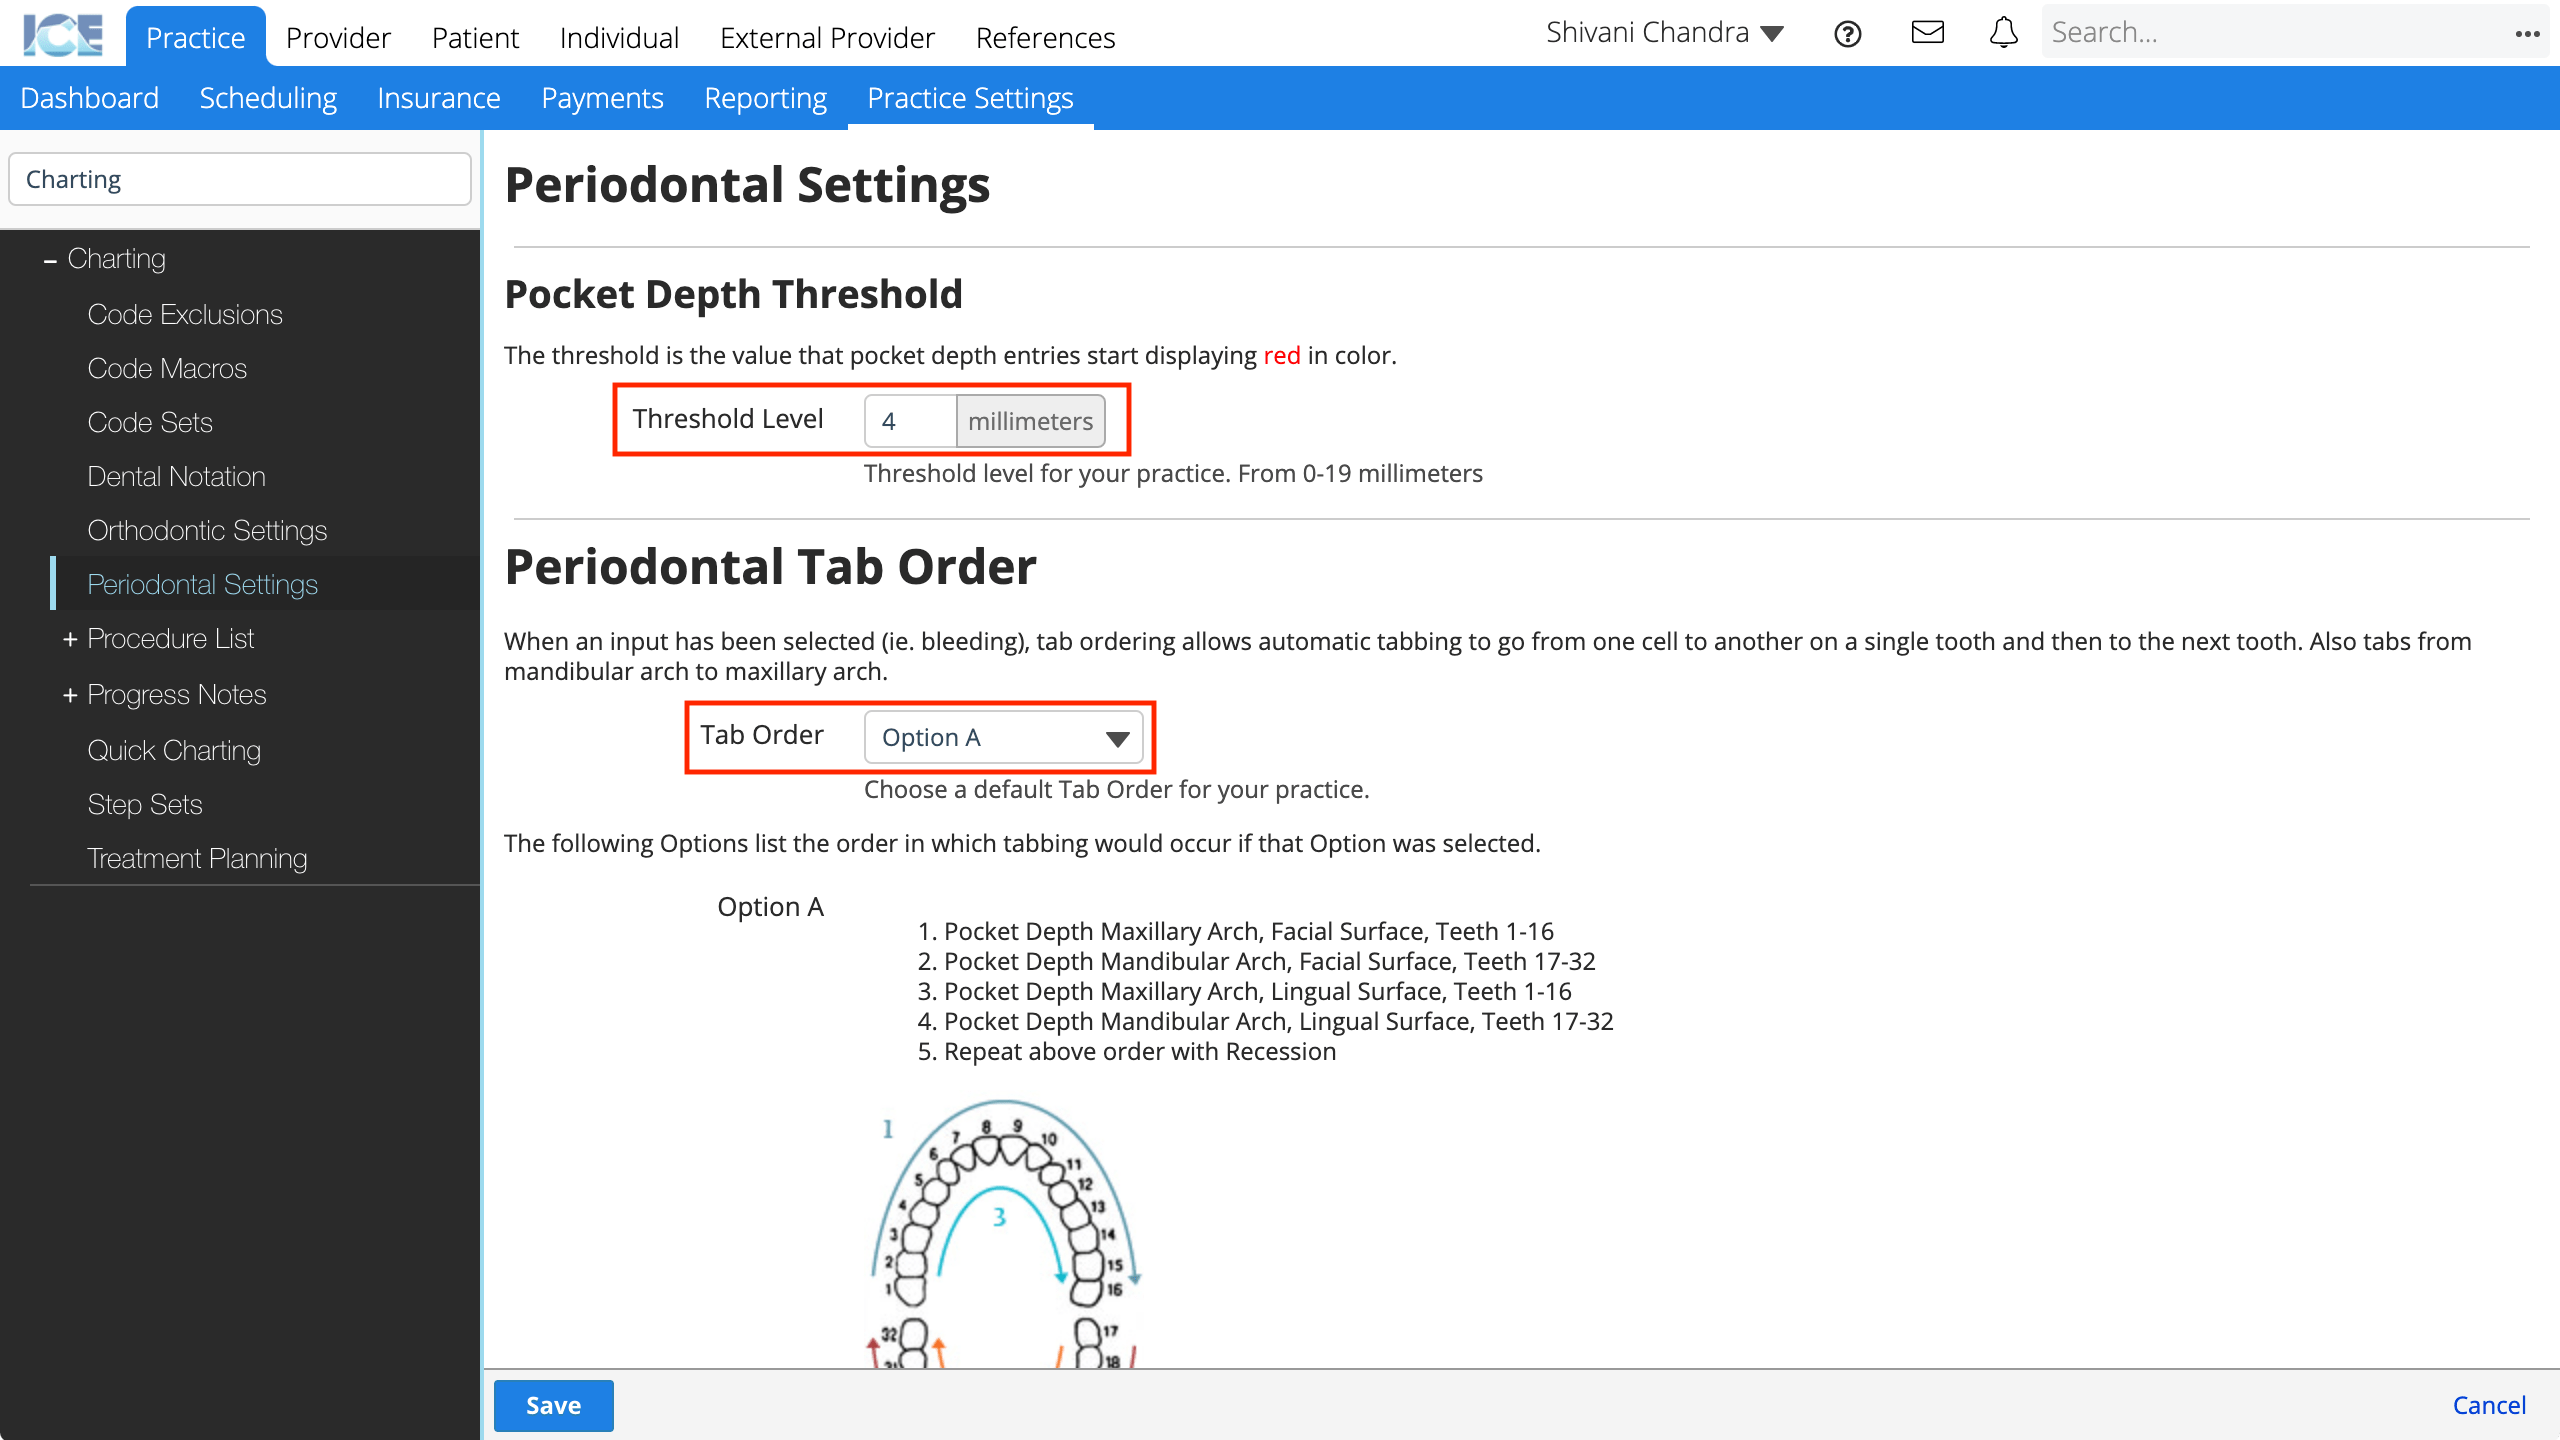
- Update the Threshold Level value
- The default pocket depth threshold is 4. The threshold is the value that pocket depth entries start displaying in red.
- Select a Tab Order option from the drop-down menu
- Scroll down the page to view descriptions of each tab order.
- Select Save to save your changes
- Select Cancel to discard your changes.
Orthodontic Procedure List
These values define what orthodontic data you can enter in a patient's orthodontic procedure list.
- Go to Practice > Practice Settings > Charting > Procedure List > Orthodontic Procedure List
- From here, you can edit, manage and reorder the options in the Orthodontic Procedure List
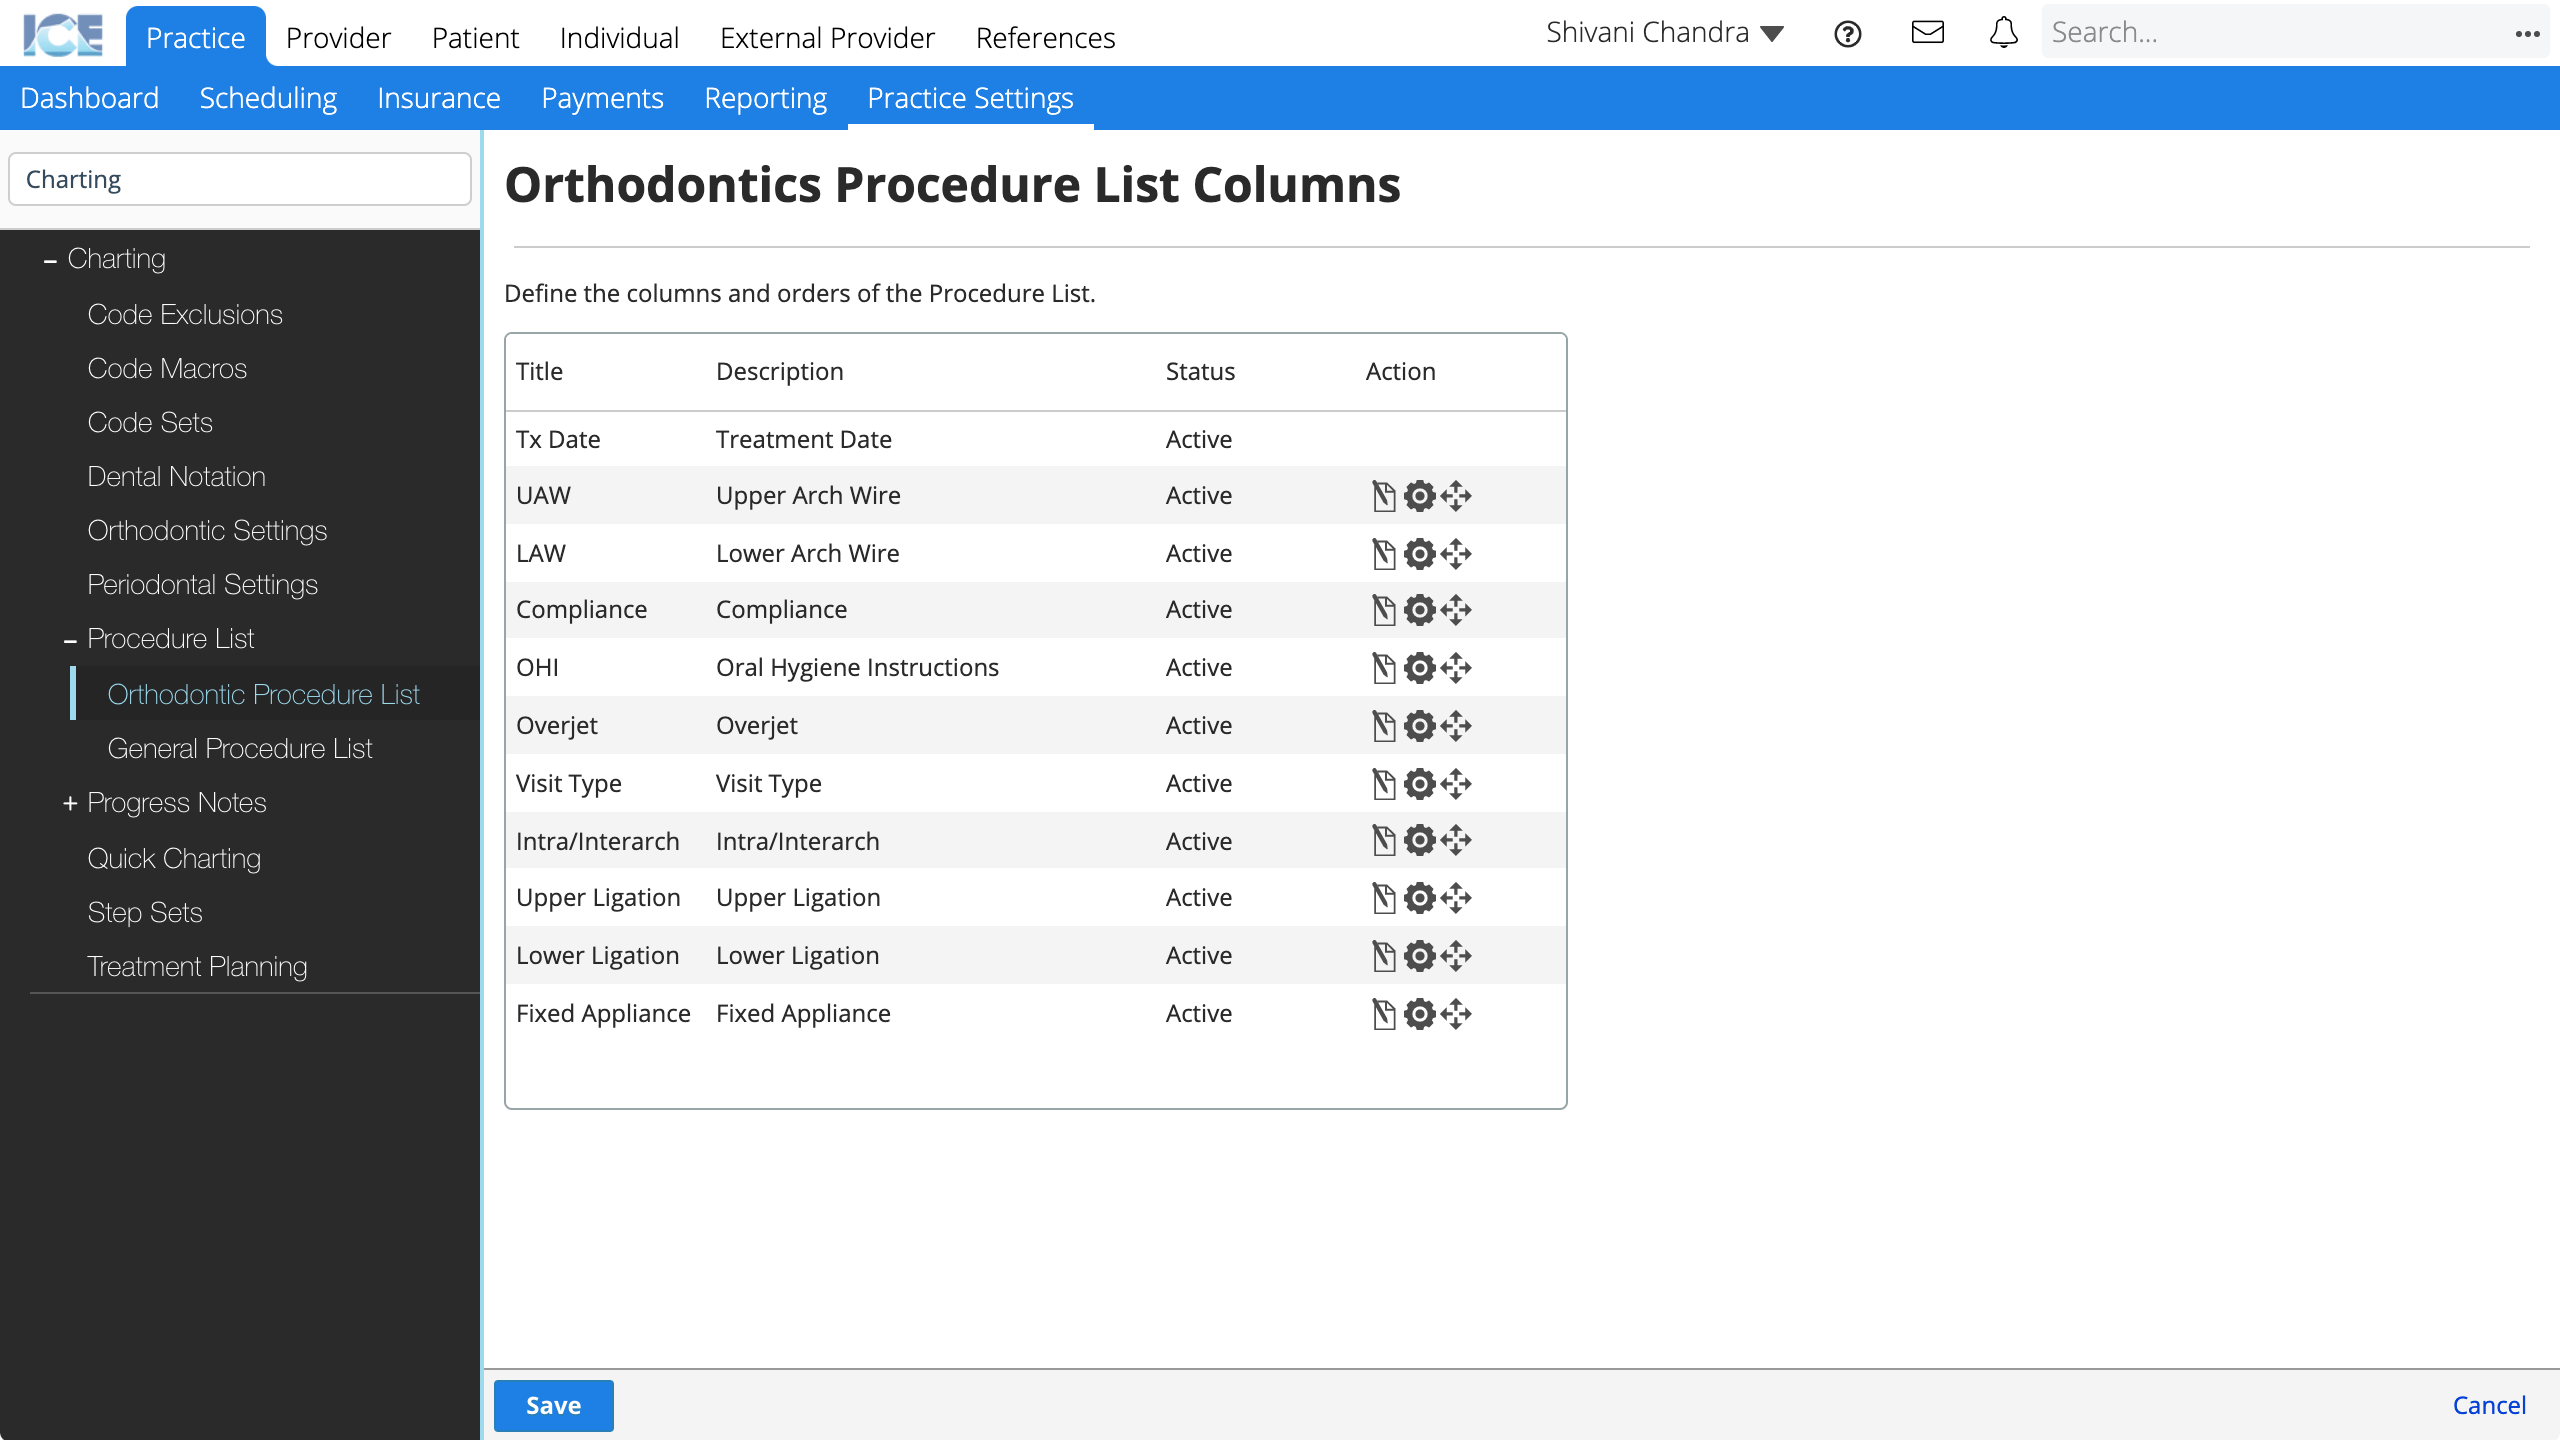
- To edit an existing column, select
- You can update:
- Name
- Description
- Status
- You can update:
- To manage the values for each column, select

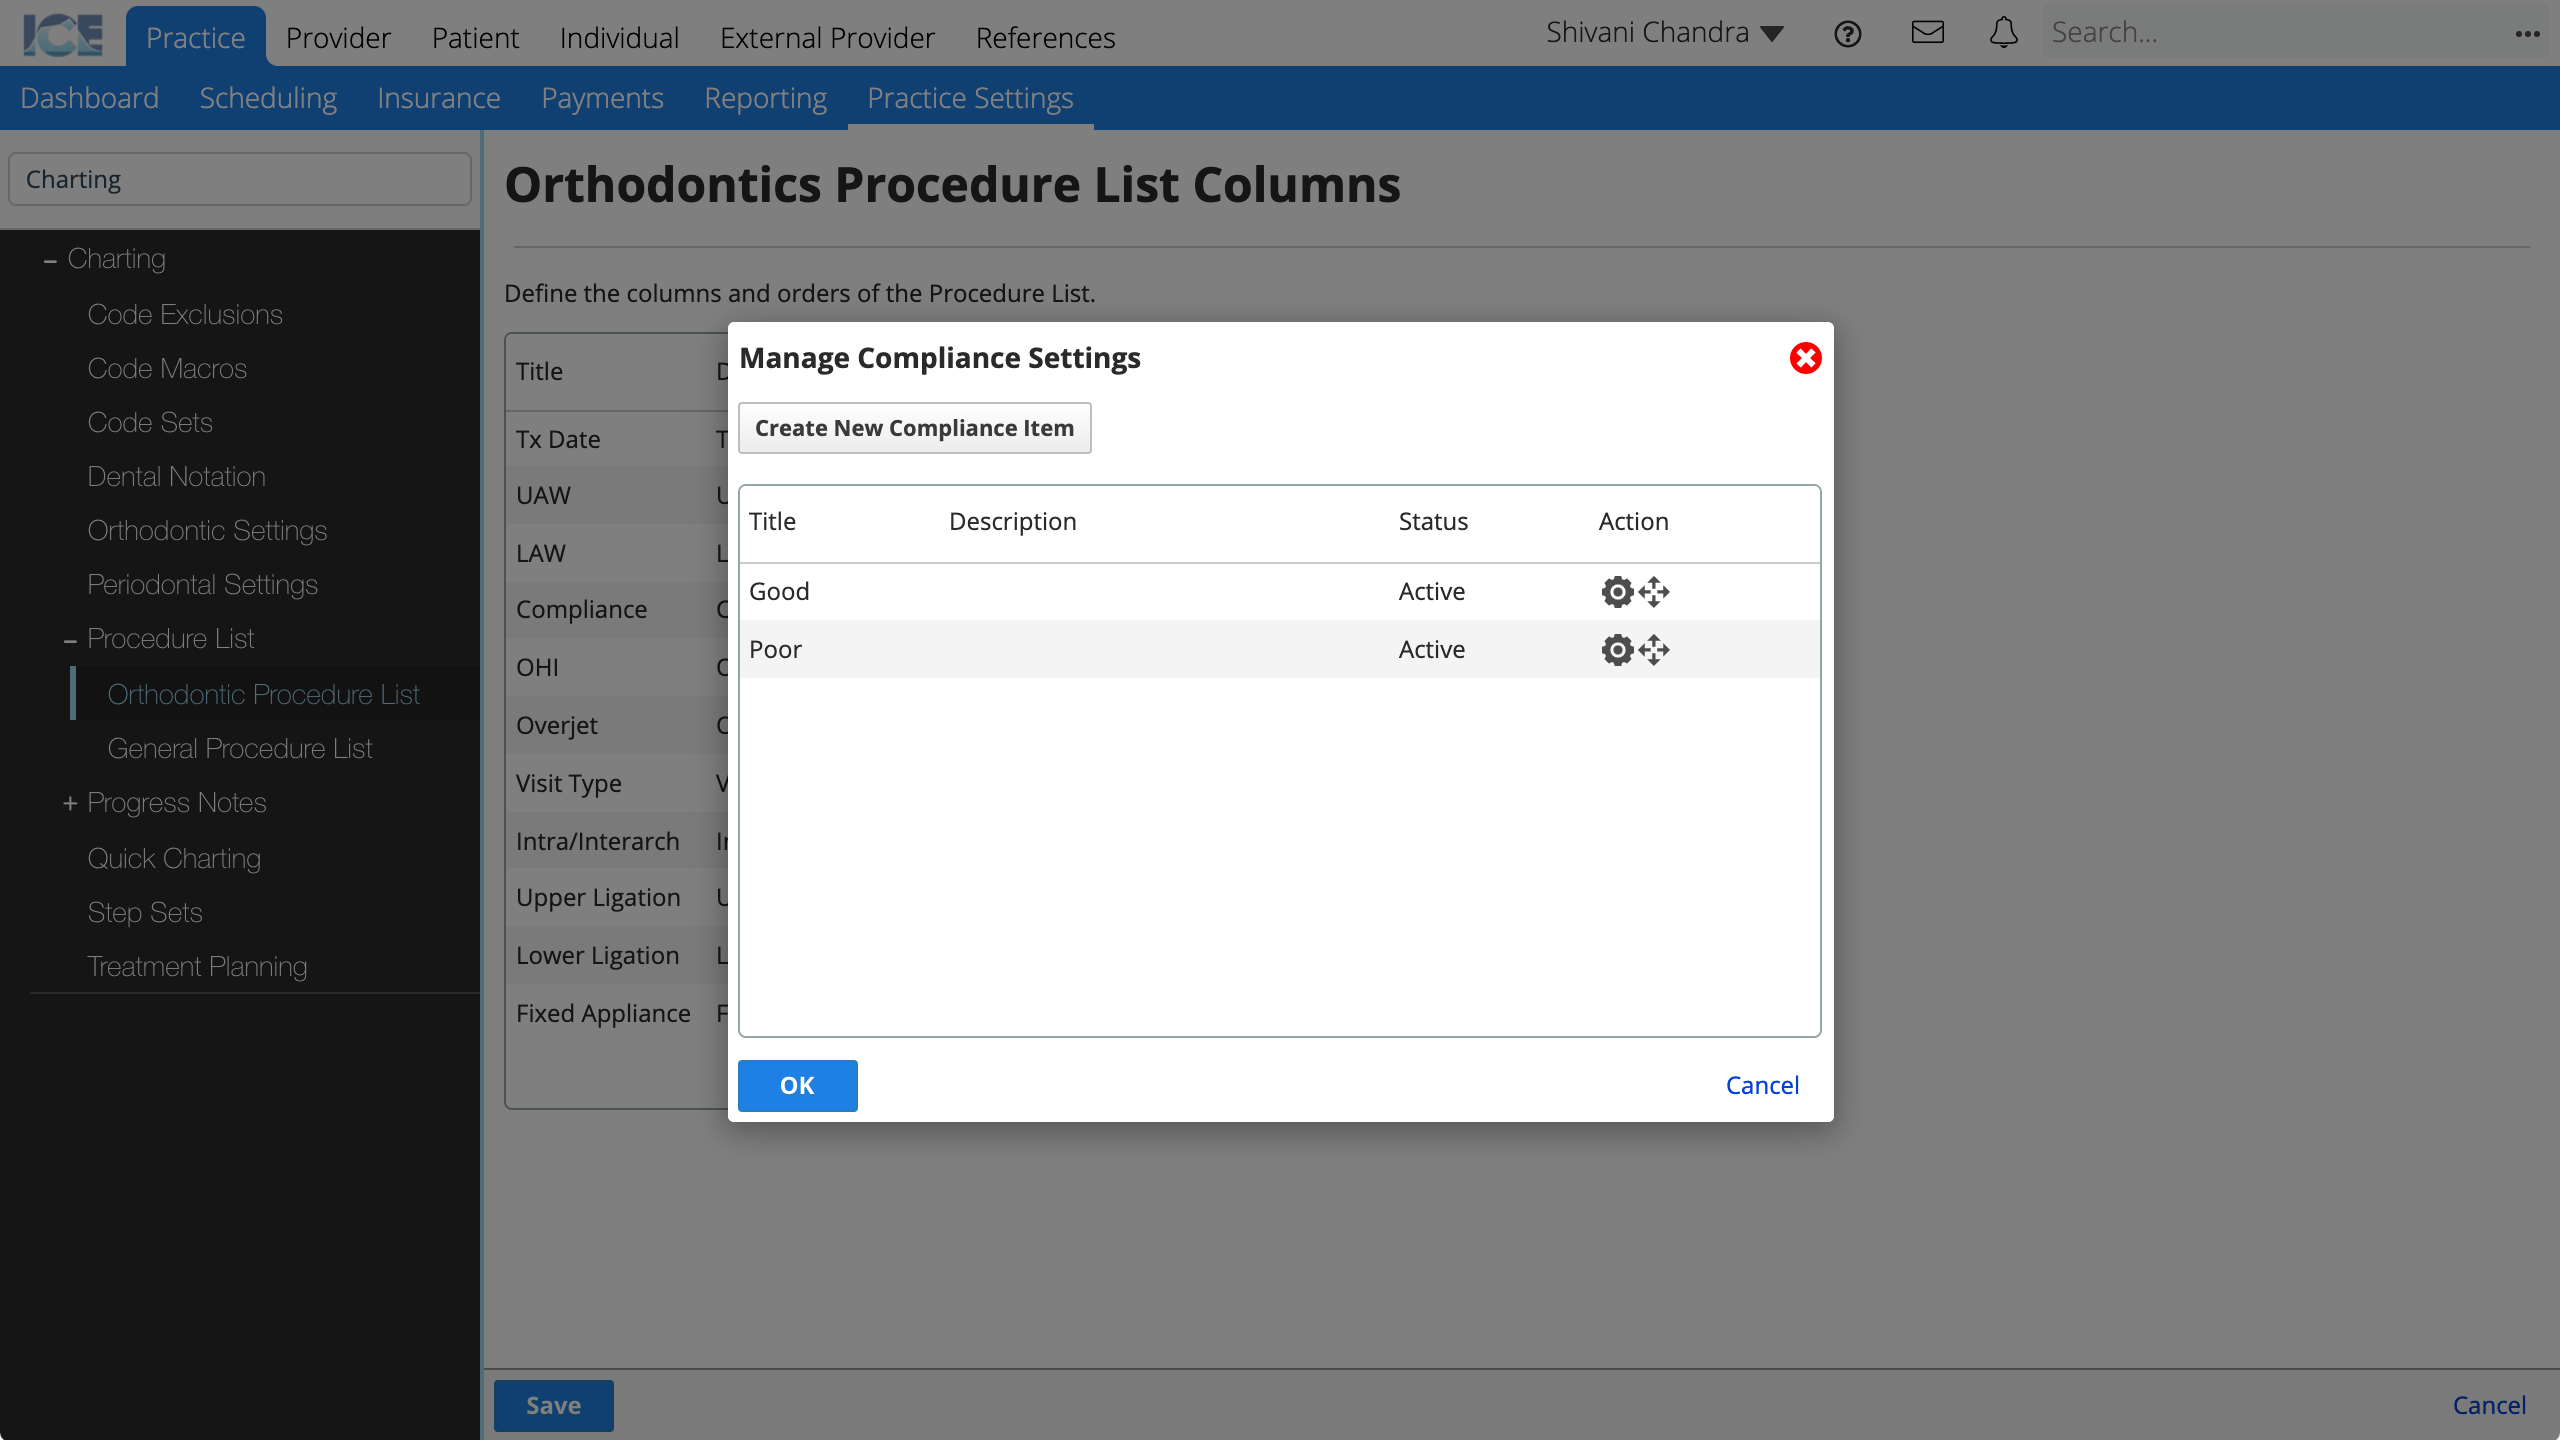
- Select Create New Item to add a new value or choice for the column
or - Select to edit the description and status of an existing value for the column
- Select Create New Item to add a new value or choice for the column
- To reorder the columns and options, drag

- Repeat as necessary
- Select Save to save your changes
- Select Cancel to discard your changes.
General Procedure List
Define the columns included in the General Procedure List.
- Go to Practice > Practice Settings > Charting > Procedure List > General Procedure List
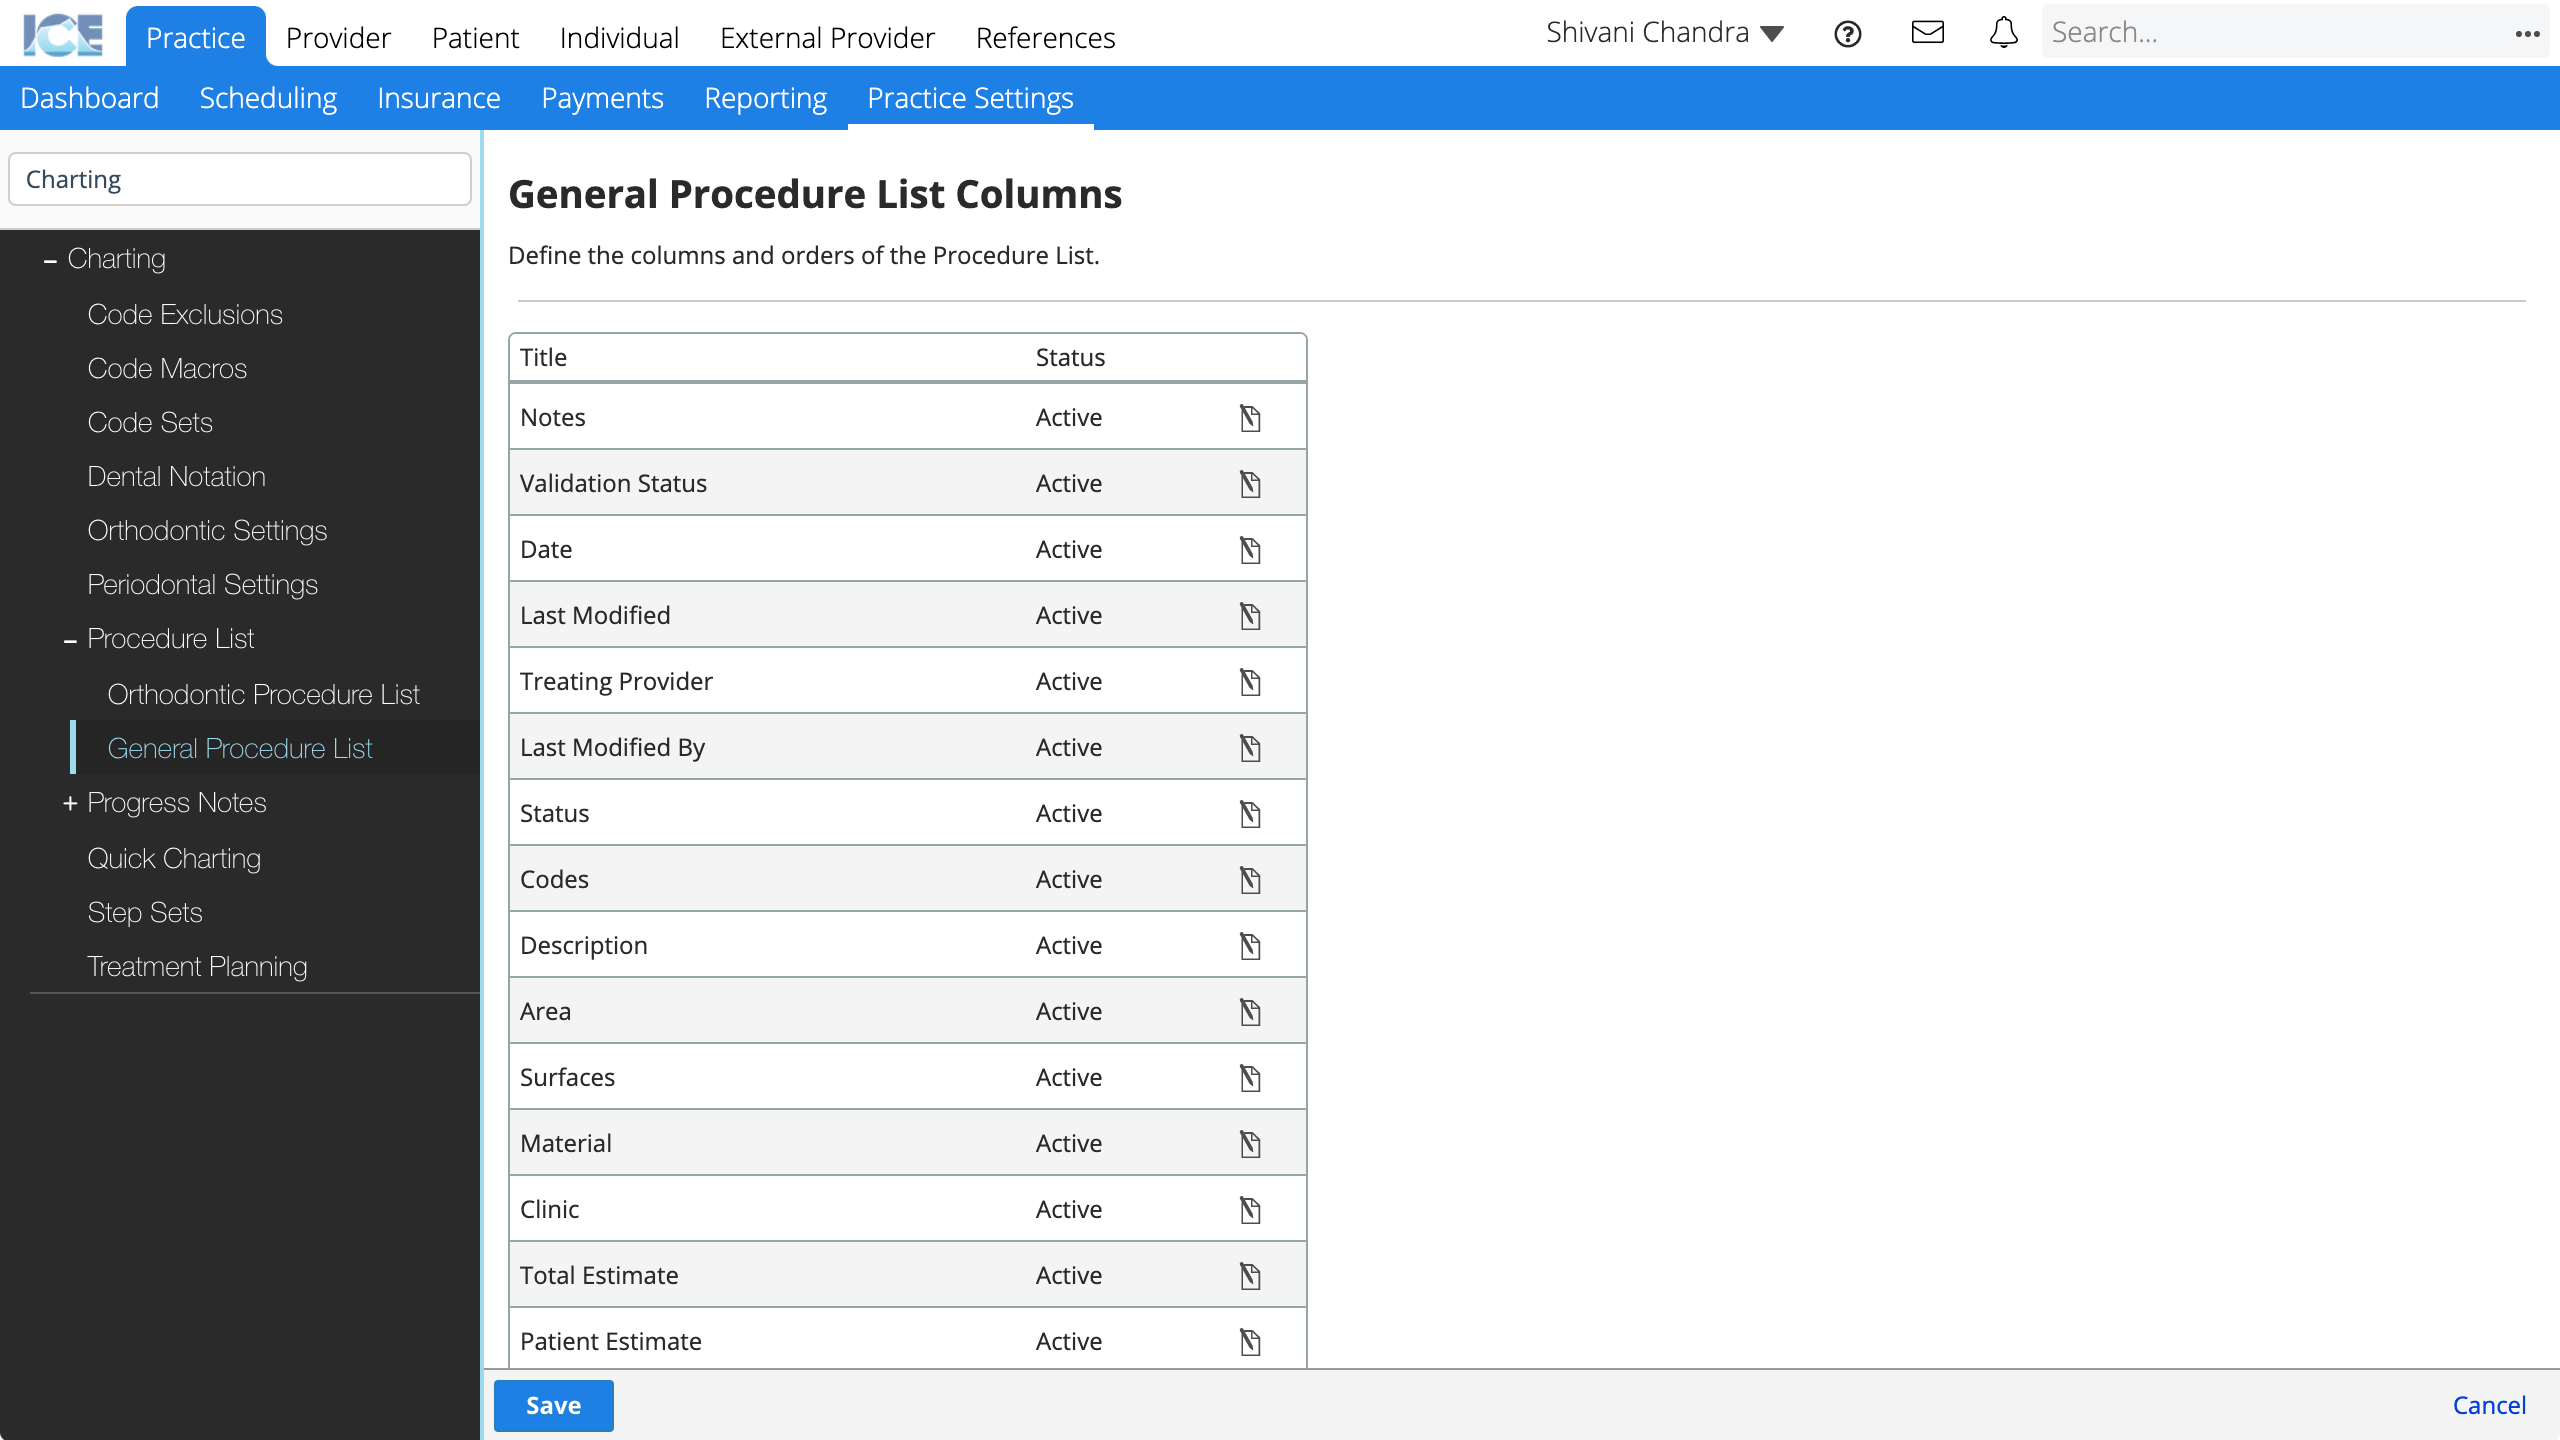
- Select to update the available settings for a column
- Title: The name of the column that appears in the General Procedure List.
- Status: Active columns appear for use in the system. Inactive columns are hidden, but appear in historical references.
- Select OK
- Select Save to save your changes
- Select Cancel to discard your changes.
Progress Note Associated Providers
Associated Provider fields appear in a Progress Note's left sidebar.

They are helpful for identifying the different providers involved with an appointment or treatment.
- Go to Practice > Practice Settings > Charting > Progress Notes > Associated Providers
- Select Create New Associated Provider
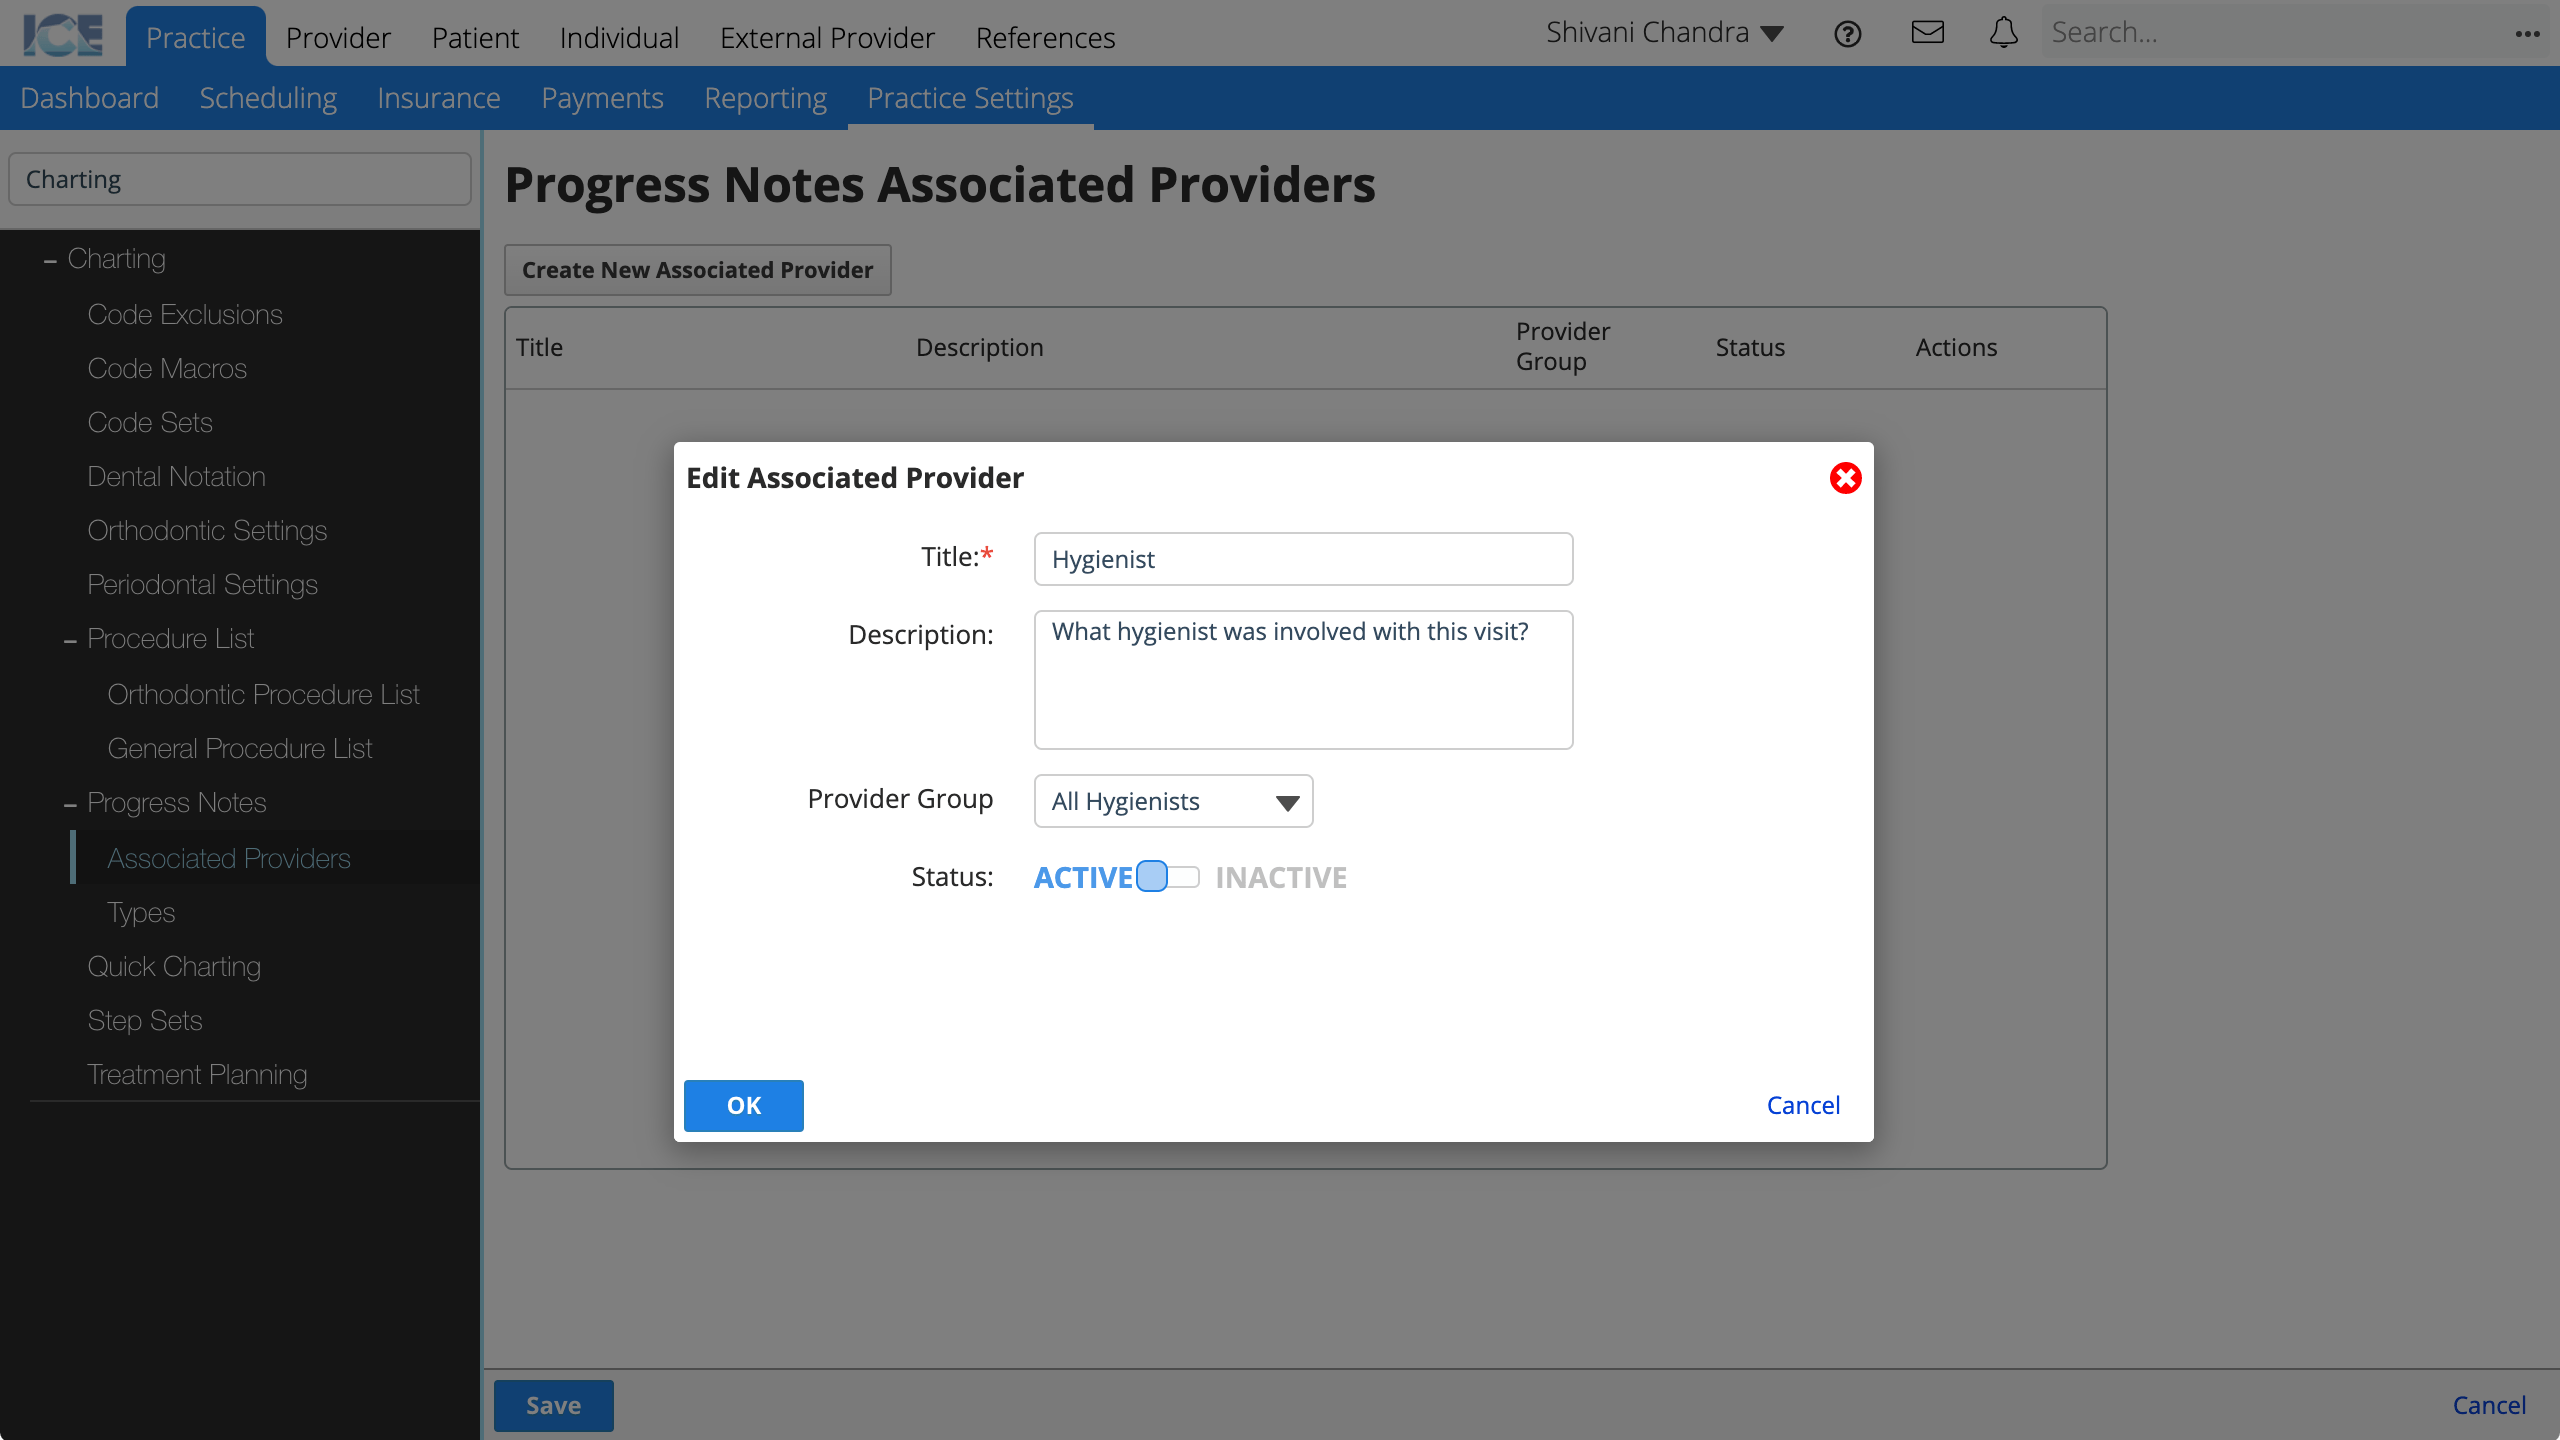
- Complete the required fields
- Title: The name of the field that appears in the left sidebar of the progress notes panel.
- Description: A longer description that only appears here in Practice Settings.
- Provider Group: Only the providers in this group will be included in the associated provider drop-down menu.
- Status: Active fields appear for use in the system. Inactive fields cannot be used, but appear in historical references.
- Select OK
- Select Save to save your changes
- Select Cancel to discard your changes.
To edit an existing associated provider field, select ![]() in the Action column.
in the Action column.
Progress Note Types
When configuring progress note templates you can define one or more types to help organize and report on your practice's progress notes.
- Go to Practice > Practice Settings > Charting > Progress Notes > Types
- Select Create New Progress Note Type
- Complete the required fields
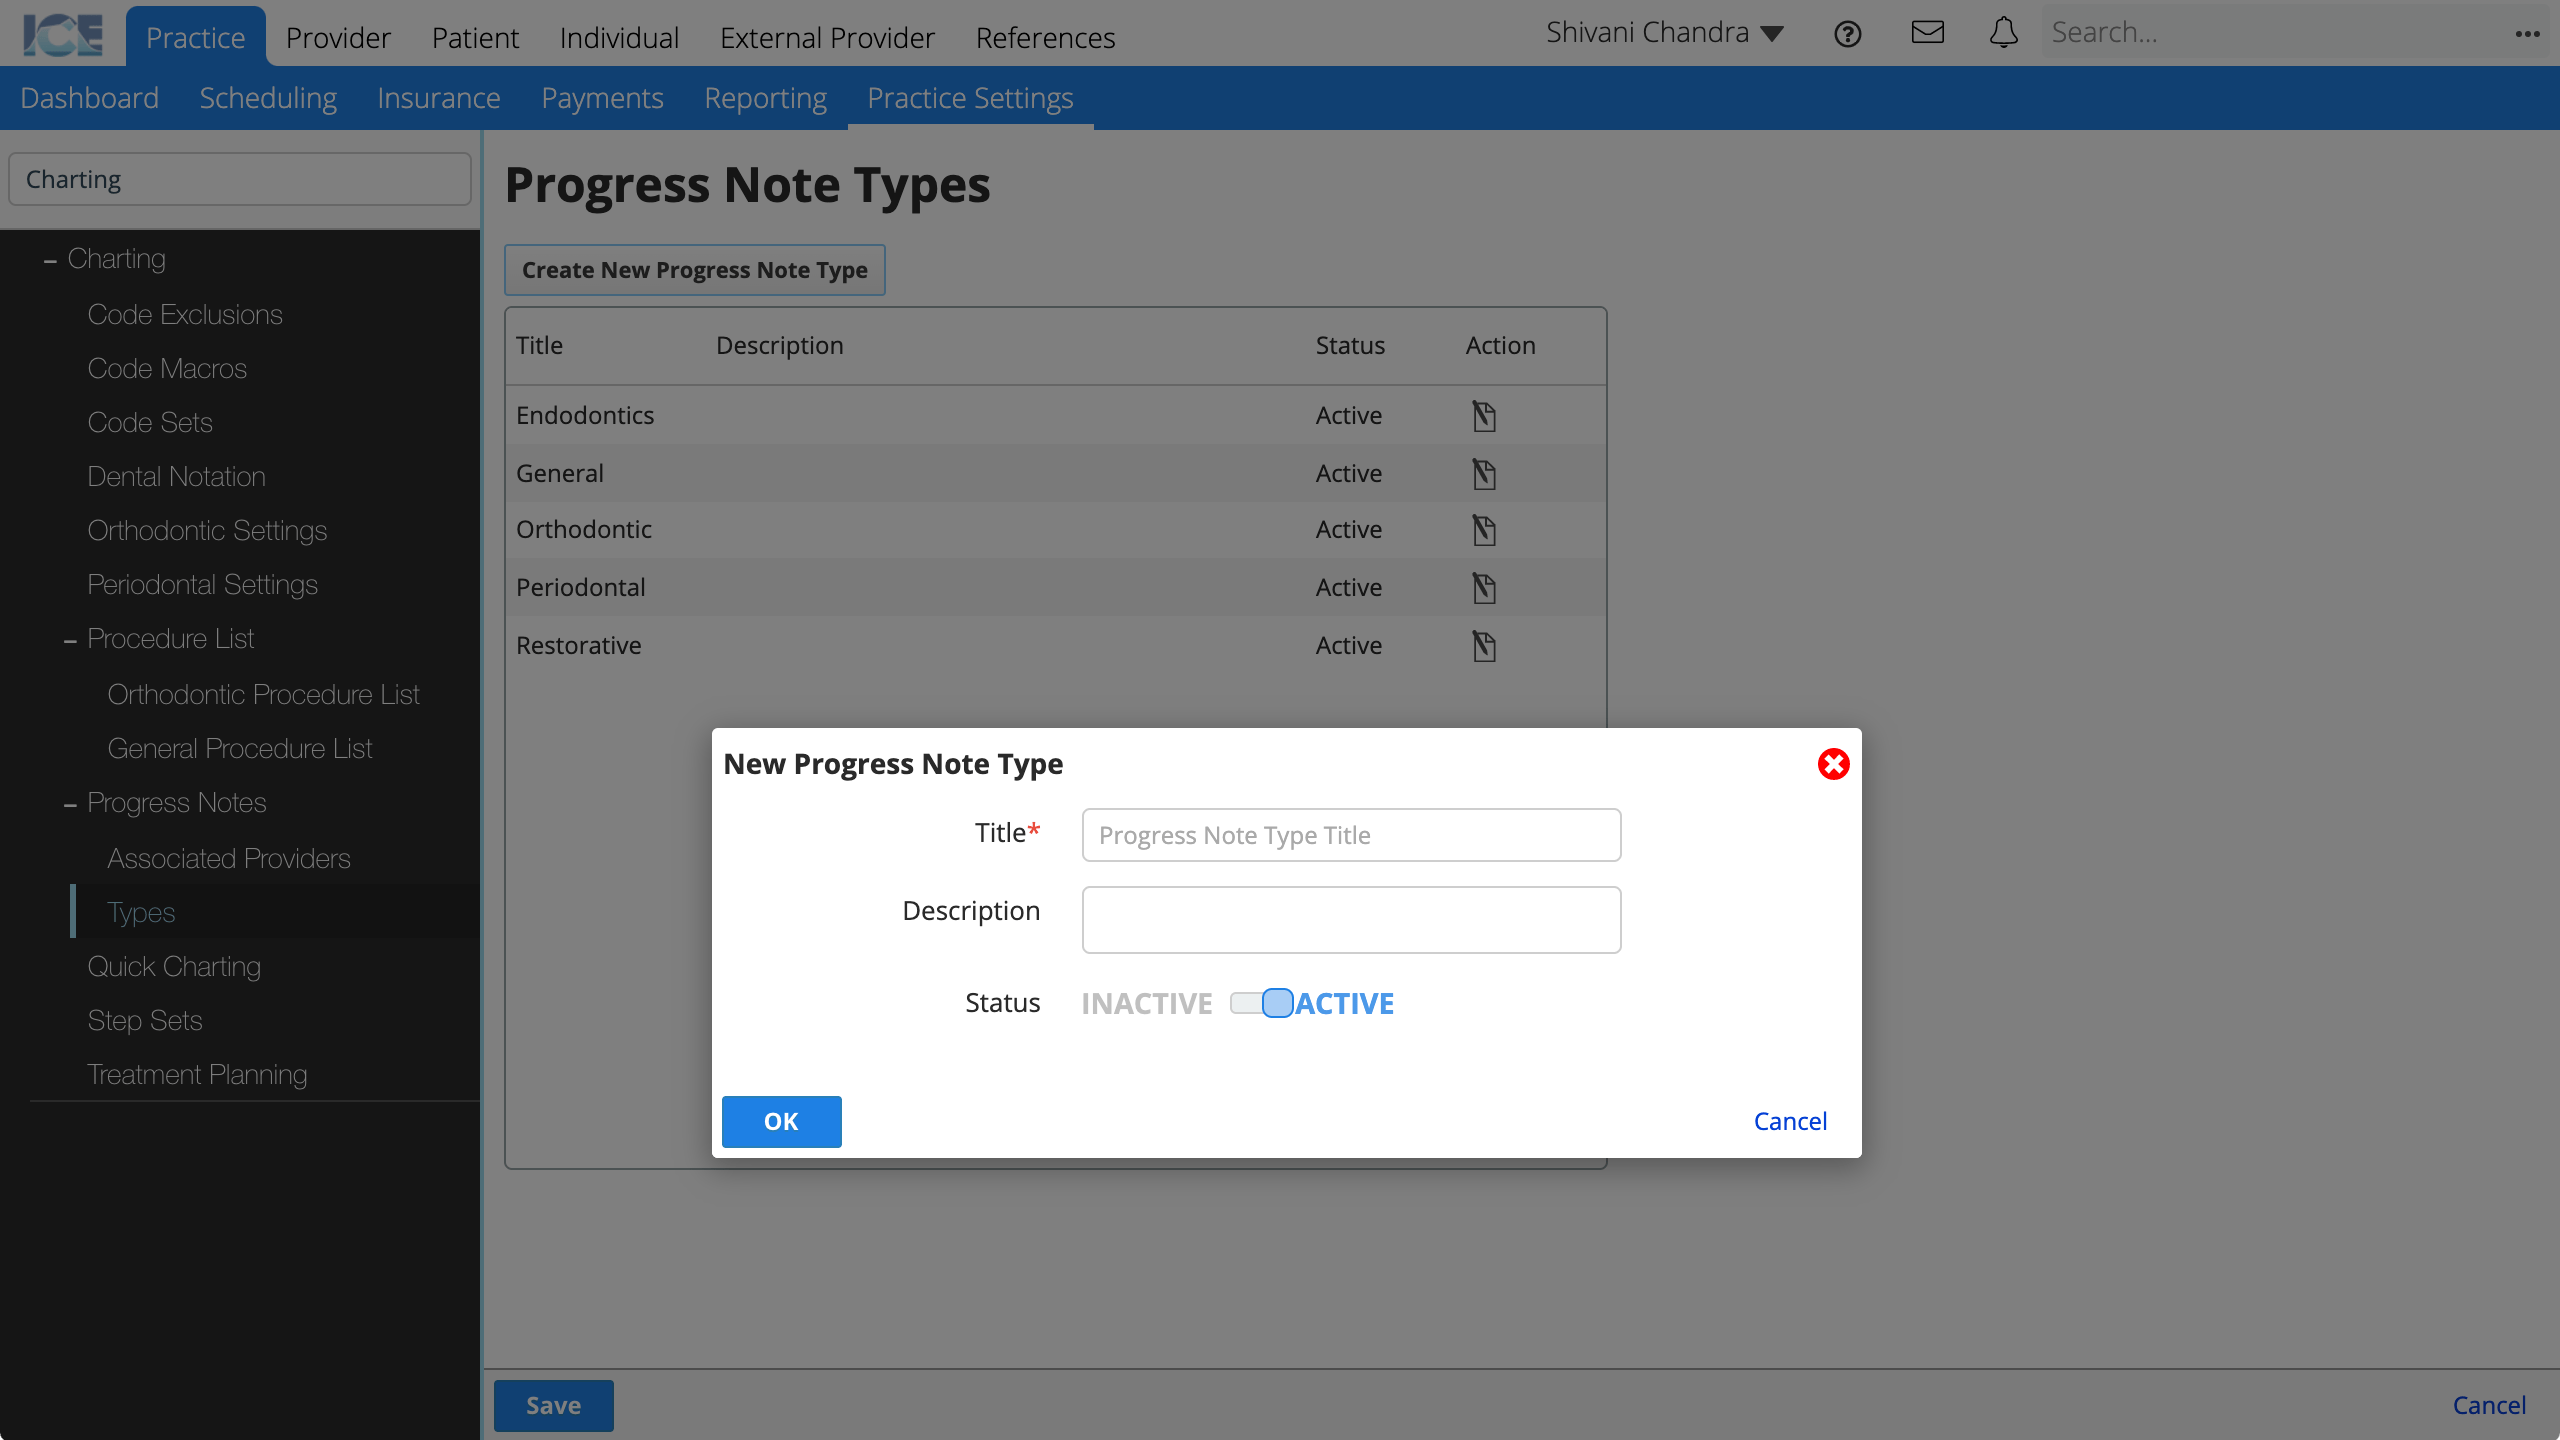
- Title: The name of the progress note type you can select when configuring progress note templates.
- Description: A longer description that only appears here in Practice Settings.
- Status: Active types appear for use in the system. Inactive types cannot be used, but appear in historical references.
- Select OK
- Choose Save to save your changes
- Select Cancel to discard your changes.
To edit an existing progress note type, select ![]() in the Action column.
in the Action column.
Quick Charting
The quick charting pop-up appears when you select a tooth or surface on the General Odontogram.
The pop-up displays 5 pre-configured procedure codes and a search option that opens the standard Procedure Input window.
Only codes that can be added to a single tooth can be added to Quick Charting.
- Go to Practice > Practice Settings > Charting > Quick Charting
- Confirm that Enable Quick Charting is set to On
- If set to Off, selecting a tooth or surface on odontogram does not show the Quick Charting pop-up.
- Select the Code field
- Search and choose the code you want to add
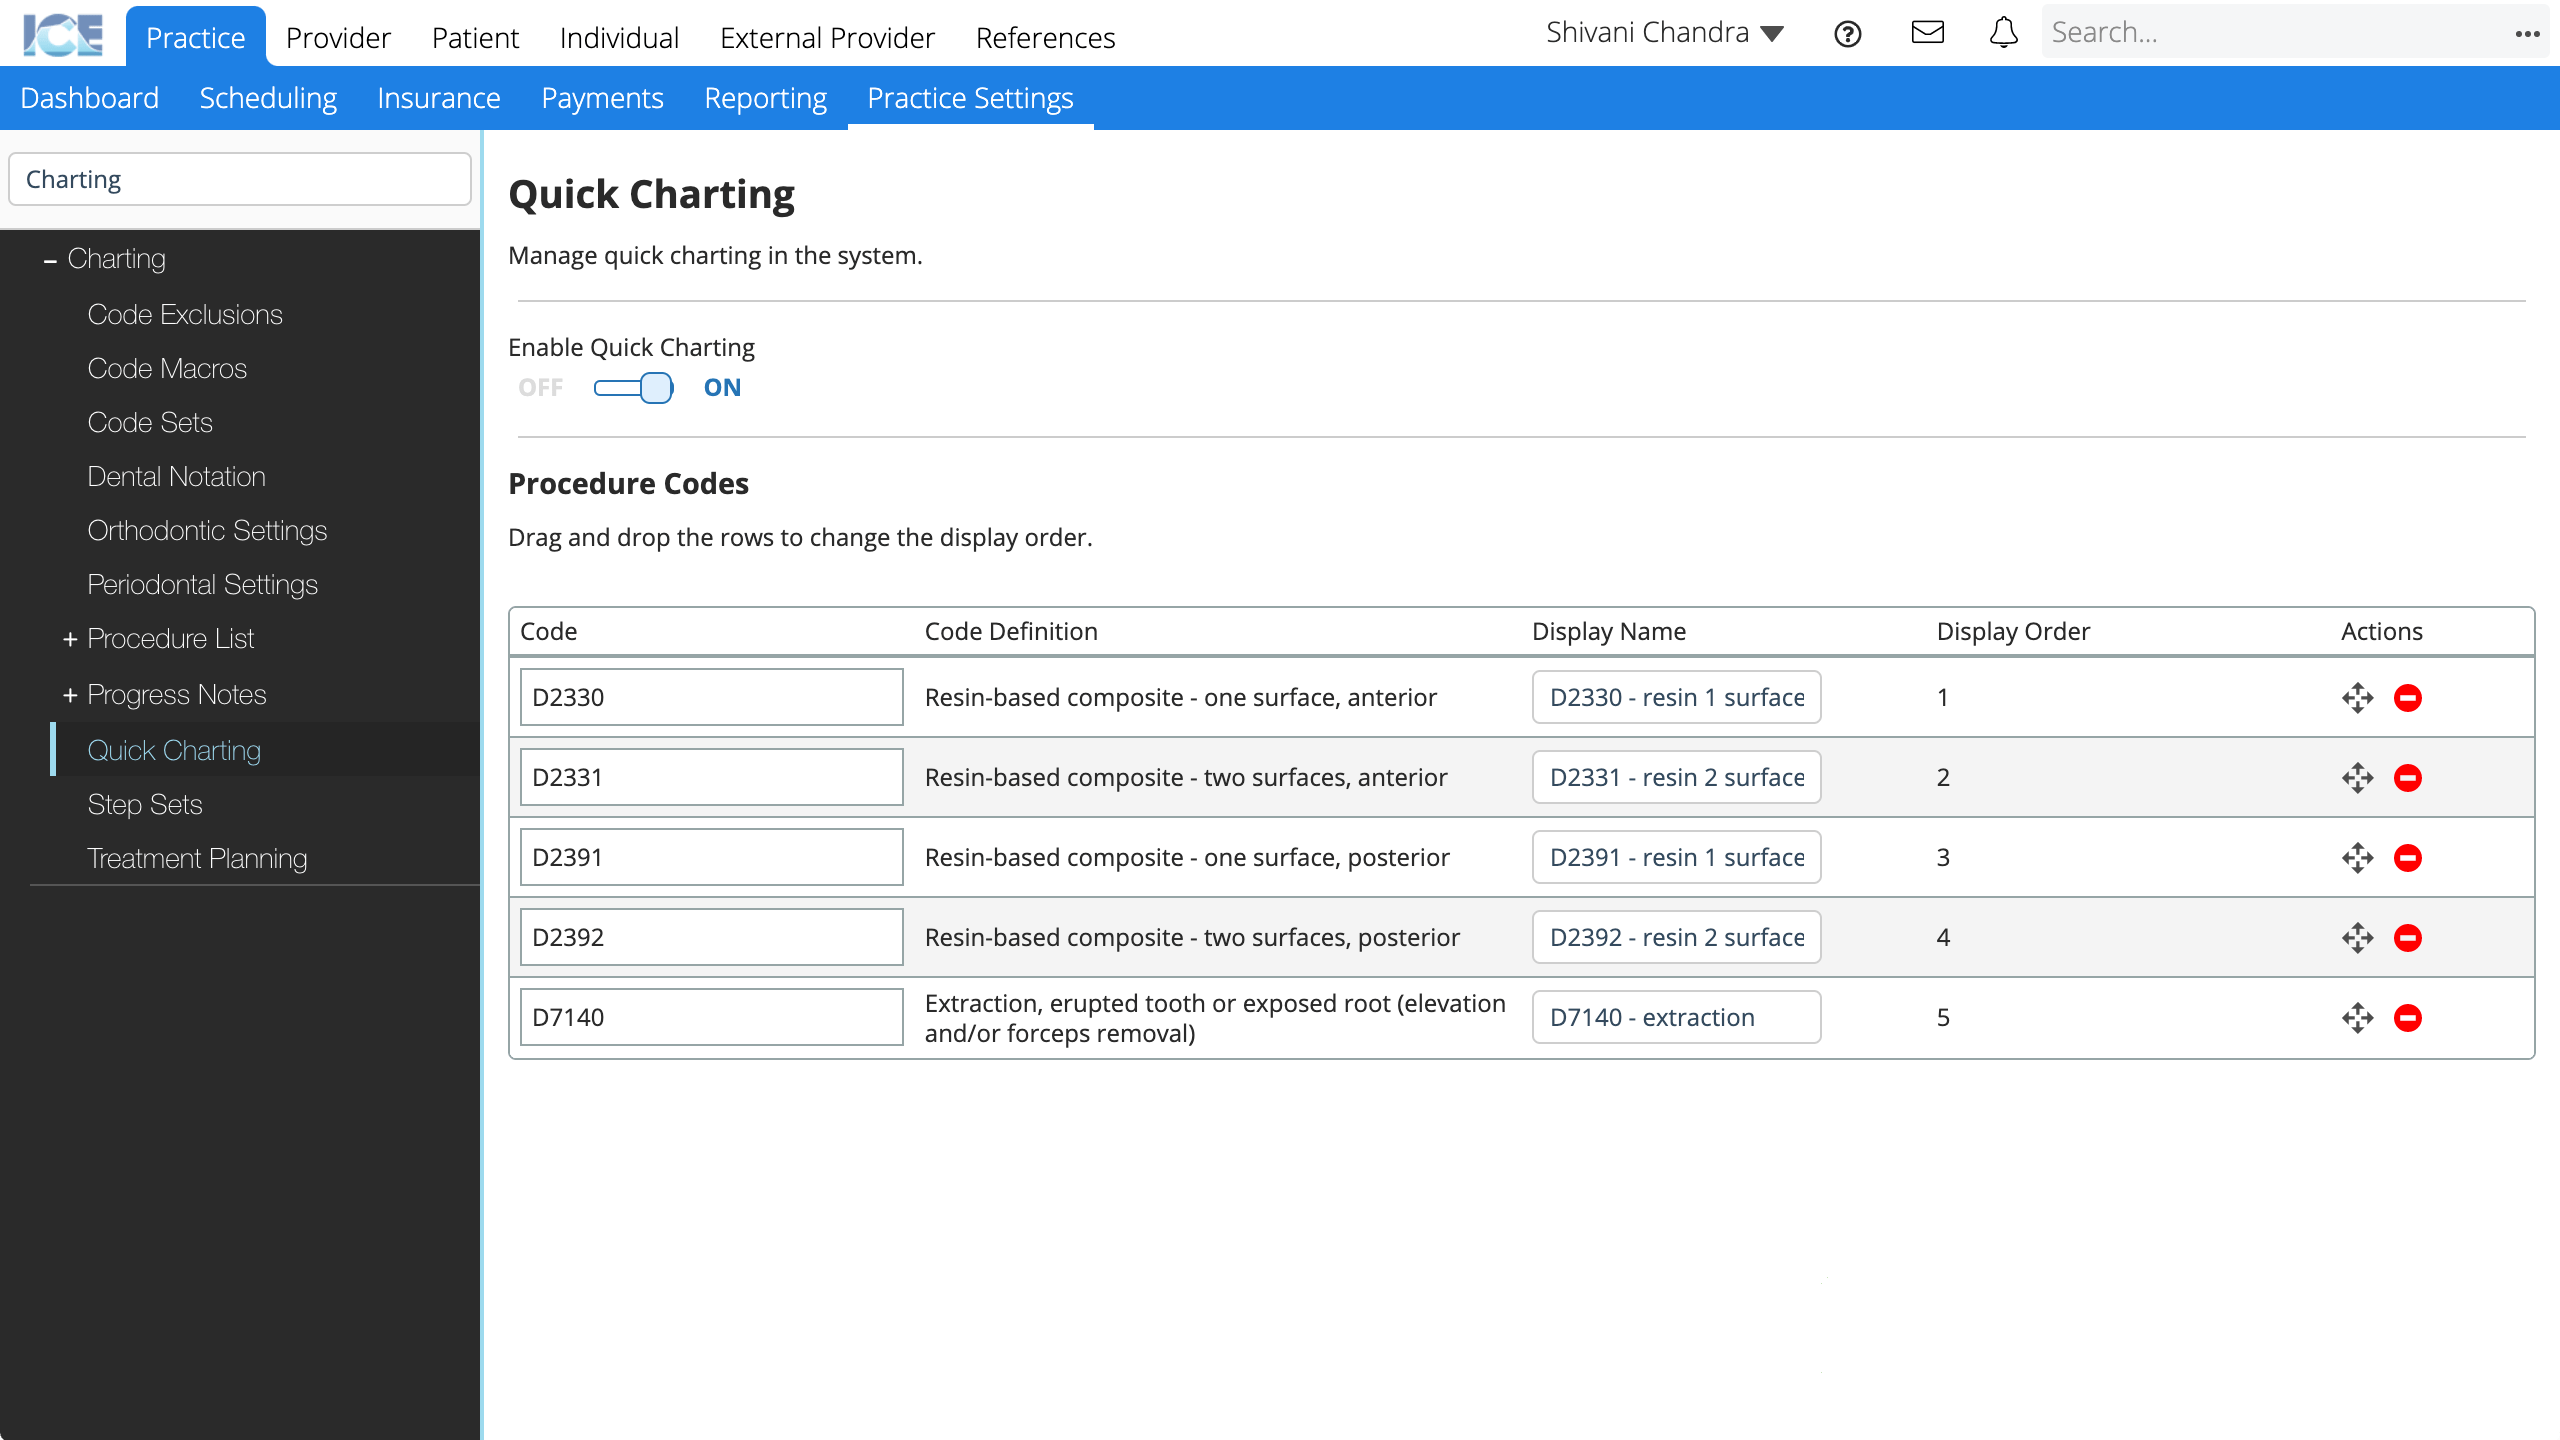
- Configure how the codes appear in the pop-up by:
- Updating the Display Name field text.
- Dragging to re-order the codes.
- Selecting to remove a code.
- Your changes are saved automatically
Step Sets
Completing a procedure can involve several steps before the work is truly completed for a patient. Step sets are used to track progress for these types of procedures. For example, providing a crown for a patient that may involve multiple steps completed over time.
A billable step can be configured for these step sets in order to indicate when in the process a patient will be billed for the entire cost of the procedure. Revenue can be calculated separately per step using the Actual Cost field. The parent code selected during the set creation process will be used for billing purposes.
Each step you define appears in charting as its own line or procedure entry. This lets you track treatment dates and statuses separately for each step. To learn more about how step sets appear in charting, see Enter a step set.
- Go to Practice > Practice Settings > Charting > Step Sets
- Select Create New Step Set
- Search and select the procedure code that is the basis for this step set
- Enter a description that will appear in procedure search results
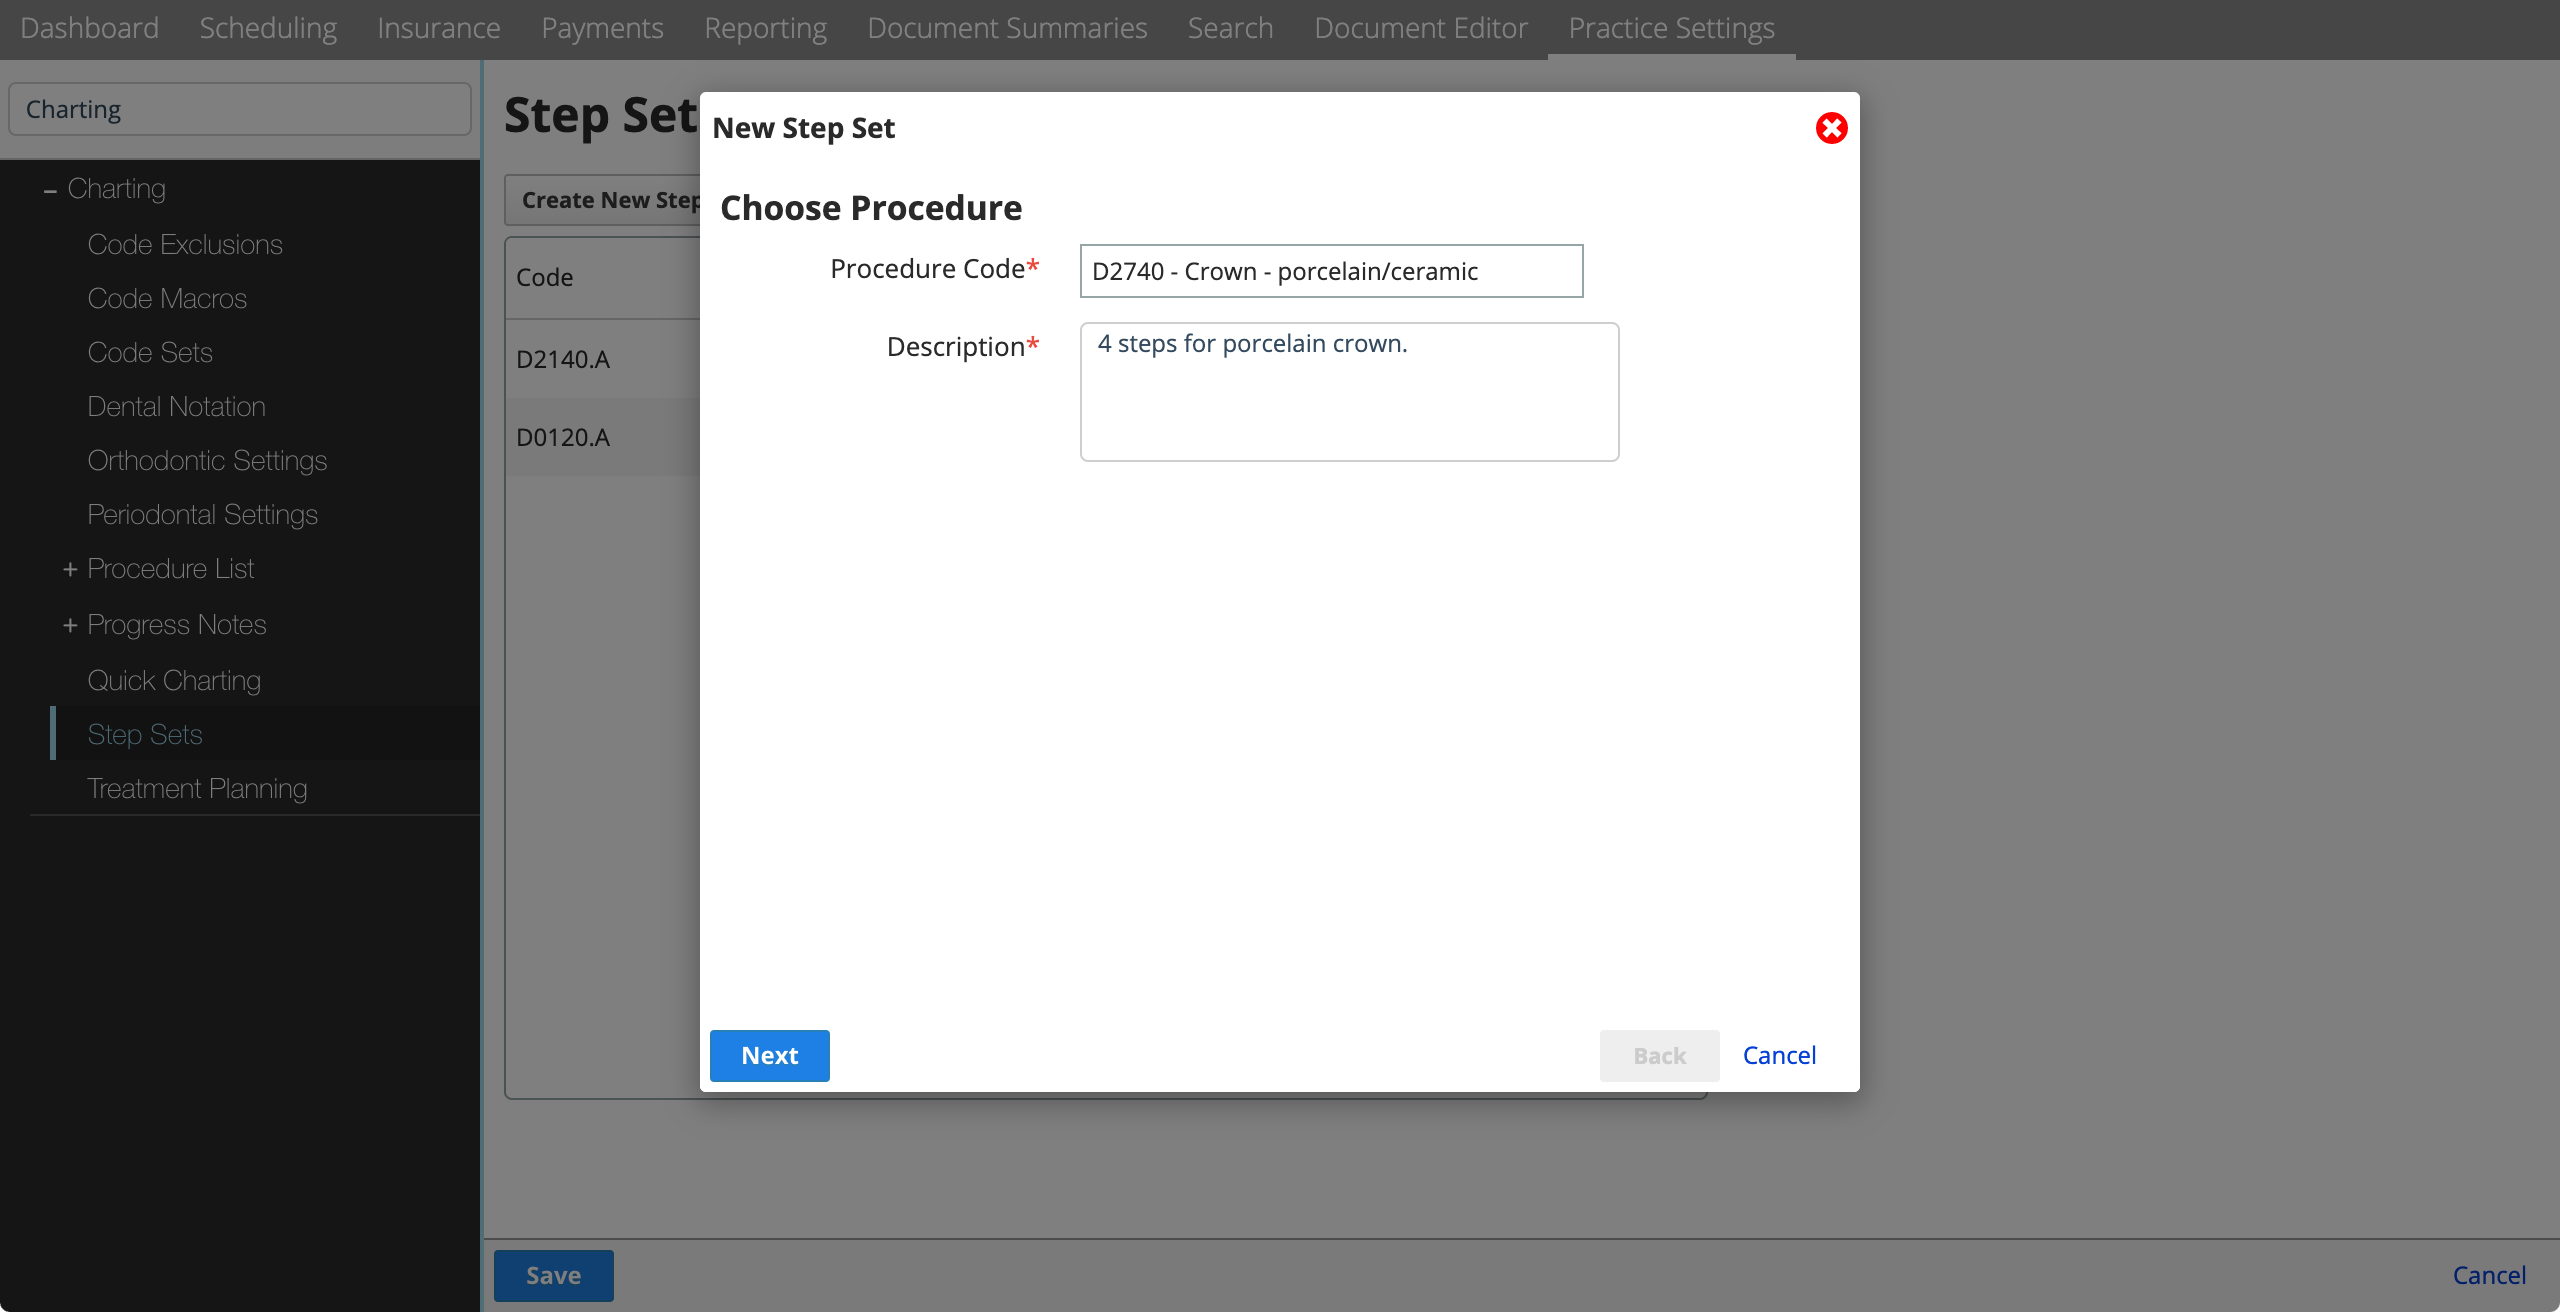
- Select Next
- Select Add Step and enter a description for each step
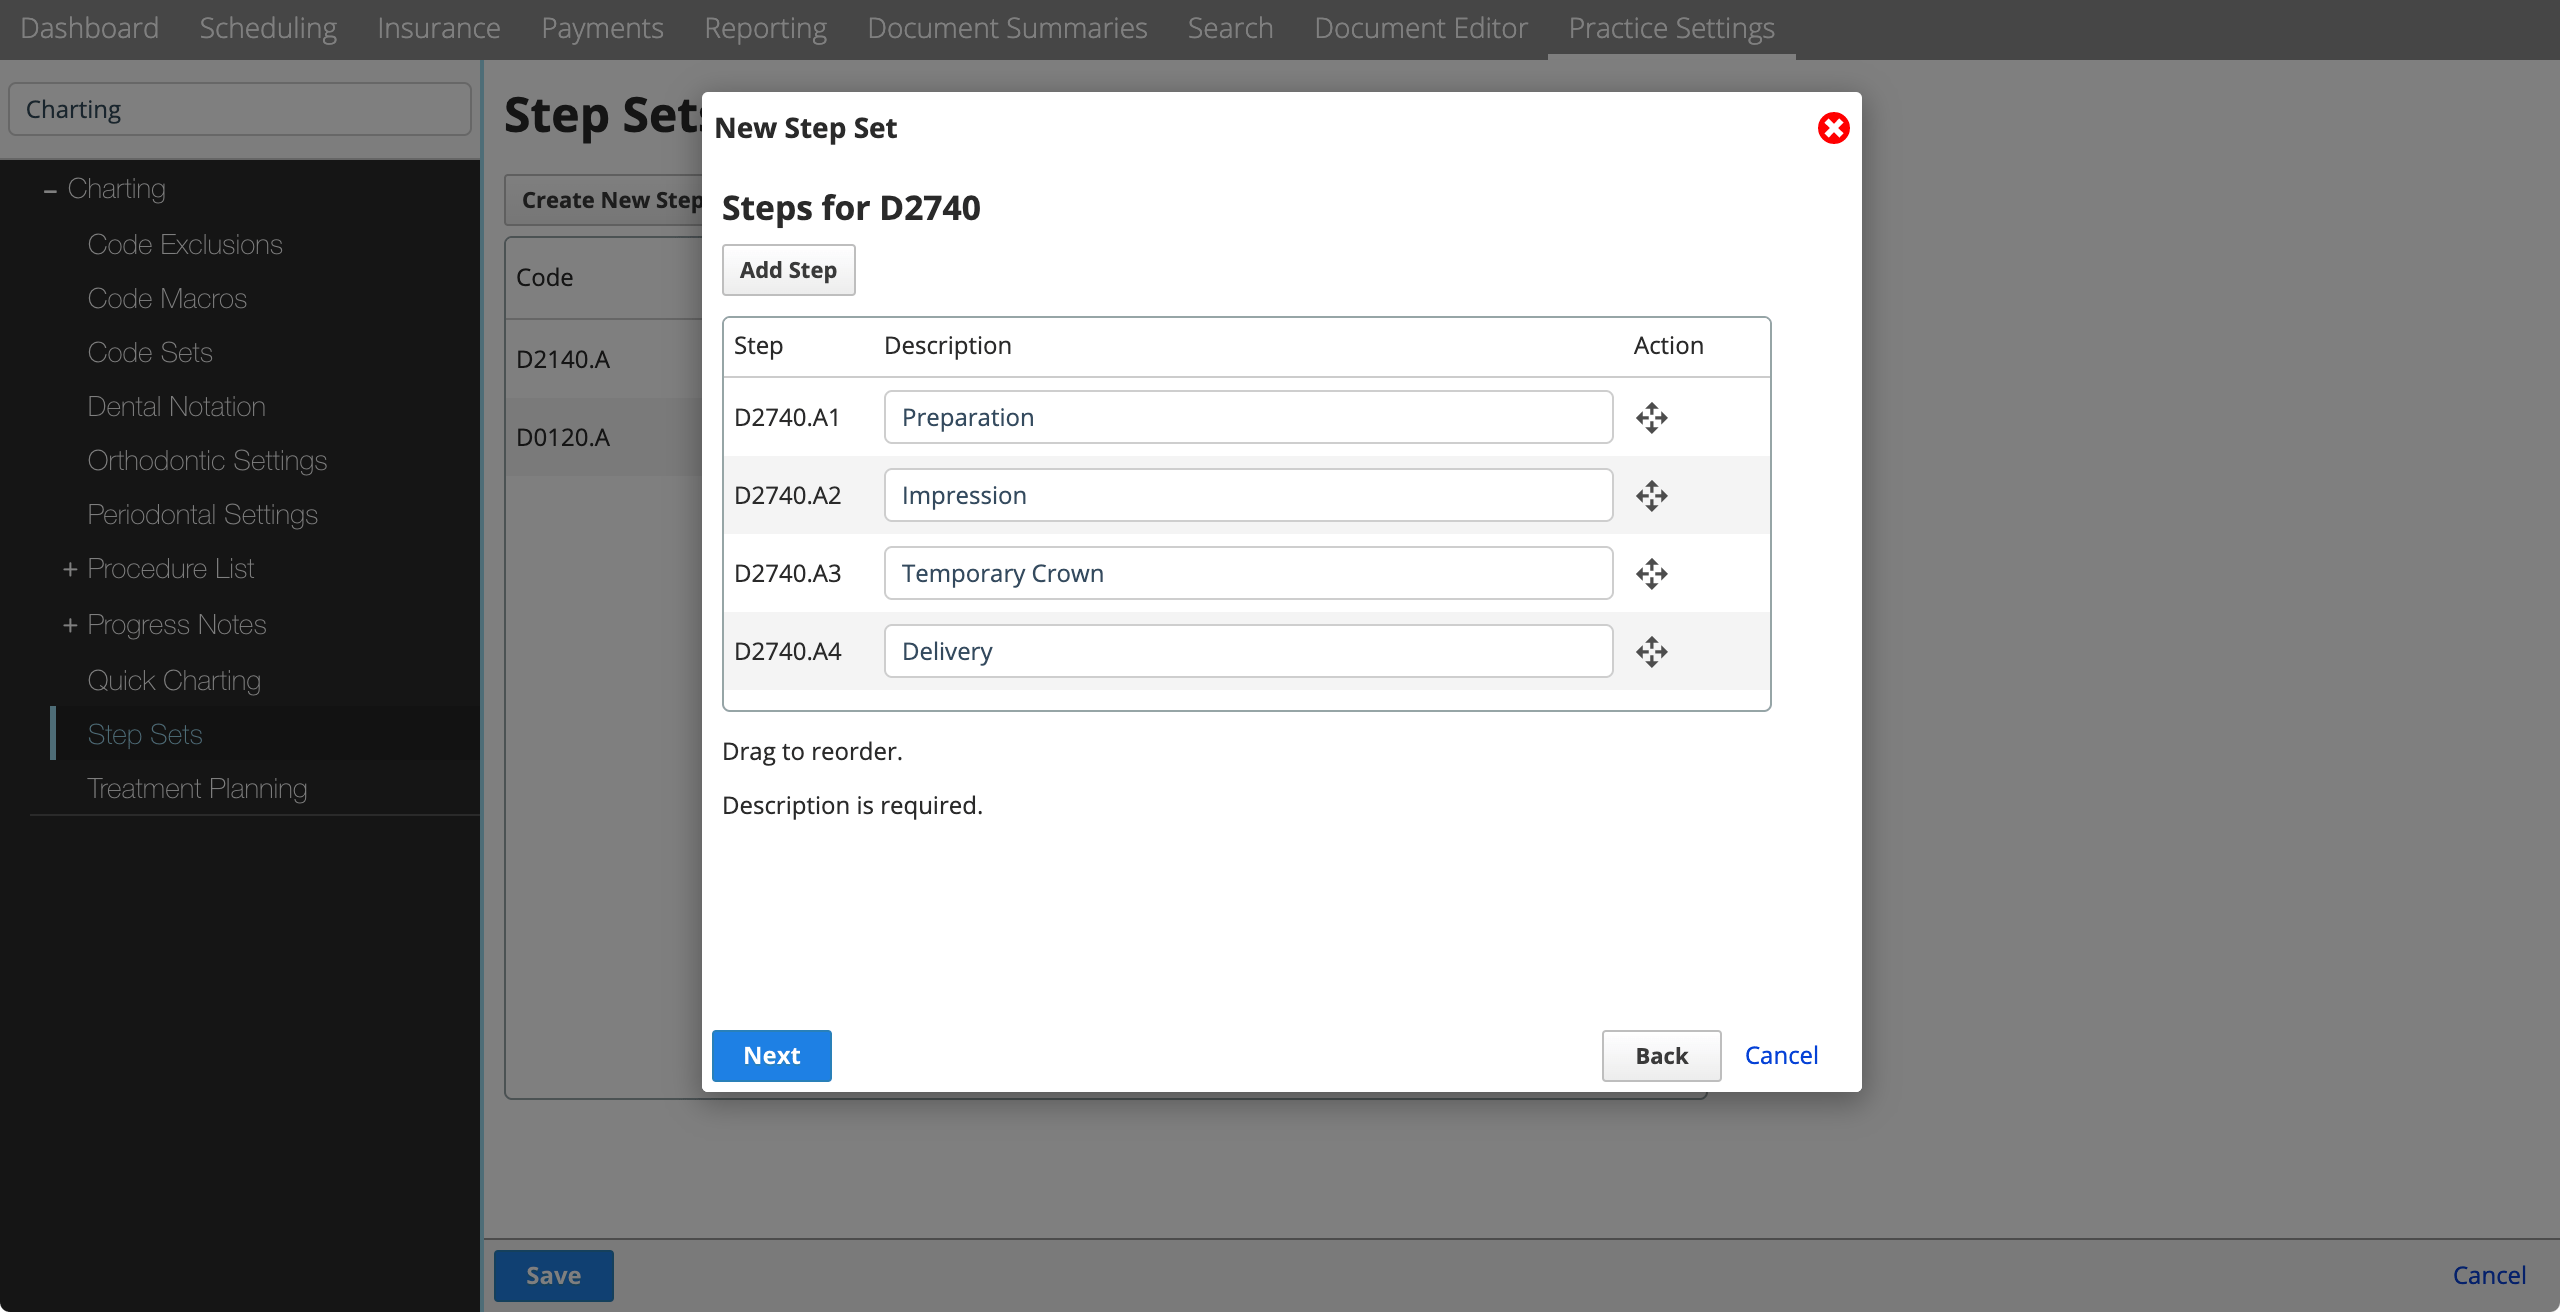
- Repeat as necessary and select Next
- Update the Actual Cost % for each step

- The Actual Cost is used to determine what portion of the cost is declared as revenue in financial reporting.
- Choose the Billable Step
- The patient is billed for the full amount of the procedure when this step is marked as completed in charting.
- Select Add Step Set
You cannot edit a step set's steps or cost breakdown after creating it. You can only set its status to inactive or update the description.
Treatment Planning
You can customize the number and names of the treatment phases available in the Treatment Planning panel.
You can define the default number of option columns to display in the Treatment Planning panel. A provider can still manually add more options if necessary.
- Go to Practice > Practice Settings > Charting > Treatment Planning
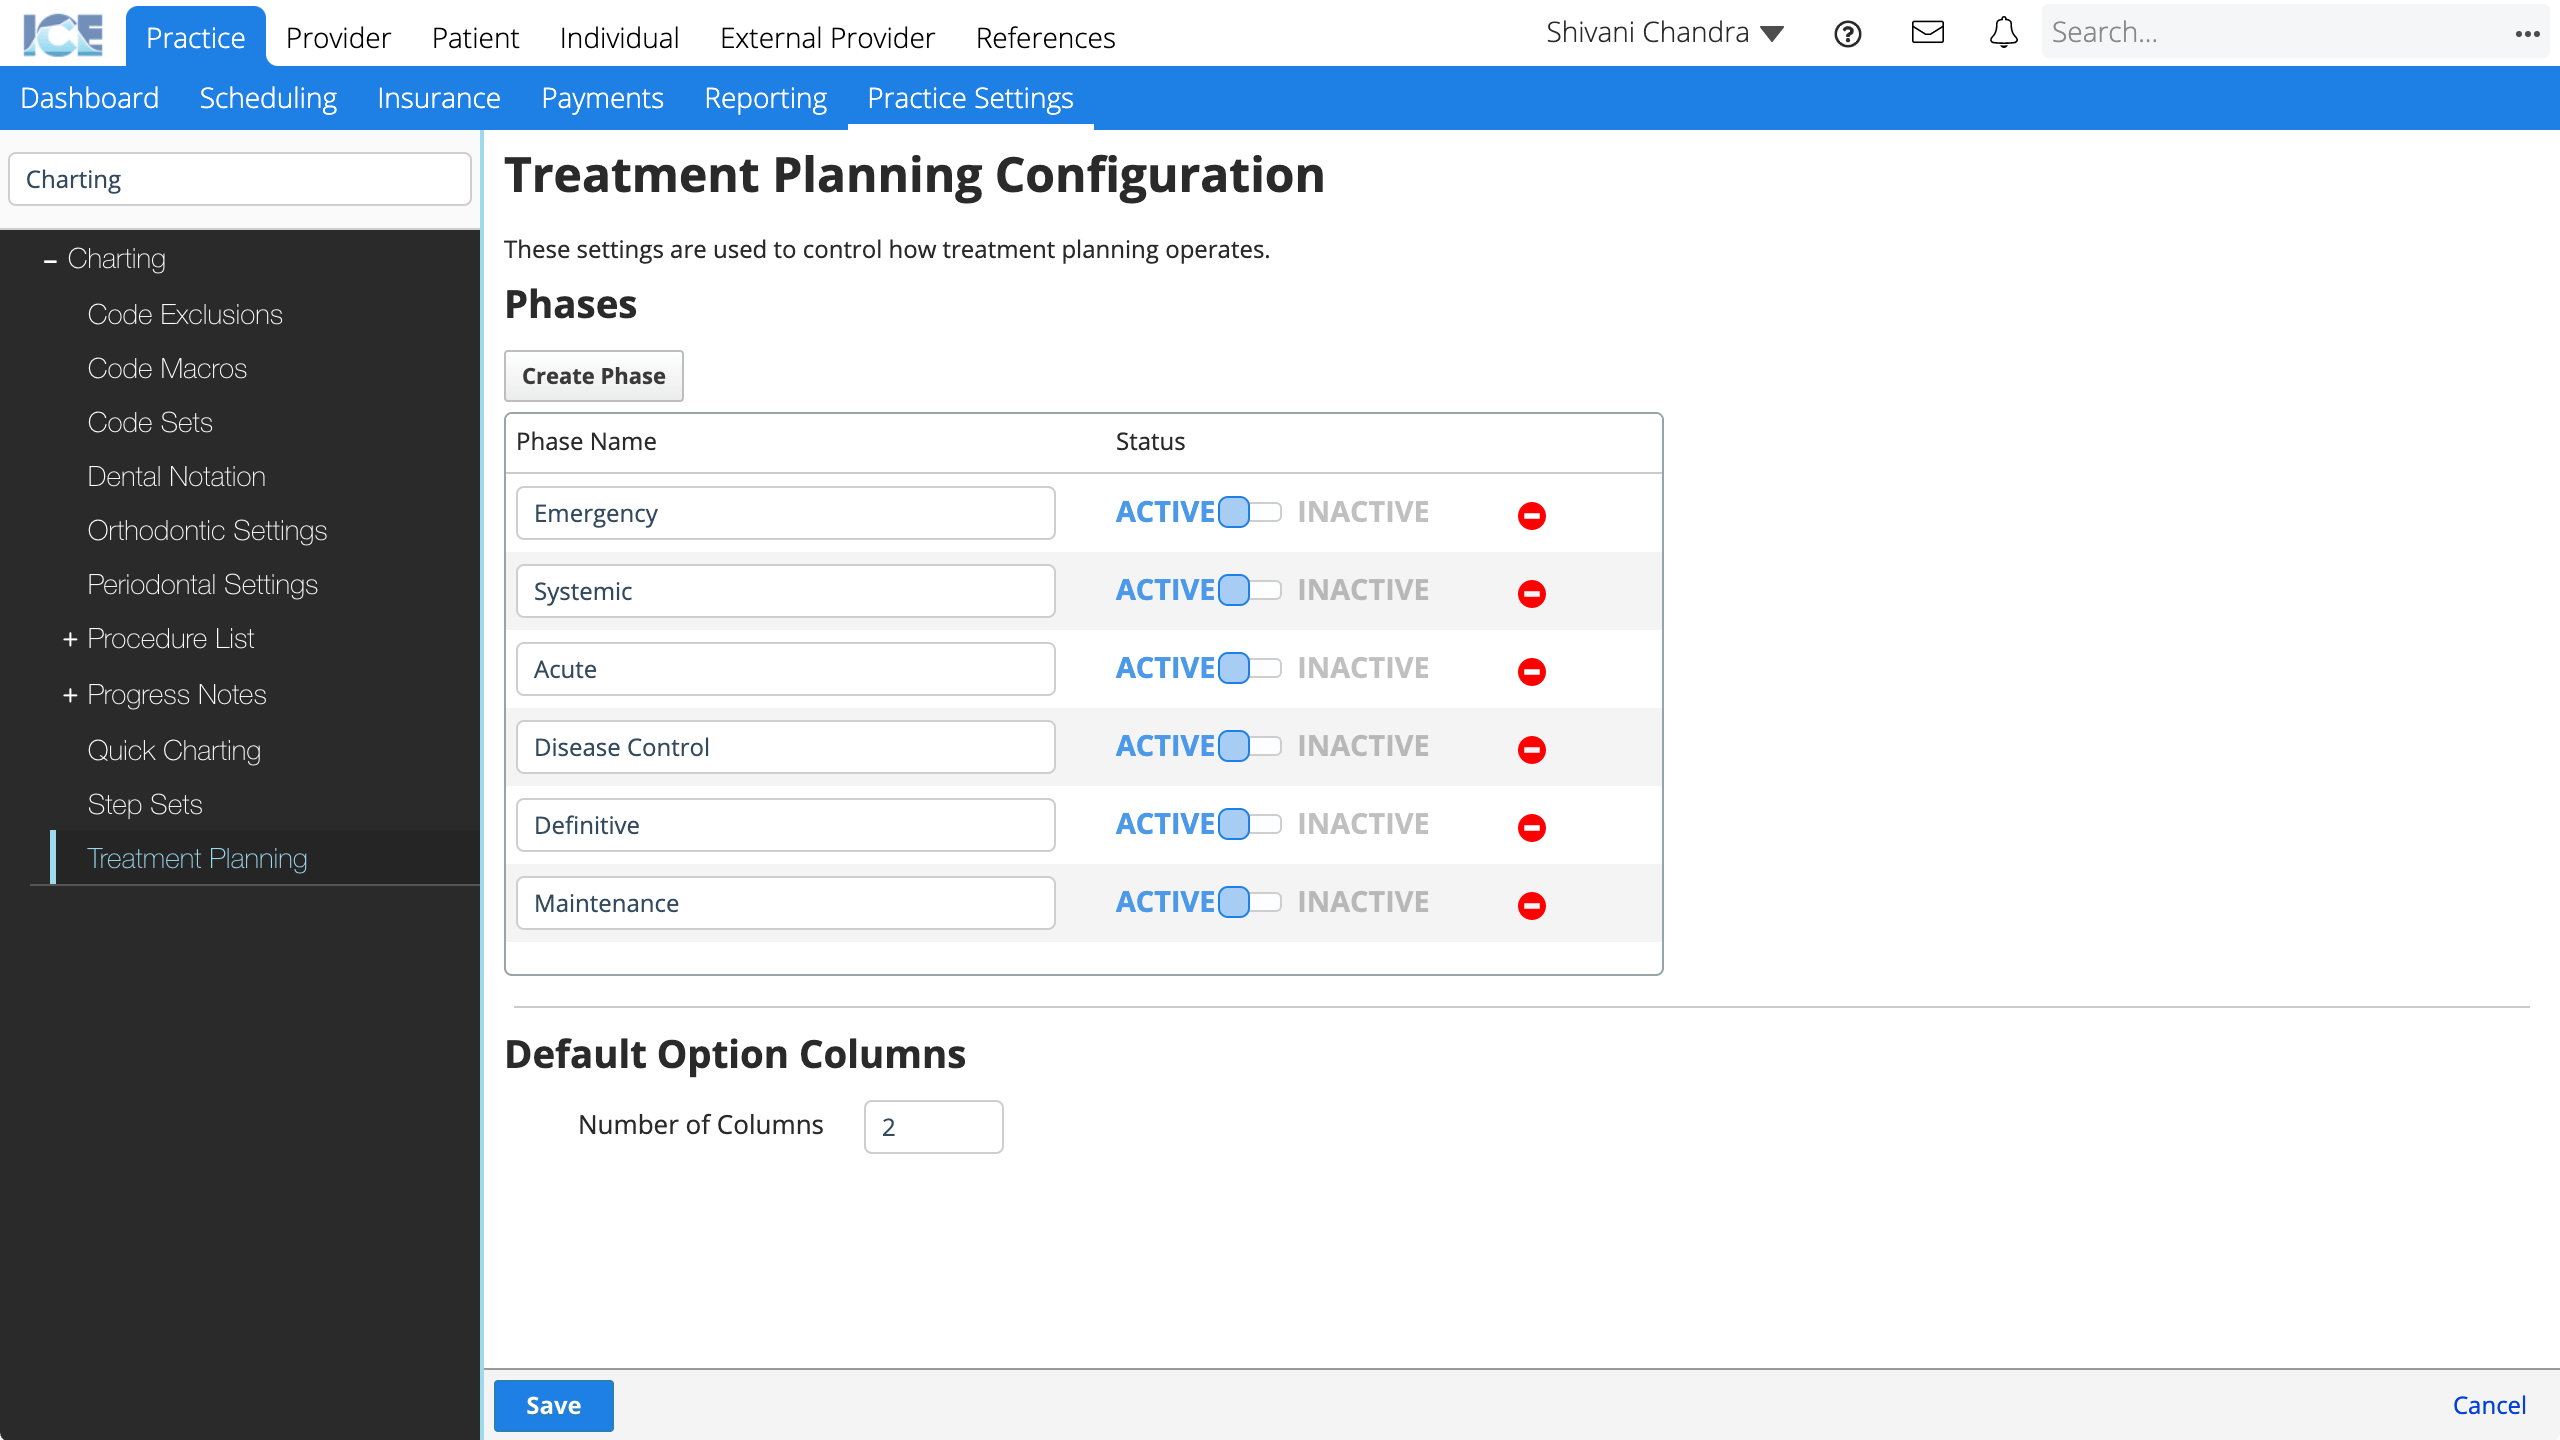
- To create a new phase, select Create Phase and enter a phase name
- Only active phases appear in the treatment planning panel.
- To delete a phase, select
- You can only delete a phase if treatment was never associated with it.
- Setting the phase to inactive hides it and any associated treatment from the treatment planning panel.
- To define how many option columns everyone starts with, update the Number of Columns field
- Choose Save to save your changes
- Select Cancel to discard your changes.