Edit images
There are three ways to start editing images.
- Select an image in the Template view to show the quick edit tools.
- Double-click an image to open the Editor view.
- Select Editor from the View menu in the top left corner.
The system saves your changes automatically. Edits are non-destructive so you can reverse them.
Edit with quick edit tools
The quick edit tools appear at the top of the workspace and the adjustment options are grouped into three categories.
- Select an image to access the quick edit tools in the top toolbar
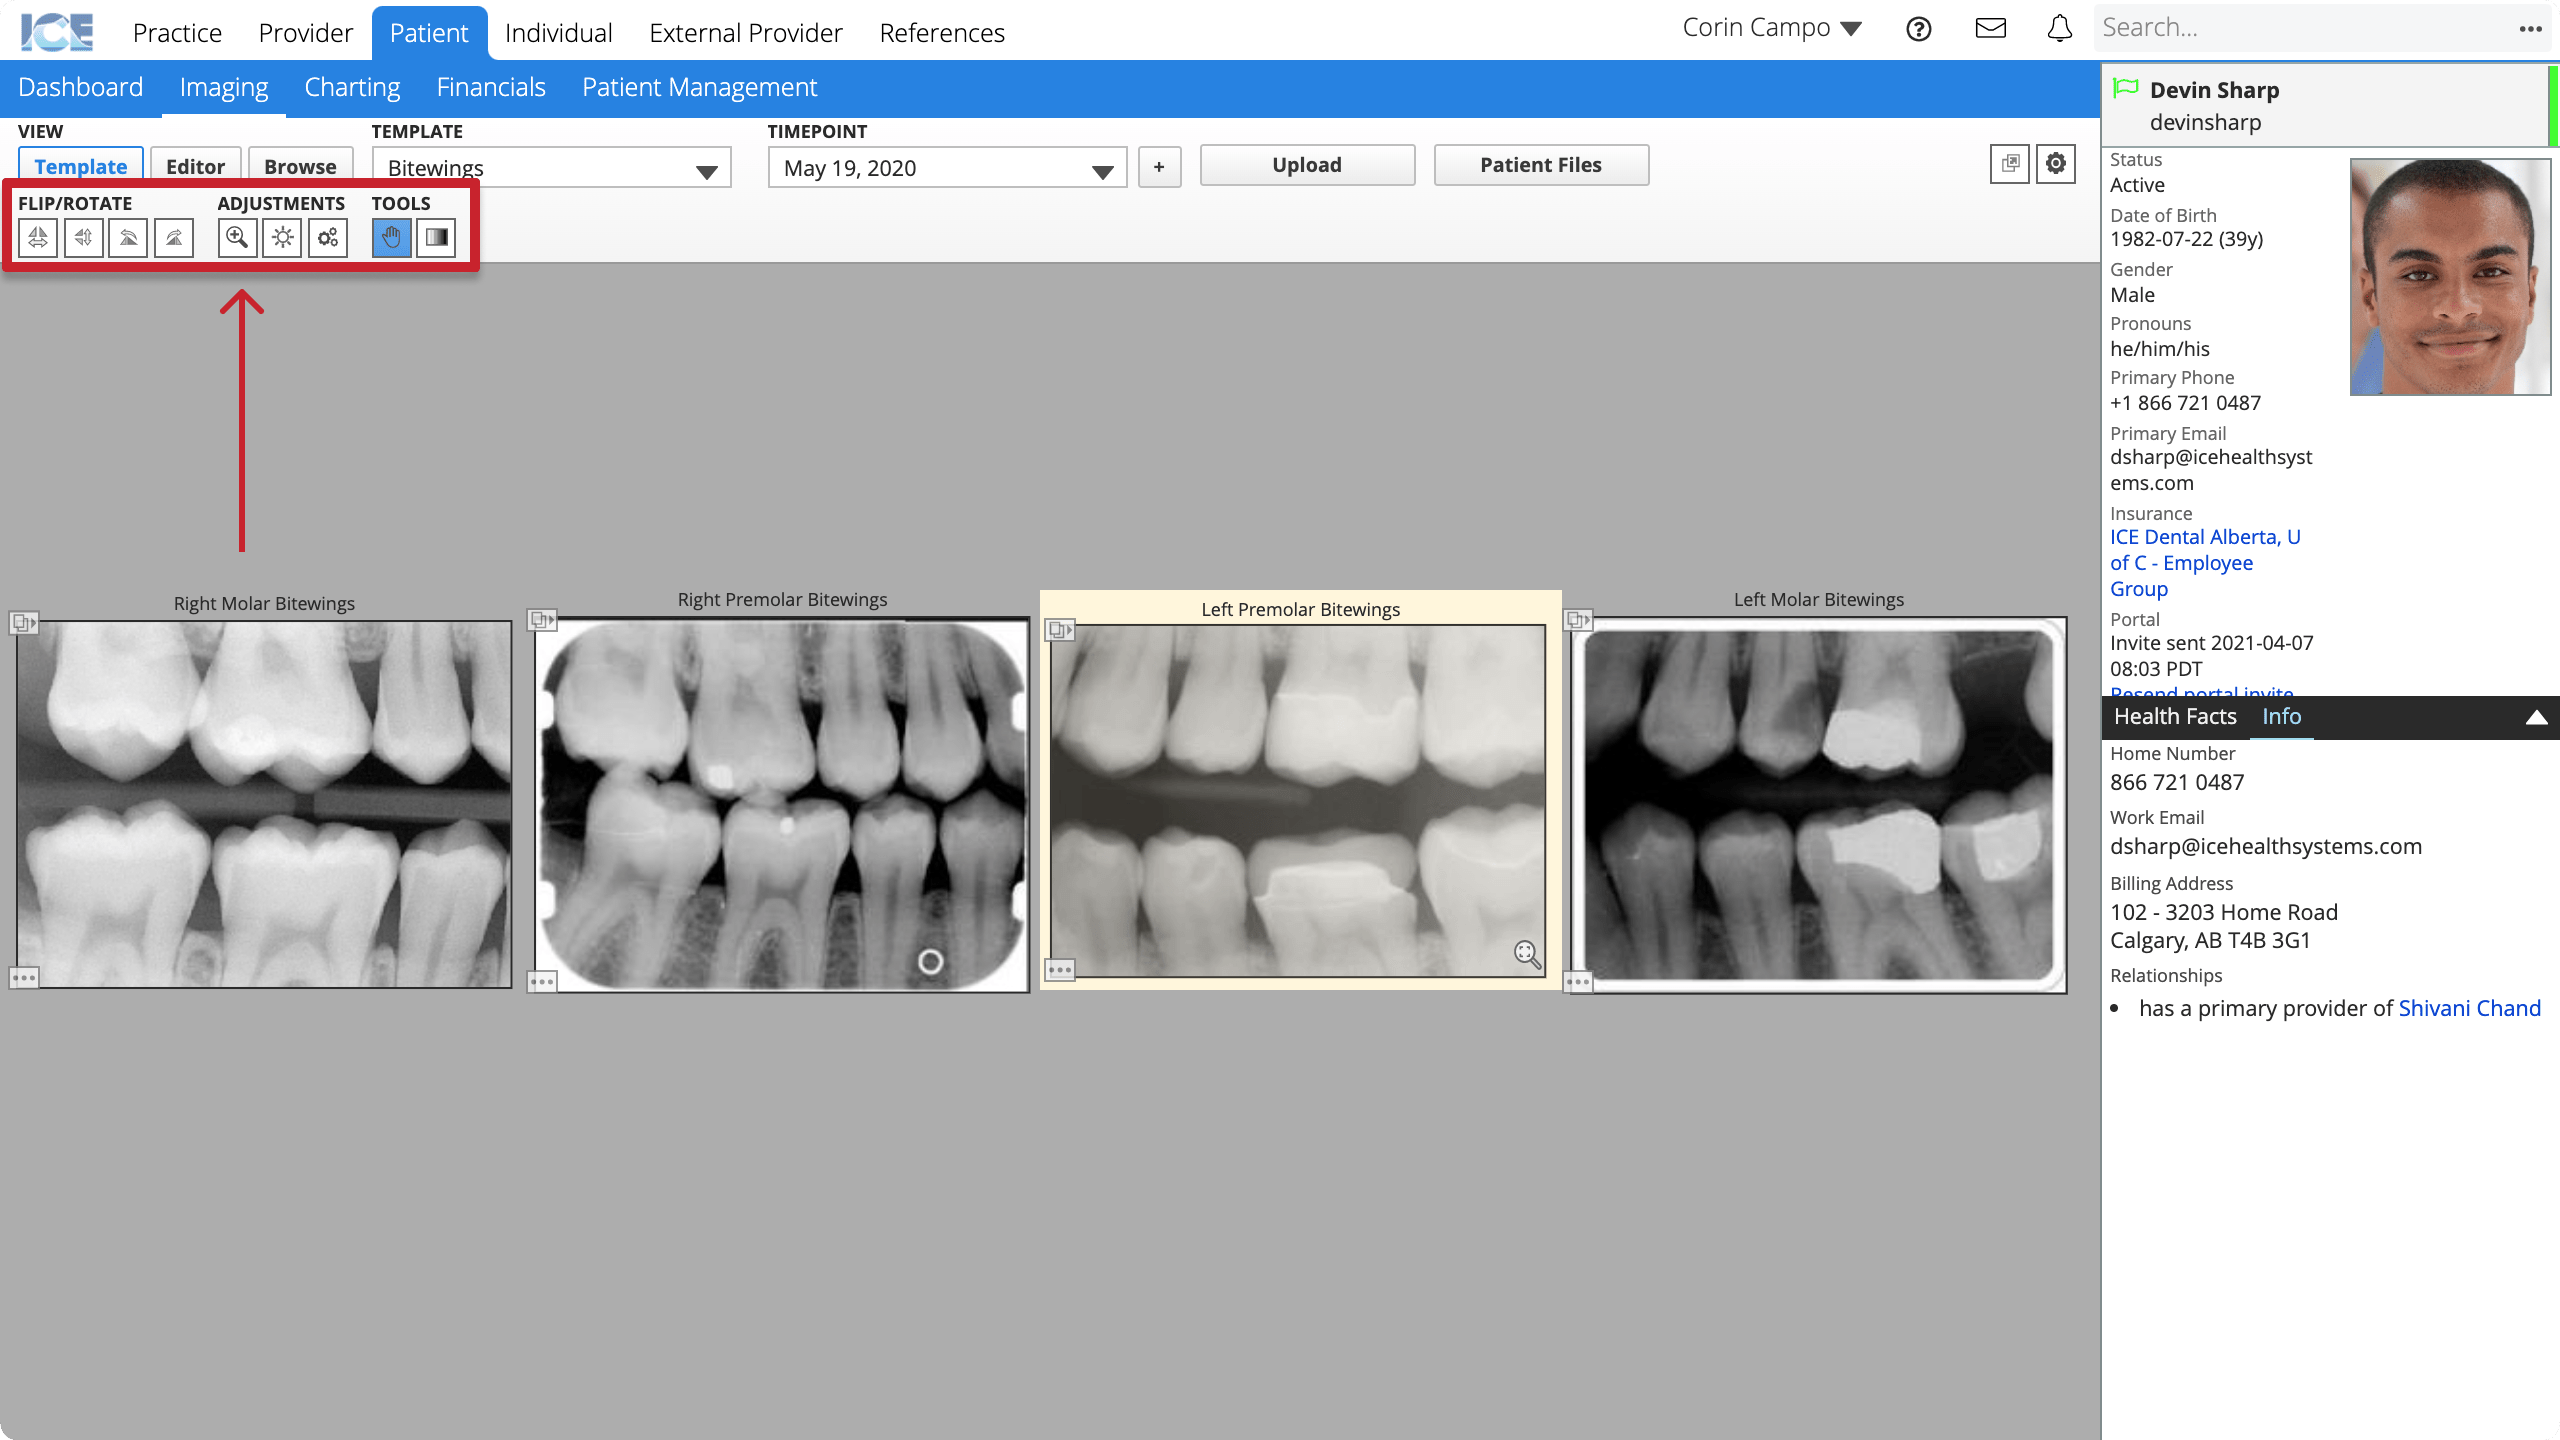
- Edit the image with the quick edit tools:
- Select the Flip/Rotate or Tools options.
- Hover over the Adjustments options and drag the sliders.
The system saves your changes automatically. Edits are non-destructive so you can reverse them.
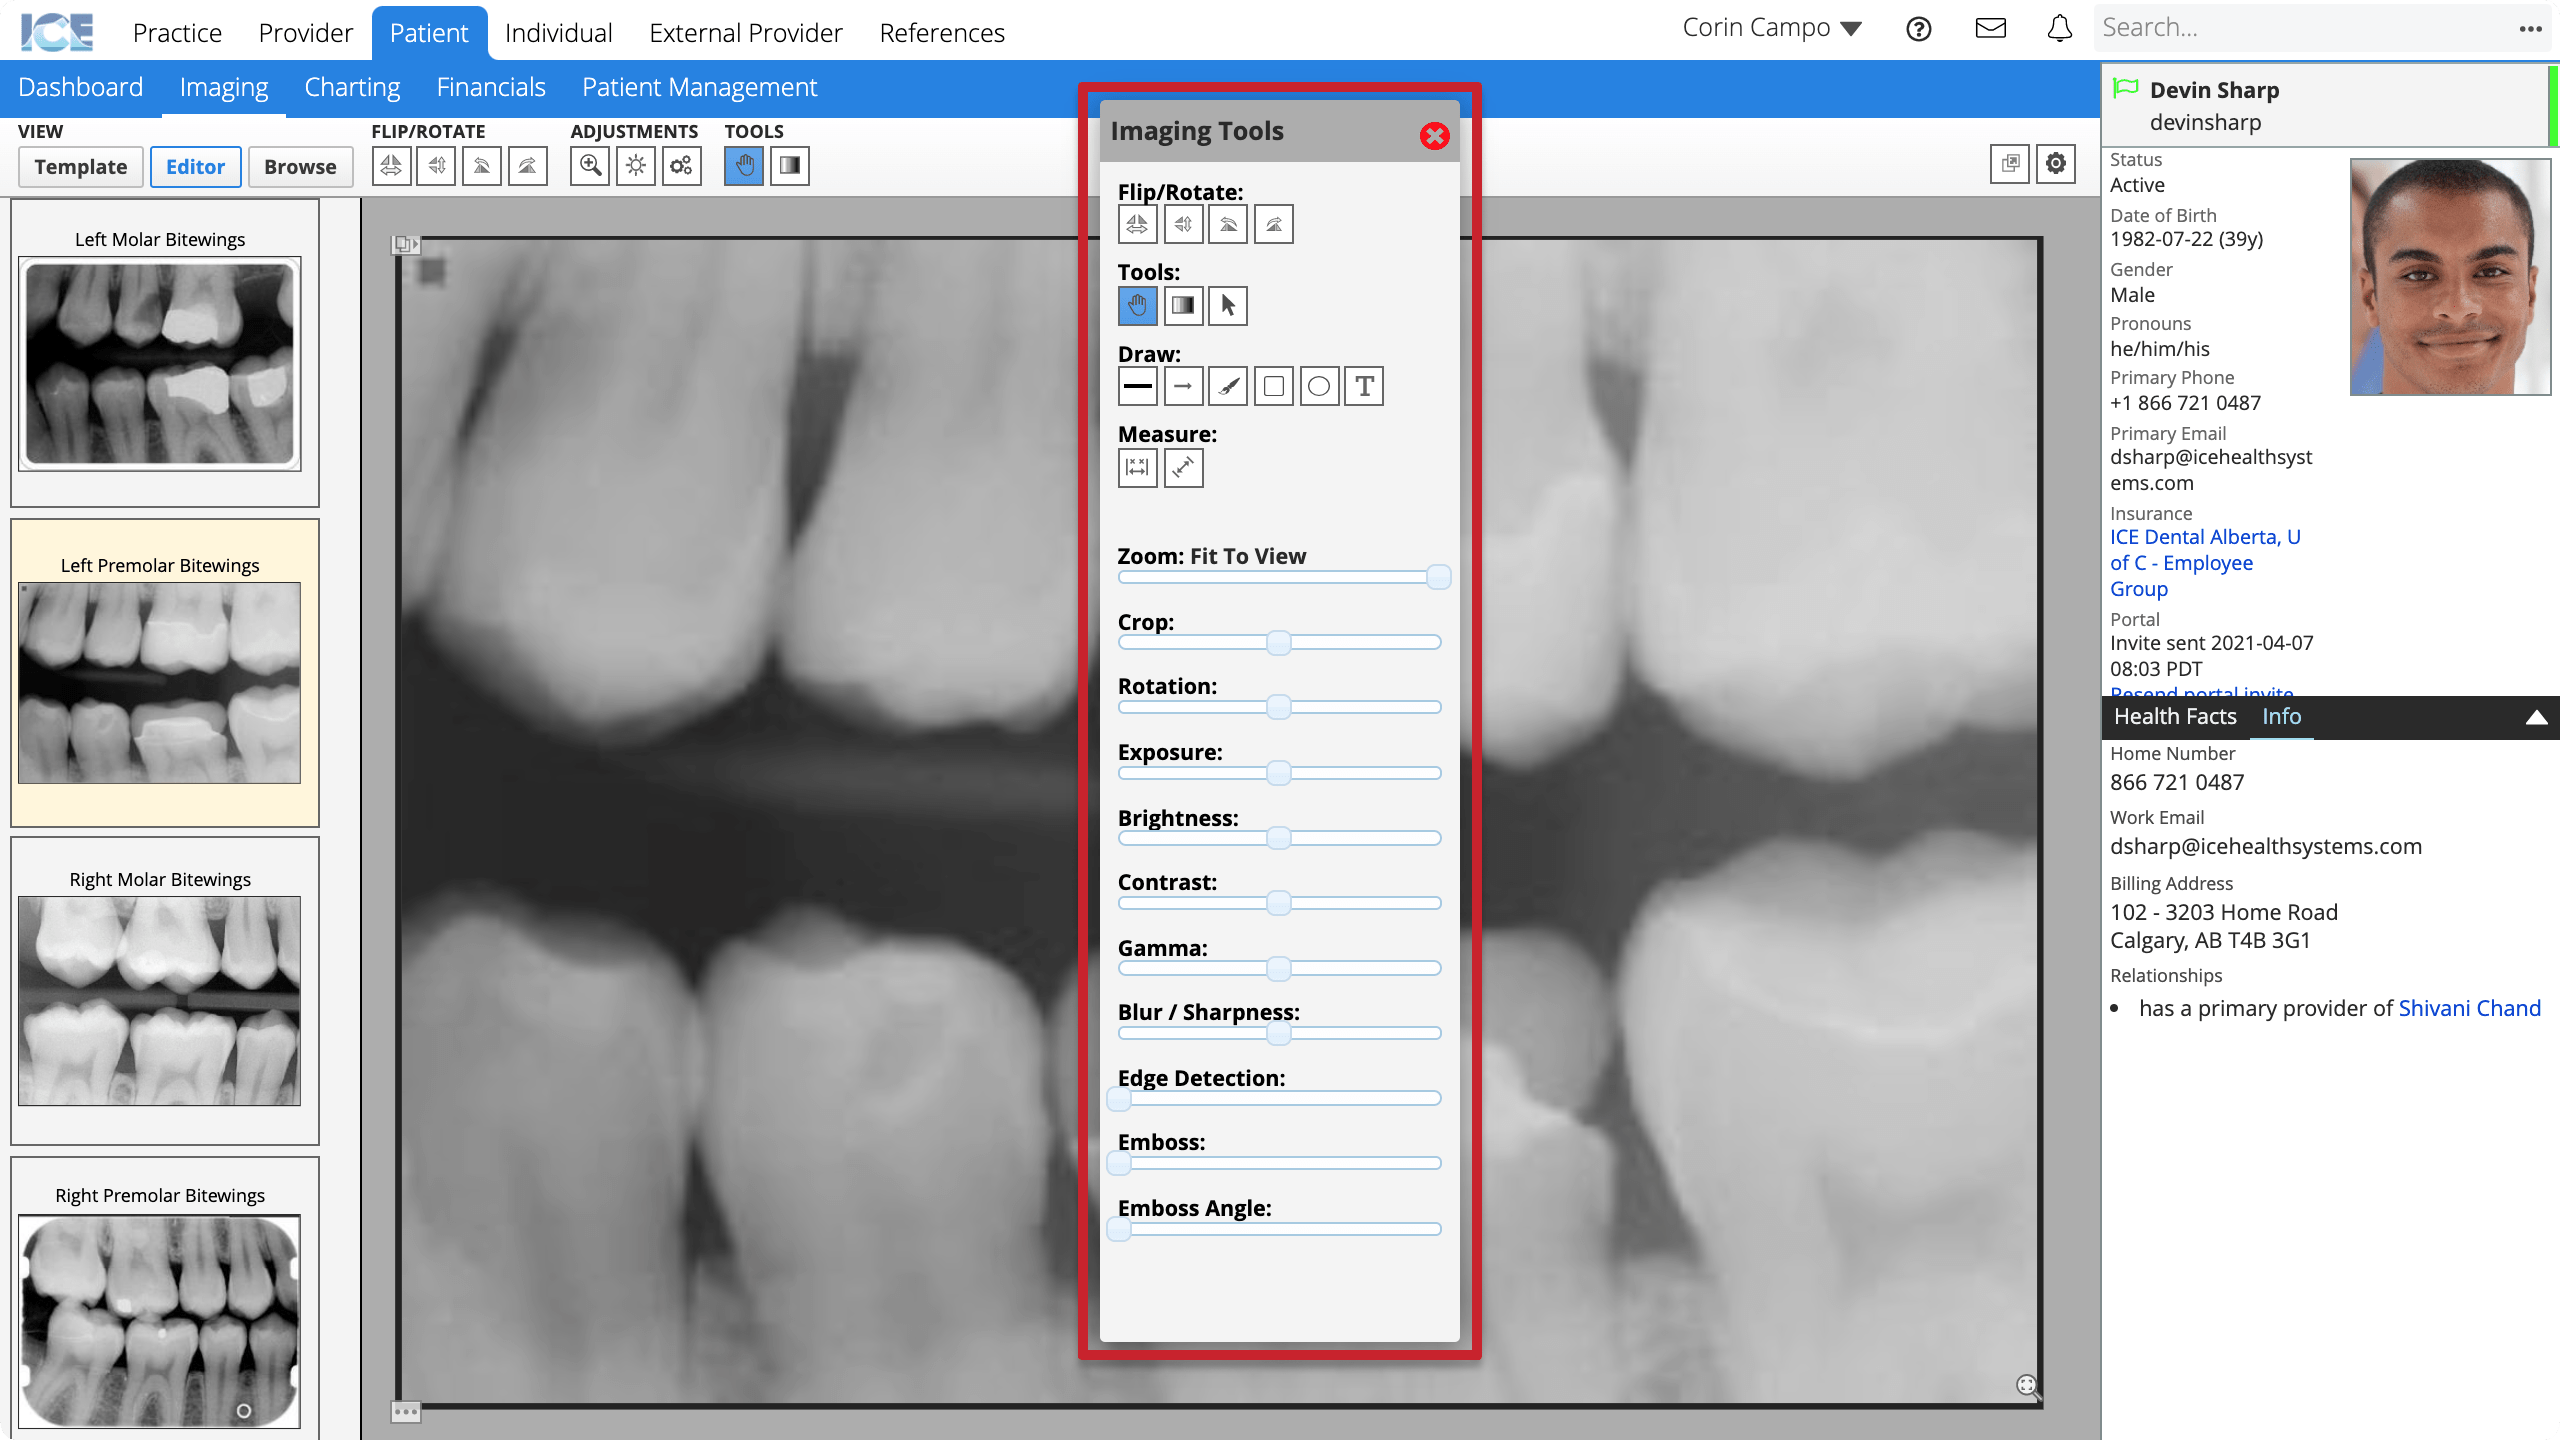
Edit in the Editor view
The Editor view includes the quick edit tools plus an Imaging Tools palette.
The Imaging Tools palette includes all of the quick edit tools, plus draw and measure options, in a single floating window.
- Double-click an image to open Editor view
or
Select Editor from the View menu in the top left corner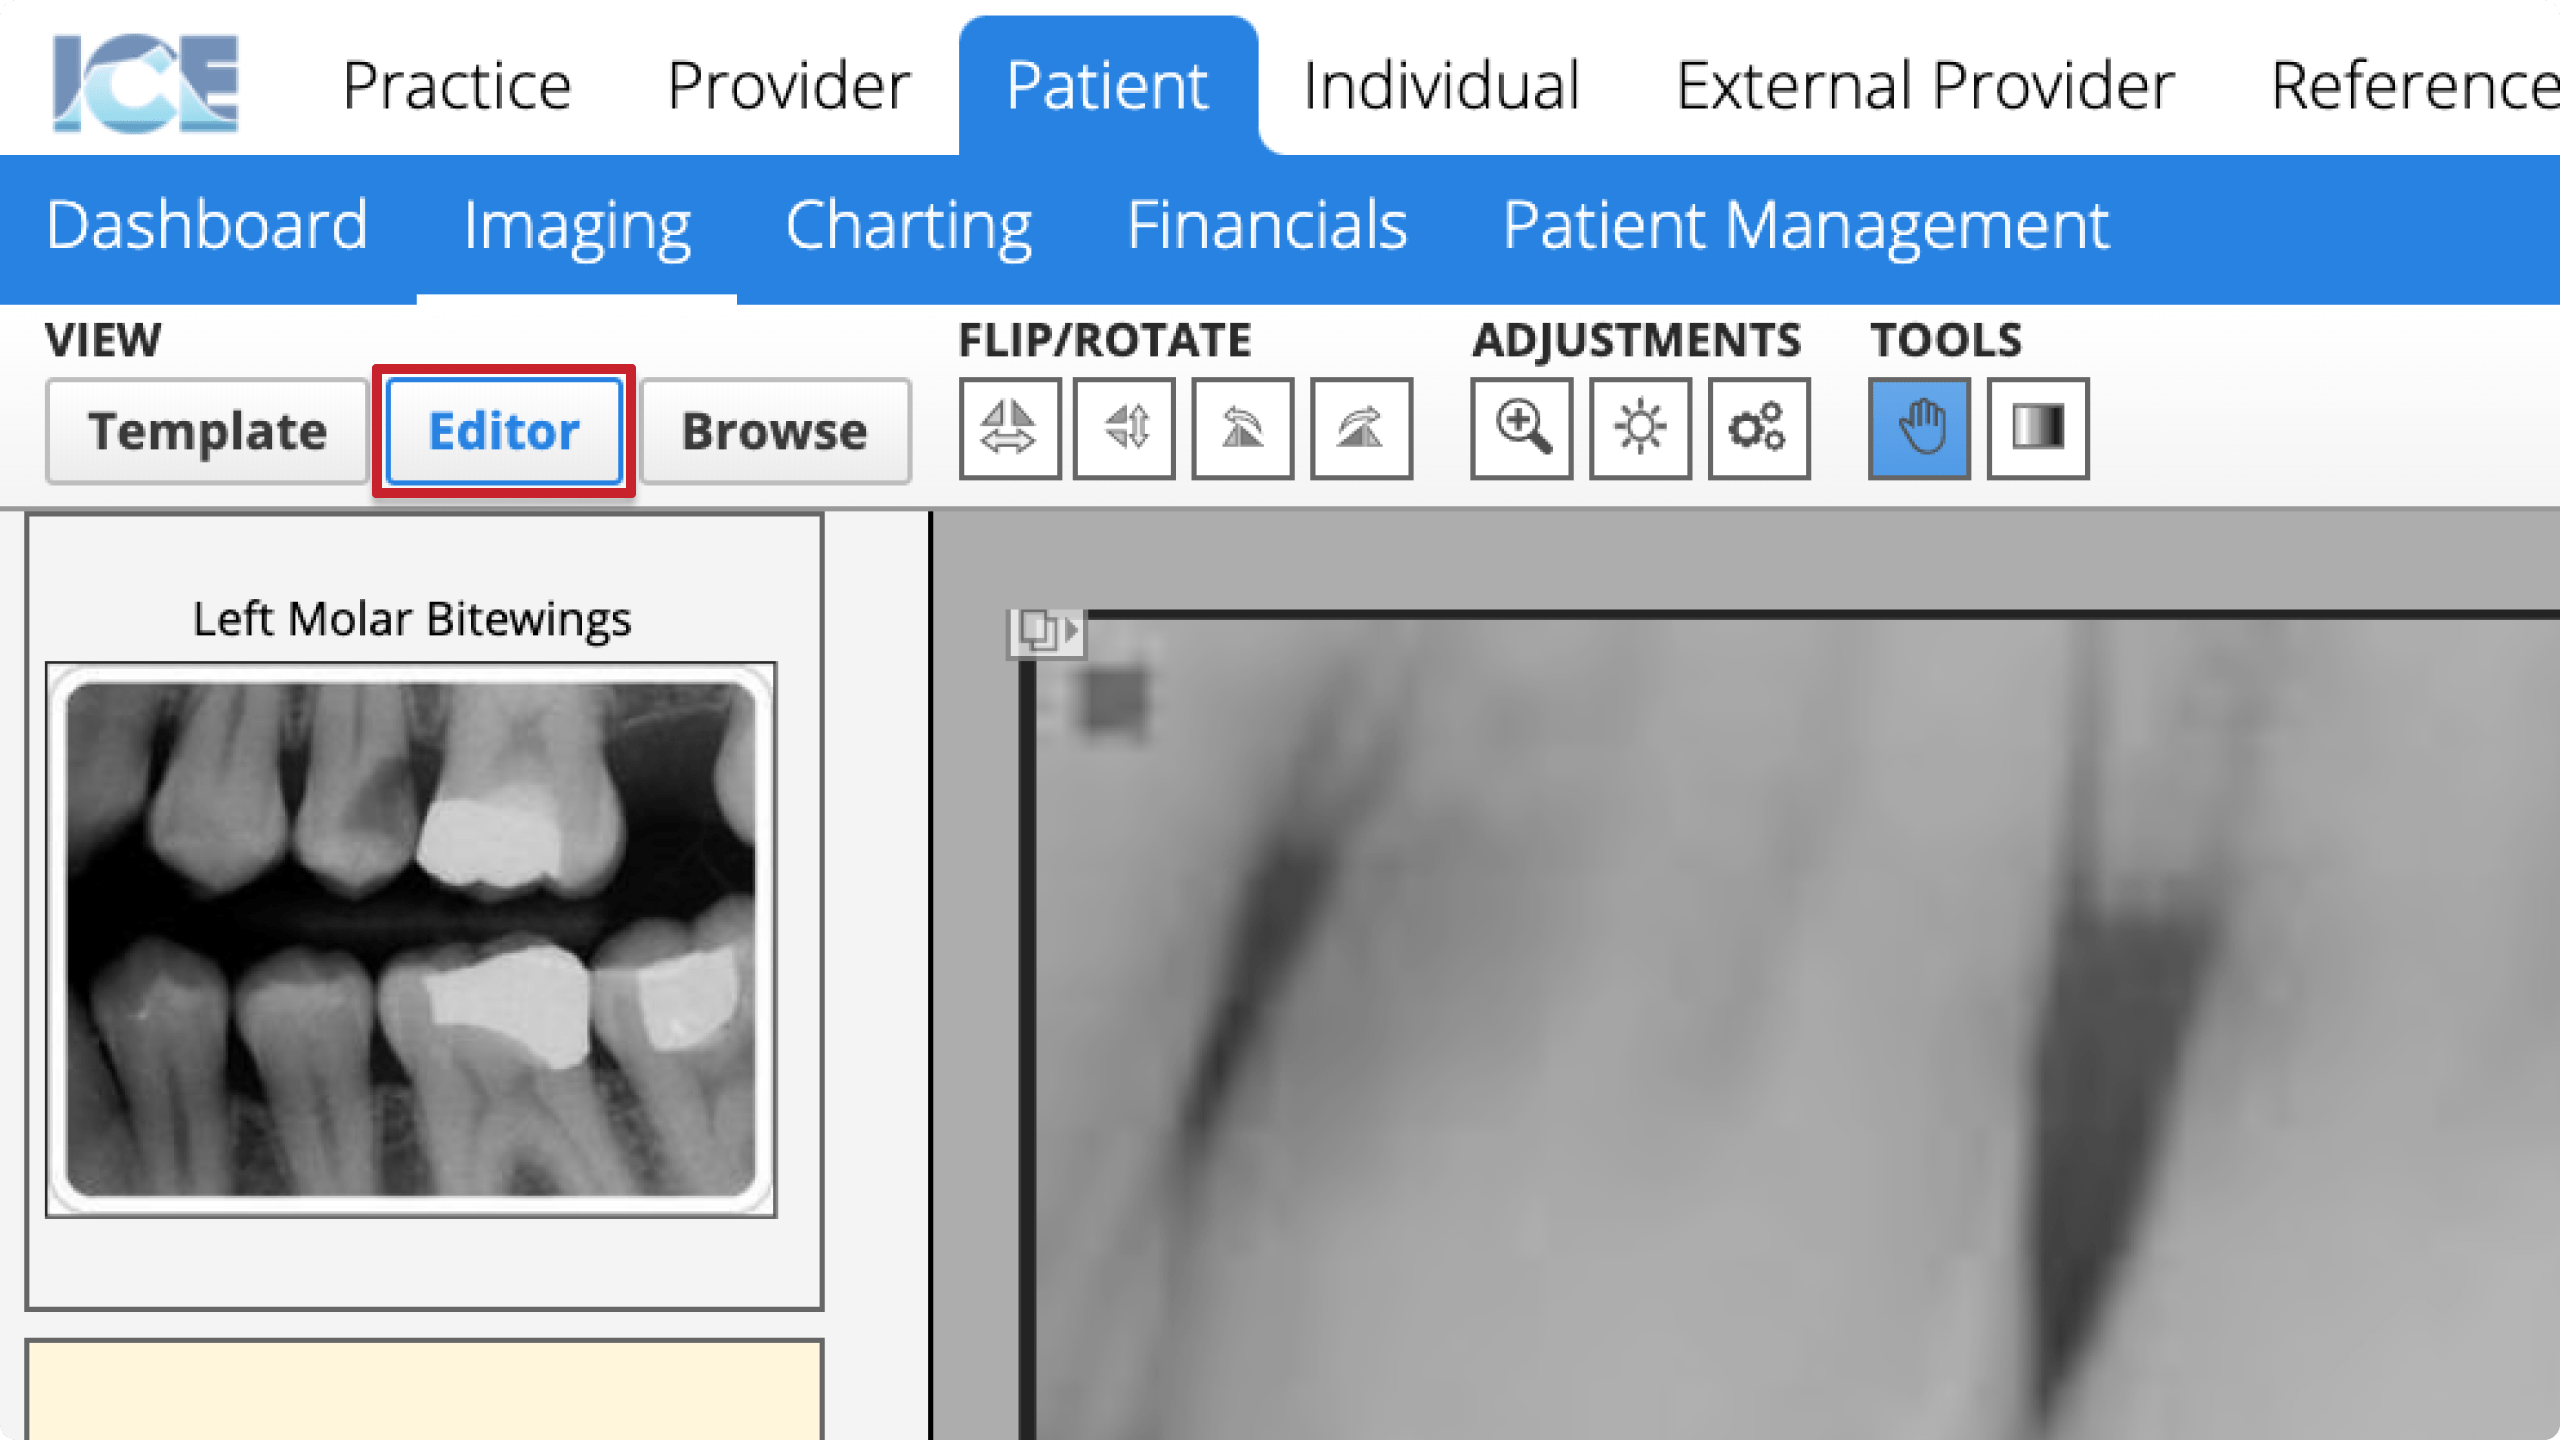
- Optional: Choose an image from the list in the left sidebar
- The sidebar shows images in the active image template.
- You can use the Imaging Tools palette to access all quick edit tools plus the Draw and Measure options.
- If the Imaging Tools palette is closed, select
 in the top-right corner of the Imaging workspace to re-open it
 - Use the tools to edit the image
The system saves your changes automatically. Edits are non-destructive so you can reverse them.
Image editing tools
The tables below summarize the image editing tools.
Flip / Rotate
The flip icons are blue if enabled so you can identify if an image is flipped from its original position.
| Icon | Name | Description |
|---|---|---|
| Flip Horizontally | Flip the image horizontally. | |
| Flip Vertically | Flip the image vertically. | |
| Rotate Counter-Clockwise | Rotate the image counter-clockwise. | |
| Rotate Clockwise | Rotate rounded the image clockwise. |
Tools
| Icon | Name | Description |
|---|---|---|
| Hand/Pan | Click and drag to reposition a zoomed-in image. | |
| Brightness/Contrast | Click and drag to adjust image brightness and contrast at the same time. | |
| Selection | Select annotations on an image. You can right-click annotations to make changes. |
Draw
You can adjust the line thickness, color, and fill of annotations before you draw them on an image.
The text tool includes font, size, color and style options.
| Icon | Name | Description |
|---|---|---|
| Line | Draw a line. | |
| Arrow | Draw an arrow. | |
| Paint | Draw freehand. | |
| Rectangle | Draw a rectangle. | |
| Circle | Draw a circle. | |
| Text | Add text on the image. |
To edit an annotation drawing, choose the ![]() Selection tool and drag the middle or outer selection boxes on the annotation.
Selection tool and drag the middle or outer selection boxes on the annotation.
To delete an annotation drawing, choose the ![]() Selection tool, right-click the annotation and choose Delete.
Selection tool, right-click the annotation and choose Delete.
Measure
To confirm the scale of the measurement, first draw a calibration line and enter a measurement value in millimetres.
Measurement lines you draw afterwards reference the calibration scale you entered and display length values with angles calculated for each connected line.
| Icon | Name | Description |
|---|---|---|
| Calibrate | Select Calibrate then draw on the image to enter the actual distance in millimetres (mm) in order to calibrate the measurement tool. | |
| Measurement Tool | Draw measurement lines on the image. |
To edit a measurement drawing, choose the ![]() Selection tool and drag the middle or outer selection boxes on the annotation.
Selection tool and drag the middle or outer selection boxes on the annotation.
To delete a measurement drawing, choose the ![]() Selection tool, right-click the annotation and choose Delete.
Selection tool, right-click the annotation and choose Delete.
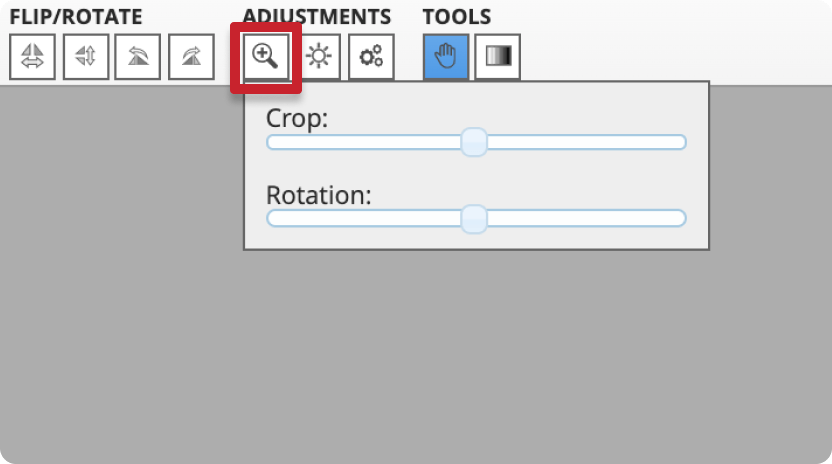
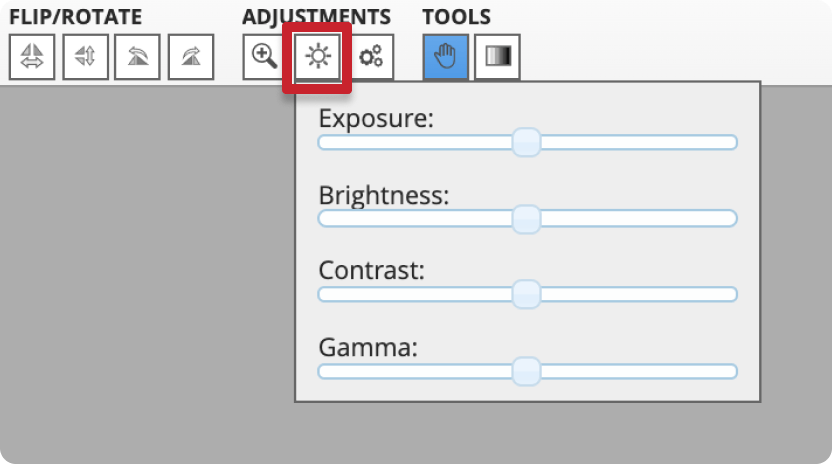
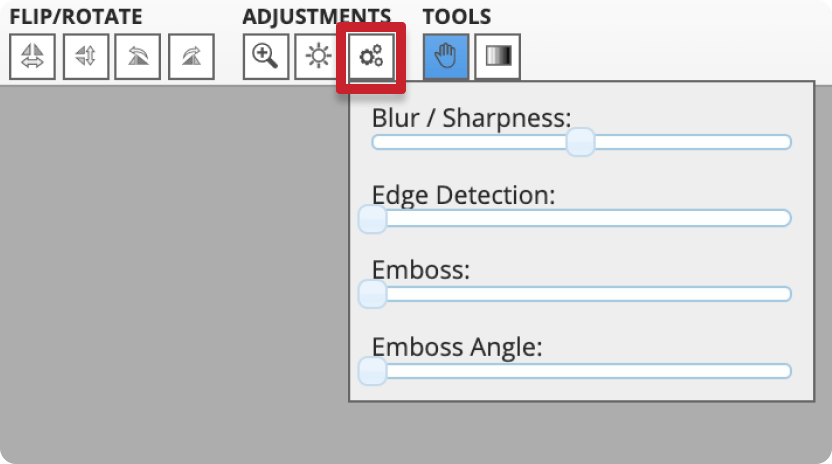
Adjustments
The quick edit toolbar groups the adjustment tools into three categories, but the Imaging Tools palette lists them all together.
| Icon | Name | Description |
|---|---|---|
| Zoom: Fit to View | Zoom the image in and out. Select Fit to View to zoom the image to fit the available space. You can also zoom an image in and out by dragging the | |
| Crop | Crop the image. | |
| Rotation | Rotate the image. | |
| Exposure | Adjust the image exposure. | |
| Brightness | Adjust the image brightness. | |
| Contrast | Adjust the image contrast. | |
| Gamma | Adjust the image gamma. | |
| Blur/Sharpness | Blur or sharpen the image. | |
| Edge Detection | Adjust the image texture. | |
| Emboss | Adjust the image layer depth. | |
| Emboss Angle | Adjust the image layer depth's angle. |
To reset image edits on a slider, double-click the slider control.
Draw and measure settings
When you have an image open in the Editor view, select ![]() in the top right corner of the workspace to toggle display settings for drawings and annotations.
in the top right corner of the workspace to toggle display settings for drawings and annotations.
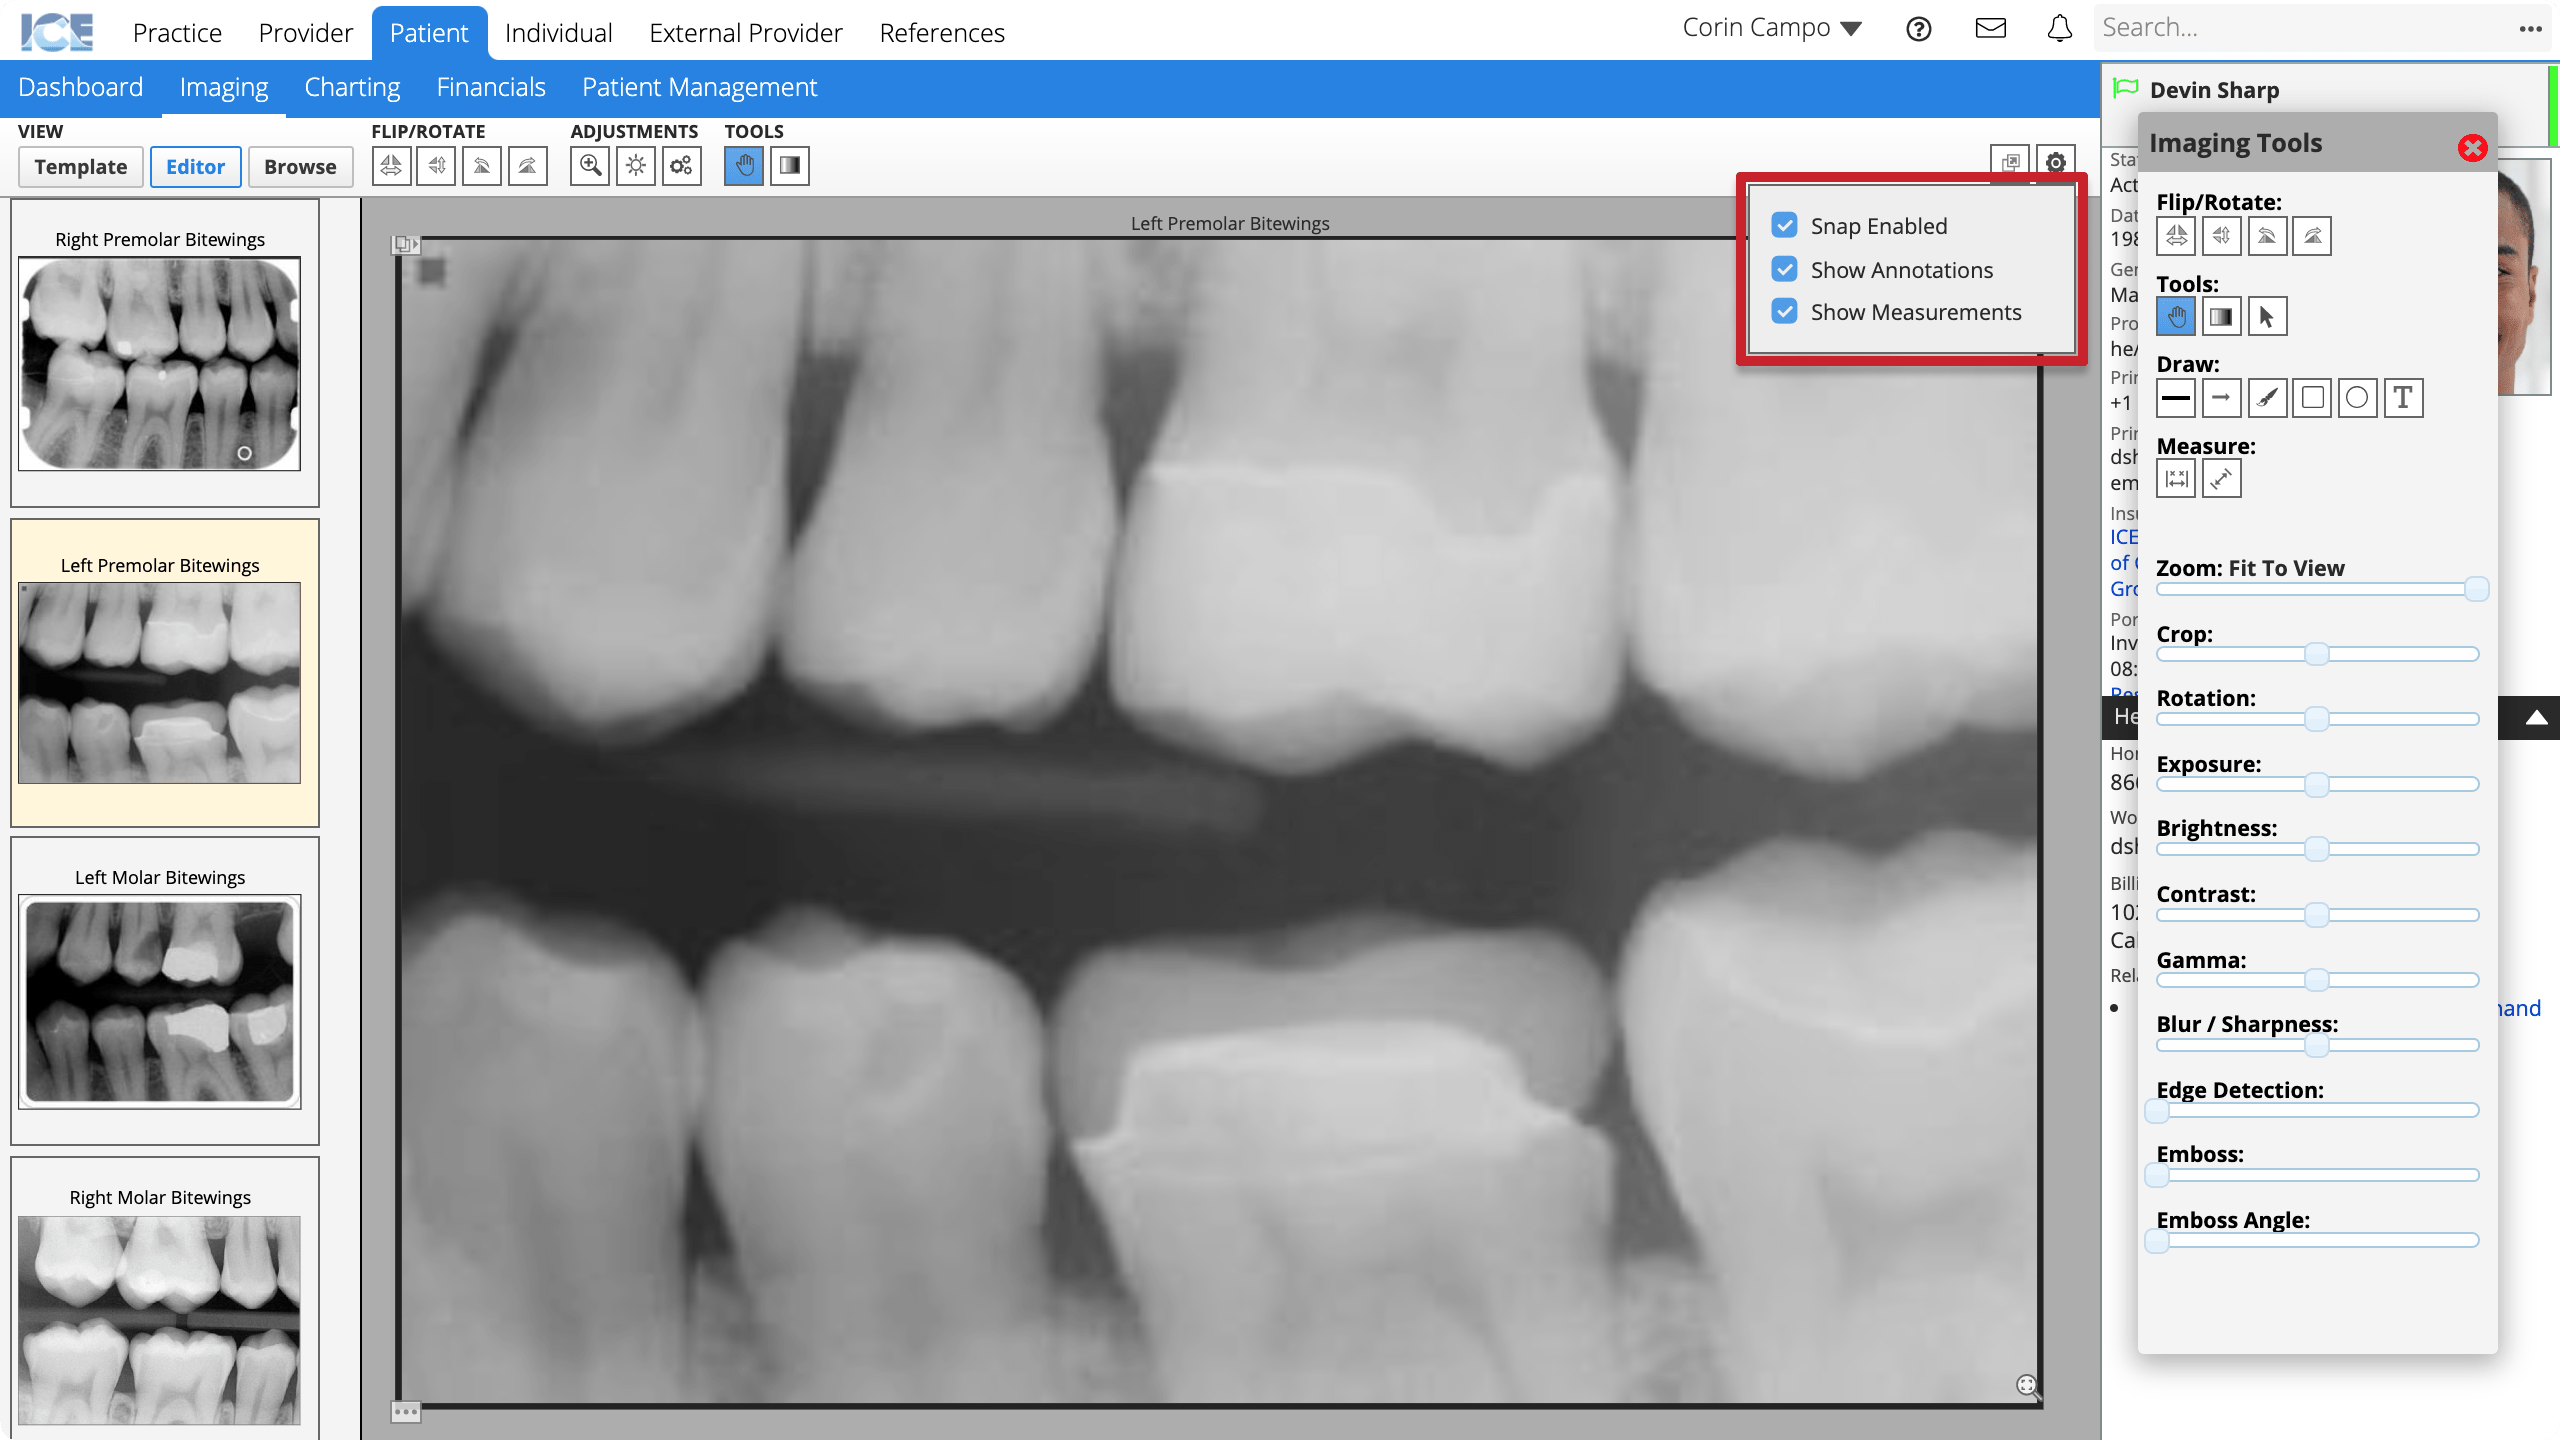
- Snap Enabled: If snap is enabled, the system snaps annotation or measurement lines together when you draw towards or from the end of another line.
- Show Annotations: Hide or show annotation drawings on the image.
- Show Measurements: Hide or show measurement lines on the image.