Allocate an insurance payment in a batch
After an insurance payment is in a batch, you can distribute the payment to charges on submitted claims for the insurance payer.
If insurance pays less or more than the system expected, you must use the adjustment tools in the allocation workspace to process the difference.
When you post a payment allocation, the system also posts any adjustments you used to process unpaid or overpaid amounts, and the system updates the status of each claim.
The overall process is the same if you use an electronic or paper reference to allocate an insurance payment. But, it is faster if you use the Electronic Remittance Advice (ERA) integration to add payments to a batch, because the system auto-fills the patients, paid amounts, and remarks from the ERA, so you can focus on processing unpaid or overpaid amounts.
Patient payments are allocated first in first out
If you added a patient payment to a batch you do not need to allocate it manually. The system allocates patient payments to oldest charges first.
You can edit an allocation by selecting View beside a patient payment in a batch and updating the allocation details in the payment allocation table.
Find a payment to allocate
To start allocating an insurance payment, find it in a batch and select Allocate.
- Go to Practice > Payments > Batch Payments
- Select Payments beside the batch that contains the payment you want to allocate
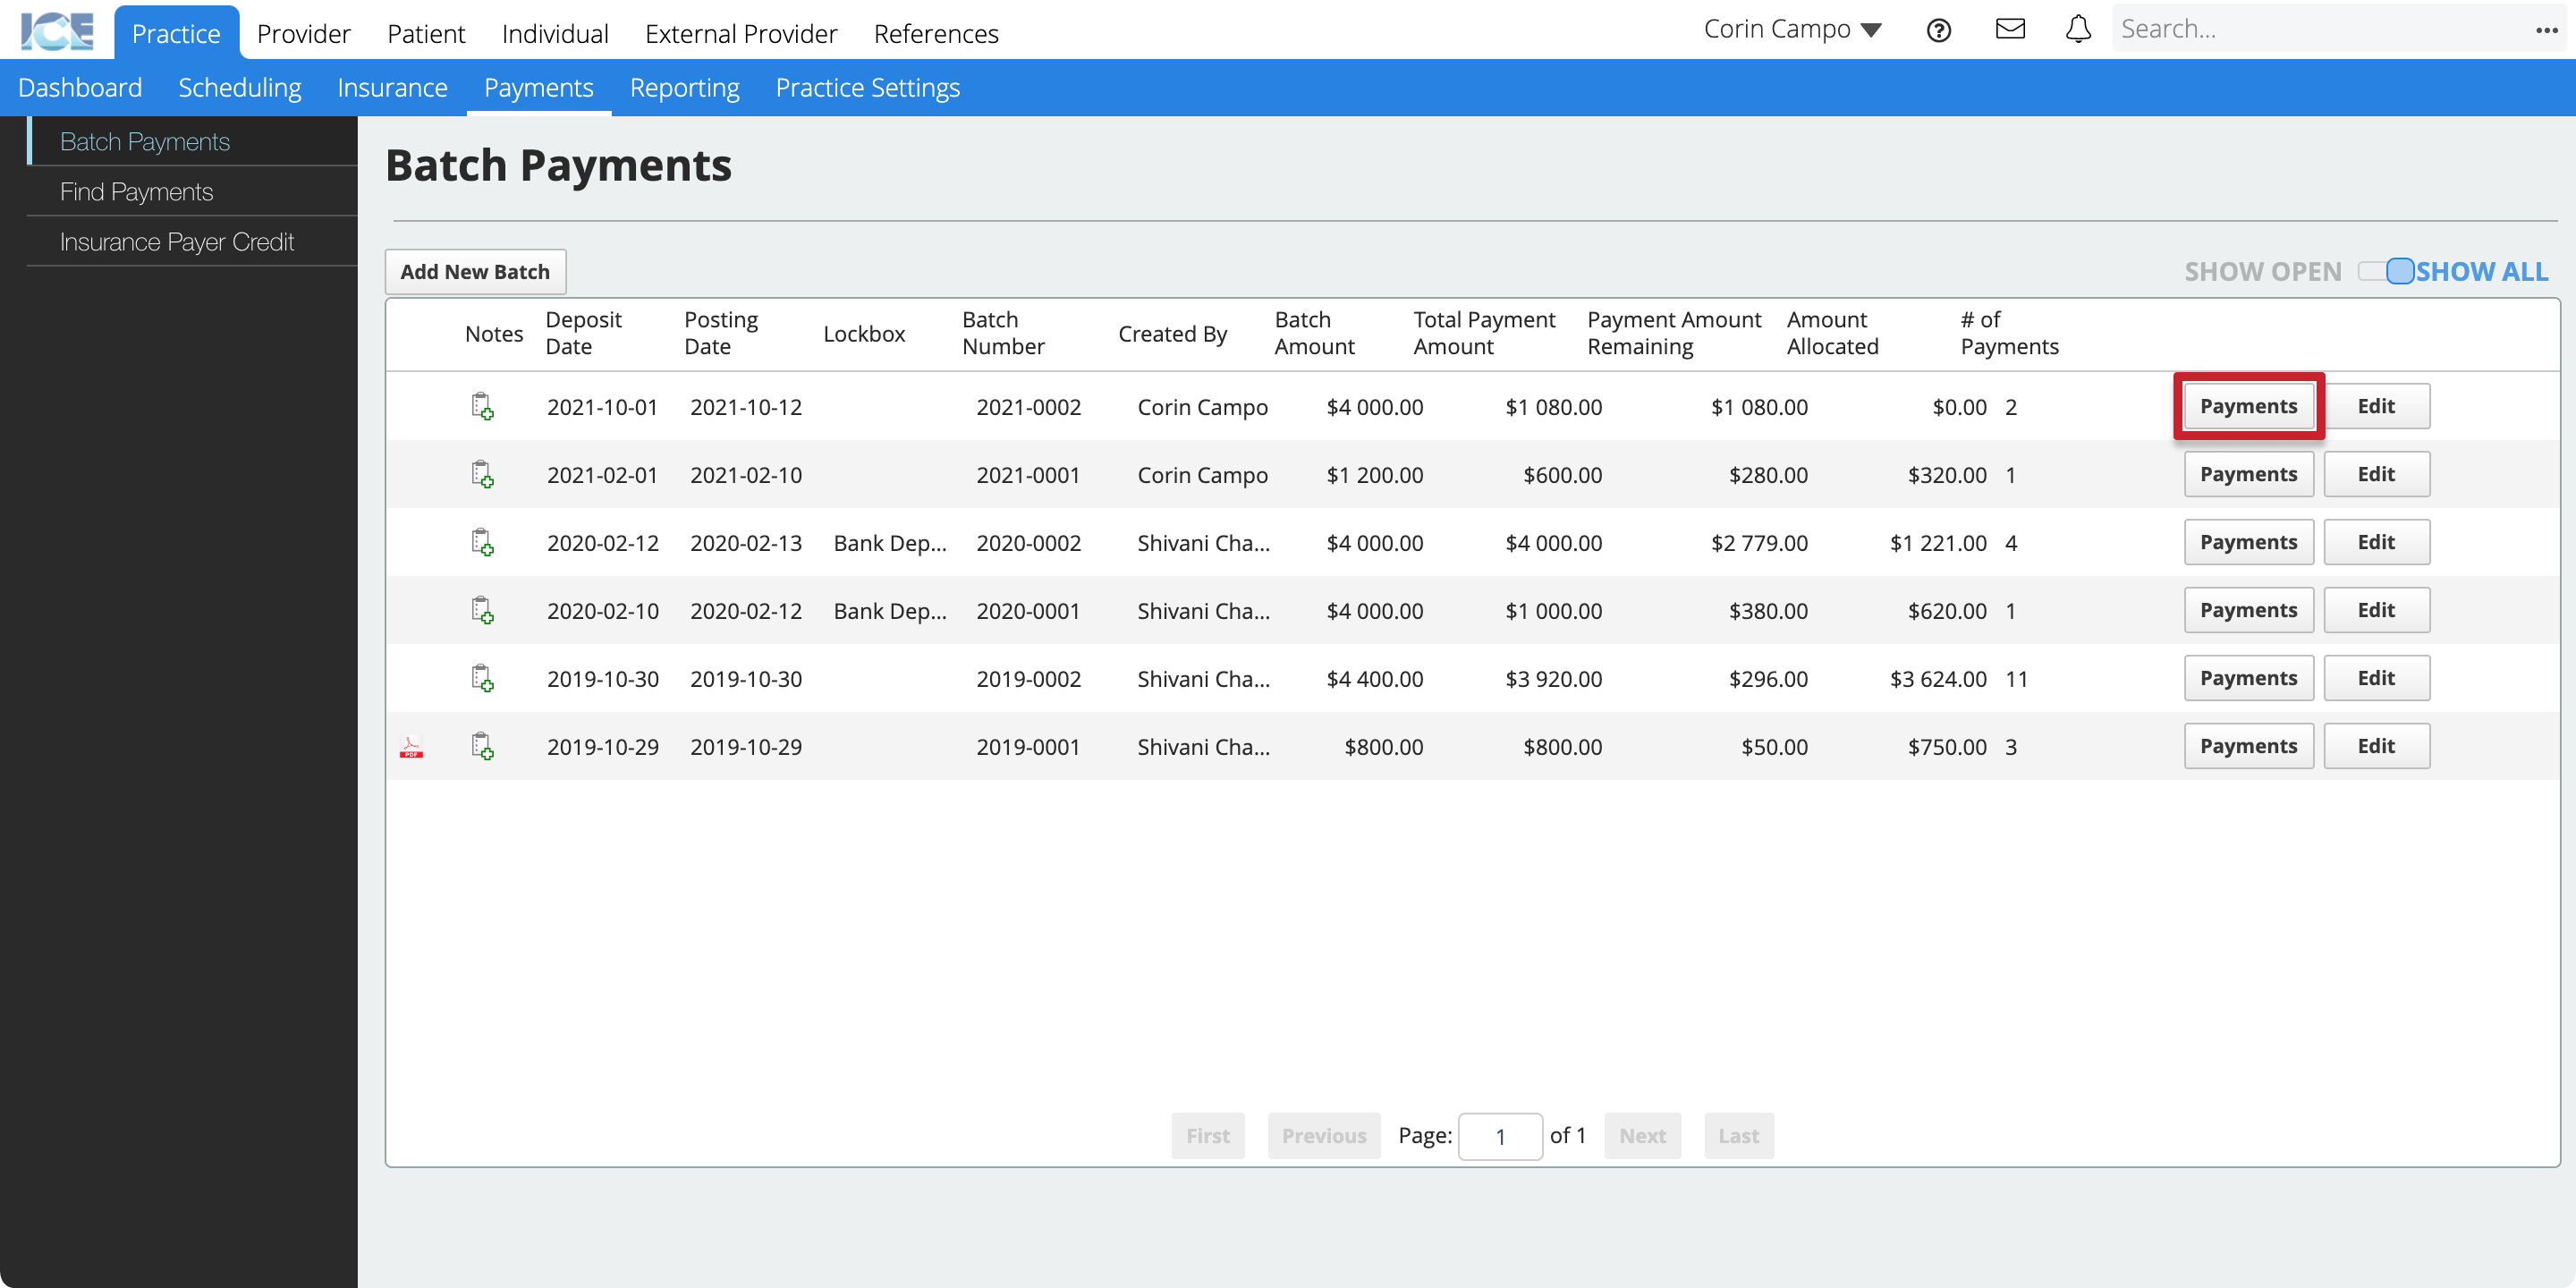
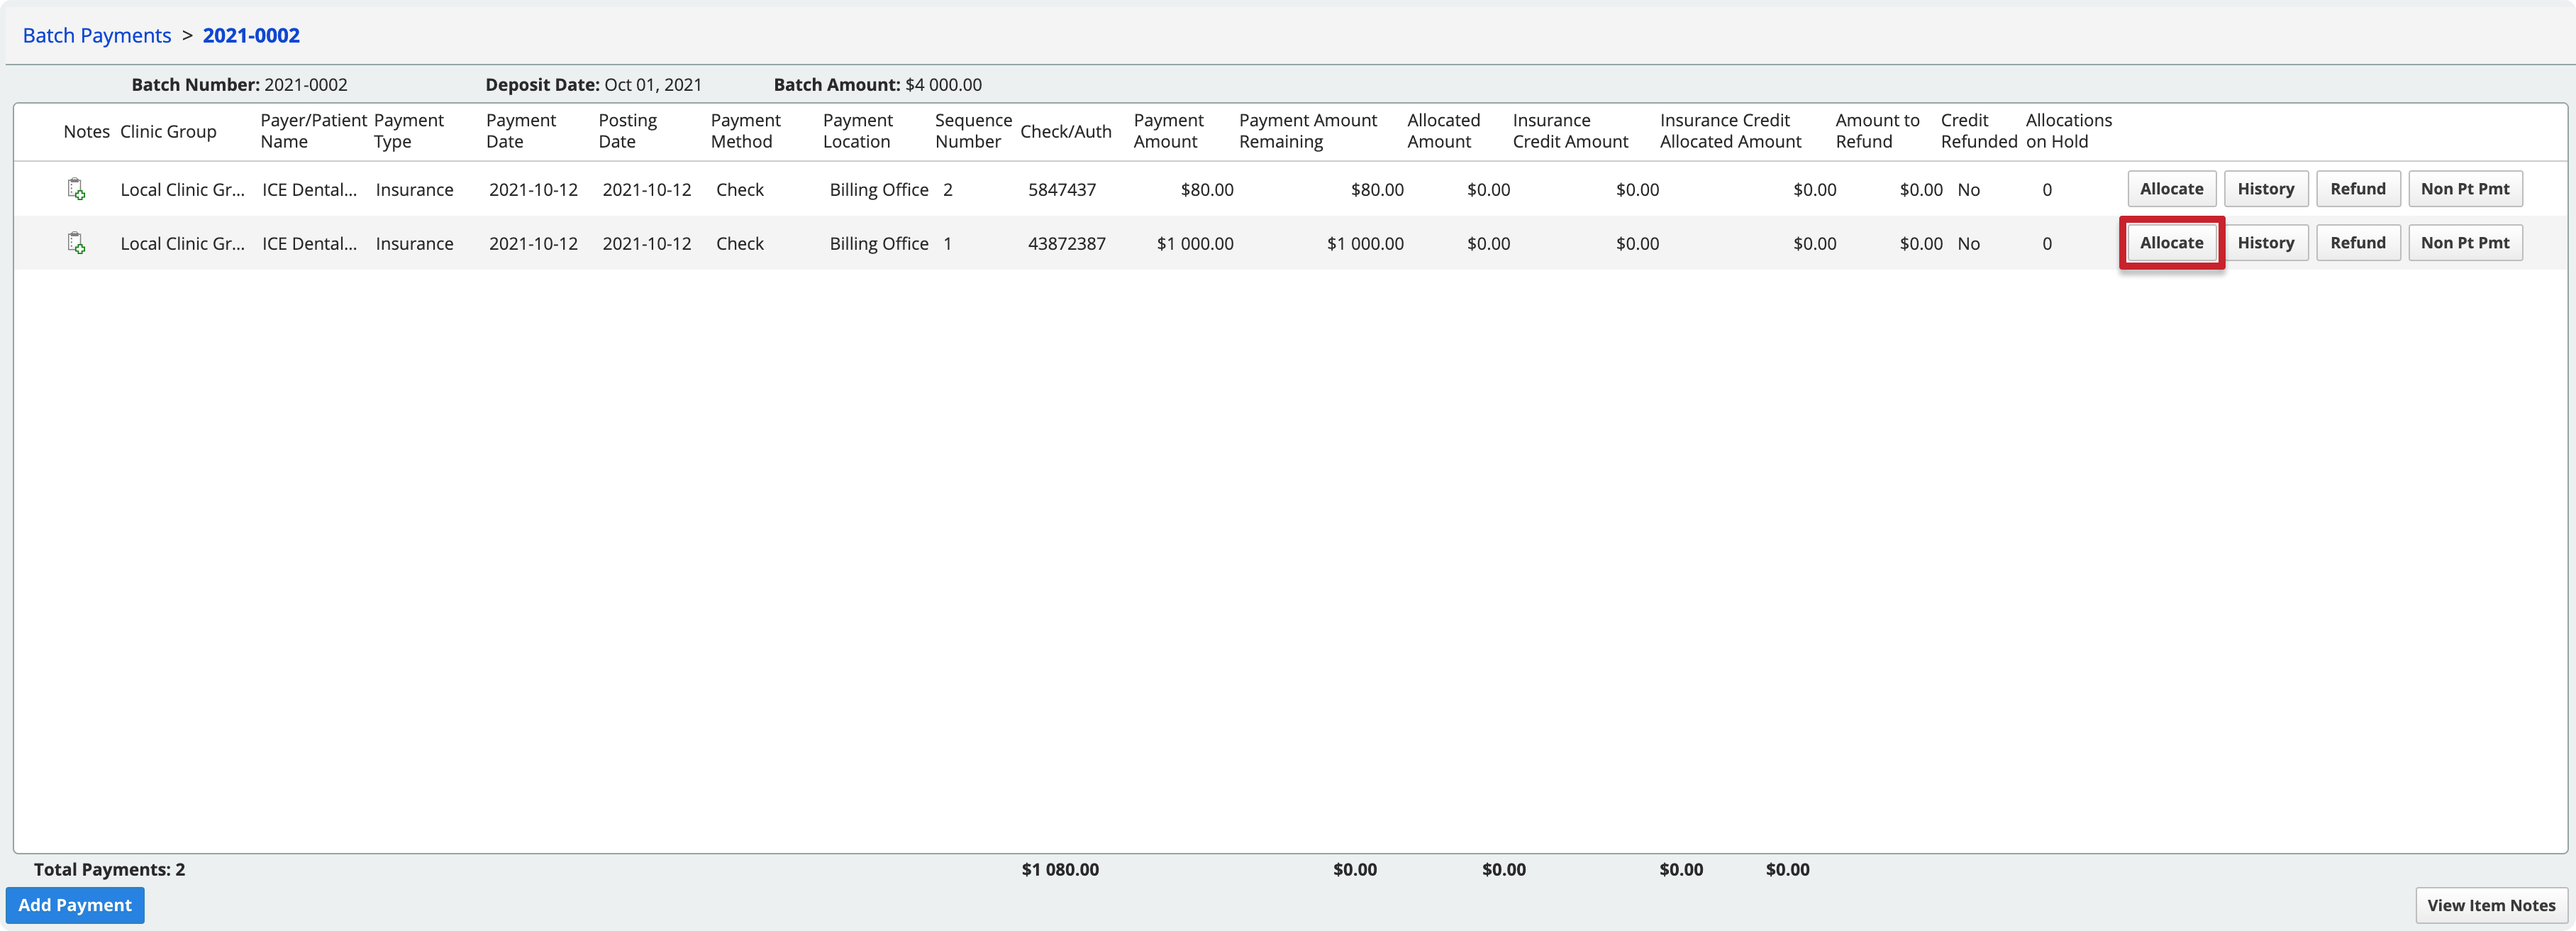
- Select Allocate beside the payment that you want to allocate
Add a patient to an allocation
You can allocate an insurance payment across multiple patients who have claims submitted to the insurance payer with an outstanding balance.
- Find a payment in a batch and select Allocate
- Select Add Patients
- Move patients whose claims you want to allocate to the Selected Patients table
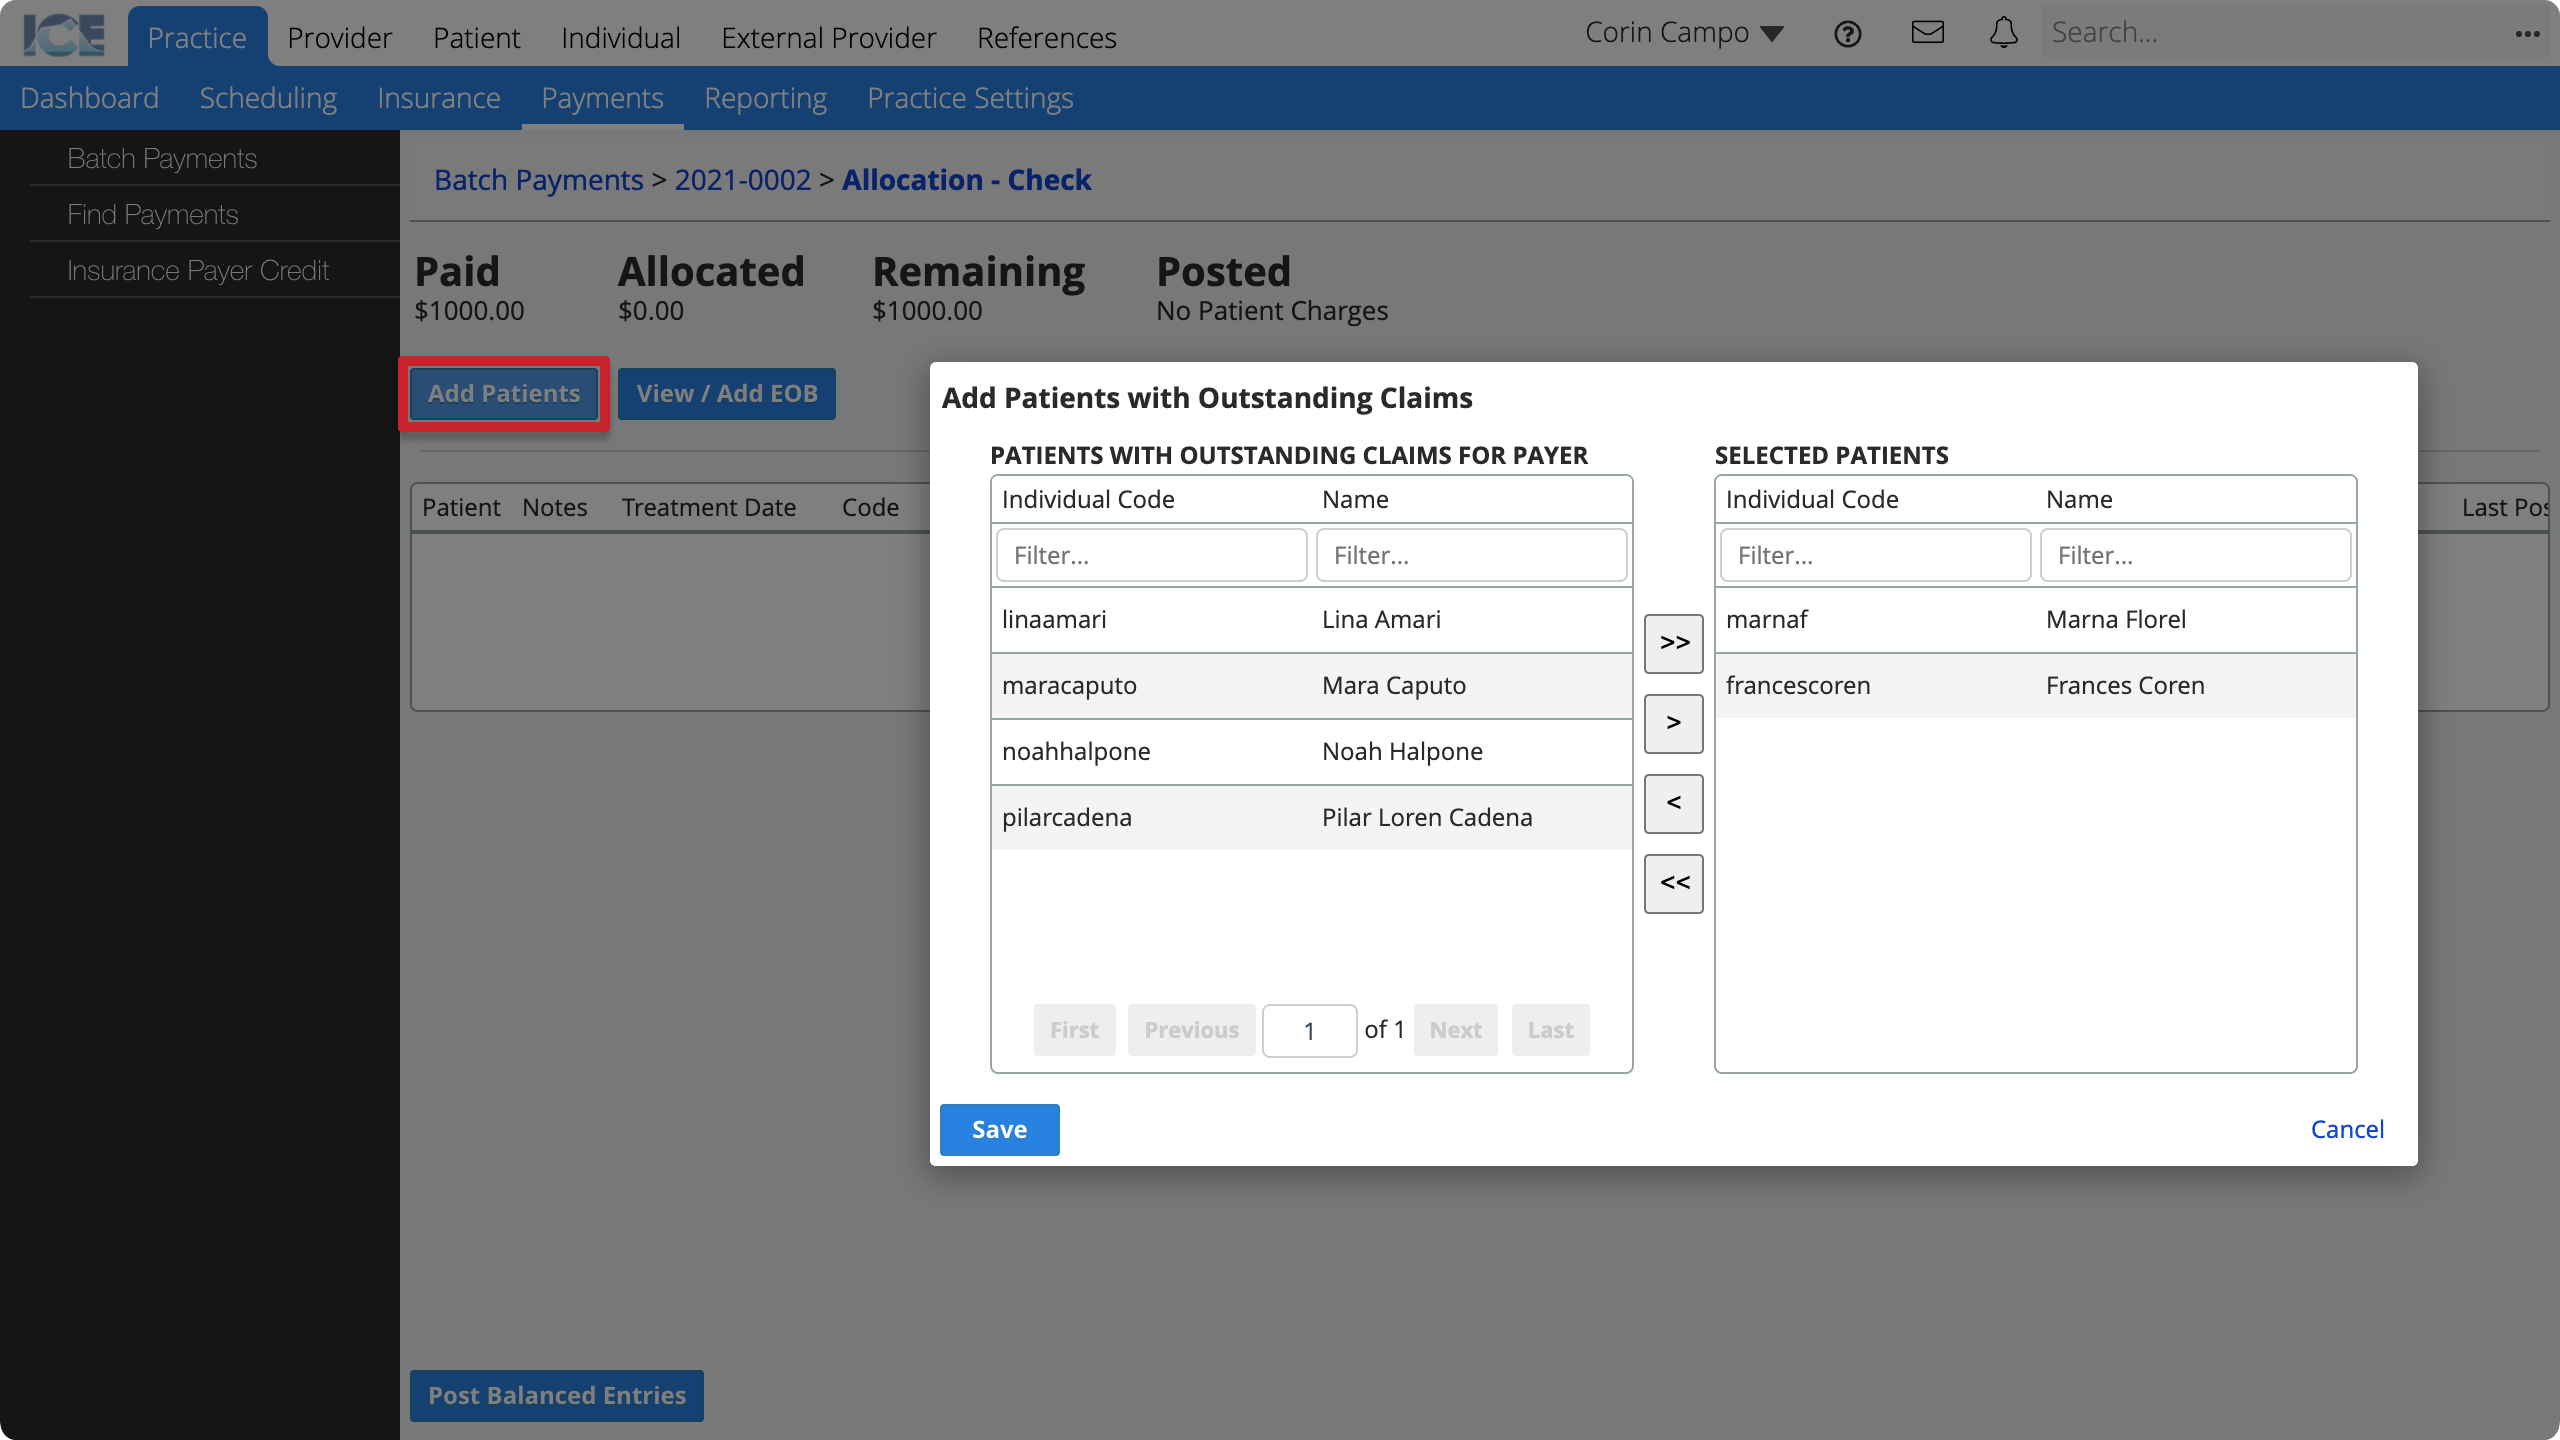
- You can use any of these methods to move a patient to the Selected Patients table:
- Double-click a patient's name.
- Select a patient's name then select >.
- Select >> to move all patients listed in the Patients With Outstanding Claims For Payer table.
- Select Save
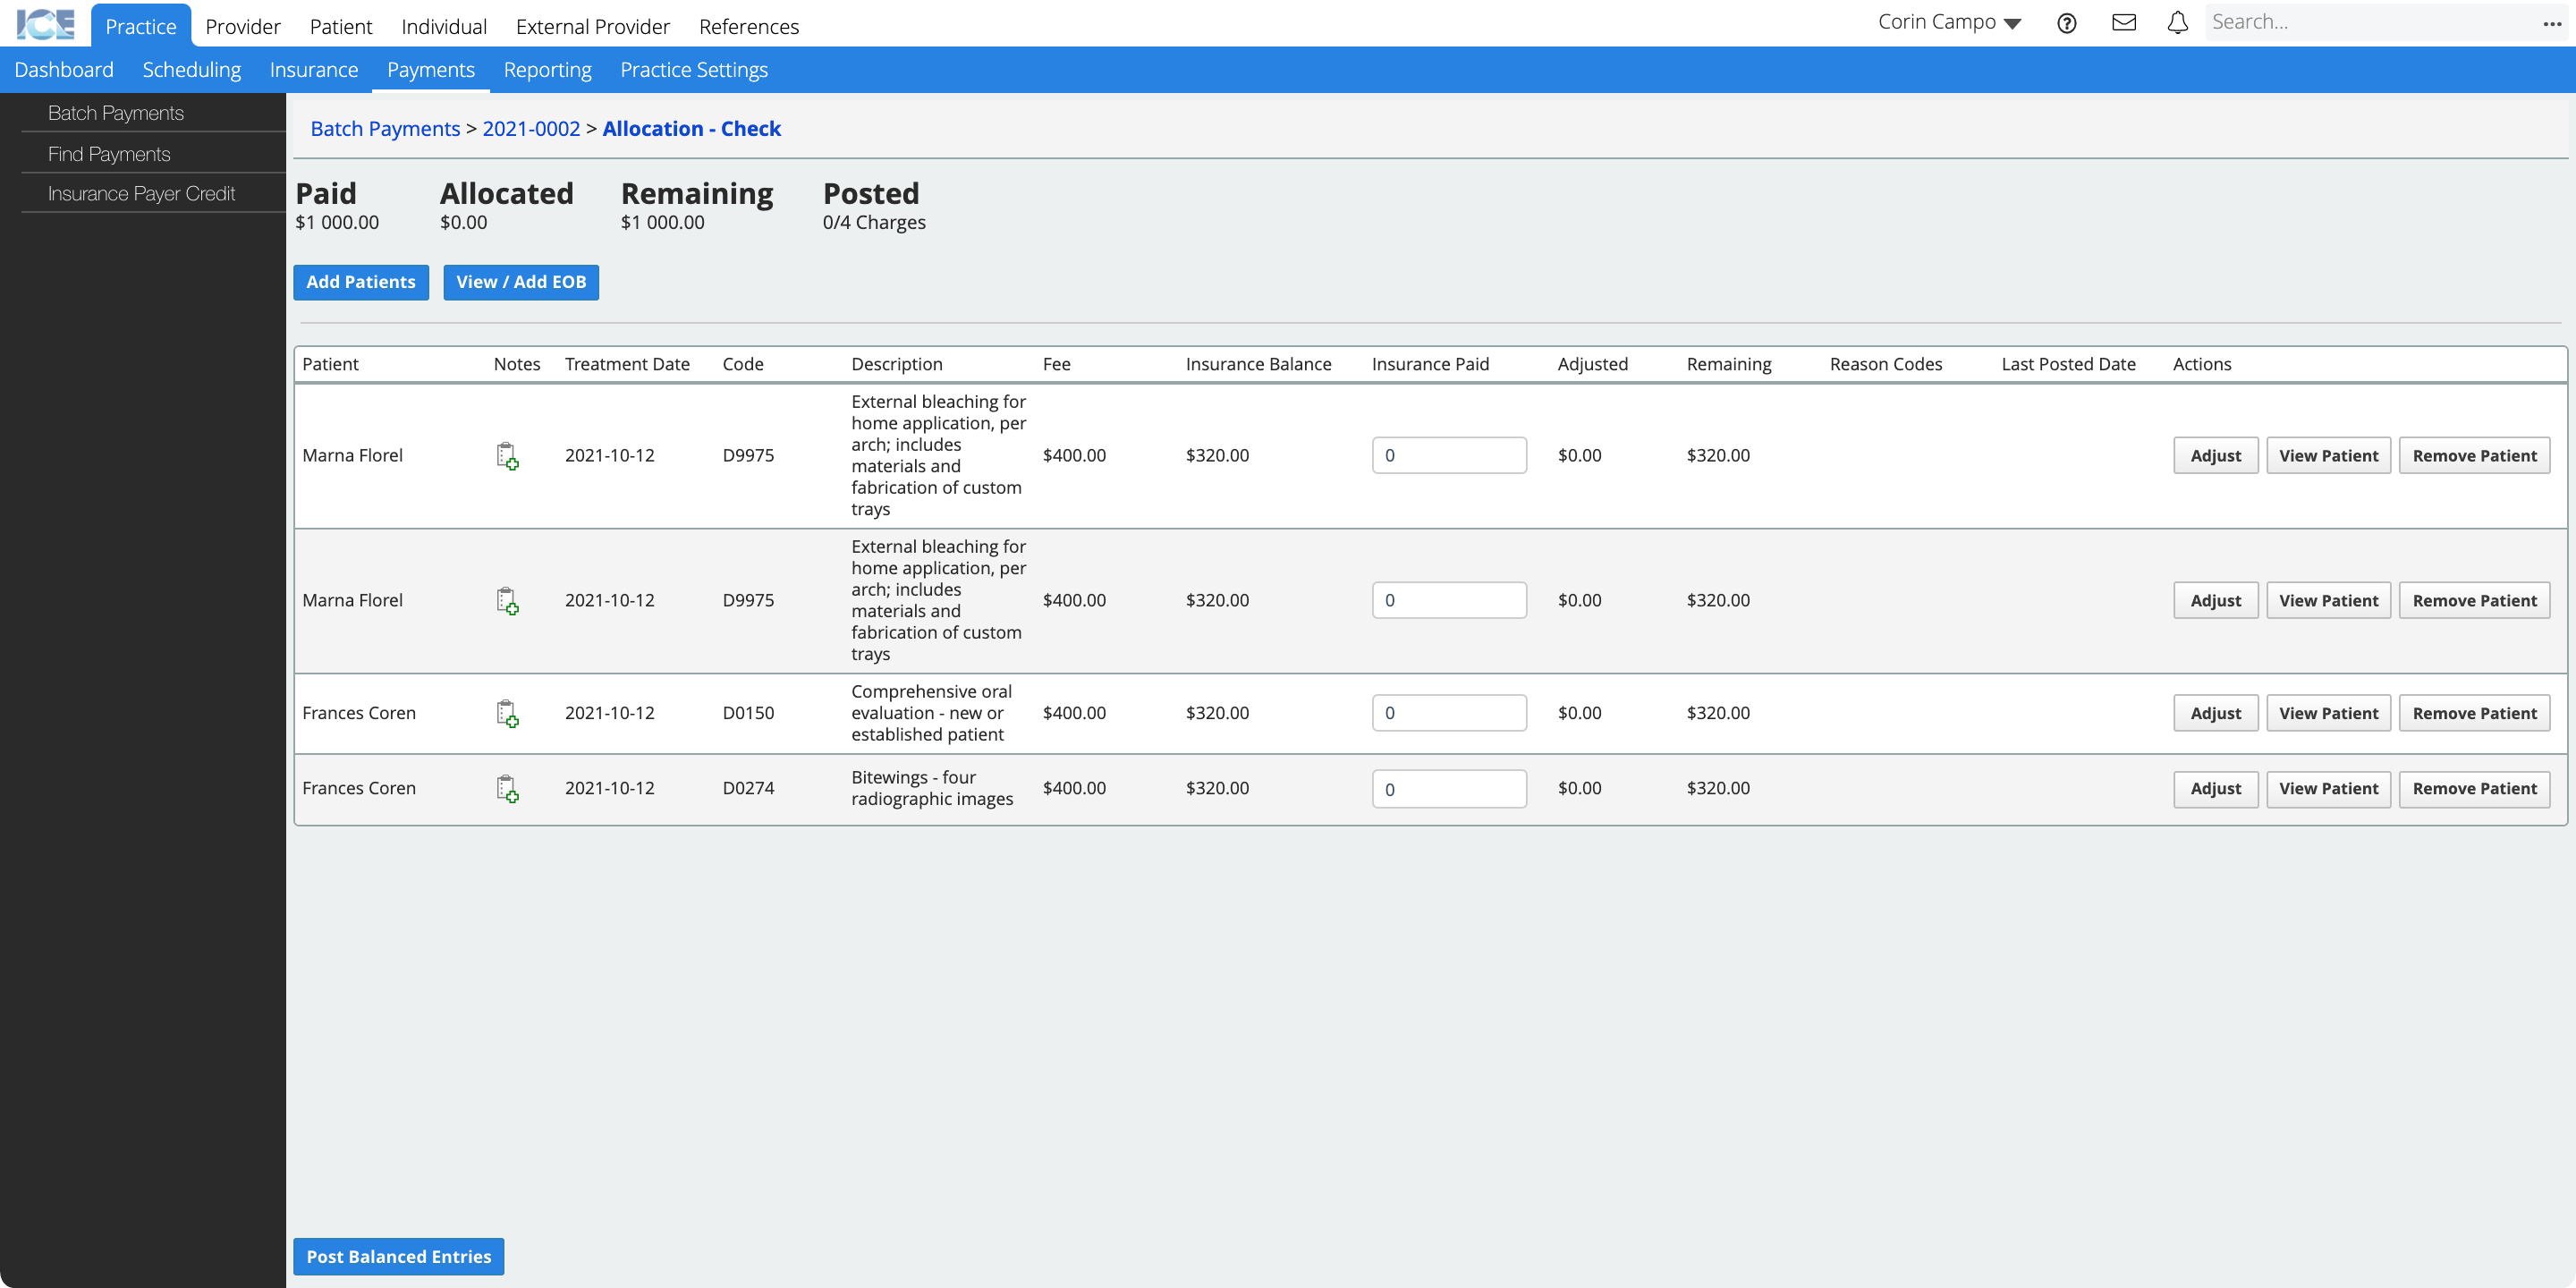
The allocation view shows a line for each unpaid insurance charge on a submitted claim for the patient(s) you selected.
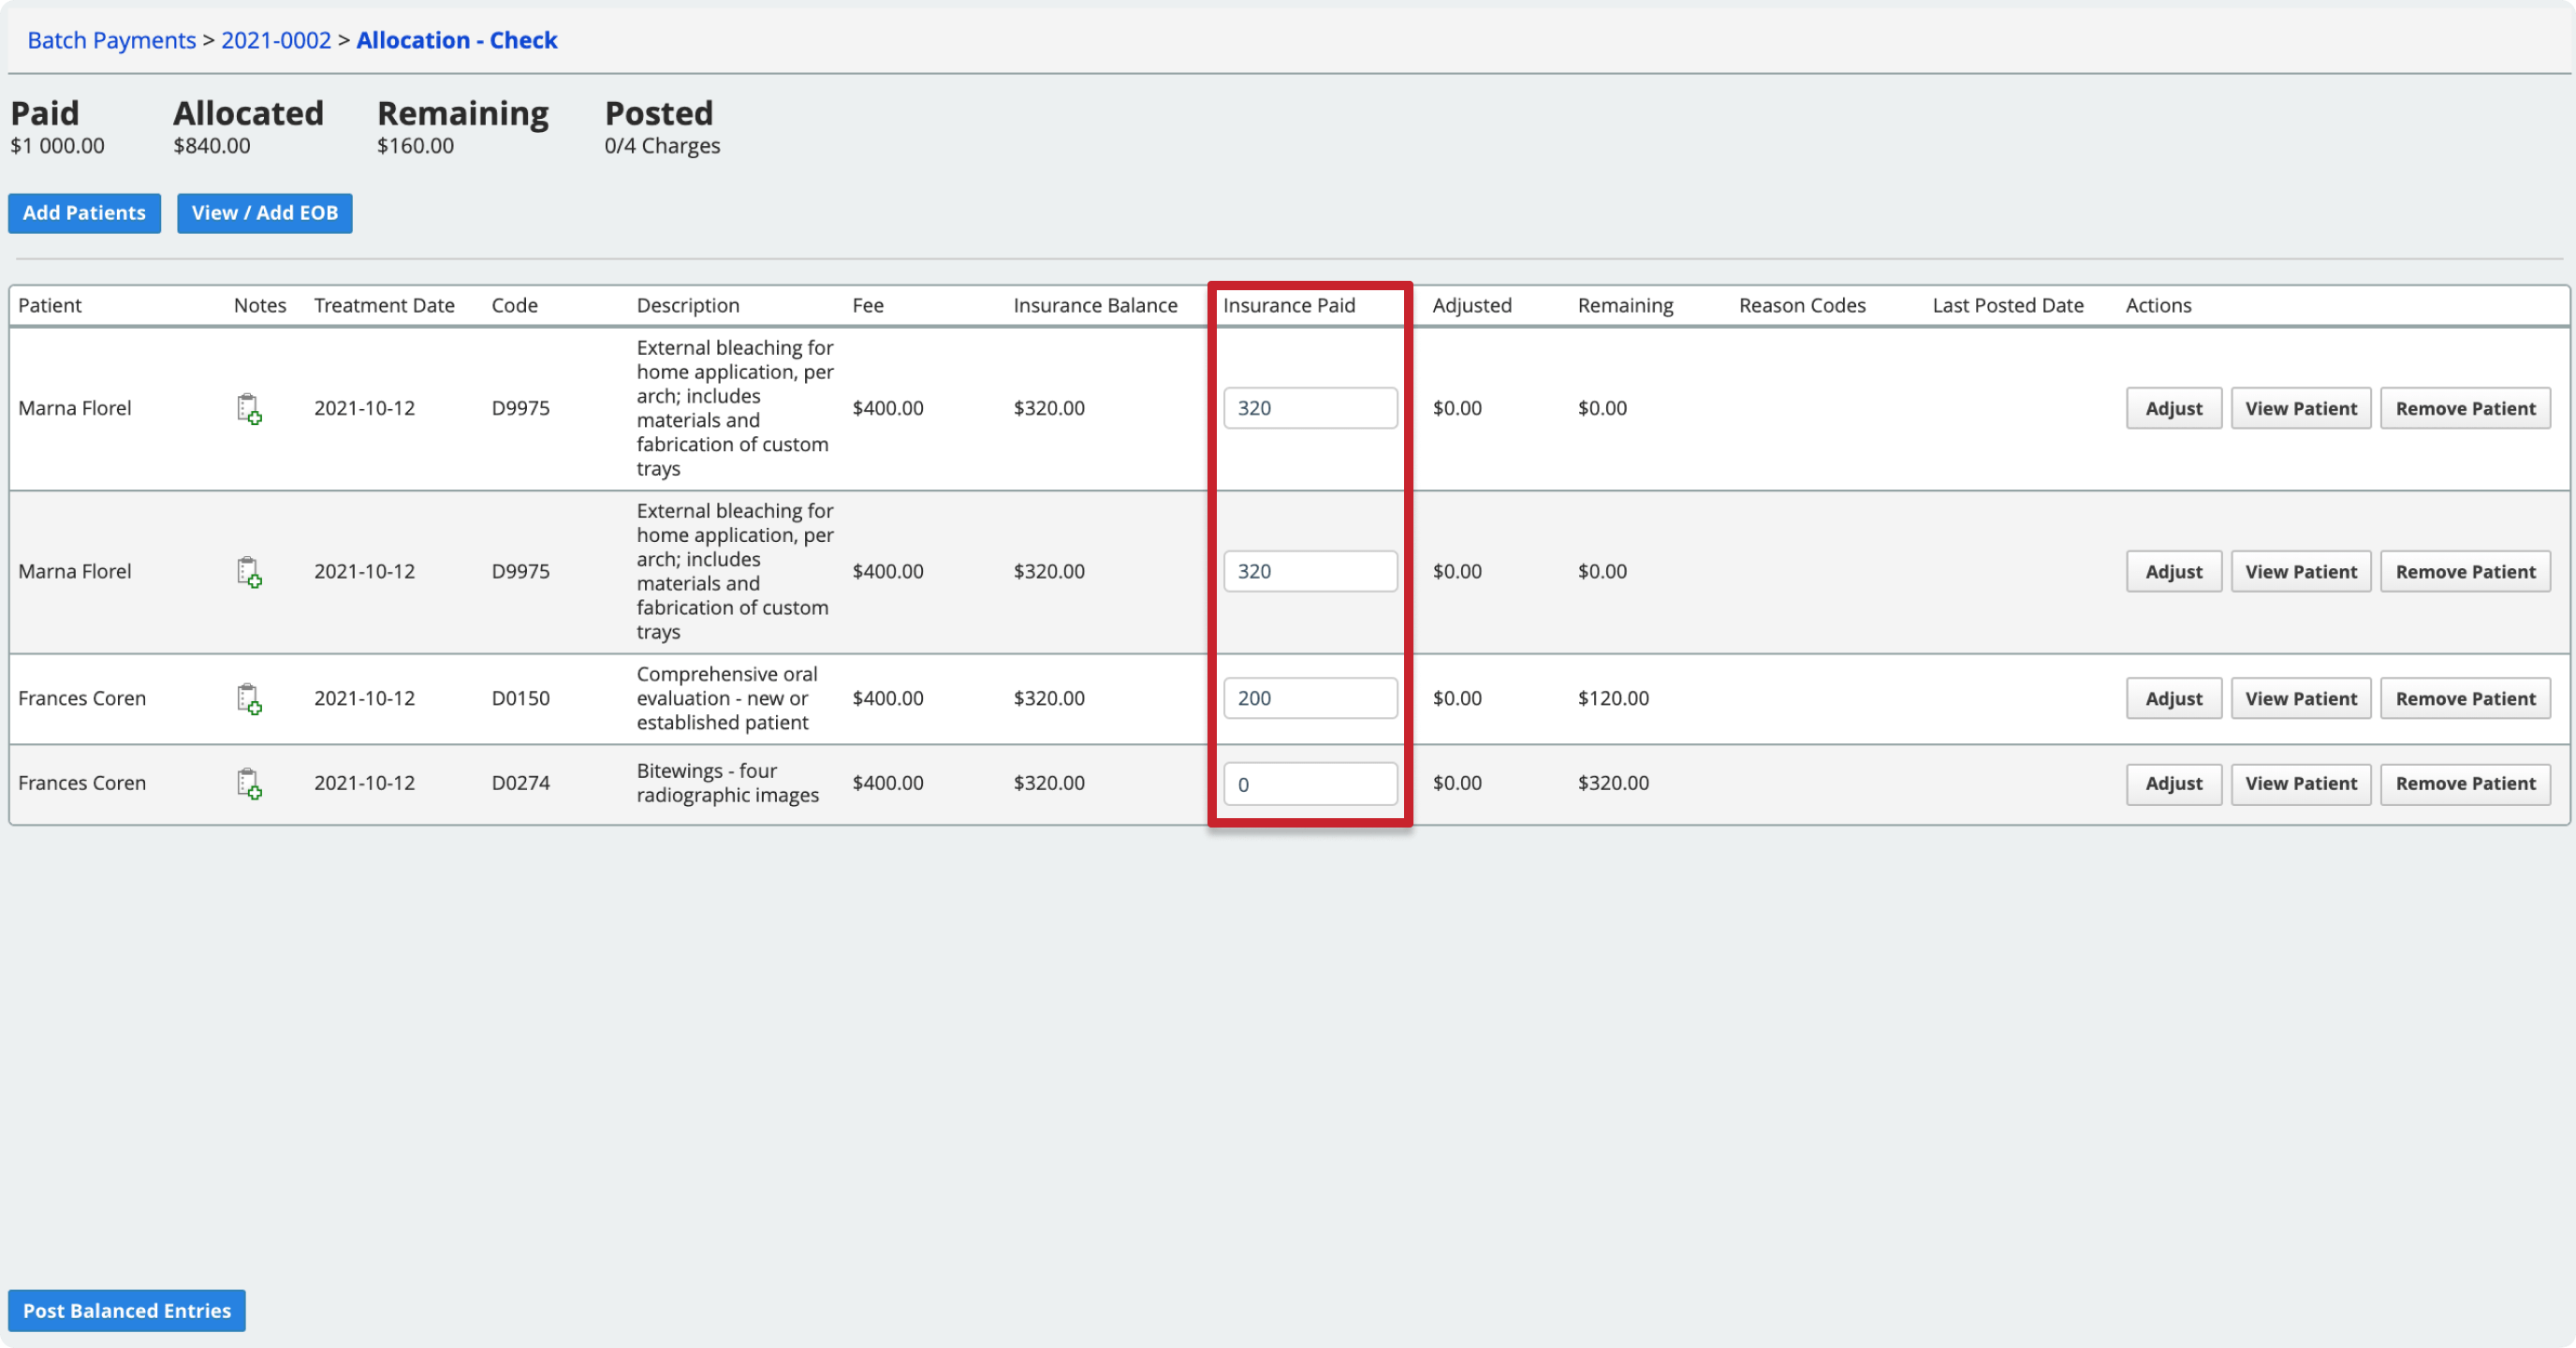
Enter the paid amount
After you add patients to the allocation view you can enter the amount that insurance paid for each charge.
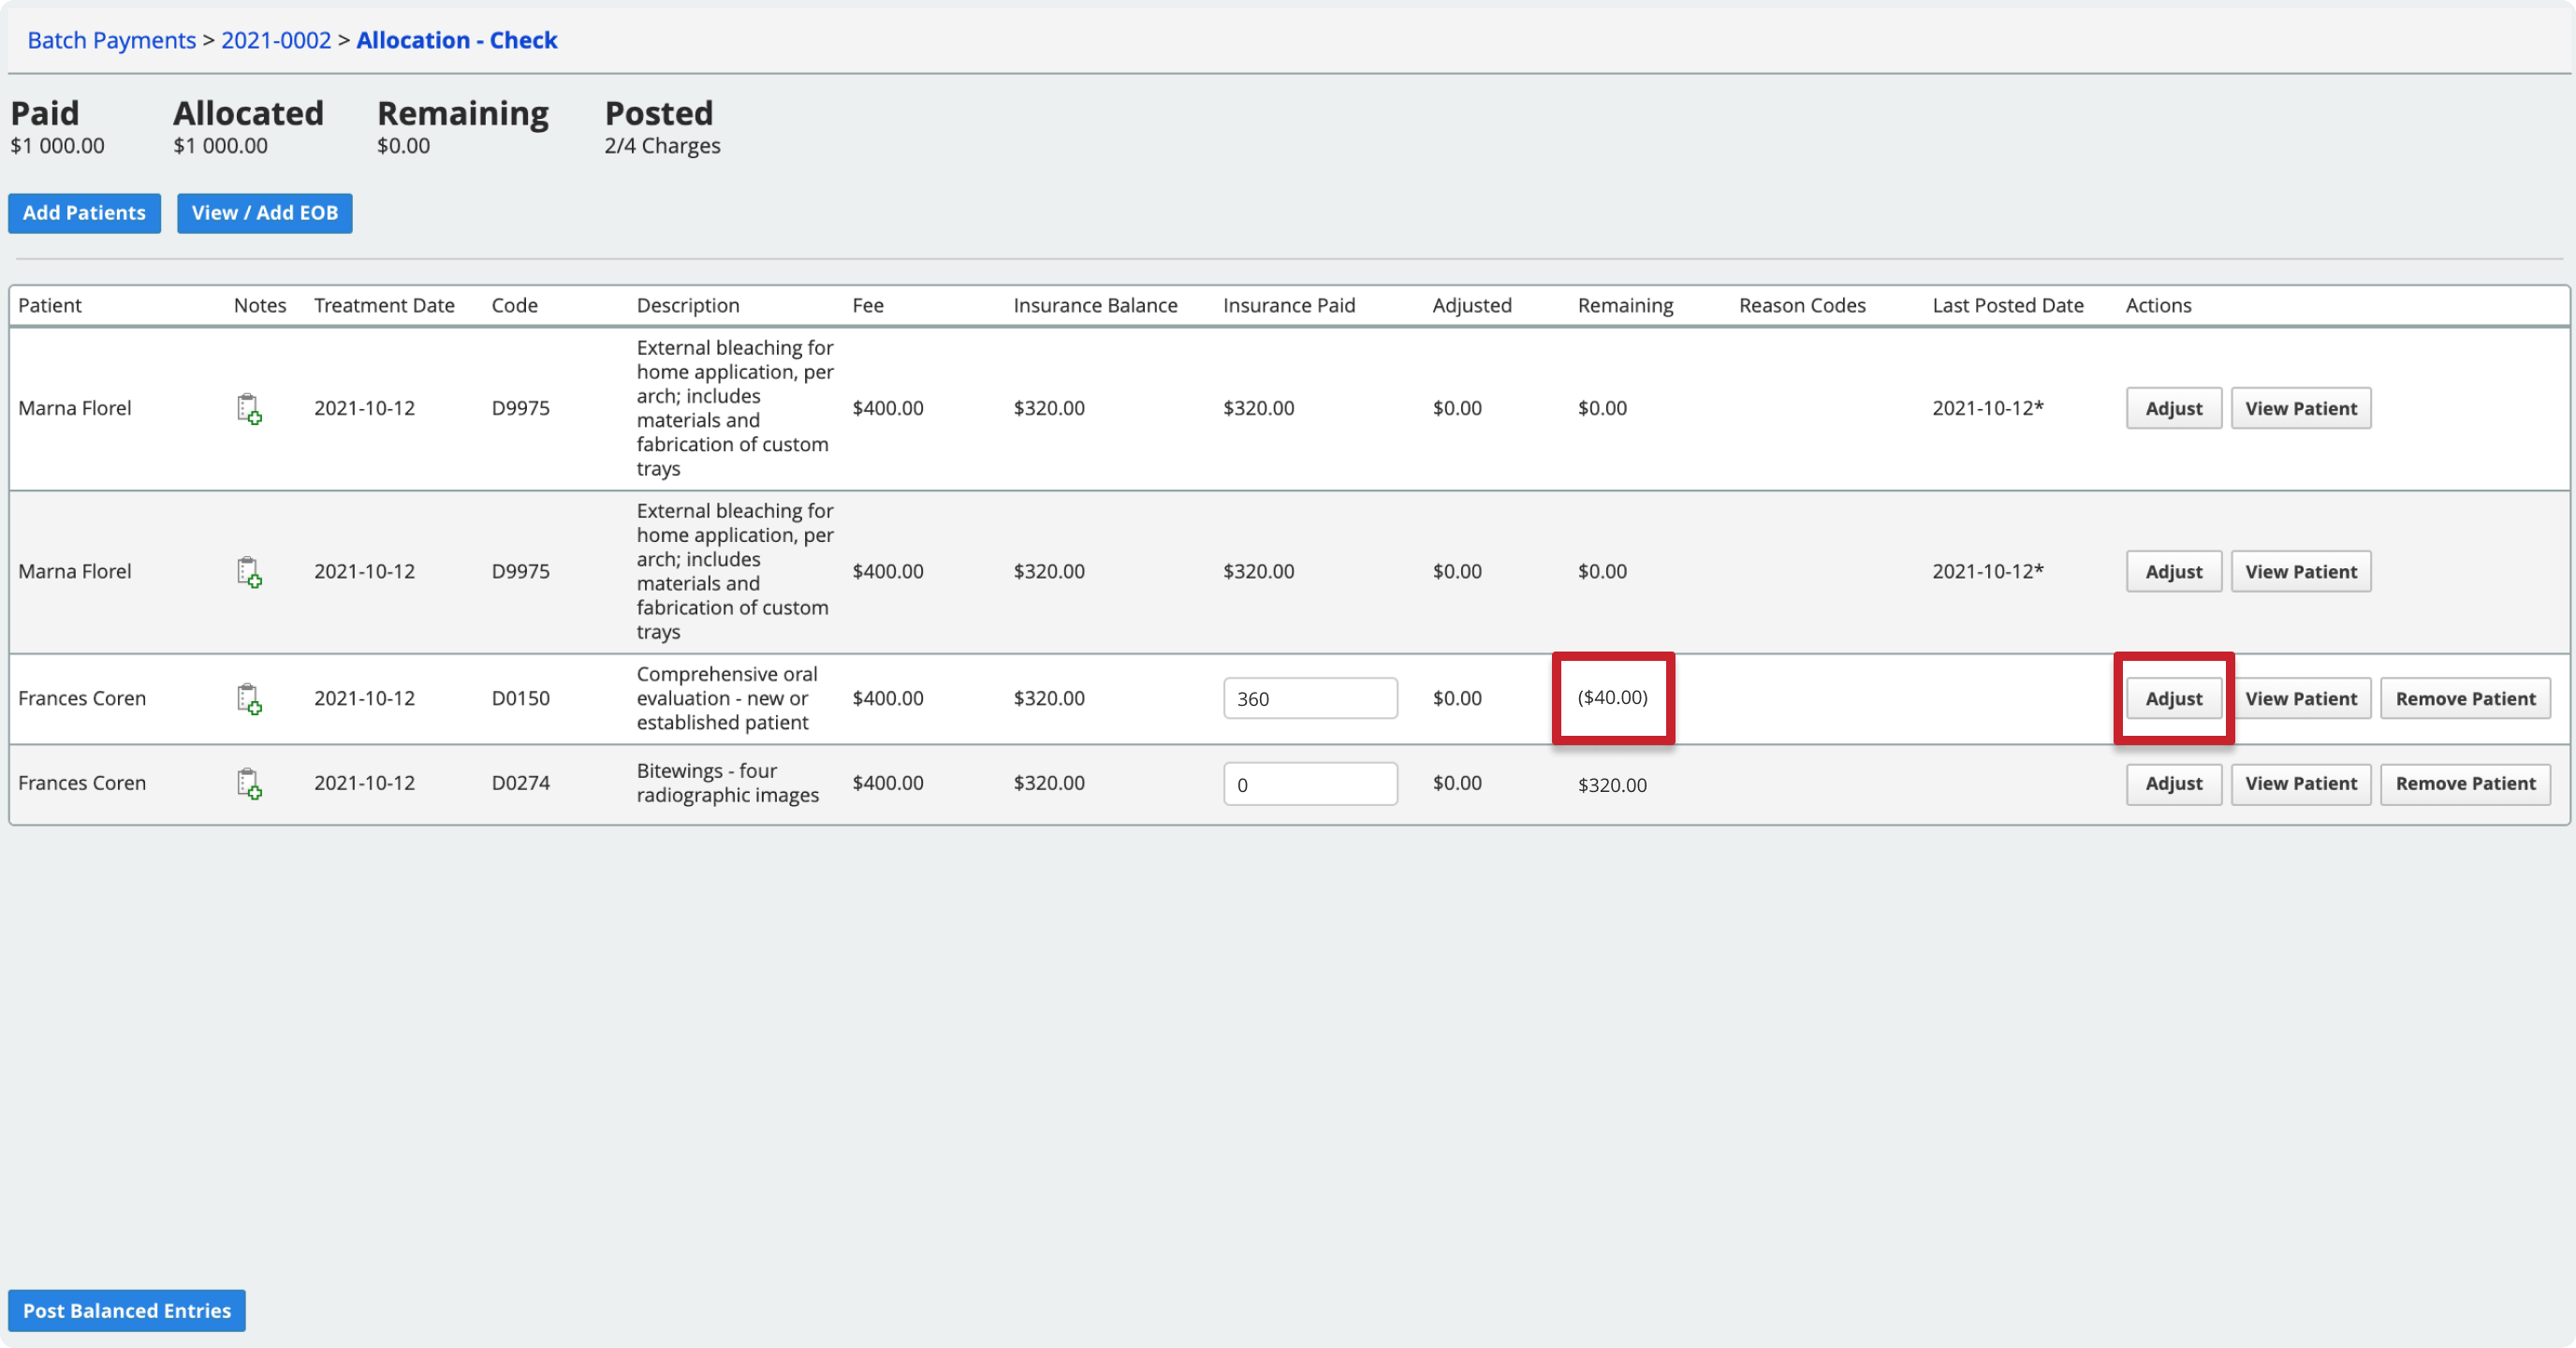
The allocation workspace displays four summary totals at the top of the screen.
- Paid: How much insurance paid.
- Allocated: How much of the payment is allocated.
- Remaining: How much of the payment still needs to be allocated.
- Posted: How many of the charges that need to be paid and/or adjusted are posted.
Your goal in the allocation workspace is to:
- Reduce the Remaining payment total to zero.
- Reduce each charge line's Remaining column total to zero.
- Post all payments and/or adjustments.
When you meet these goals, then the insurance payment is fully allocated and charges on the claims are fully processed.
- Find a payment in a batch and select Allocate
- For each charge, enter the amount insurance paid into the Insurance Paid field
- The system saves your changes automatically
The system does not post your allocations until the remaining amount on a charge line is zero and you select Post Balanced Entries.
If insurance did not pay what the system expected, follow the instructions in Process an unpaid amount or Process an overpaid amount below.
If all of the lines are balanced, follow the instructions in Post allocations below.
Allocating orthodontic payment plan charges
If you are allocating payment to charges created from an orthodontic payment plan, see Allocate to an orthodontic payment plan for additional information.
Post allocations
You can only post allocations when they reduce the remaining amount on the charge line to zero.
If insurance did not pay what the system expected and the remaining amount on a line is not zero, follow the instructions in Process an unpaid amount or Process an overpaid amount below to post that allocation and/or adjustment.
- Find a payment in a batch and select Allocate
- Confirm that each line you want to post has a Remaining Amount of zero
- Select Post Balanced Entries
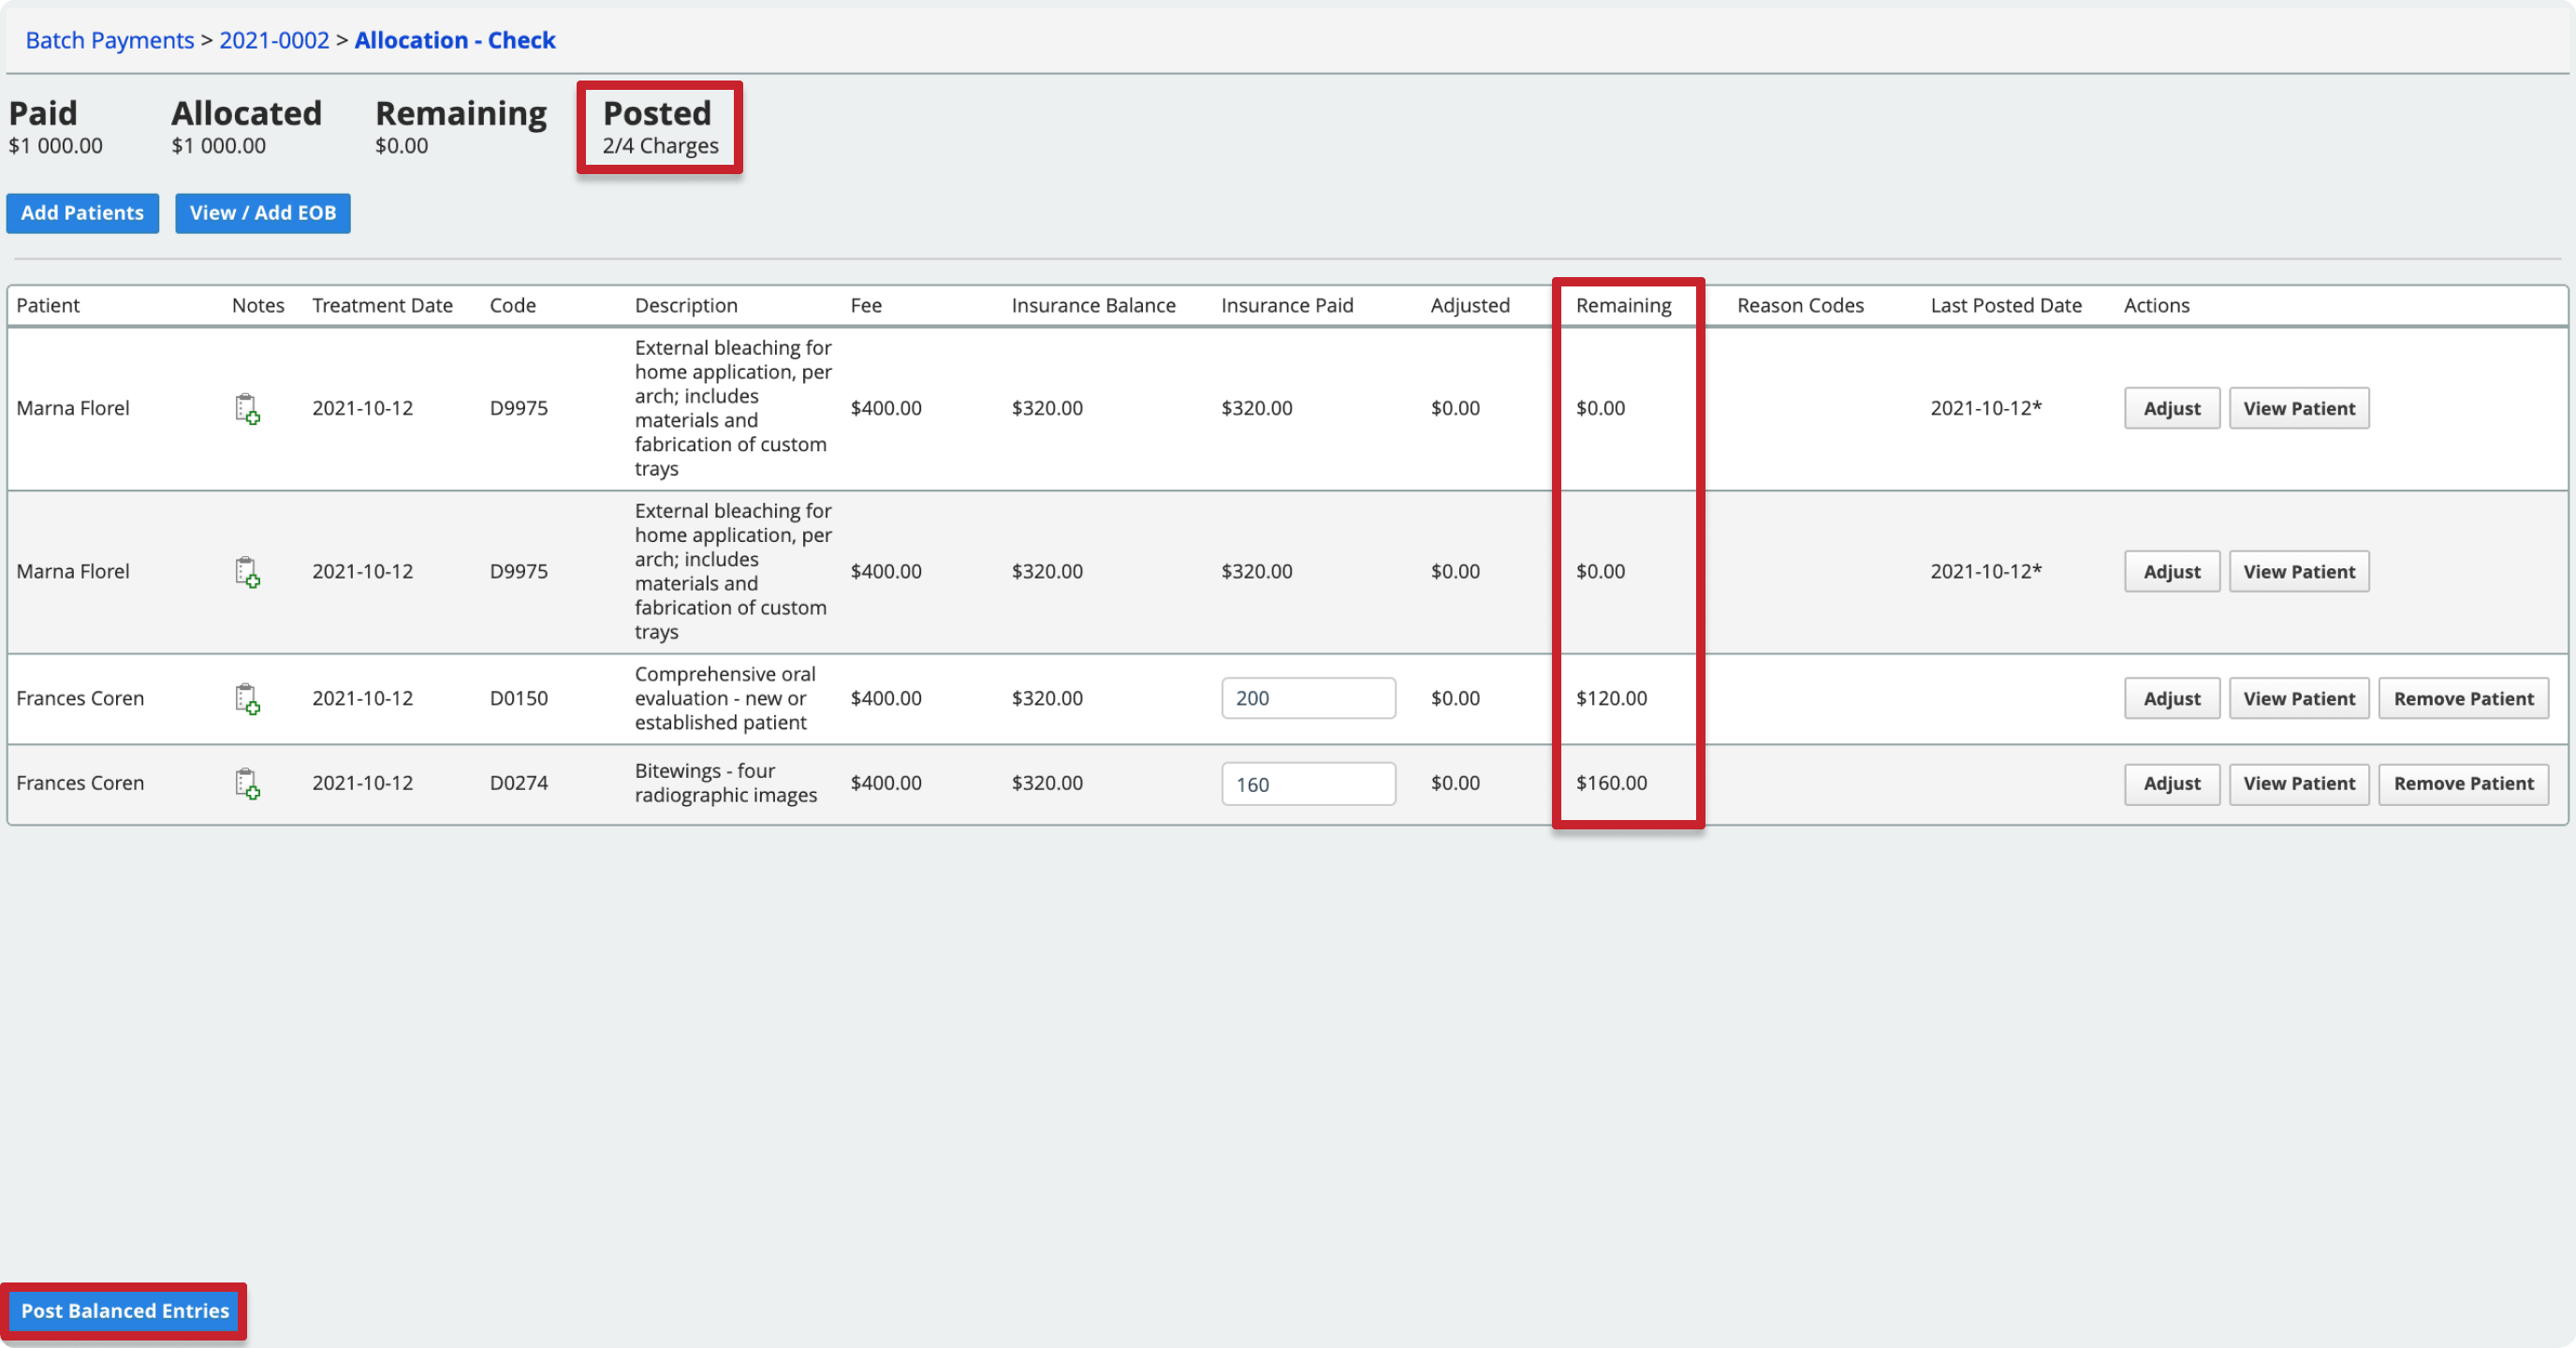
The Posted count updates to reflect how many lines you have left to process in the allocation workspace.
After posting, the system updates each claim's status. To learn how different actions affect the claim status, see Claim statuses after allocation.
When you post an allocation, the patient's record shows the payment with two dates:
- Post Date that matches the day you posted the payment allocation.
- Payment Date that matches the payment date associated with the full payment.
Process an unpaid amount
If insurance doesn't cover the full cost from a claim, you must account for the remaining cost. You can use the adjustment tools to:
- Transfer the remaining cost to the patient.
- Transfer the remaining cost to secondary insurance and submit a secondary claim.
- Adjust the remaining balance as a Contractual Adjustment with the insurance payer, or as a regular Adjustment such as a write-off.
- Enter denial or rejection codes that explain why a claim was not paid.
- Re-submit claims that included errors.
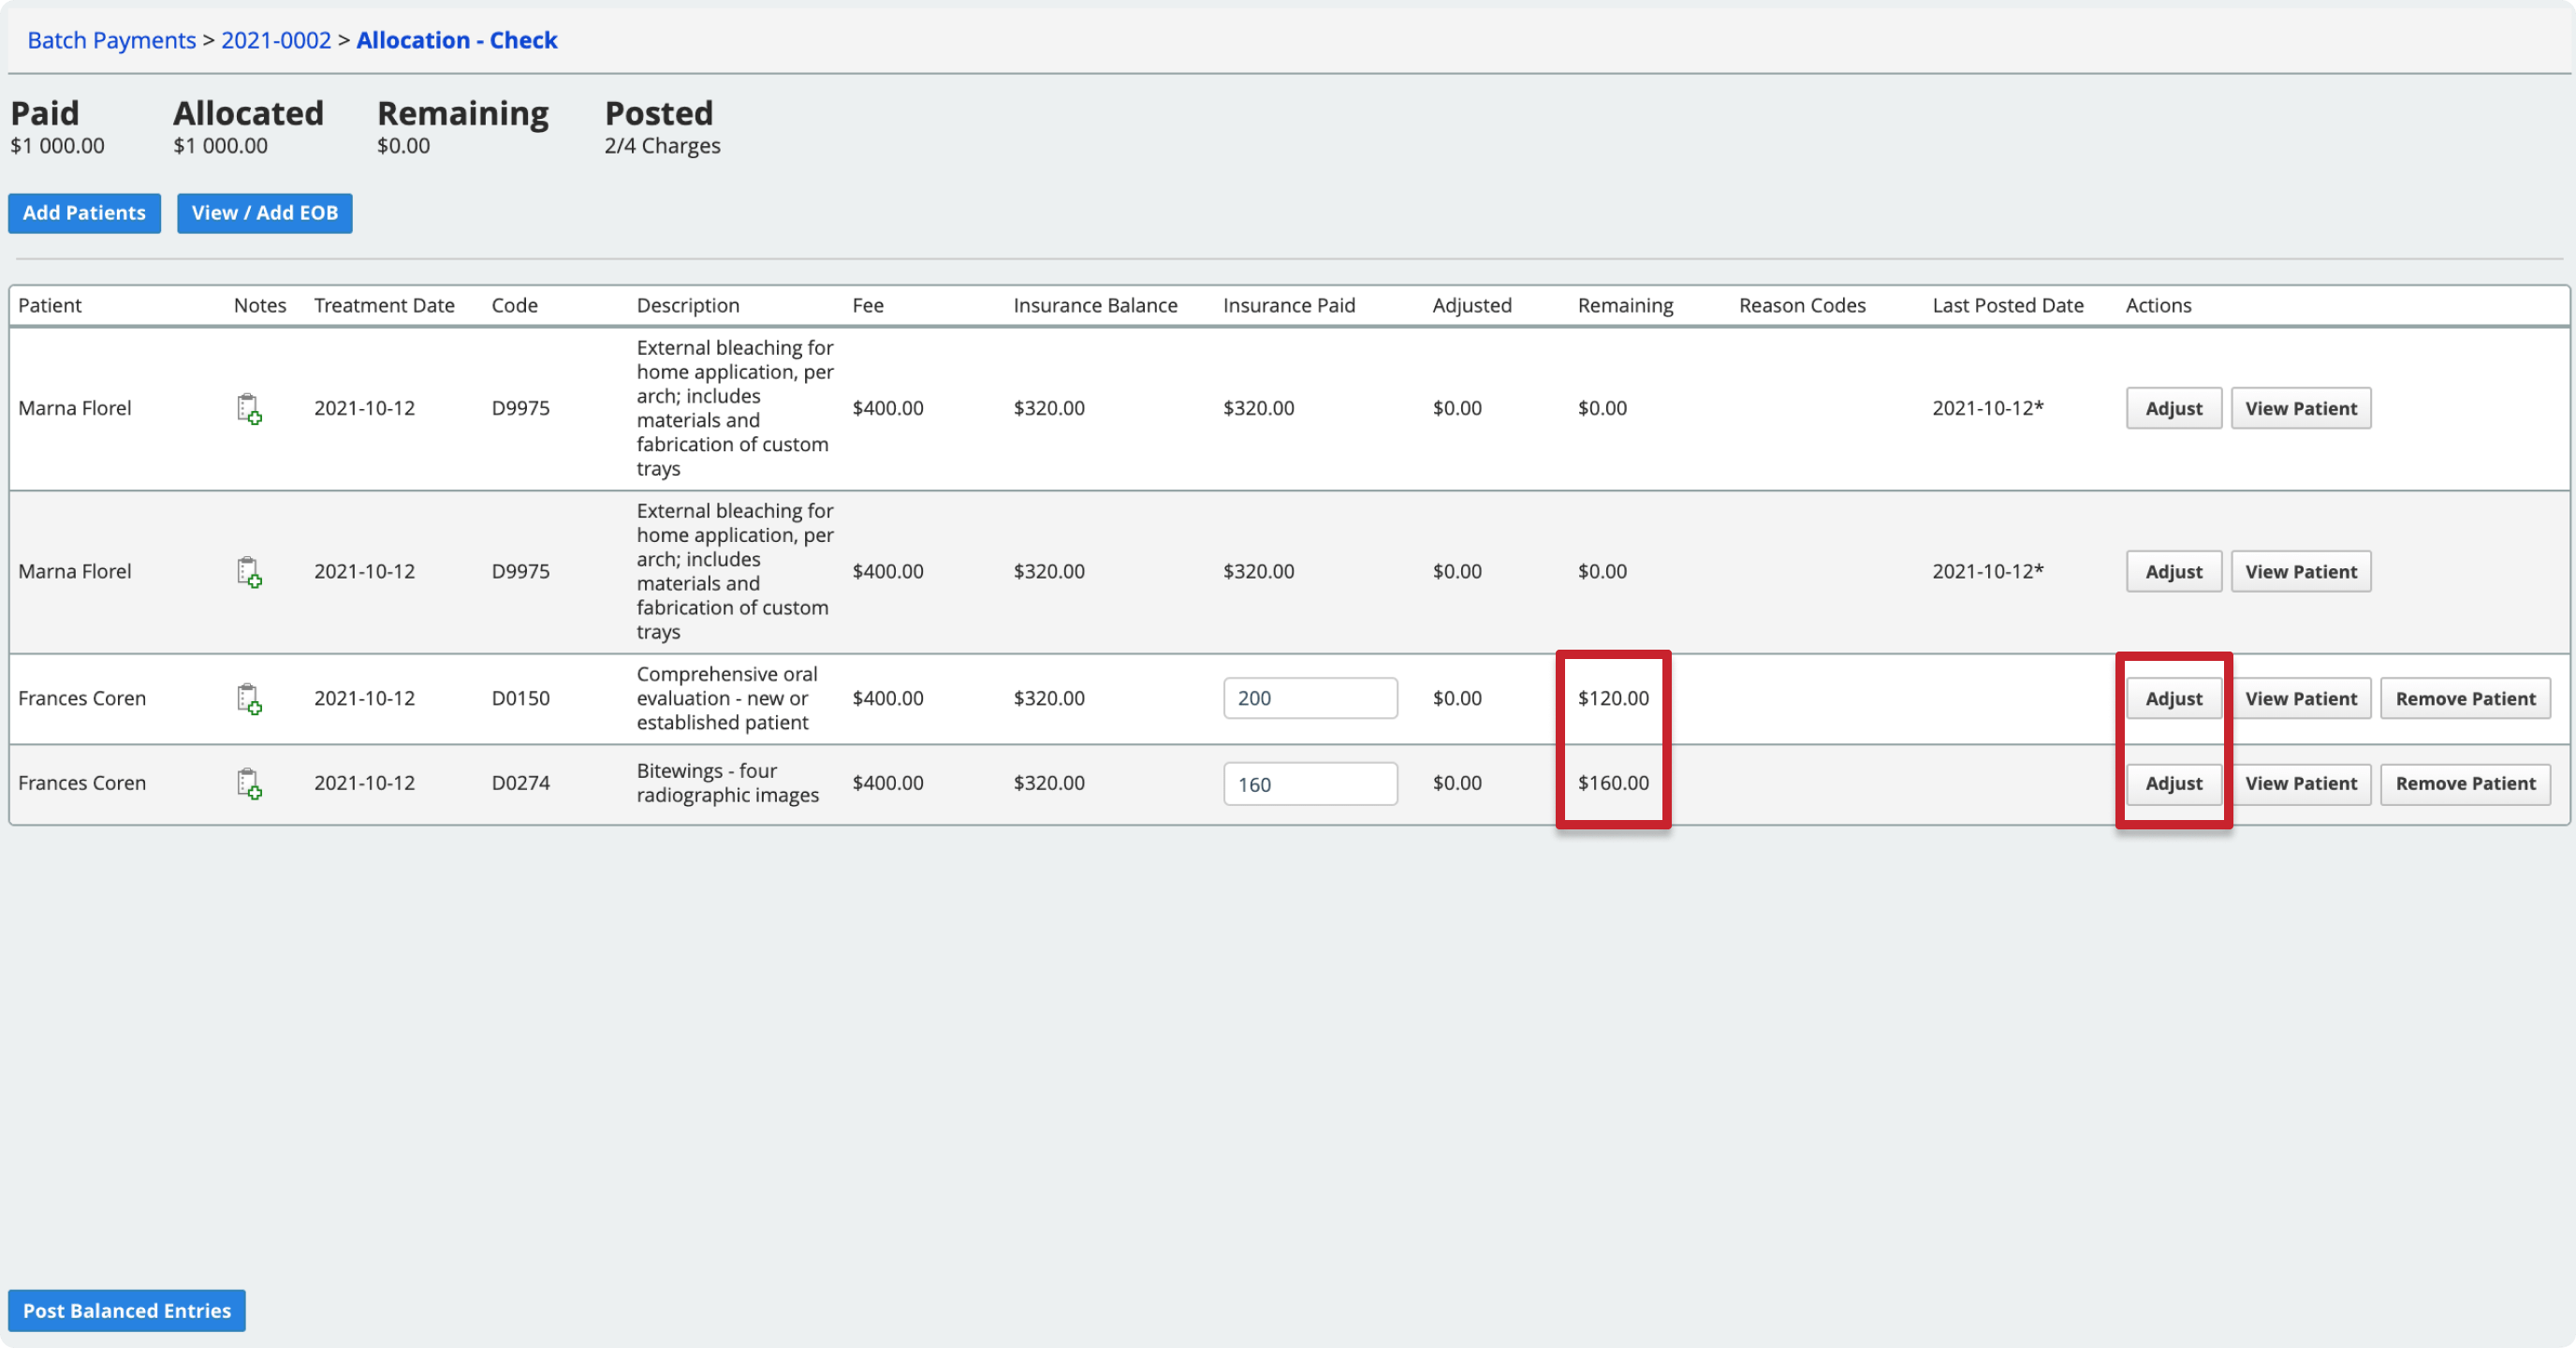
All of the tools to process the unpaid balance are available from the Adjust view.
- Find a payment in a batch and select Allocate
- Select Adjust under the Actions column of the line you want to process
- Use one or more of the following tools in the adjustment view to reduce the remaining amount (Rem Amt) to 0:
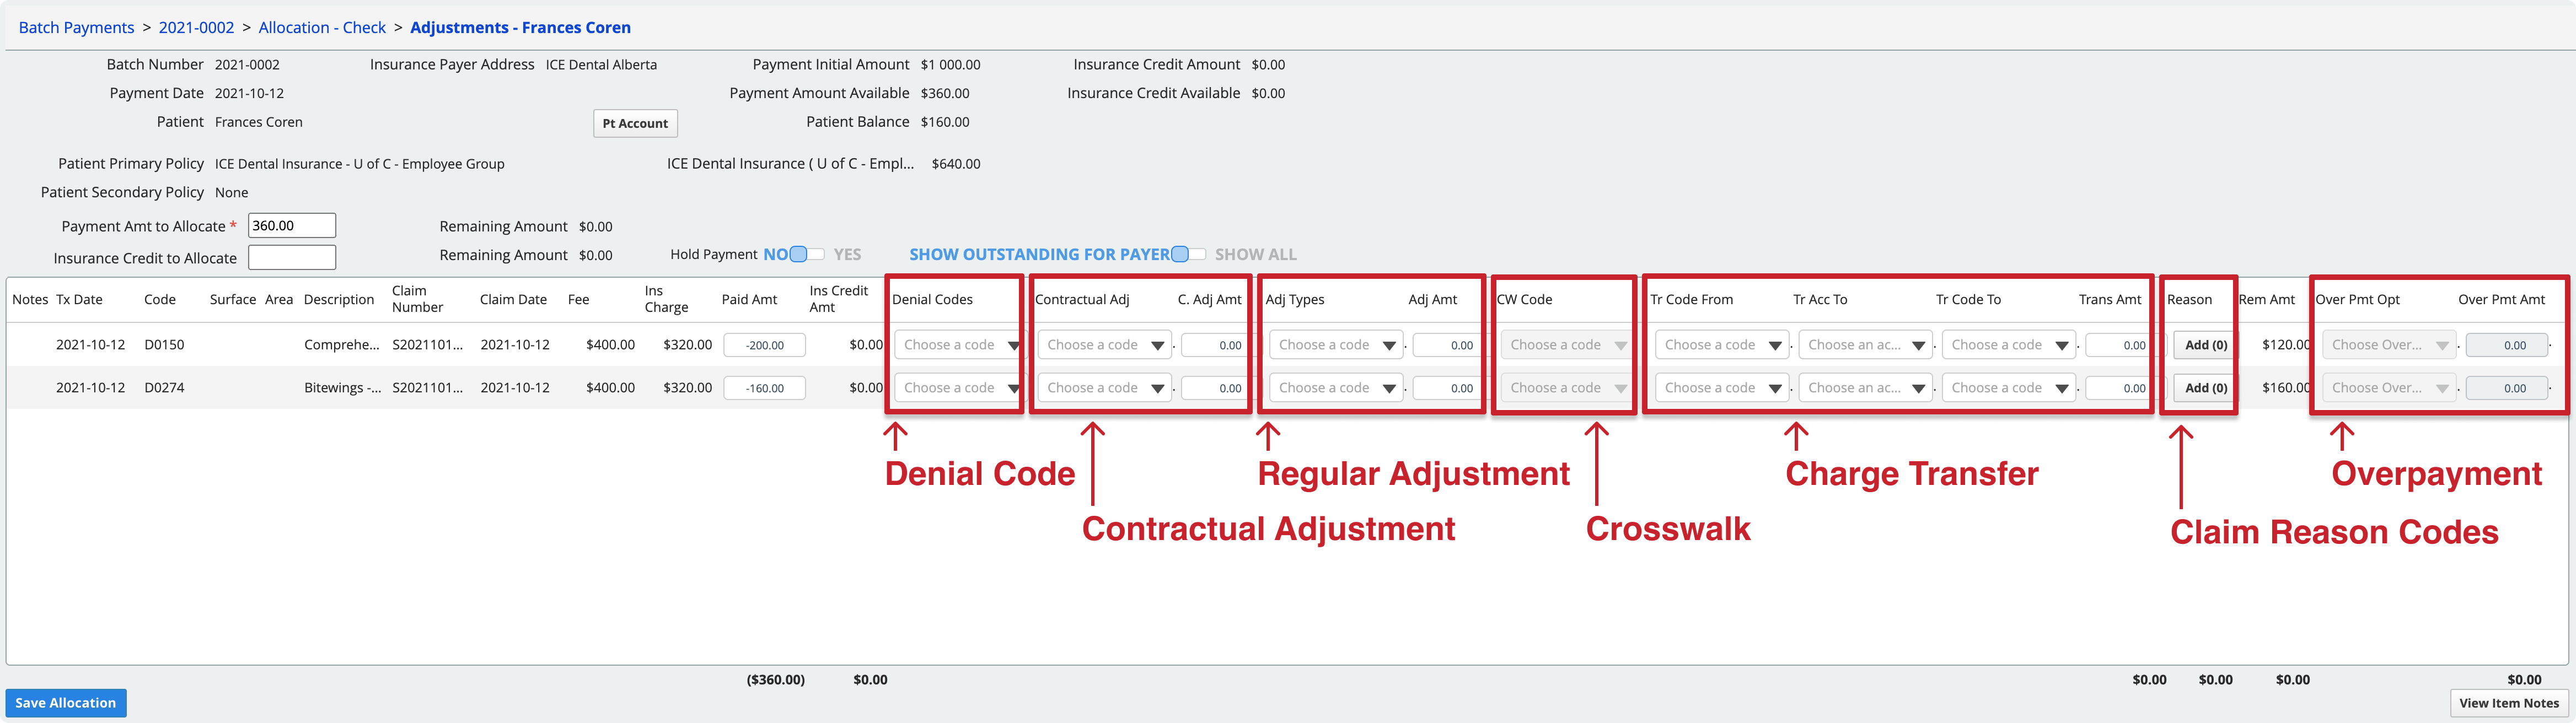
- Denial Code
- A denial code is for when there is an issue with the claim that needs to be corrected and re-submitted before insurance will consider whether or not it will be covered.
- For example, if a claim was denied because information was missing, use a Denial Code to indicate the issue so then you can add the procedure to a new claim to resubmit with the missing information included. The insurance payer continues to owe the insurance charge amount when you use a Denial Code.
- Use column: Denial Codes.
- If there is no issue with the claim, and the charge is simply not covered by the insurance policy, do not use a Denial Code. Instead:
- Set the Paid Amt to zero.
- Add the Claim Reason Code included on the EOB.
- Adjust or transfer the outstanding cost of the treatment.
- Contractual Adjustment
- Decrease the cost of a charge based on a contractual agreement you have with this insurance payer.
- The system automatically adds claim reason code 45 to a charge that is adjusted with a contractual adjustment code.
- If the insurance policy is configured as a PPO policy, the system will have already posted a contractual adjustment for the difference between the standard fee and the policy's PPO fee. The adjustment details do not appear here.
- Use columns: Contractual Adj, C. Adj Amt.
- Regular Adjustment
- Increase or decrease the cost of charge.
- For example, write-off of the remaining balance.
- Use columns: Adj Types, Adj Amount.
- If you are adjusting a charge that is from an orthodontic payment plan schedule, adjustments configured specifically for orthodontic payment plans show an "(O)" beside their name.
- Crosswalk
- Crosswalk a charge from medical to dental codes, or dental to medical codes in order to submit an insurance claim to another insurance payer using a different code set.
- The paid amount must be 0 and the full balance must be transferred. You cannot record a partial payment and crosswalk codes at the same time.
- Use column: CW Code.
- Charge Transfer
- Transfer the outstanding amount on the charge to another payer.
- For example, to either the patient or to secondary insurance.
- Use columns: Tr Code From, Tr Acc To, Tr Code To, Trans Amt.
- Charges transferred this way are aged by transfer date, not by the original claim date.
- If you transfer the remaining balance to secondary insurance, the system generates a secondary insurance claim when you post the transfer. It adds the claim to the appropriate paper or electronic queue for approval and submission.
- To learn more about what happens to a claim when a charge transfer occurs during allocation, see Claim statuses after allocation.
- Claim Reason Code
- Enter one or more claim reason codes that explain the payer's decisions.
- Use column: Reason Code.
- Denial Code
- When the remaining amount in the Rem Amt column is 0 select Save Allocation to post the payment and any adjustments
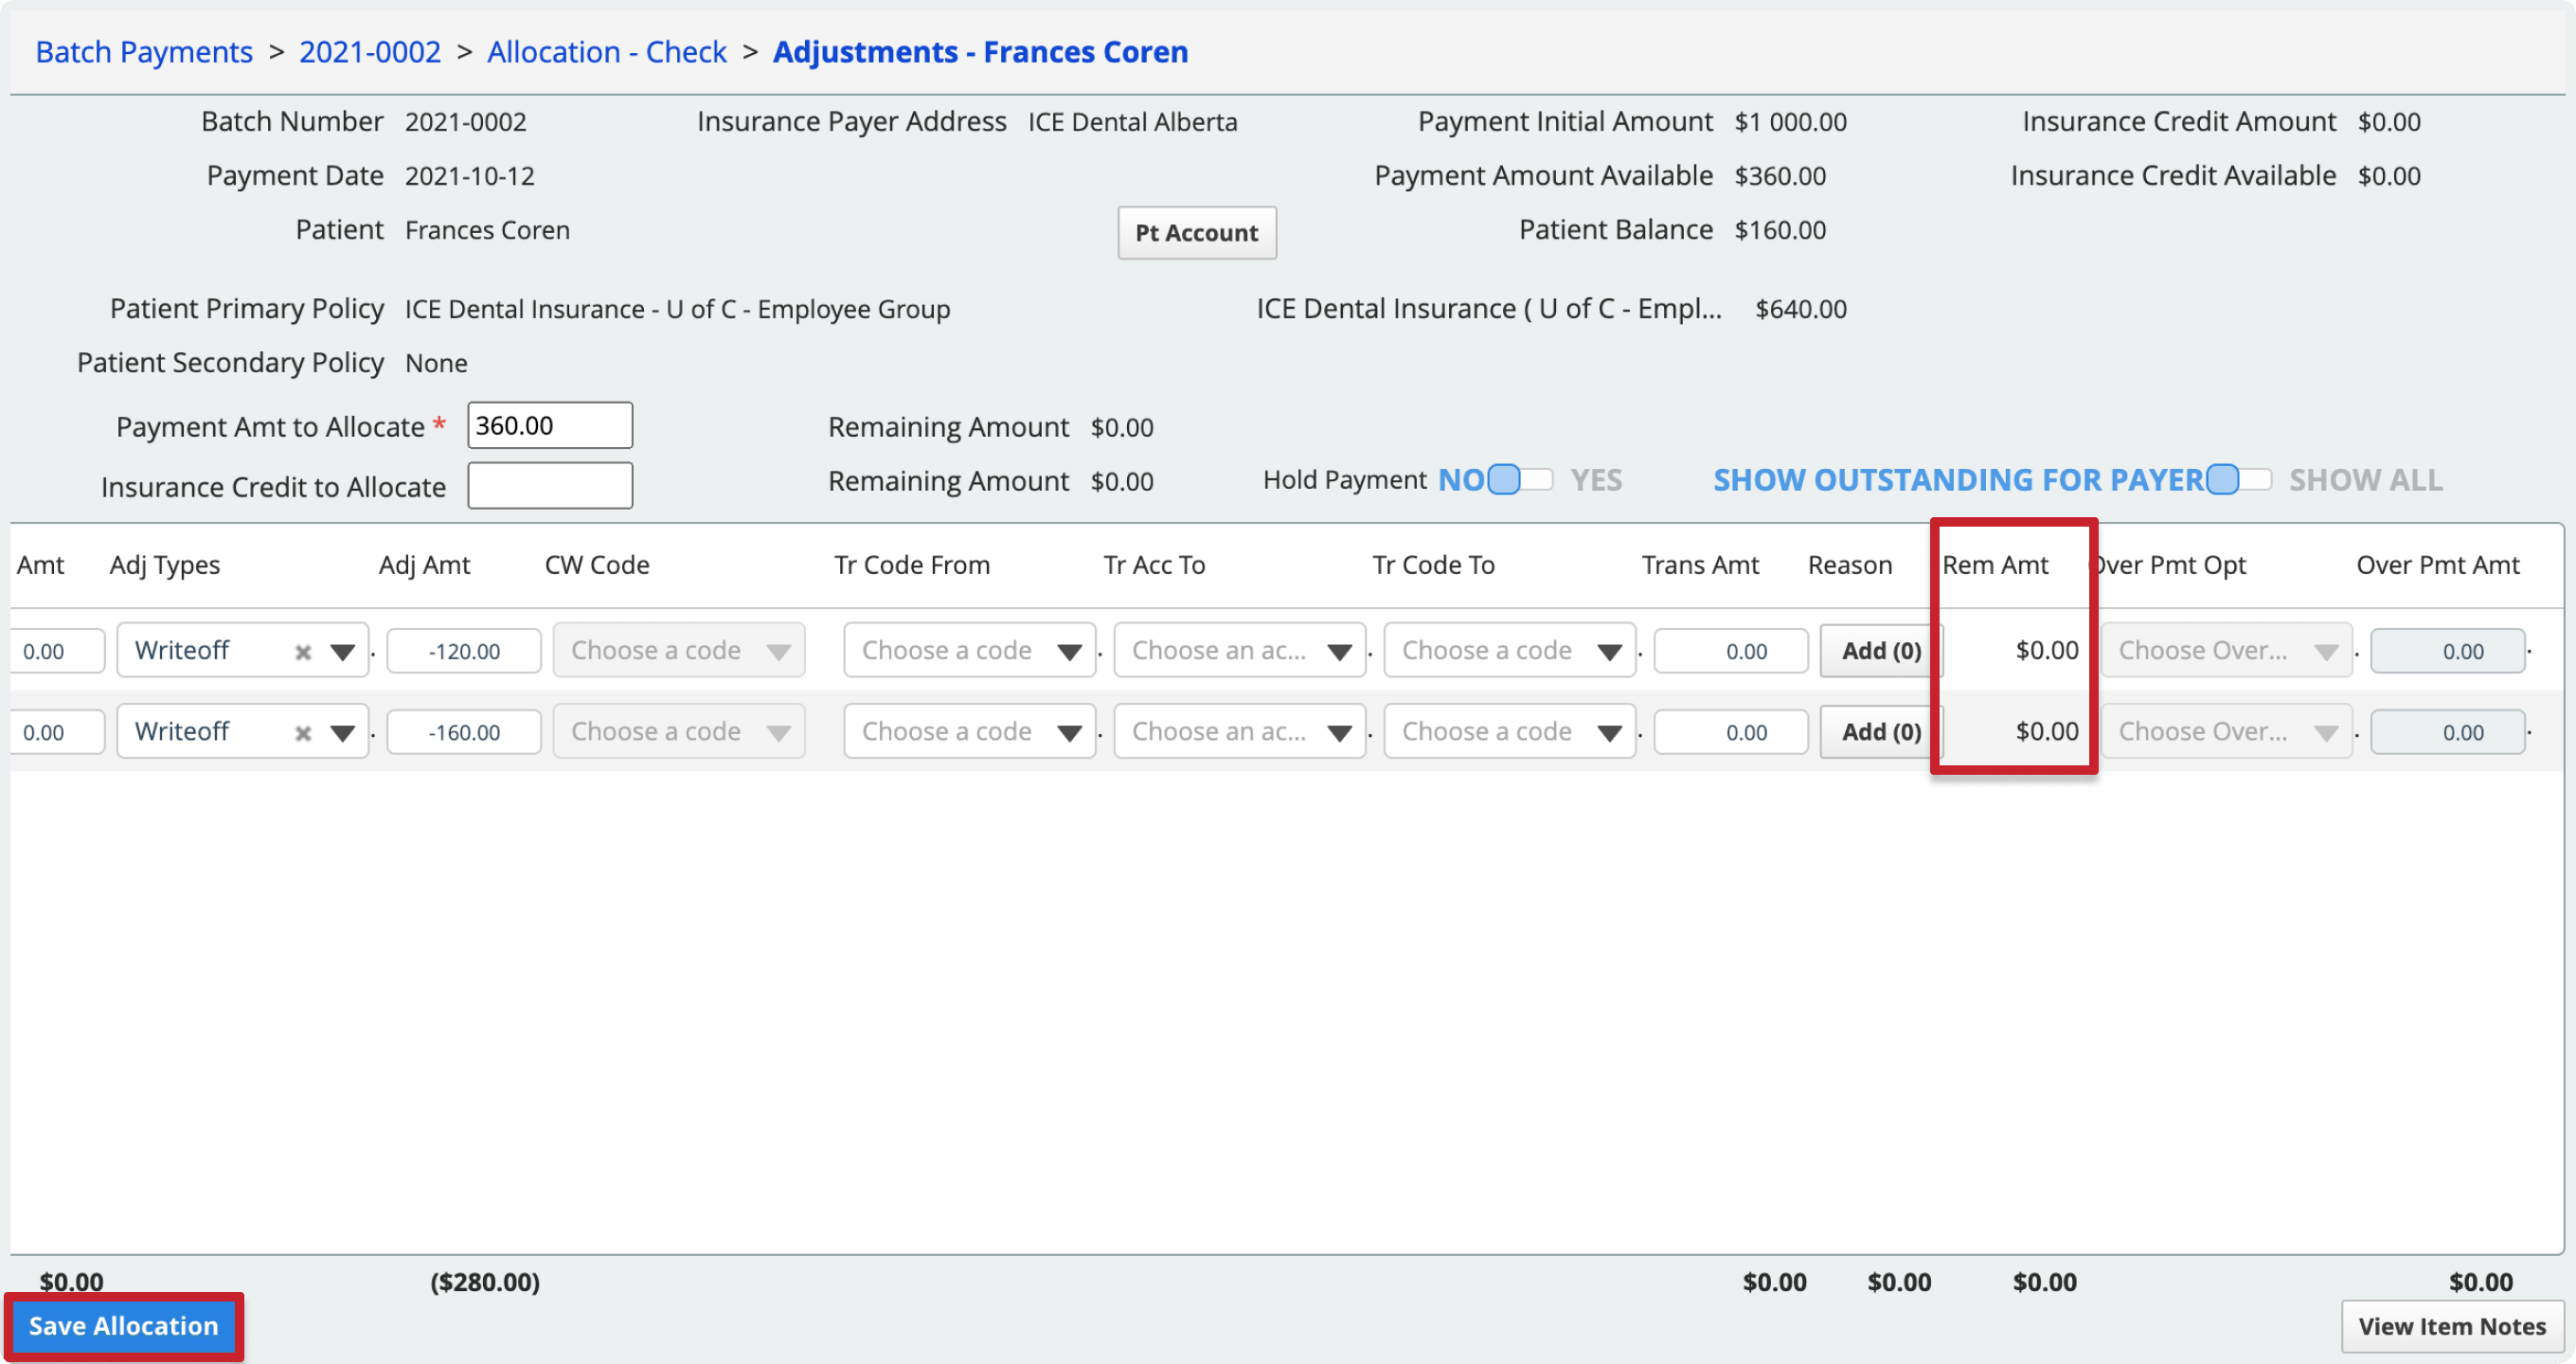
- This includes posting any adjustments, transfers, denial codes, or overpayments entered on the charge line that were needed to get the remaining amount to 0.
- In the allocation view, the Posted total increases by one.
- Optional: If you want to save your work but do not want to post the allocation and any adjustments right now, toggle Hold Payment to Yes before selecting Save Allocation. While on Hold, the amount you allocated cannot be allocated to other patients or charges.
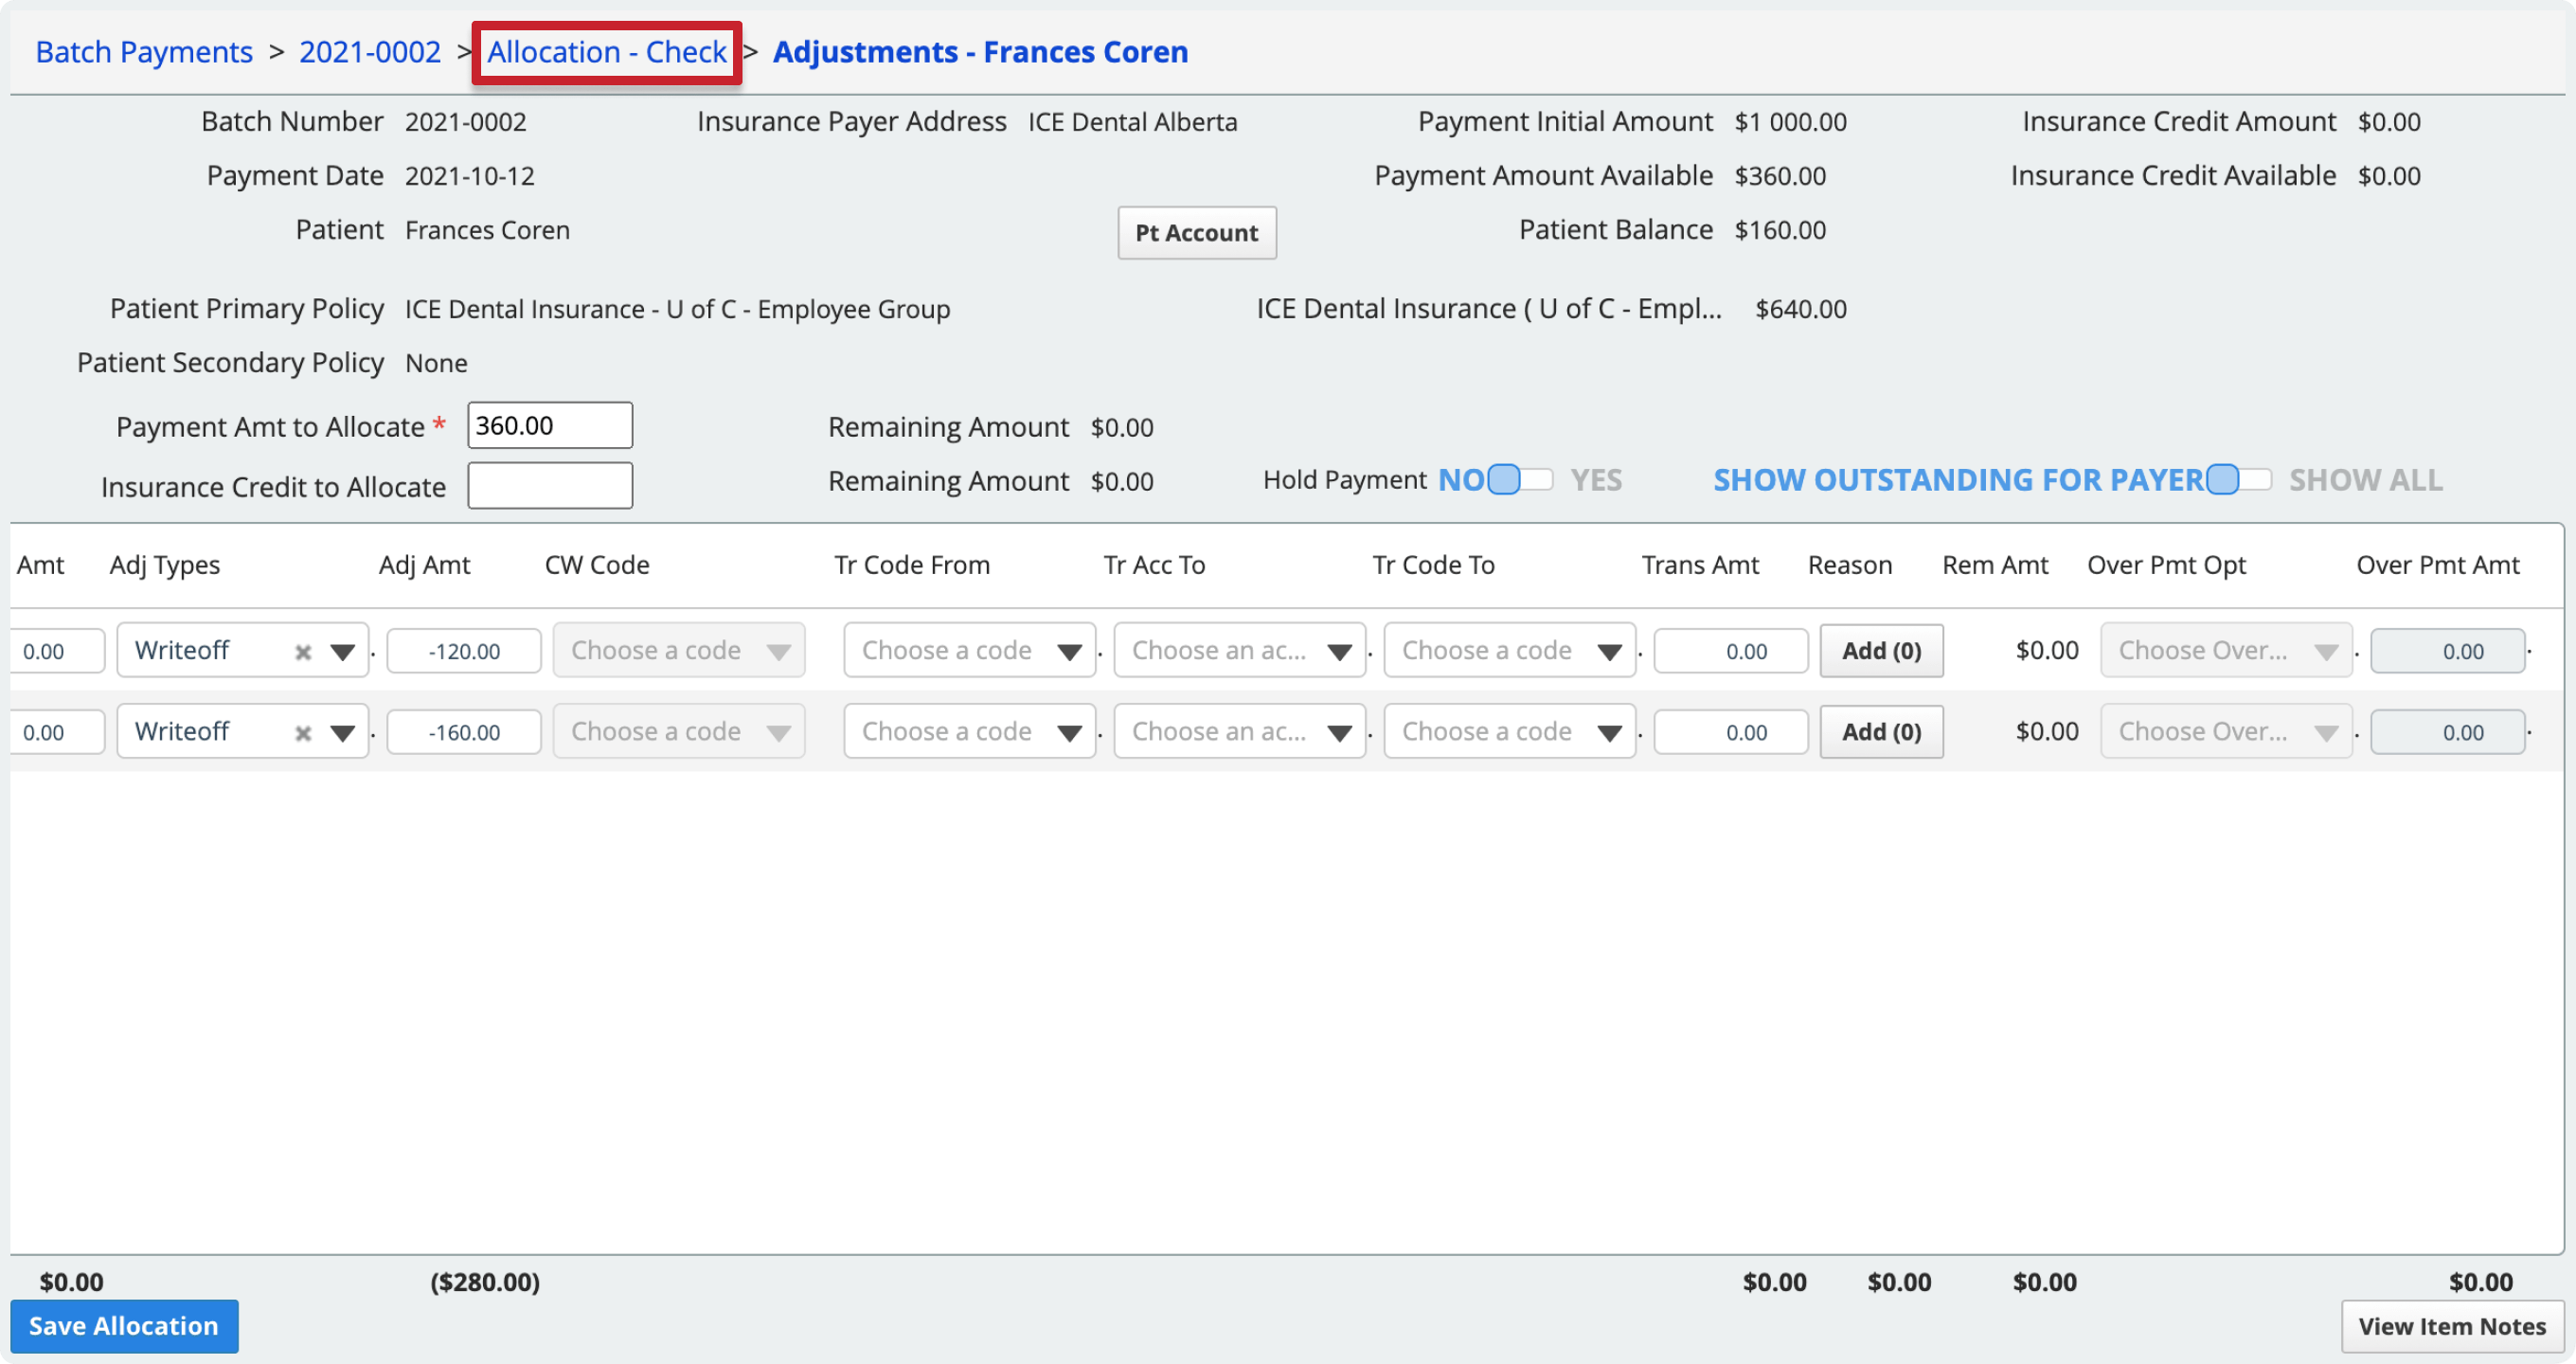
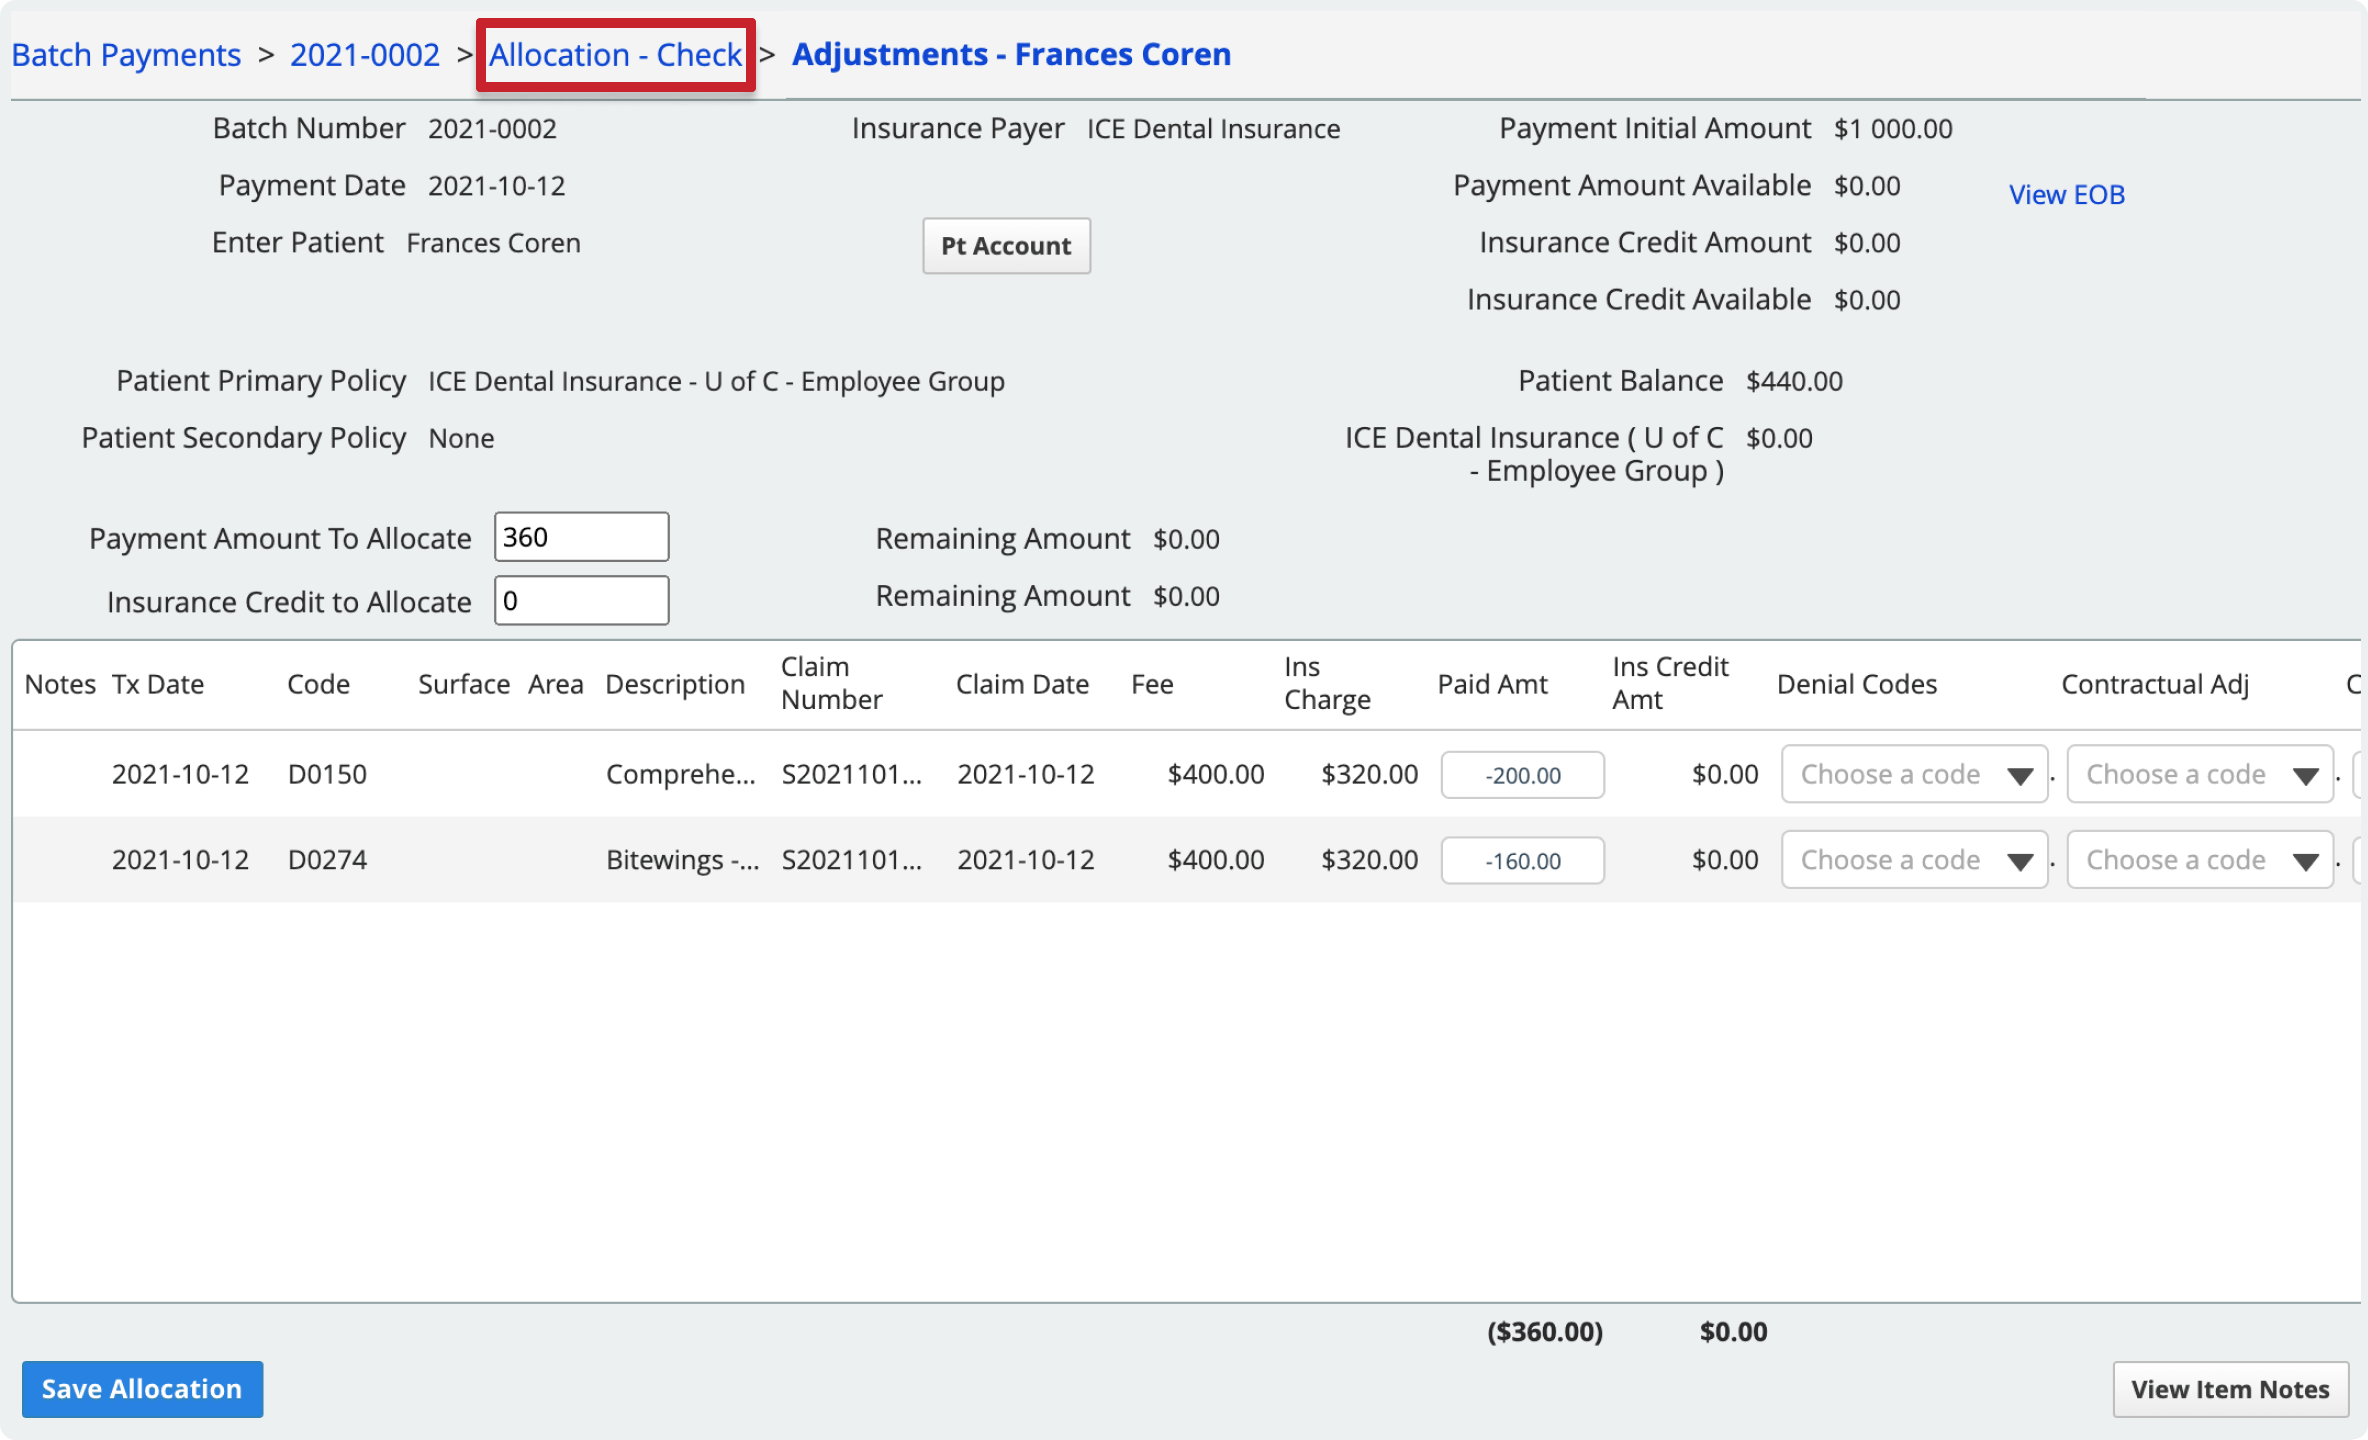
To go back to the allocation view, select the allocation name in the breadcrumb trail in the top left.
Process an overpaid amount
If insurance overpays for a claim, you must account for the overpayment difference. You can use the adjustment tools to:
- Refund the overpayment to insurance.
- Turn the overpayment into a credit for insurance to use on a future claim.
- Transfer the overpayment to the patient as a credit.
- Refund the entire payment to insurance and submit a corrective claim with updated details.
All of the tools to process the overpaid balance are available from the Adjust view.
- Find a payment in a batch and select Allocate
- Select Adjust under the Actions column of the line you want to process
- Use one of the following tools in the Over Pmt Opt column to process the insurance overpayment:
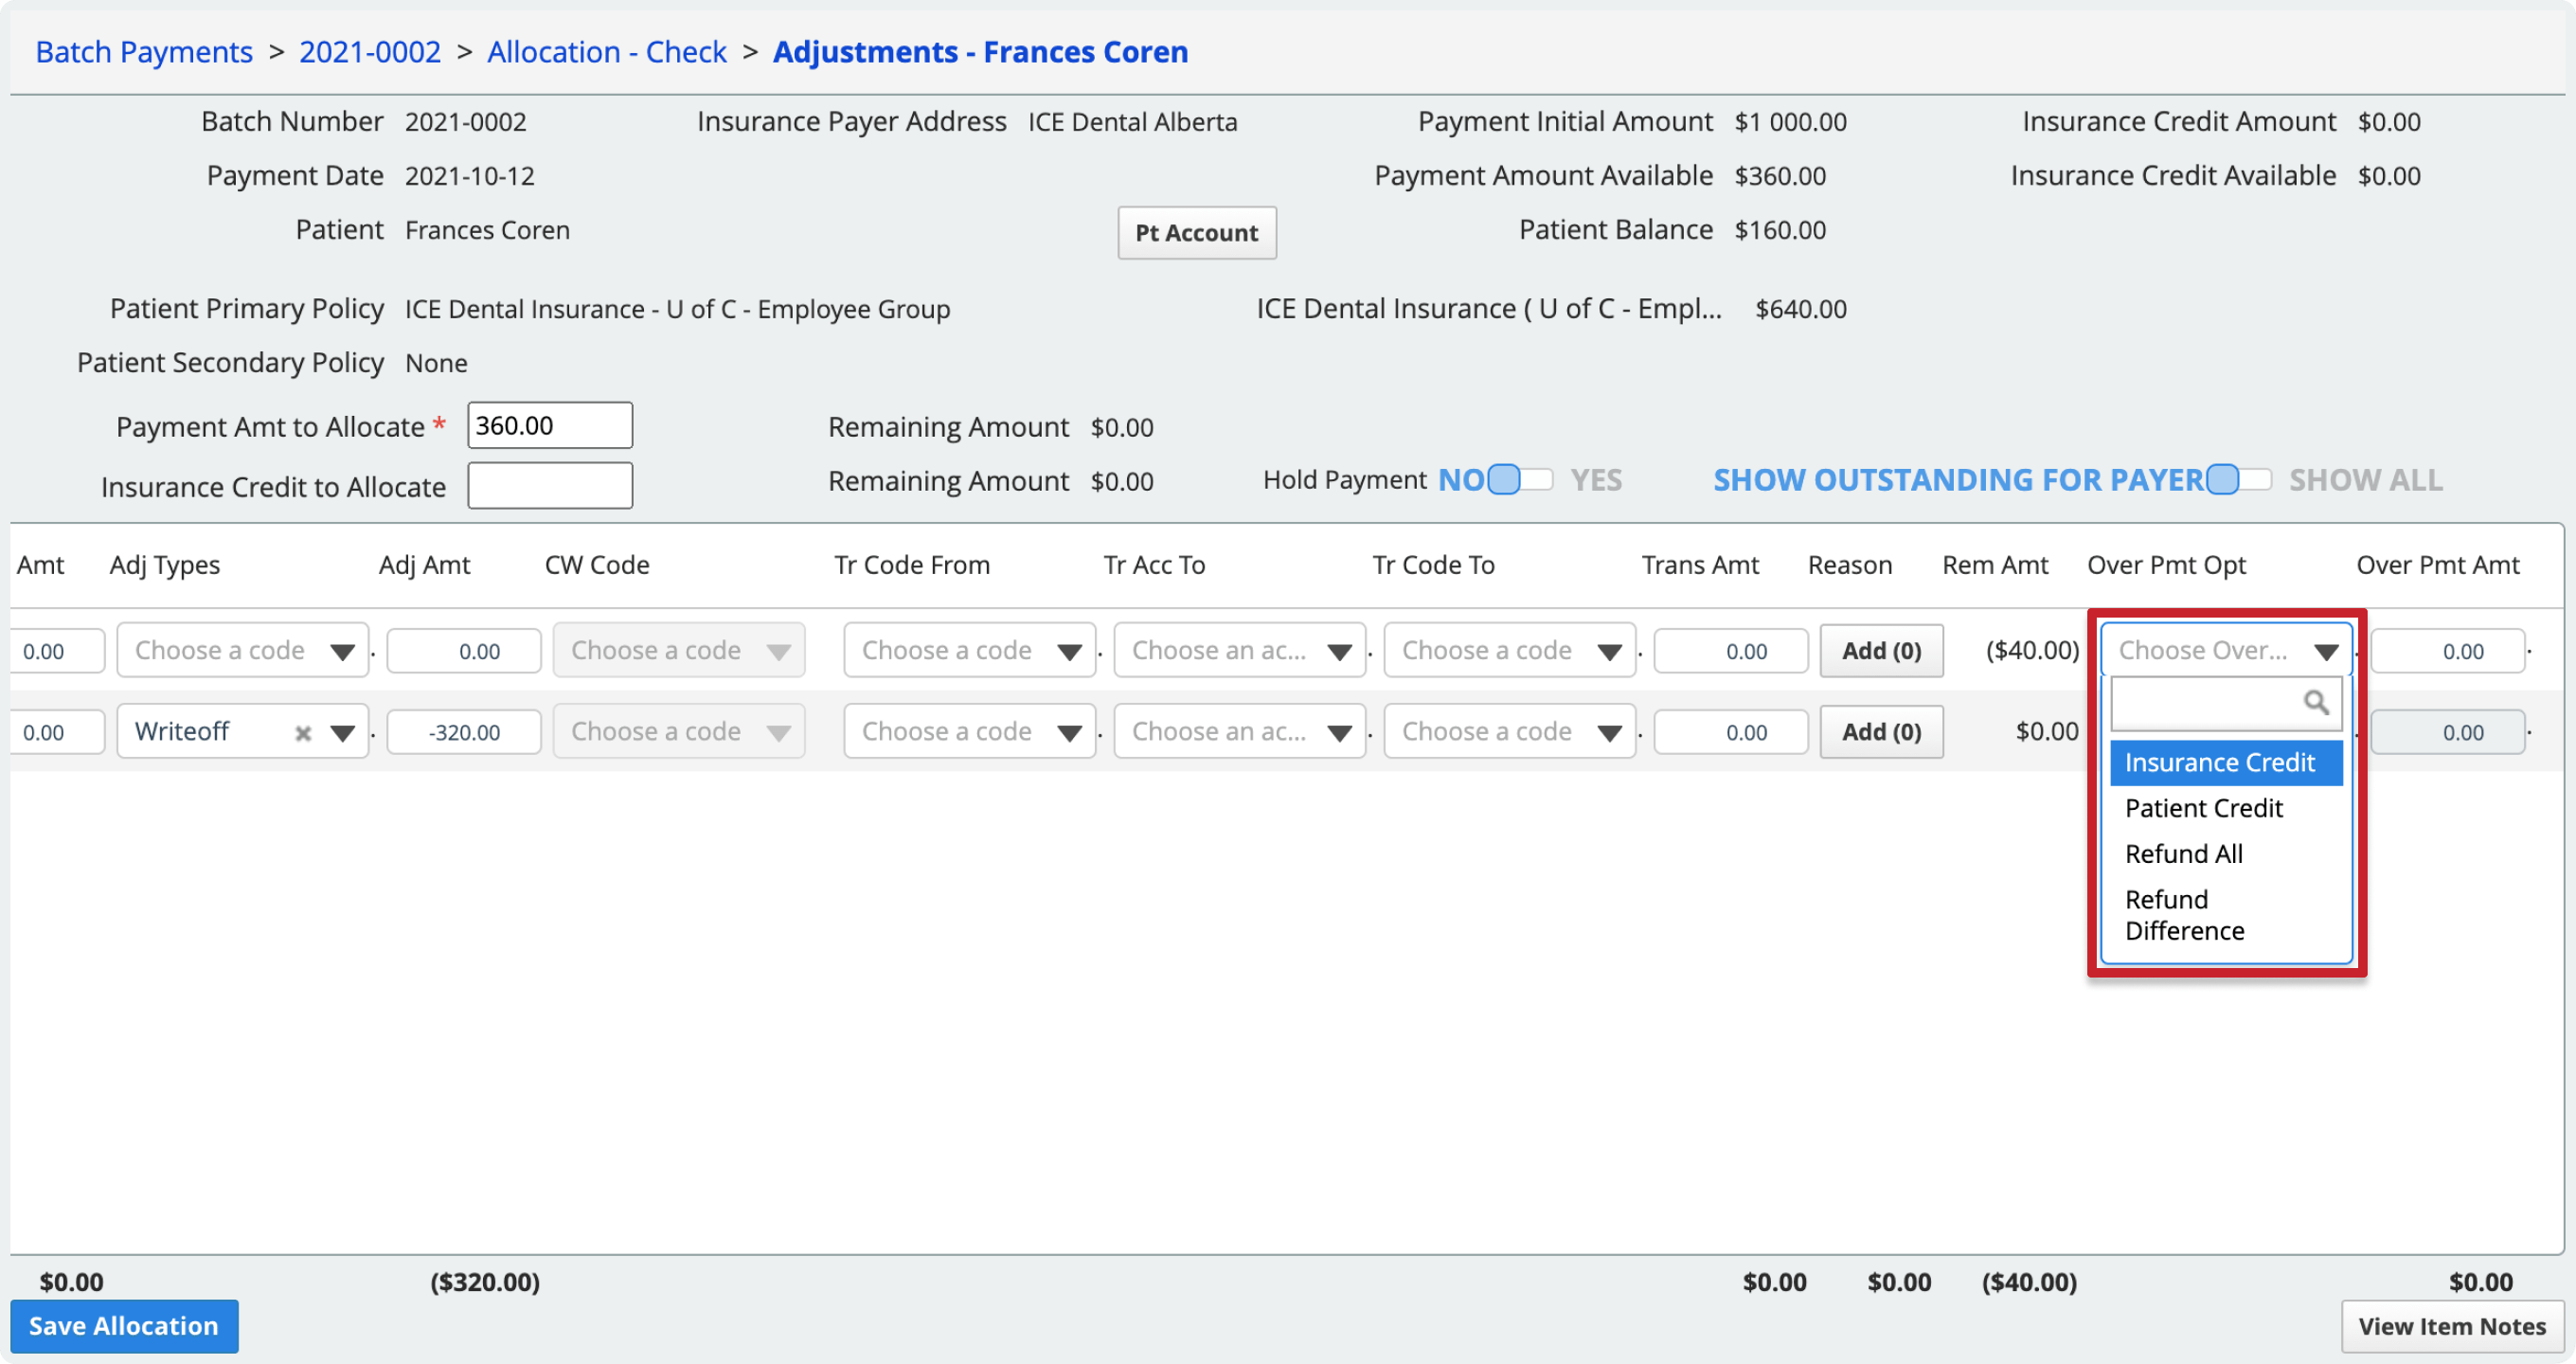
- Patient Credit
- Transfer the overpayment difference to the patient as credit.
- The credit appears on the patient's record and can be used to pay a future patient charge or refunded to the patient.
- Insurance Credit
- Turn the overpayment difference into a credit for the insurance payer address.
- This credit can then be allocated as part of a future payment from the same insurance payer address.
- Refund Difference
- Turn the overpayment difference into a credit for the insurance payer address that you will refund to them.
- To learn more about refunding insurance credit, see Process an insurance refund.
- Refund All
- Turn the full charge payment amount into a credit for the insurance payer address, to be refunded to them.
- The system generates a corrective claim for submission to insurance.
- To learn more about refunding insurance credit, see Process an insurance refund.
- Patient Credit
- When the remaining amount in the Rem Amt column is 0 select Save Allocation to post the payment and any adjustments
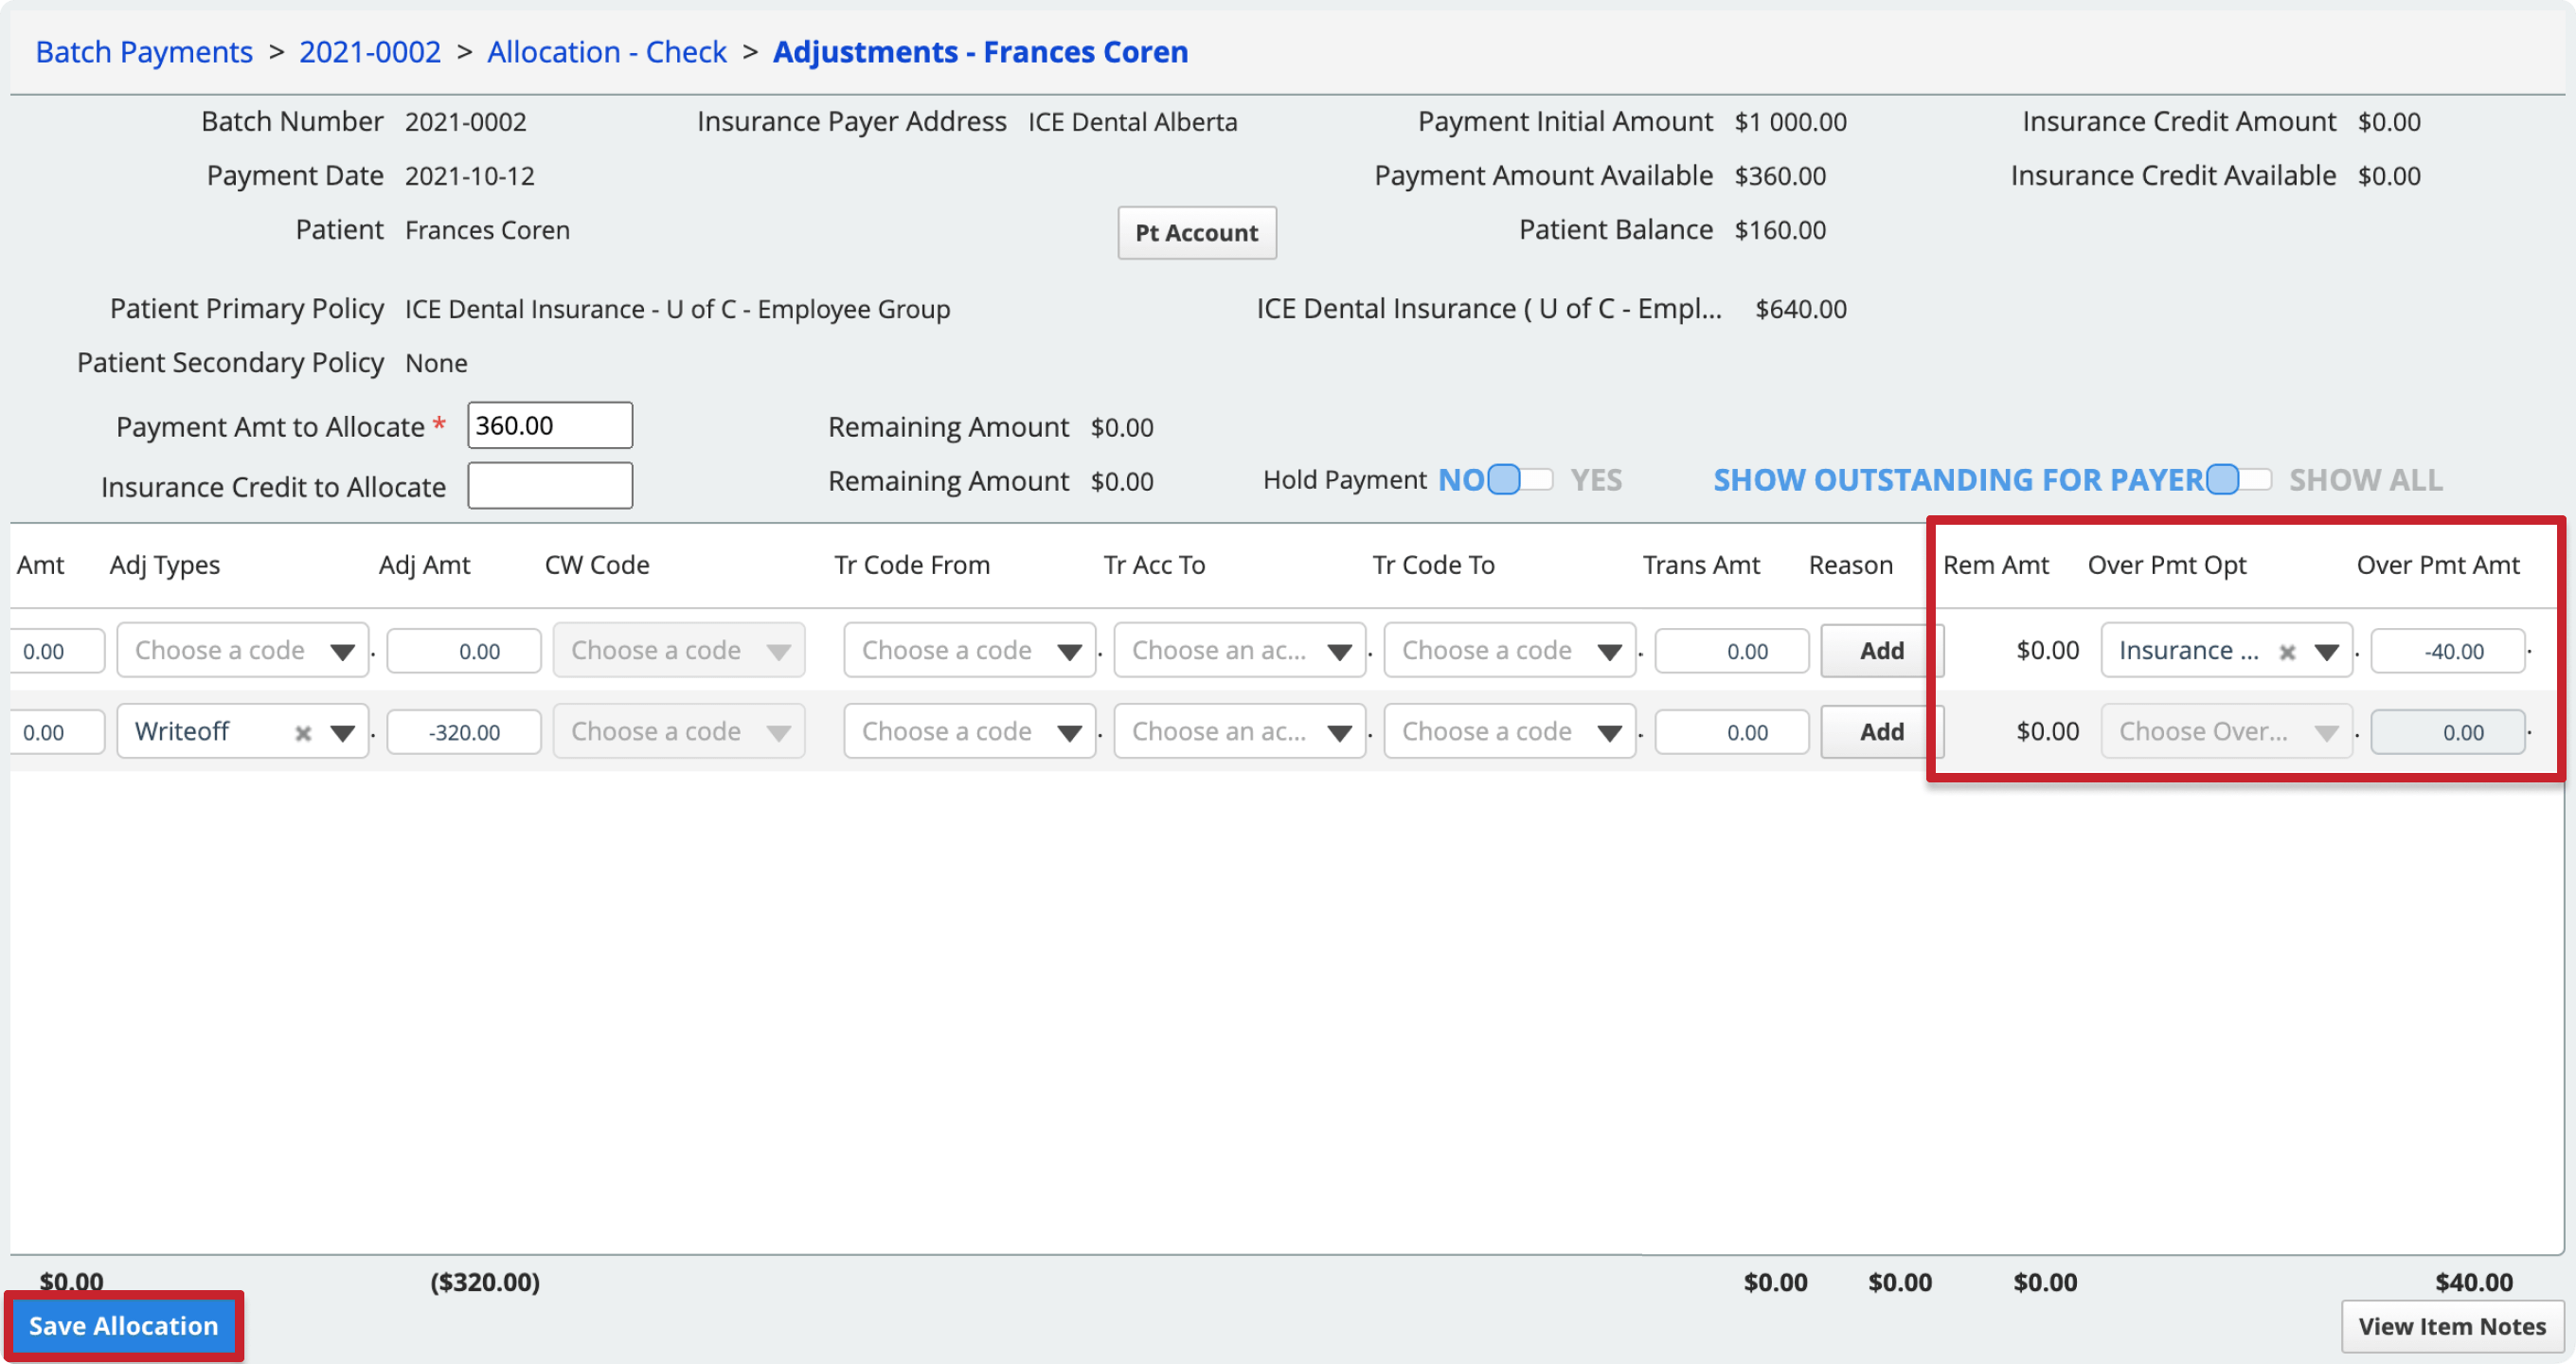
- This includes posting any adjustments, transfers, denial codes, or overpayments entered on the charge line that were needed to get the remaining amount to 0.
- In the allocation view, the Posted total increases by one.
- Optional: If you want to save your work but do not want to post the allocation and any adjustments right now, toggle Hold Payment to Yes before selecting Save Allocation. While on Hold, the amount you allocated cannot be allocated to other patients or charges.
To go back to the allocation view, select the allocation name in the breadcrumb trail in the top left.

Enter the paid amount in the Adjust view
You can also enter paid amounts in the adjustment view if you prefer to enter paid amounts and adjustments from the same screen.
To allocate an insurance credit amount from a payment in a batch, you need to work from the adjustment view.
- Find a payment in a batch and select Allocate
- Select Adjust under the Actions column of the line you want to process
- Fill out the Payment Amount to Allocate field with the total amount from the payment that you want to allocate to the charge(s)
- You must enter an amount here before you can update the paid amount for individual charges.
- If you included insurance payer credit in this payment, you can use it by filling out the Insurance Credit to Allocate field.
- Enter the Paid Amt for the charge
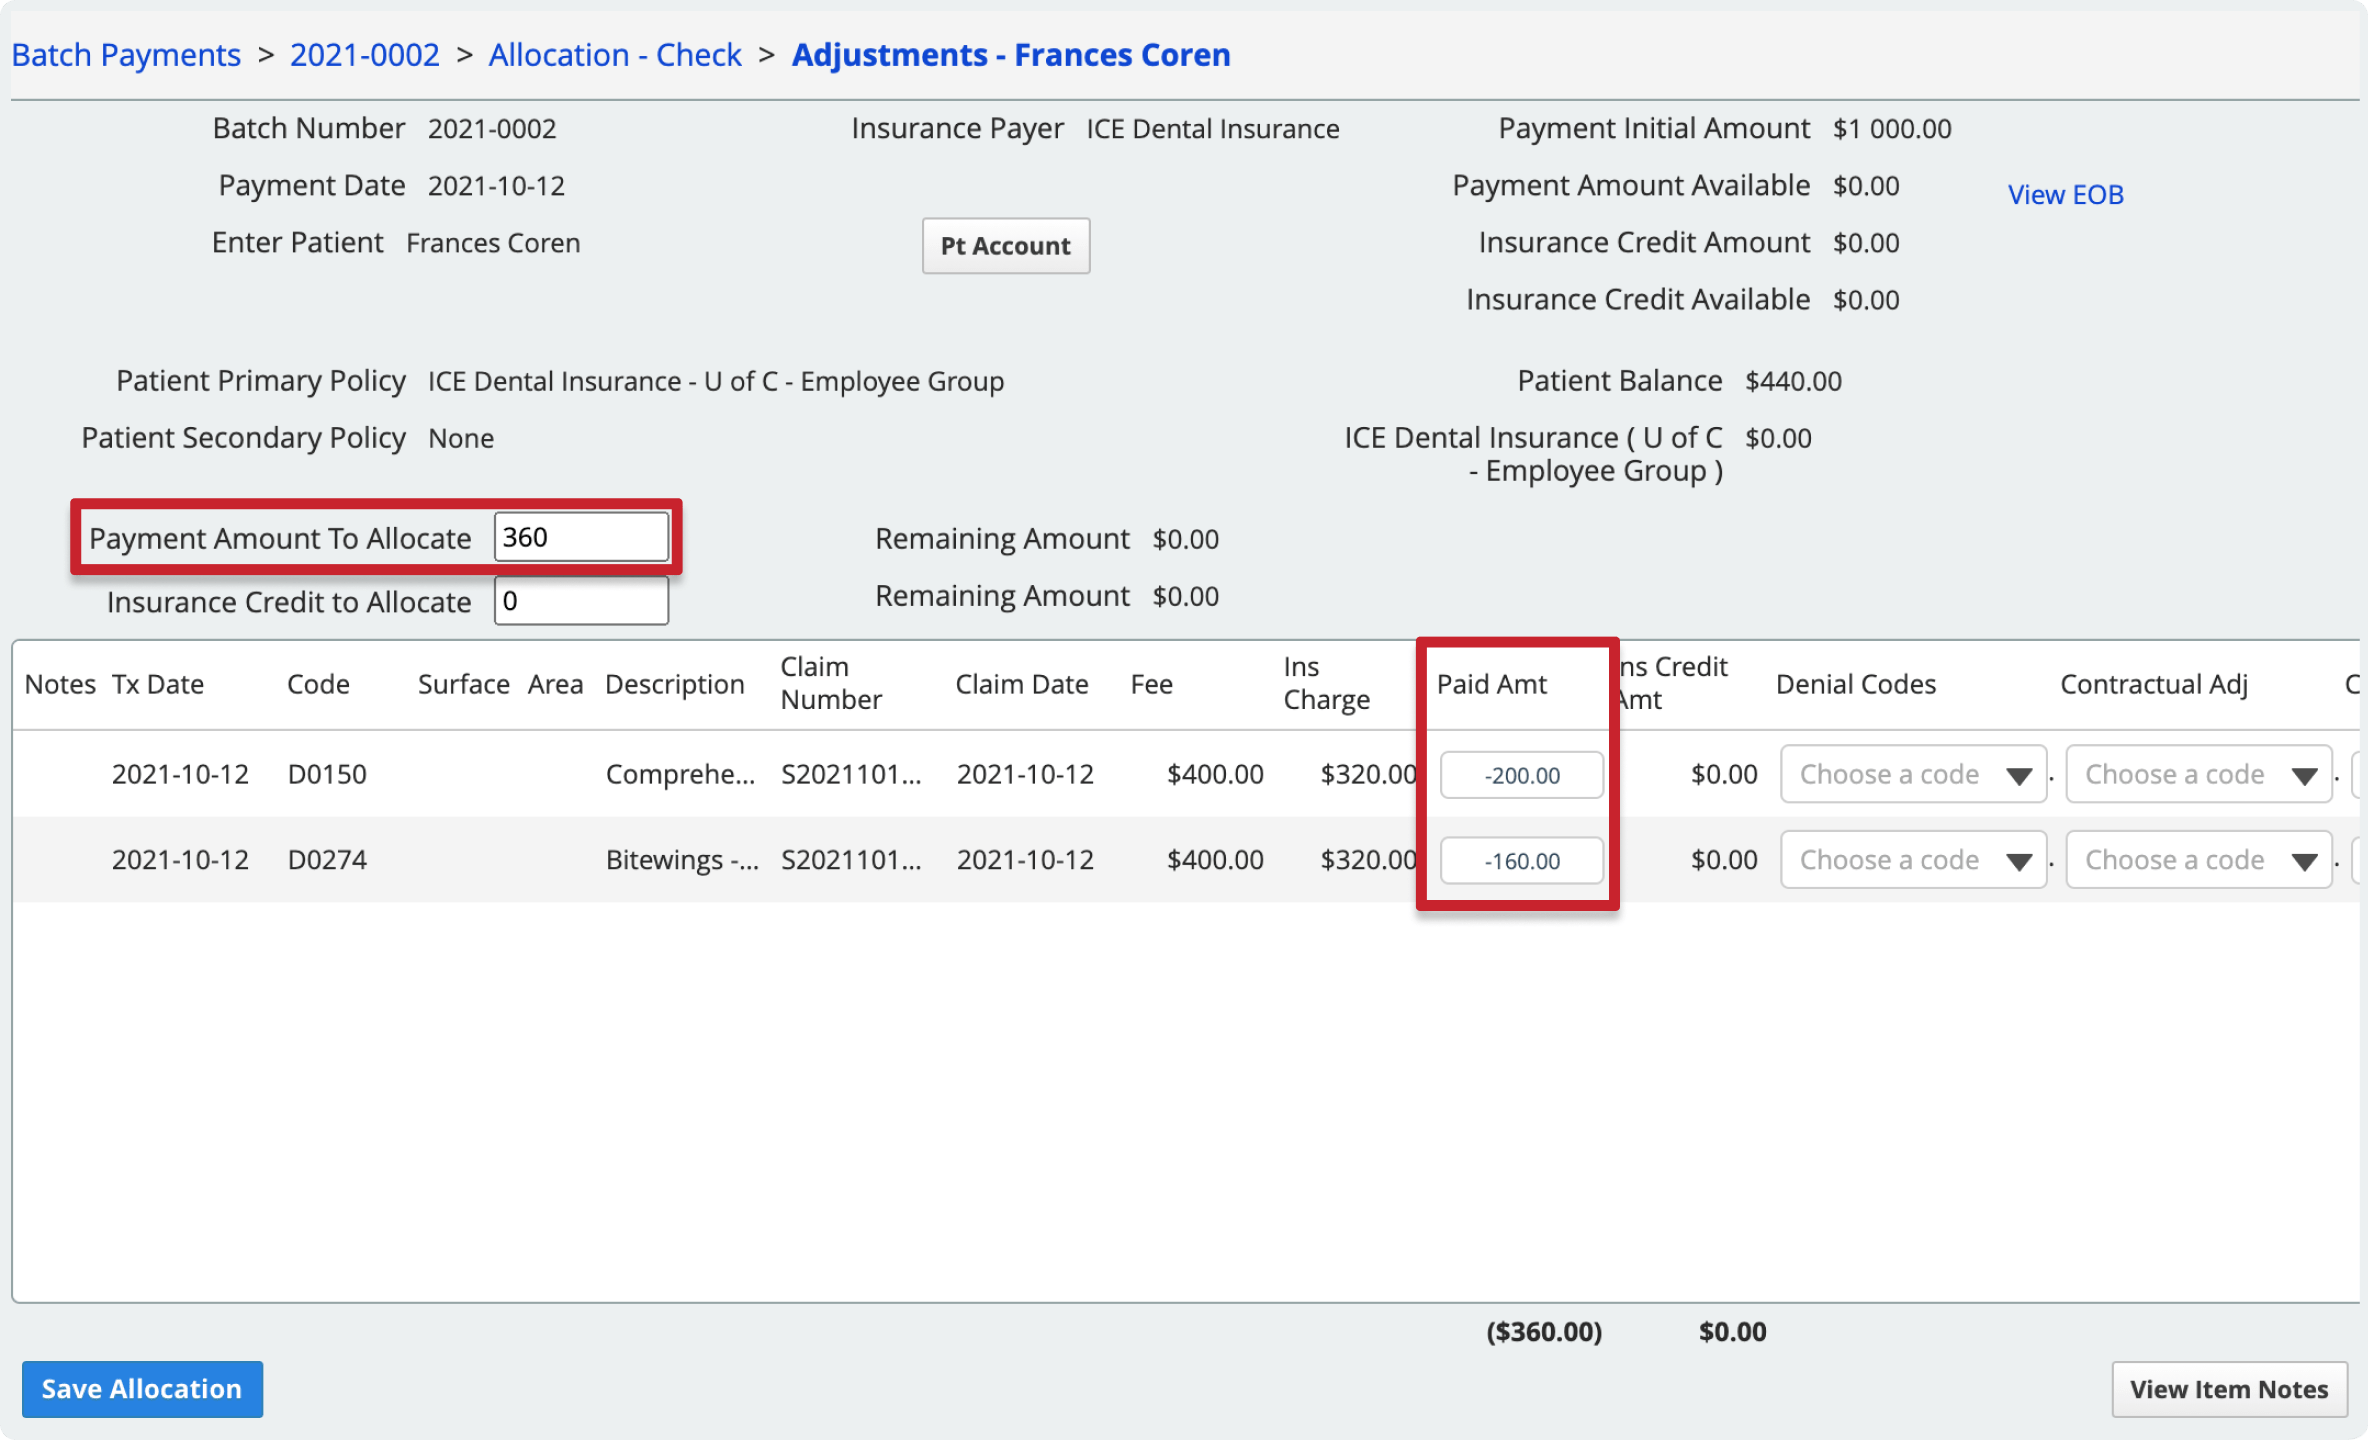
- If you included insurance payer credit in this payment, double click the Ins Credit Amt column amount and enter the amount you want to use for the charge.
- Optional: You can put the allocation and adjustments on hold by switching the Hold Payment toggle to Yes
- This allows you to enter all the allocation details as a draft, but does not post the allocation to the patient account when you save it.
- An allocation on hold also means that even though it hasn't been posted yet, that payment amount is held for the patient and cannot be allocated to another one.
- This may be helpful if you want to enter all the details for every payment or allocation, and then post them once you're happy that what you've entered matches the EOB.
- If you are editing a payment that has already been posted, you cannot put it on hold.
- When the remaining amount in the Rem Amt column is 0 select Save Allocation to post the payment and any adjustments
To go back to the allocation view, select the allocation name in the breadcrumb trail in the top left.
View an insurance explanation
When you allocate payments you may want to reference an Explanation of Benefits (EOB) or similar document from the insurance company that explains how they decided to pay a claim.
To view or upload a reference document to the payment you're allocating, select View / Add EOB
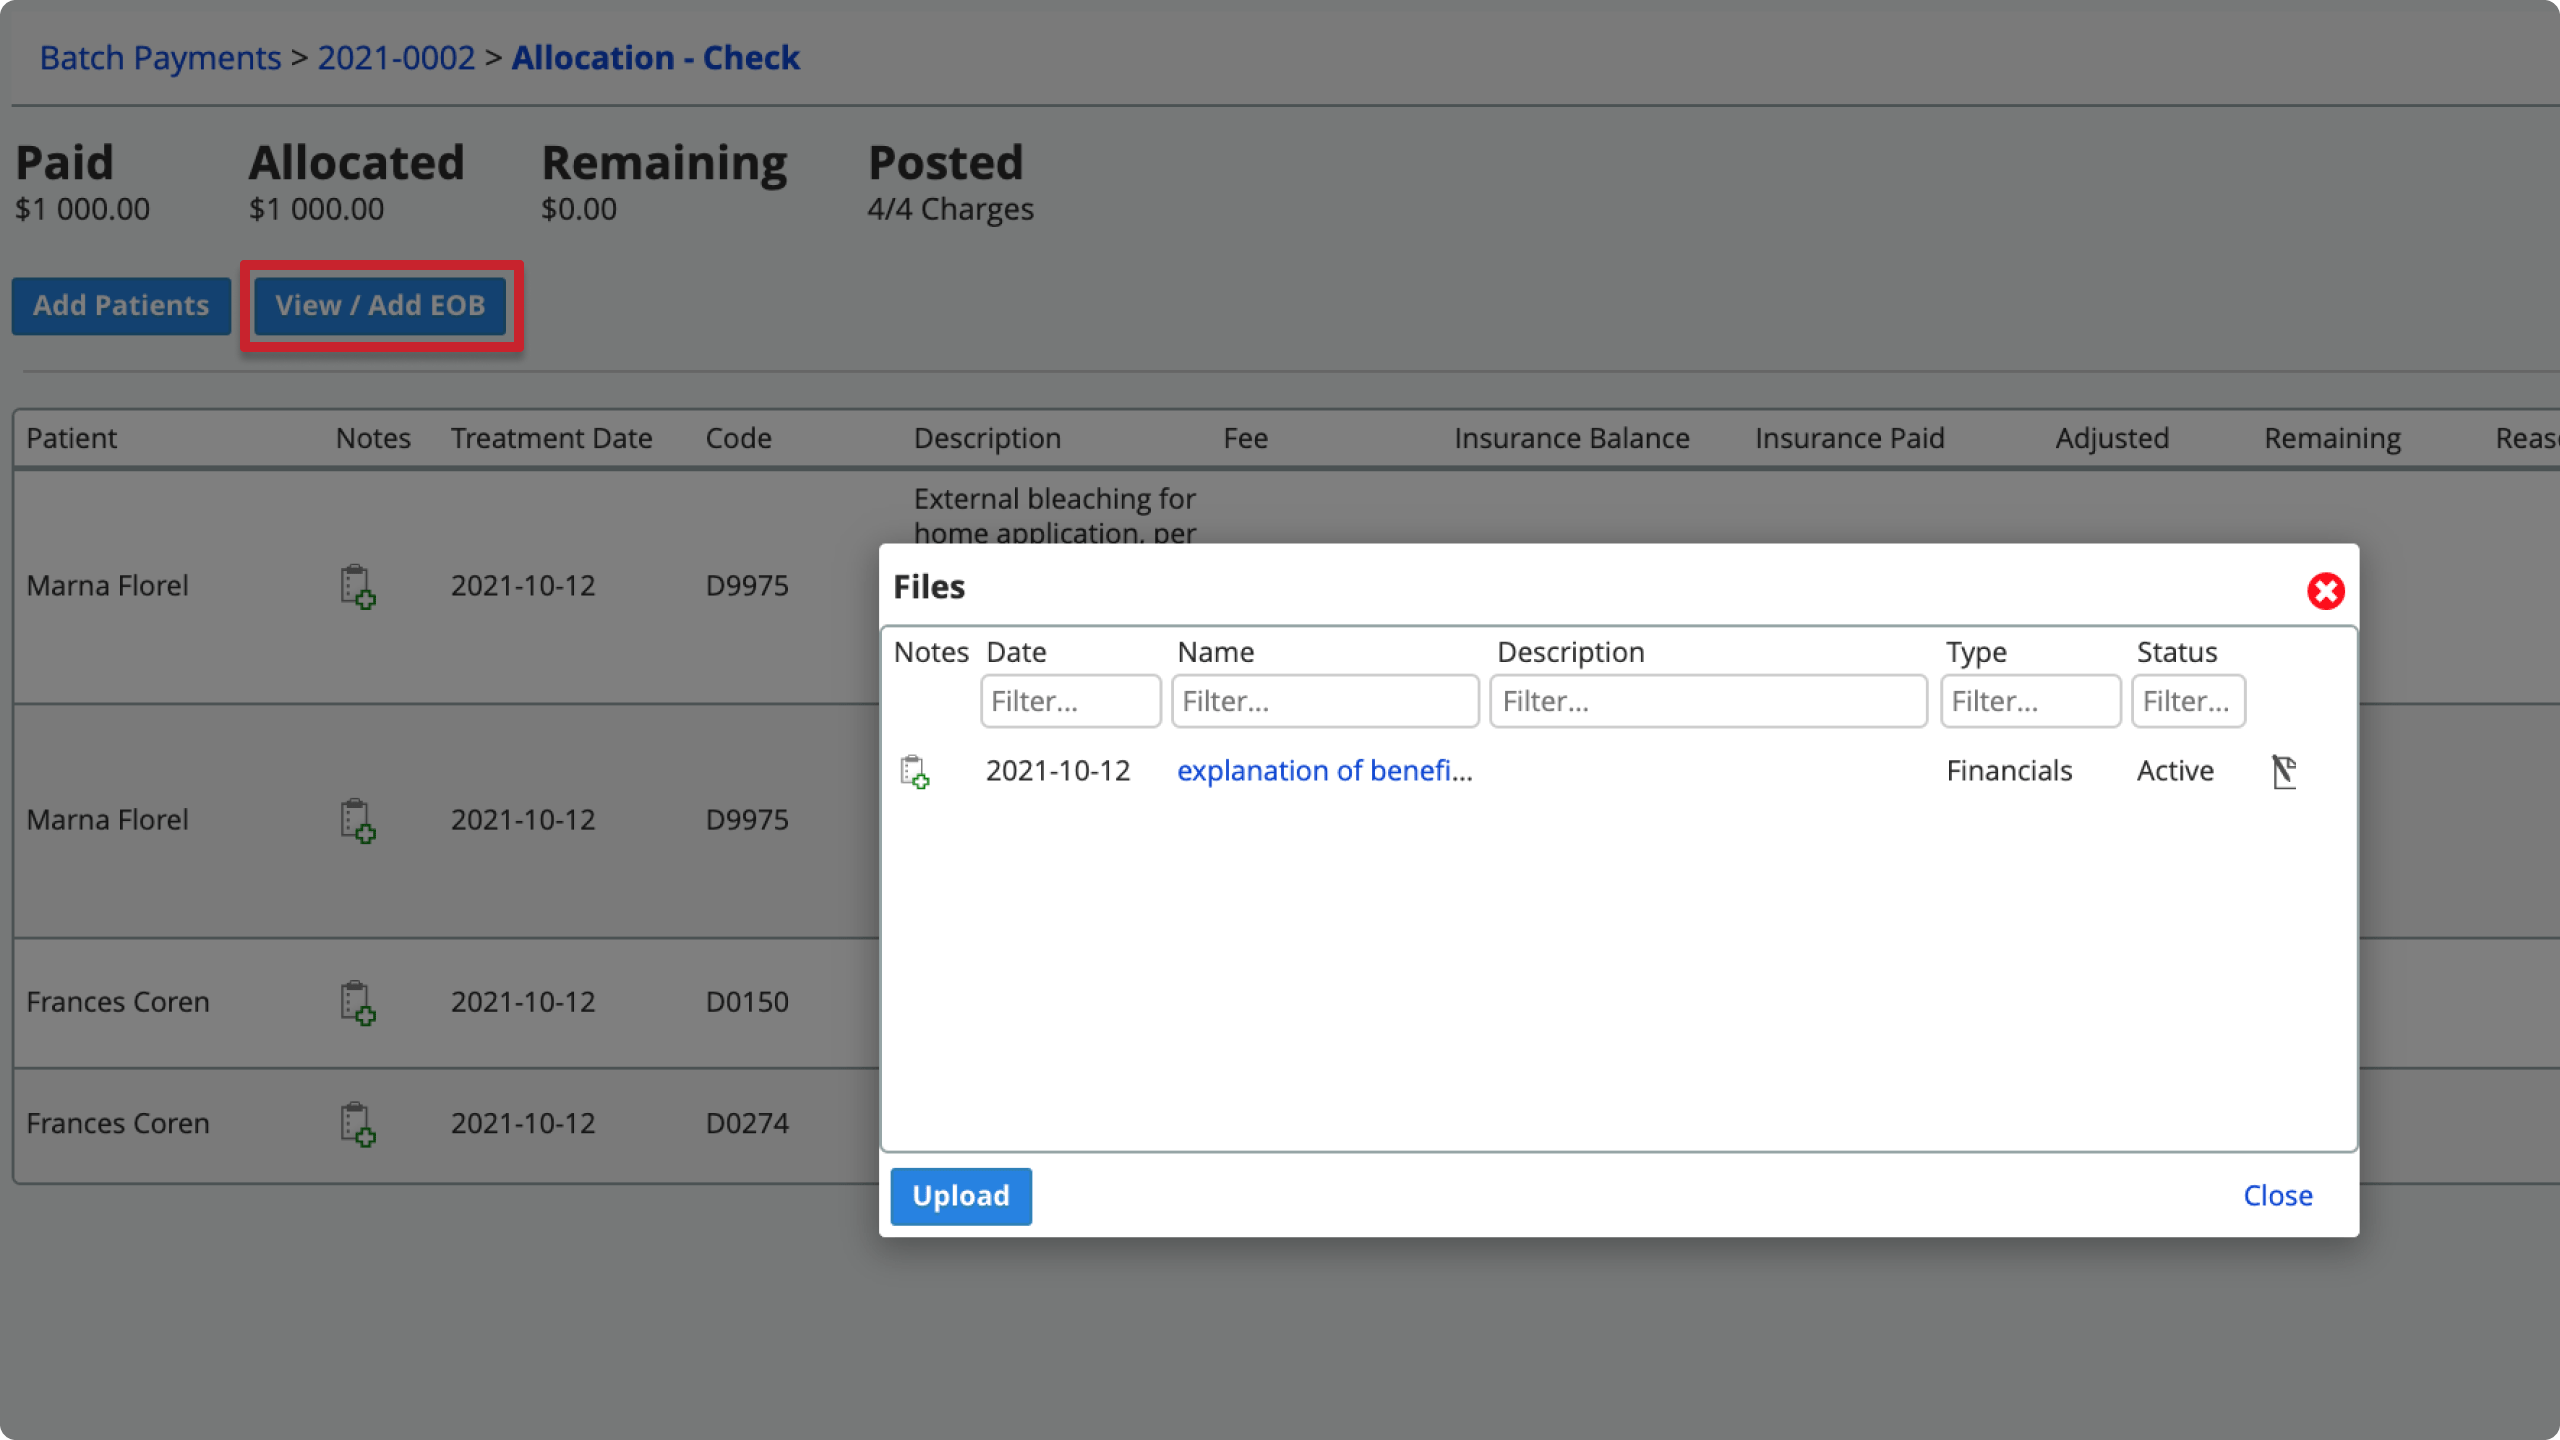
- From the Files window: select a file's name to view it, or select Upload to add another file.
To view the claim or procedure details from an imported ERA, see View ERA details.
Note: Payment based on incorrect fee
While allocating payments, you may notice an asterisk on the fee and insurance charge. This indicates an incorrect fee.
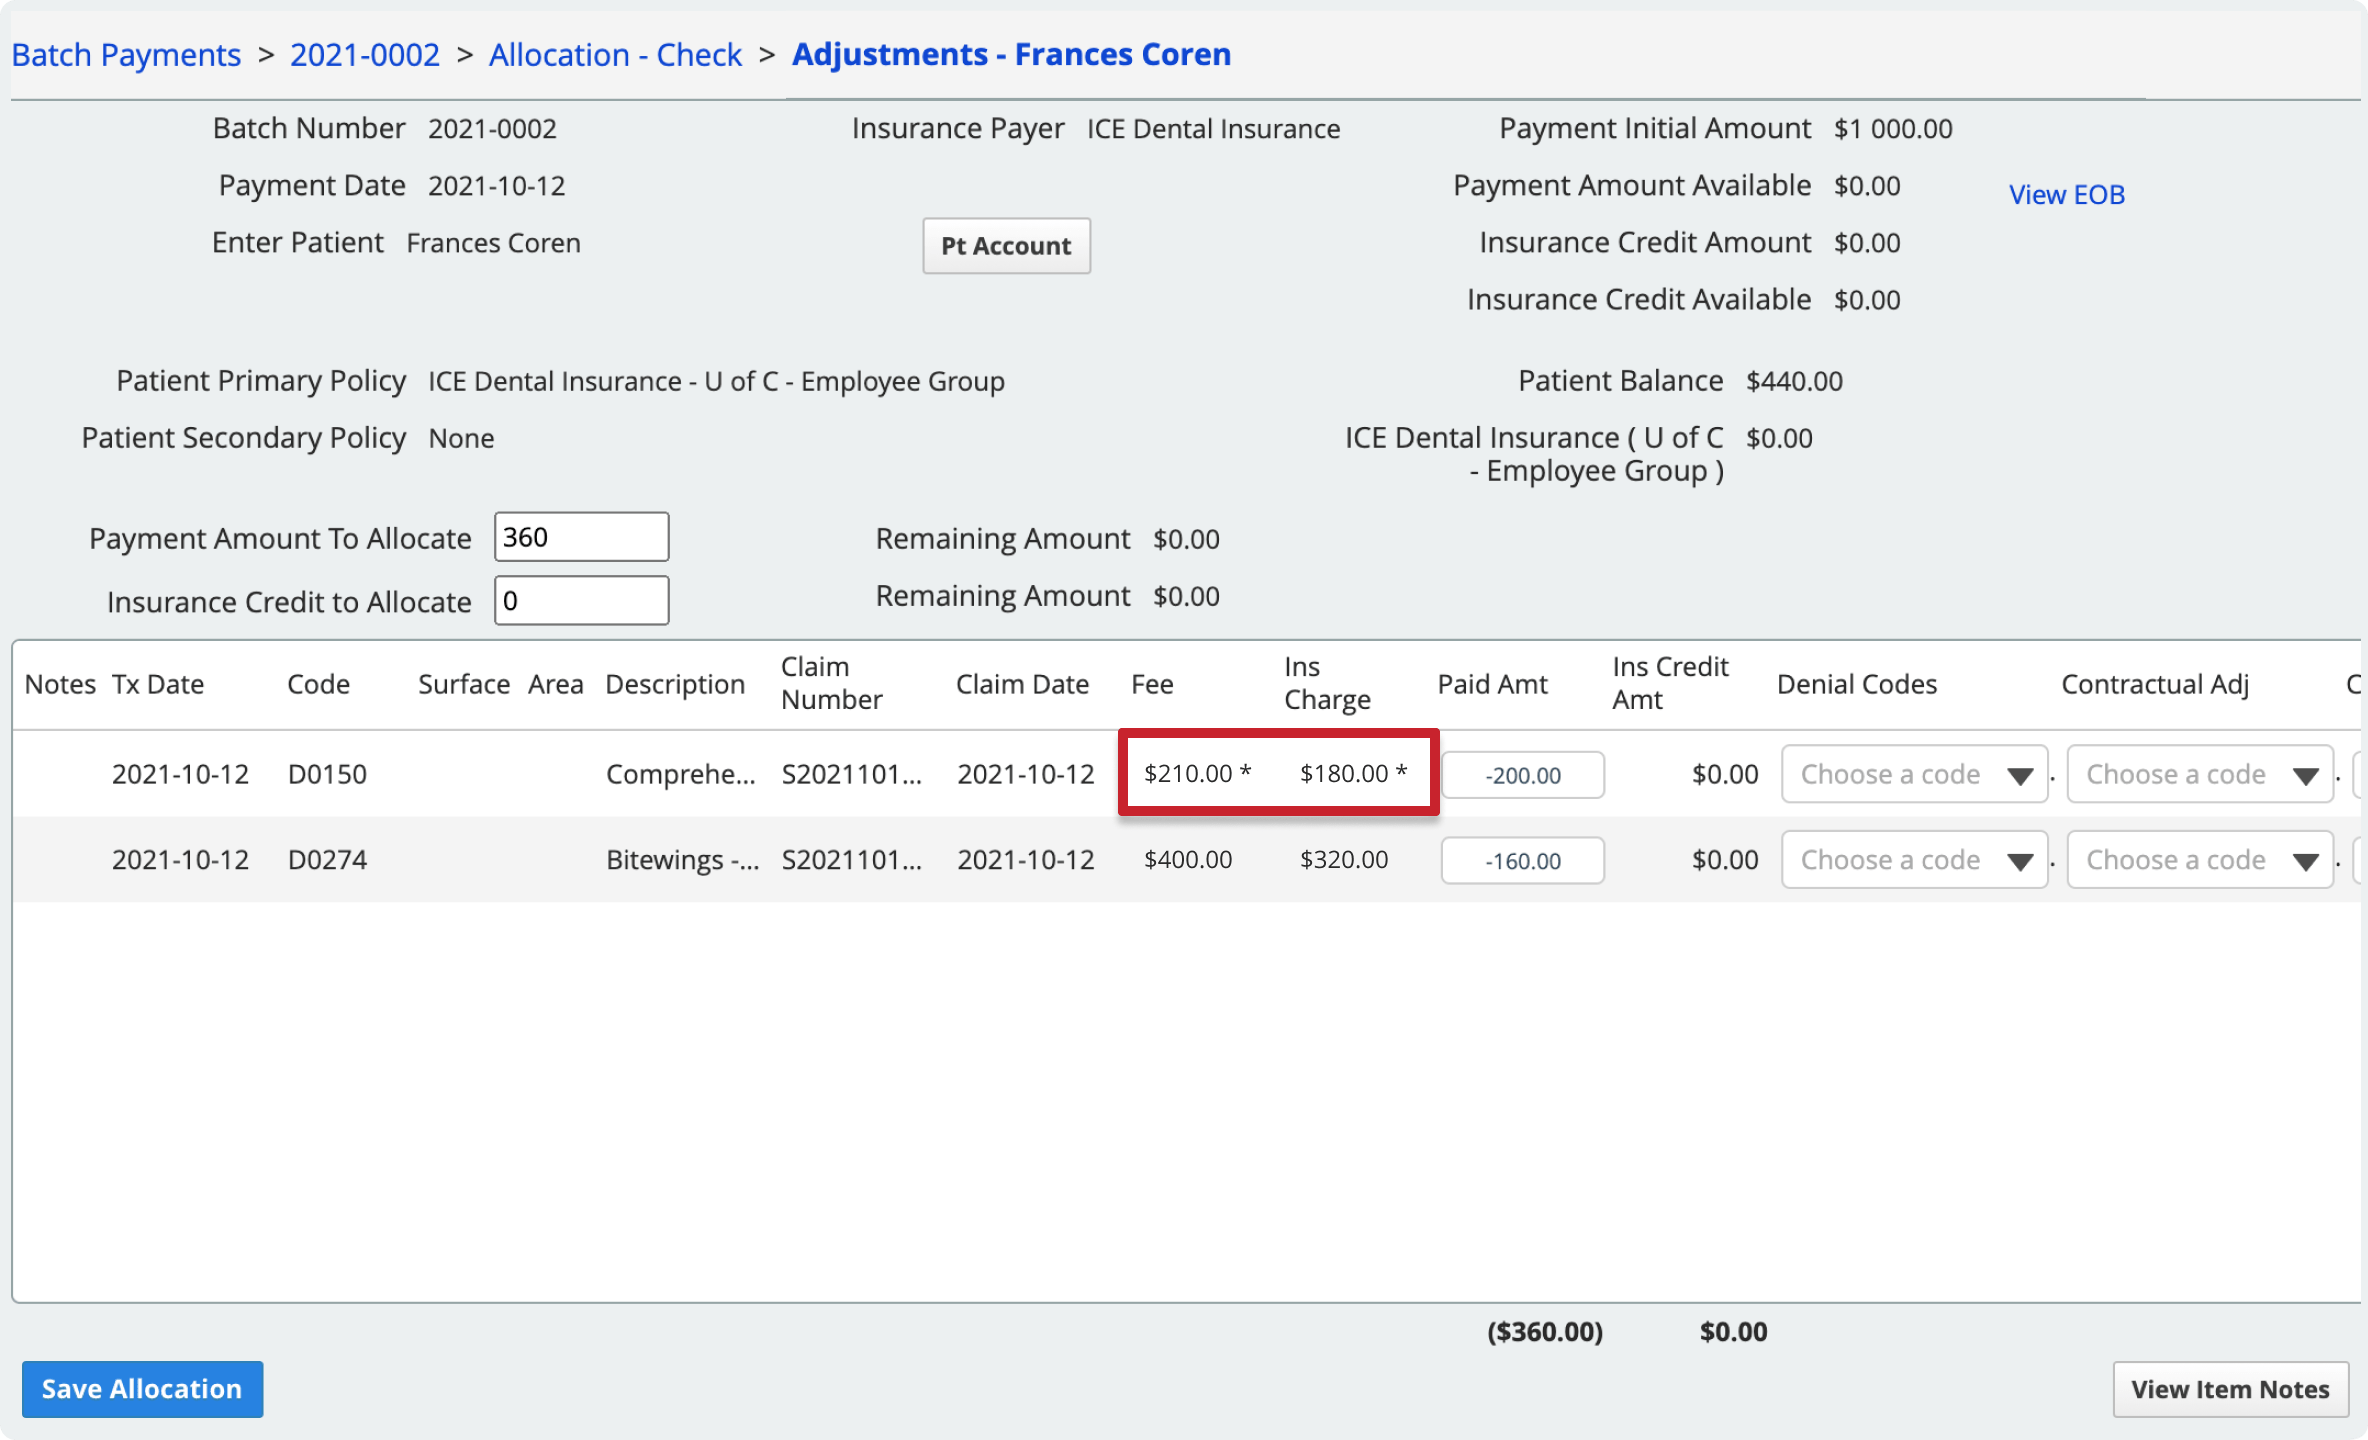
An incorrect fee may occur when a charge is adjusted after the claim has already been submitted to insurance.
- For example, if the original $250 charge was adjusted to $210 after the claim was submitted, then the EOB will show an insurance payment based on the $250 incorrect fee.
- In the screenshot example, insurance paid $200 based on the $250 charge, but they actually only need to pay $180 based on the $210 charge.
Hover the insurance charge amount to see what the original charge was.
The overpayment options allow you to process the overpayment based on what the insurance carrier has instructed you to do with the overpayment.