Practice settings: document templates
All of the documents you and your team use, whether to collect information in forms, or to record clinical details in progress notes, are created from templates configured inside Practice > Practice Settings > Document Templates
You can use the configuration options to create brand new templates, organize templates into folders, reorder the sections of existing templates, or adjust the wording of individual questions and responses.
Configuration Tip: Structured Content
To help you identify different kinds of document templates you may want to configure, check out the Collaboration Sharing Center.
It contains a regularly updated library of structured content that can be imported to your server and customized for your use.
Organize a folder of templates
You can only find and fill out a new document on a patient record if the document template is placed inside a folder.
The document template folders also help you organize your templates by creating a structure that makes it easier for people to find the templates they need while working.
- Go to Practice > Practice Settings > Document Templates > Template Folders
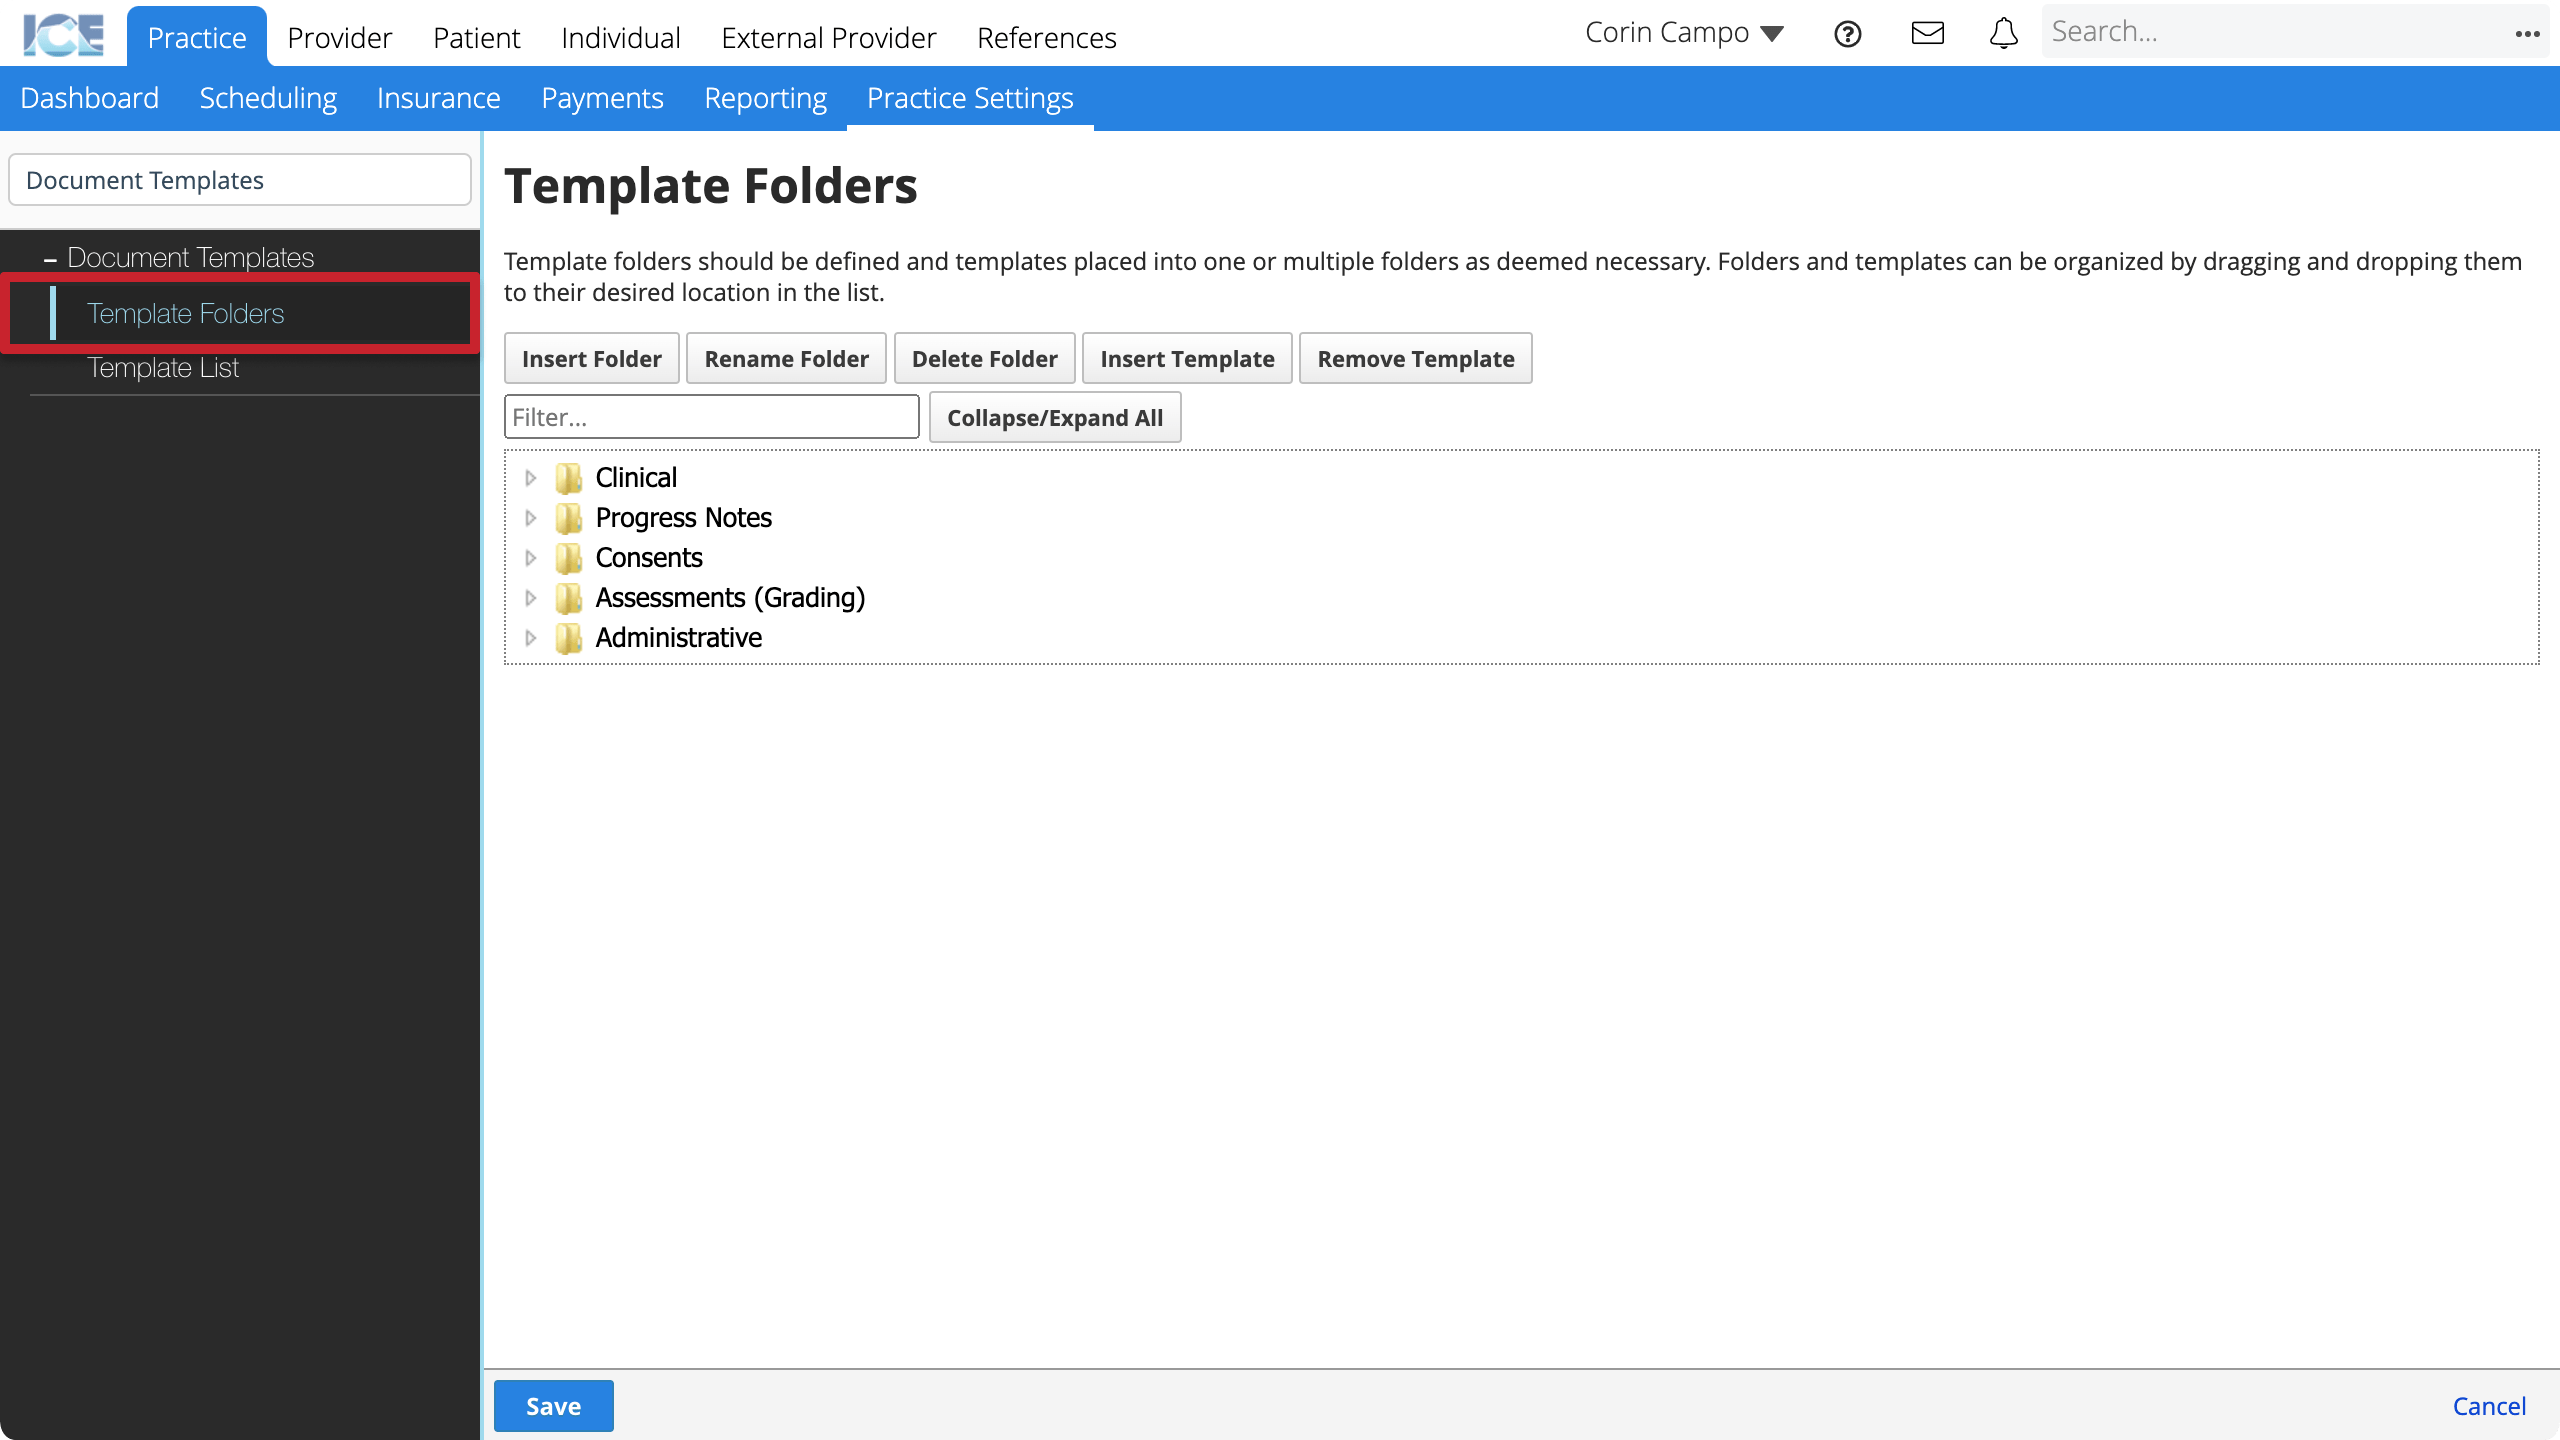
- Select the action buttons at the top of the workspace to manage folders and which templates they contain.
- Insert Folder creates a new folder.
- To create a subfolder, select the parent folder before selecting Insert Folder.
- Rename Folder edits the name of the selected folder.
- Delete Folder removes the selected folder from the list.
- If you delete a folder, the templates inside are just removed from that folder. They remain in the Template List and can be added to other folders.
- Insert Template adds templates to the selected folder.
- You can add the same template to multiple folders.
- Remove Template takes templates out of the selected folder.
- If you remove a template from a folder, the template is still in the Template List and can be added to other folders.
- Insert Folder creates a new folder.
Create a template
When you first create a document template in Practice Settings, you can specify basic information about the document template like name, type, and description.
After you create a document template, you can define its content by using sections to organize text and questions.
To learn more about adding sections, text, and questions, refer to Configure template content.
- Select Create Template
or
To start from an existing template, select in the Actions column of a template you want to duplicate
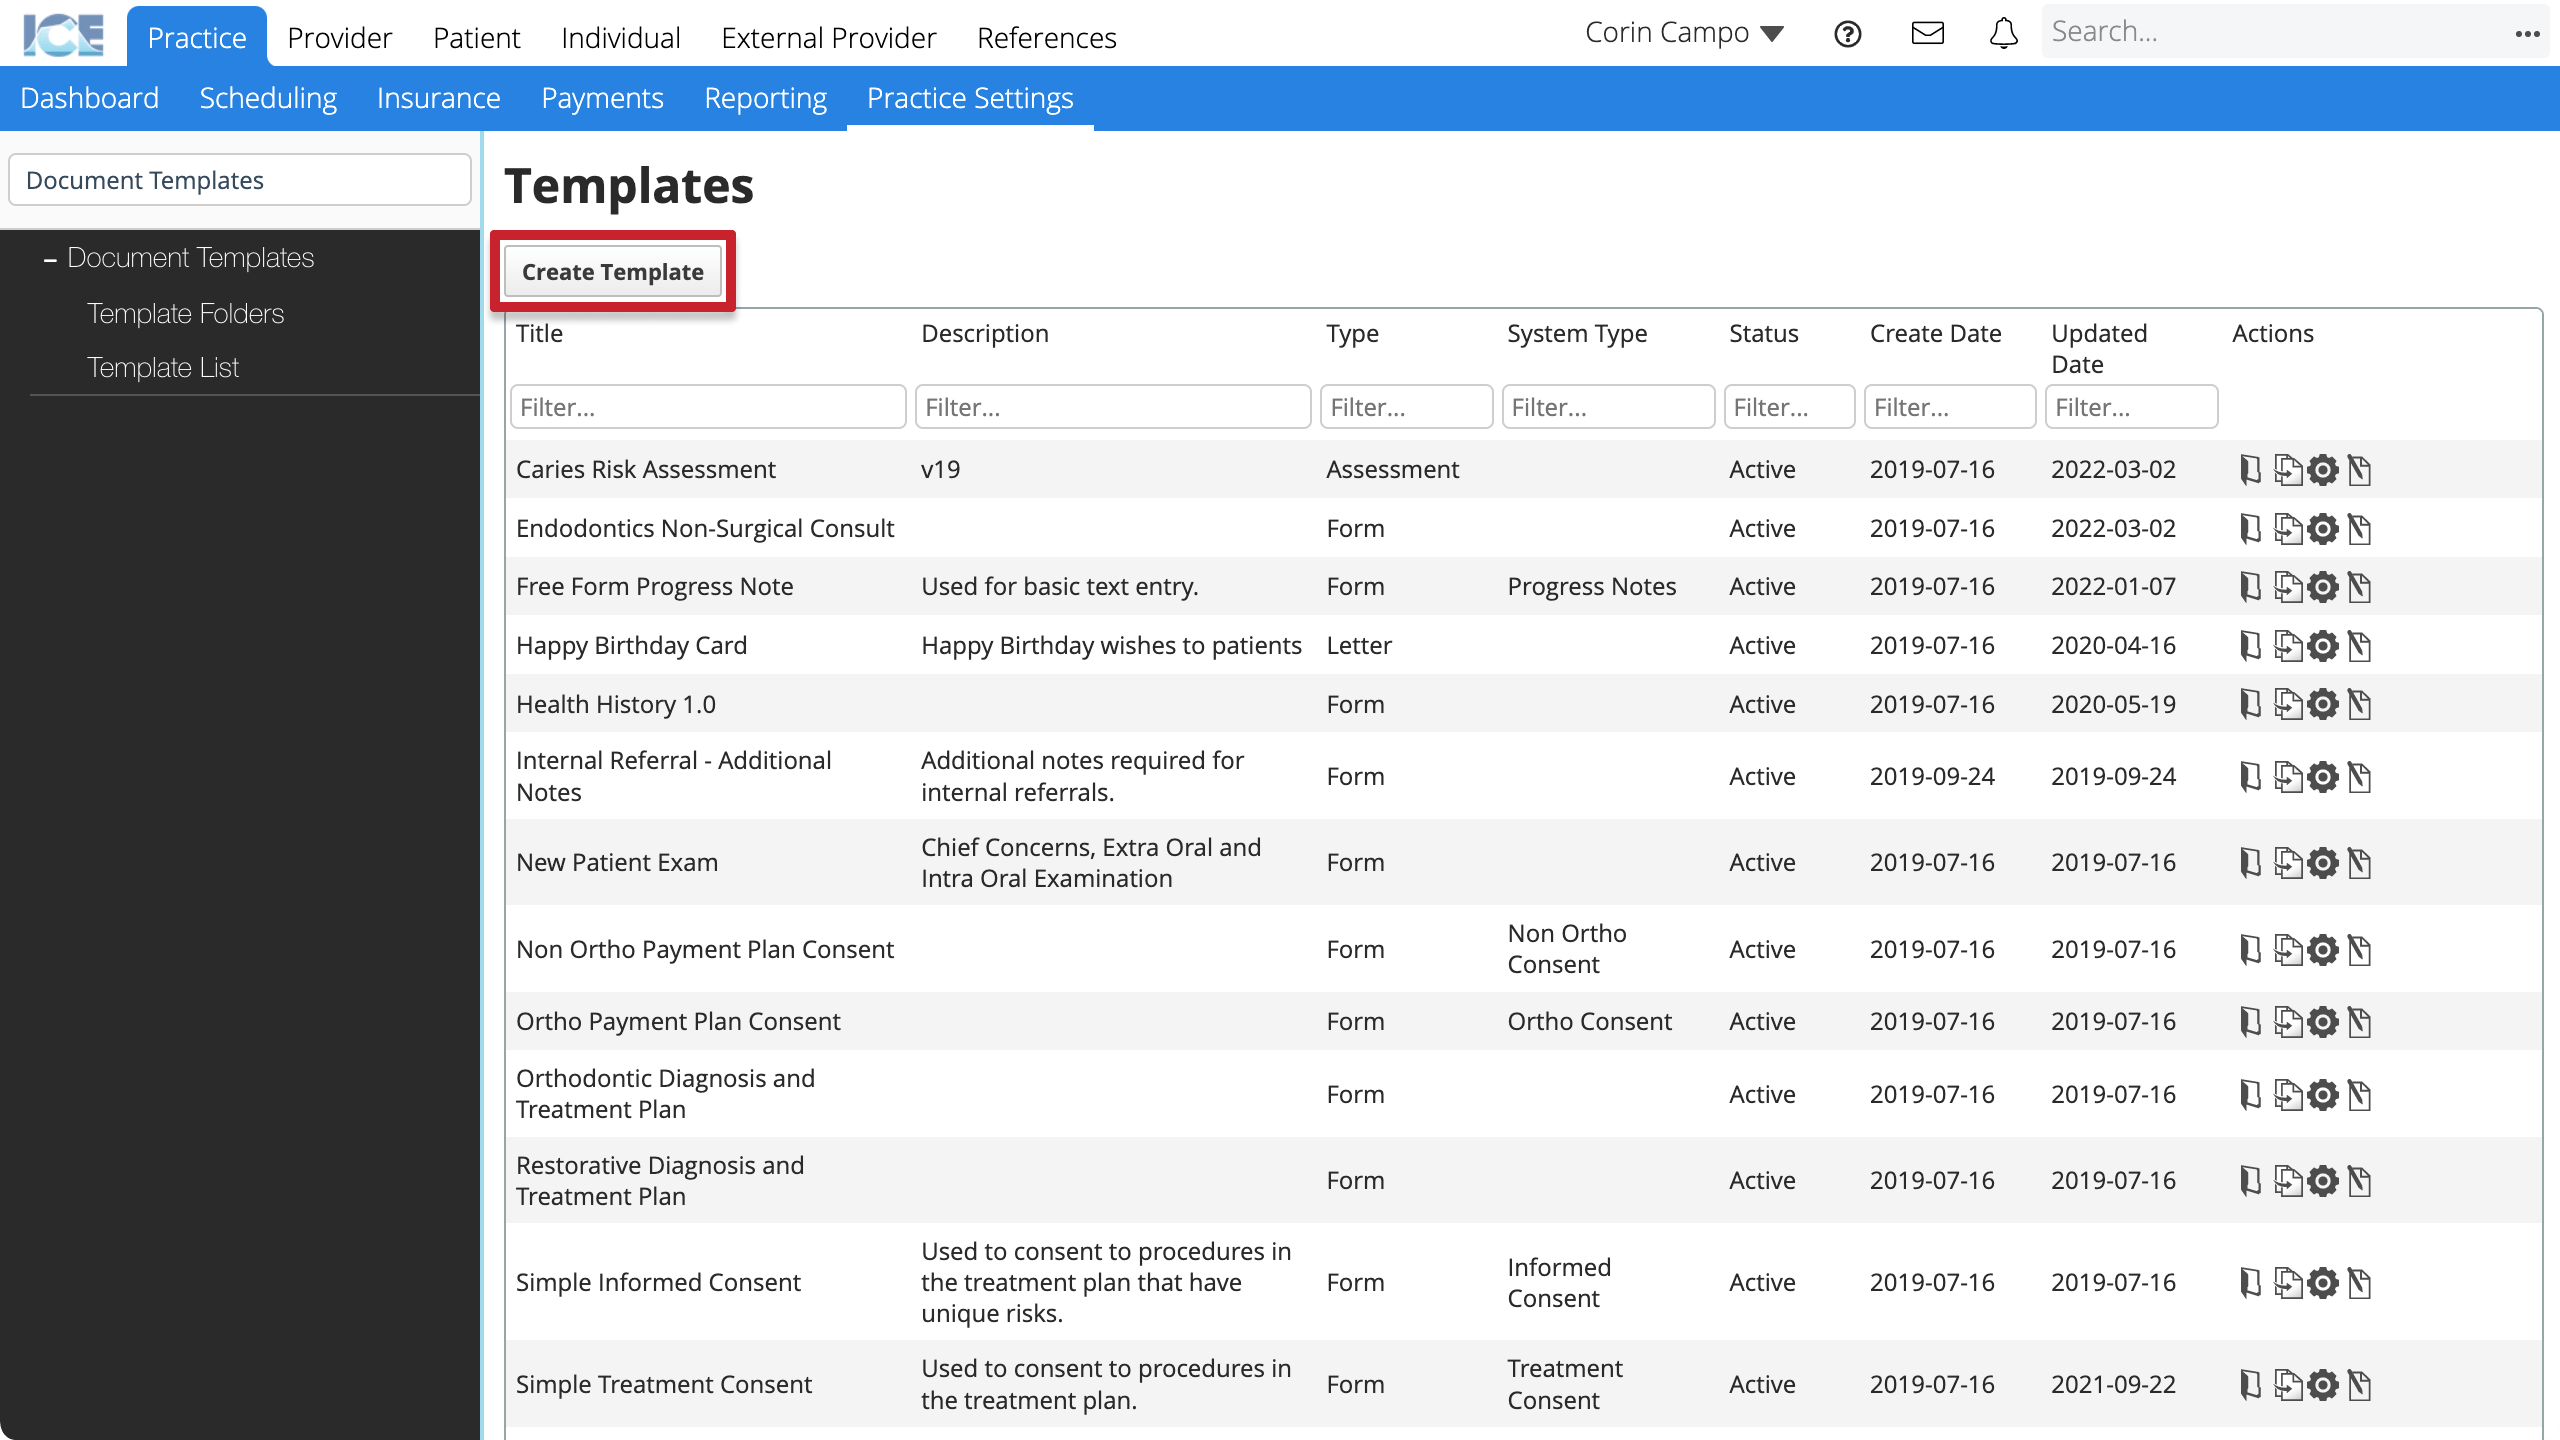
- Enter the required information into the New Template dialog
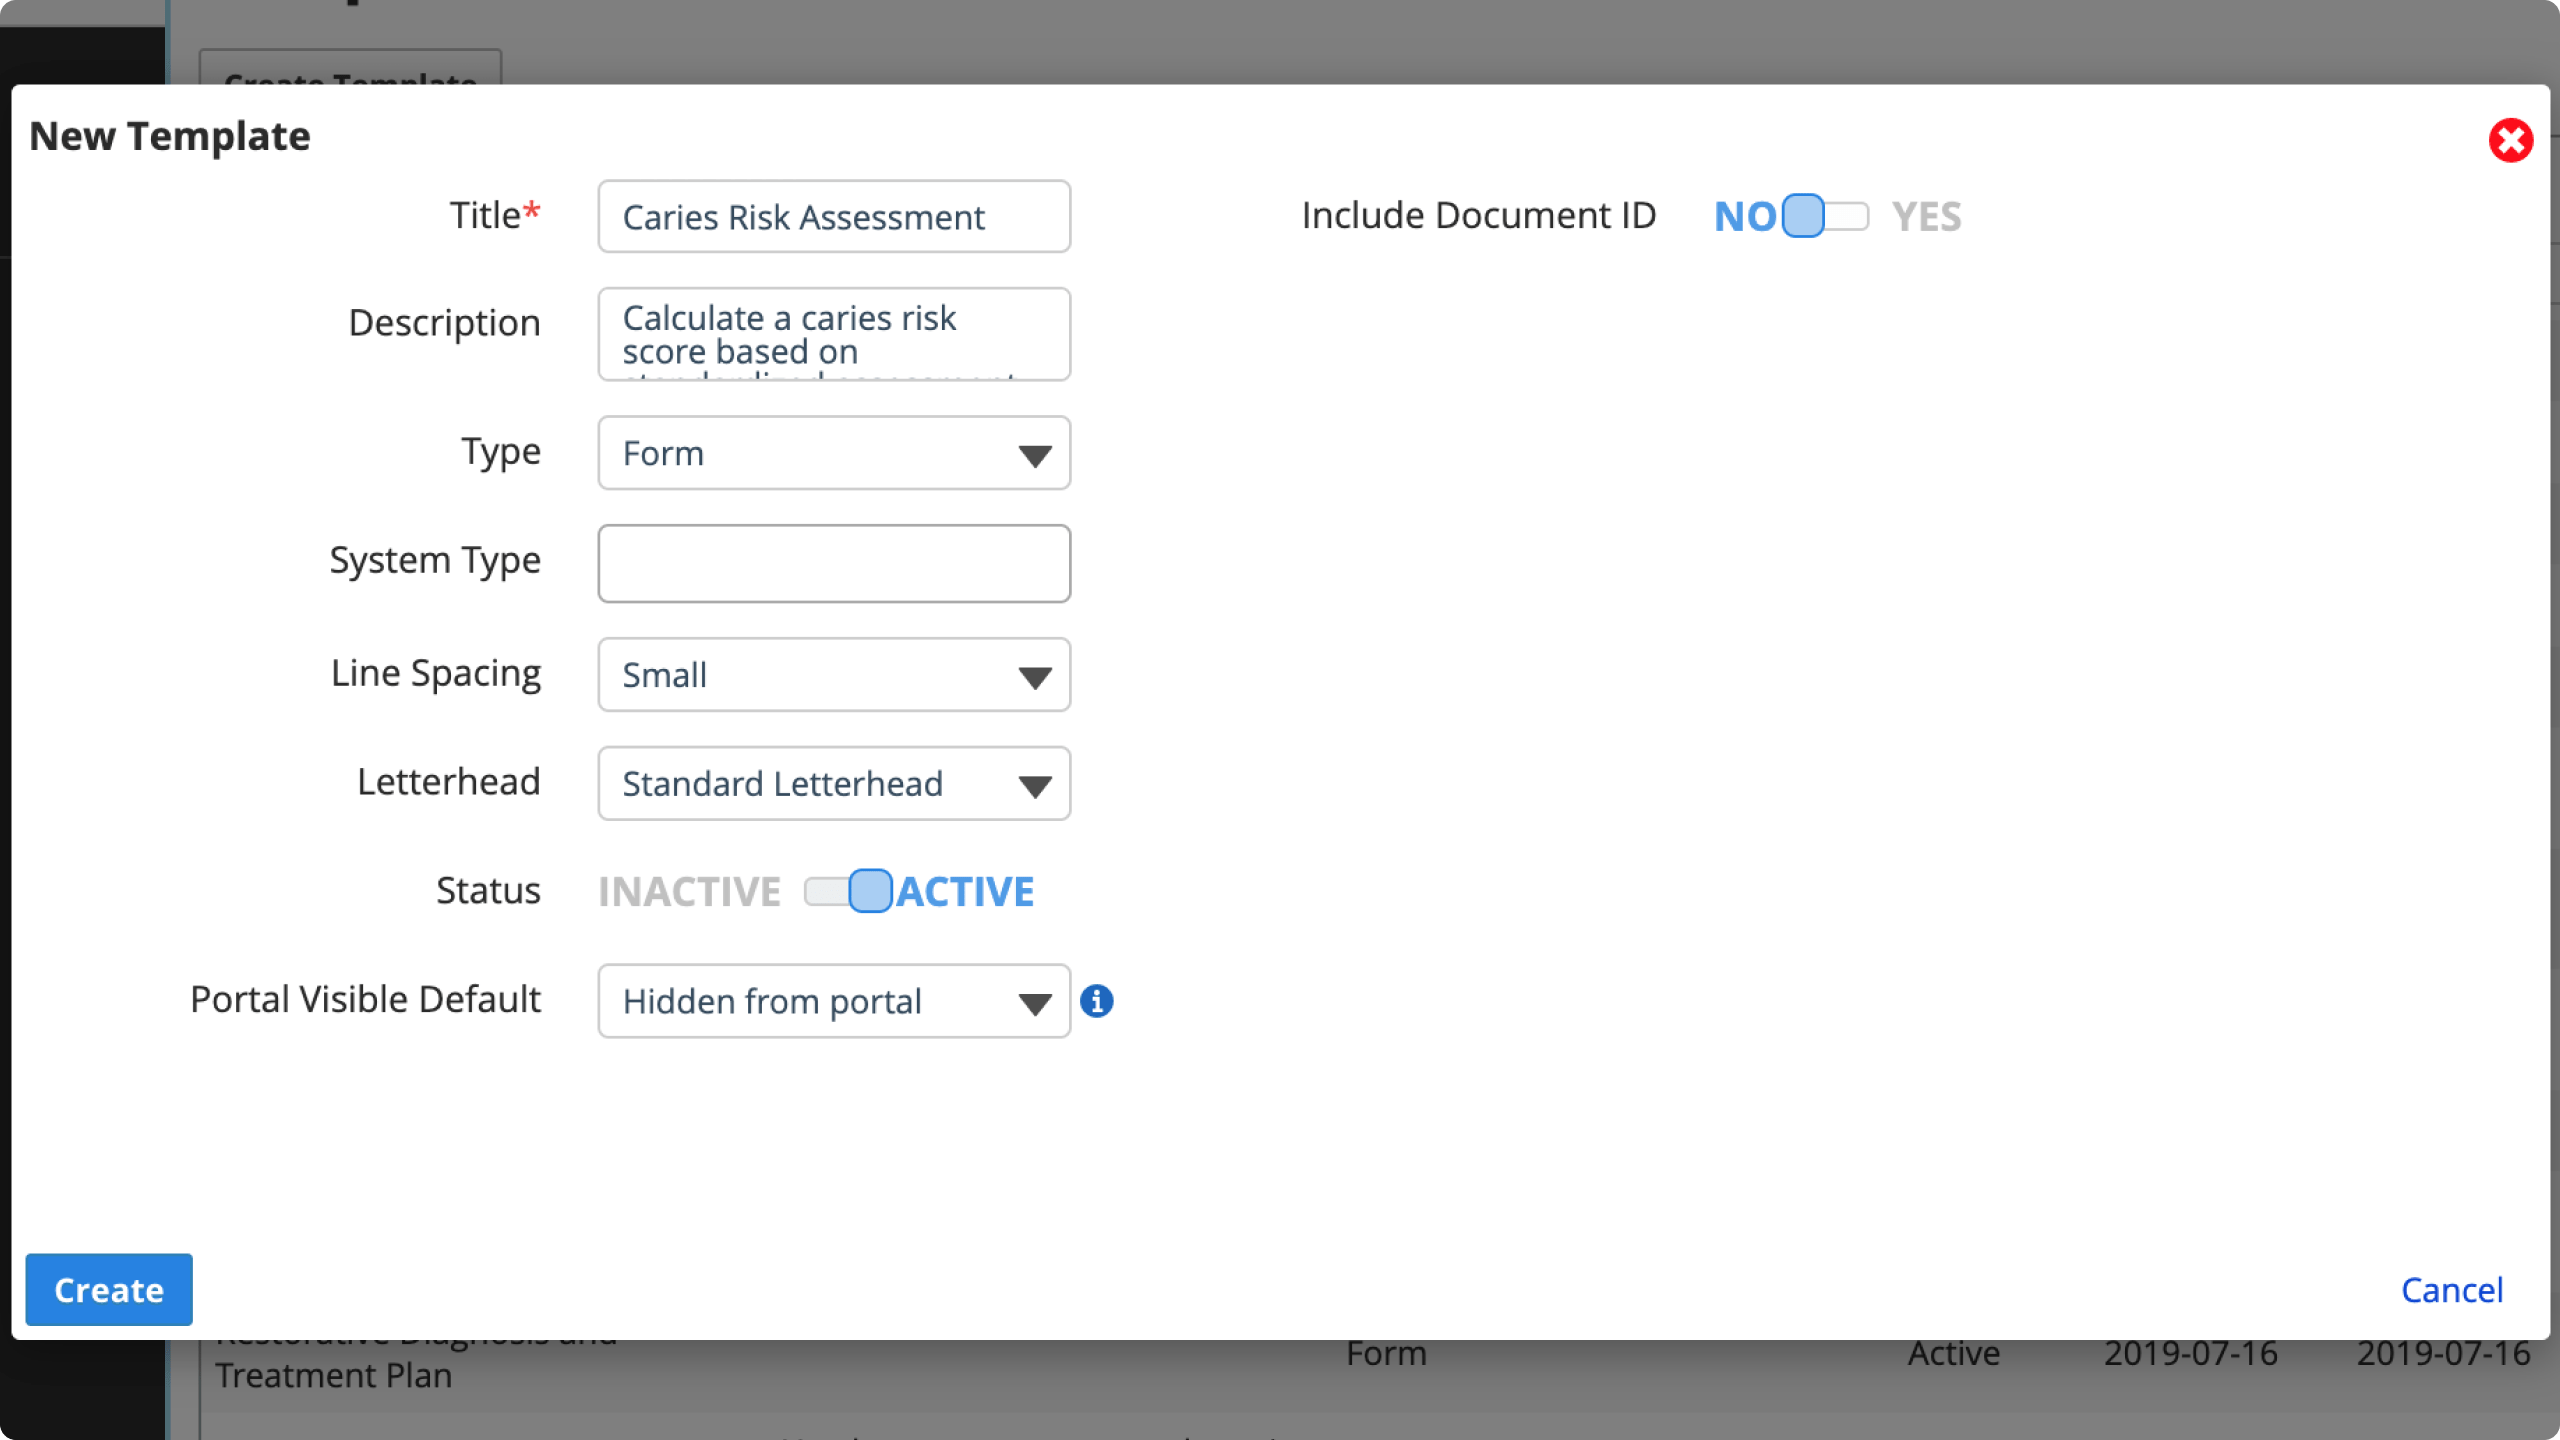
- Title: A short description that appears in the document list.
- Description: A longer description that appears in the template selector when someone picks a new document to complete.
- Write something that helps people understand what this template is meant to do.
- Type
- Form: This is a standard form that is filled out on the patient's record. Often used for information gathering, e.g., health histories, examination forms, etc.
- Assessment: Assessments allow you to calculate a value based on the answers entered into the document. For example, a Caries Risk Assessment that calculates a score based on the patient's responses.
- Grading: Grading documents allow providers (often one student and one faculty) to evaluate a student's treatment of an encounter. They are associated with the provider’s record, not the patient’s record.
- Letter: A letter is primarily used for printing and sharing with a patient. It may include many data hooks and fill-in fields to customize the letter content for a patient.
- System Type
- If you leave System Type blank, the template is accessible from the Documents panel.
- If you select one of the options, the template is accessible in areas specific to that workflow:
- Informed Consent: Accessible from Documents panel, and Treatment Planning when creating a consent from proposed procedures.
- Lab Order: Accessible from Documents panel.
- Non Ortho Consent: Accessible from Documents panel, and Financials > Payment Plans when creating a consent for a payment plan schedule.
- Oral Pathology: Accessible from Documents panel.
- Ortho Consent: Accessible from Documents panel, and Financials > Payment Plans when creating a consent for a payment plan schedule.
- Progress Notes: Accessible from the Progress Notes panels.
- Treatment Consent: Accessible from Documents panel, and Treatment Planning when creating a consent from proposed procedures.
- System type also helps with organizing, filtering, and reporting.
- Score Ranges: For assessment document types only. Set score ranges that correspond to different assessment result labels. When you add question choices, you can configure a score value for each choice in the document that the system totals to decide which assessment result to display.
- Requires Additional Submission: For grading document types only. Require the person who fills out and locks this document to create and assign a second copy to another provider – usually a supervisor or instructor – for them to fill out.
- Line Spacing: Choose a style of line spacing for when you're viewing the document.
- Letterhead: What letterhead do you want to use when printing this document?
- Status: Active templates appear for use in the system. Inactive templates cannot be used, but appear in historical references.
- Portal Visible Default: Choose if you want documents created from this template to automatically become visible in a patient's portal for viewing and/or editing. You can manually change a document's portal visibility after adding it to a patient's Documents panel by using the PV checkbox.
- Hidden from portal: This document does not automatically appear in the patient's portal when you add or lock it.
- Portal Visible on add: This document becomes visible in the patient's portal as soon as you add the document to the patient's record.
- Portal Visible on lock: This document becomes visible in the patient's portal after it is filled out and locked.
- Include Document ID: You can configure an incremental ID number the system assigns to each copy of a document created from this document template. The ID number appears in the Documents panel and is useful for document tracking.

- If you use a yearly prefix, the incremental suffix restarts from the start number in the new year. For example, from CRA-2022-782 on December 31st to CRA-2023-001 on January 1st.
- If the incremental suffix reaches the limit of the digits setting, it continues by adding another digit. For example, after 999, the next ID is 1000, 1001, and so on.
- Select Create
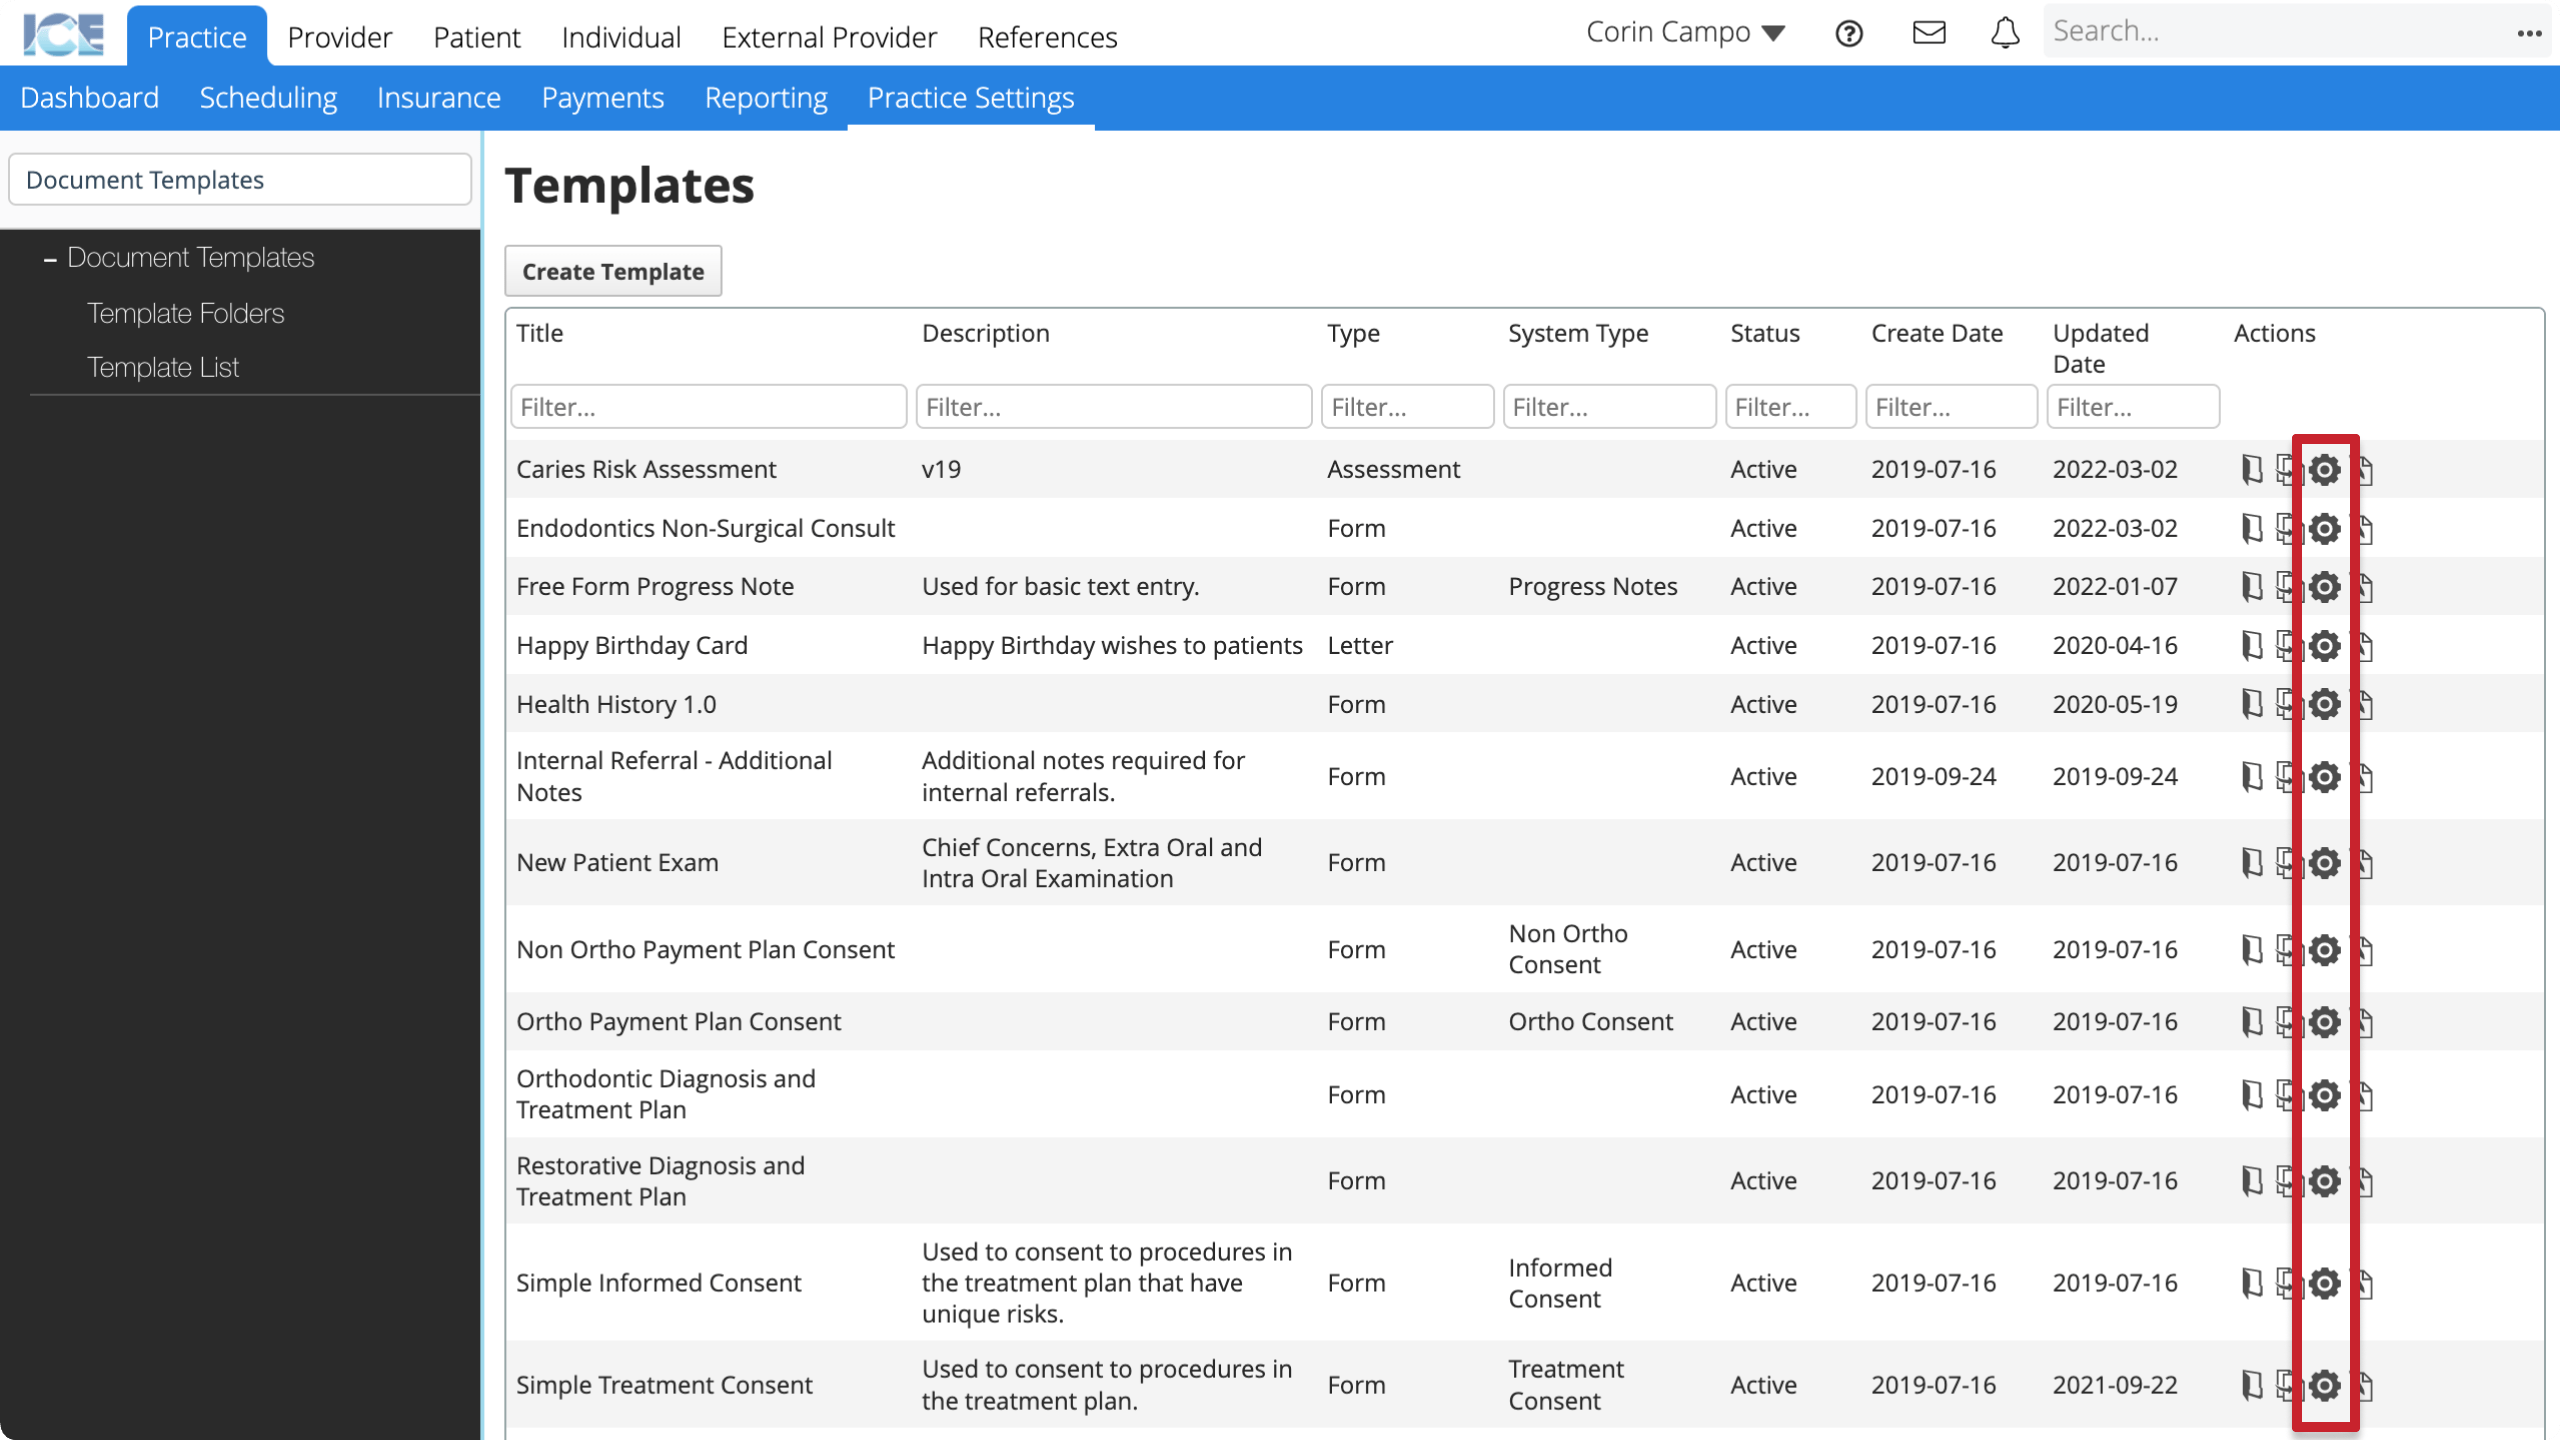
To edit a template's settings later, select ![]() in the Actions column.
in the Actions column.
To remove an existing template, set its status to Inactive. Inactive templates cannot be used, but appear in historical references.
To start adding text and questions to your template, see Configure template content below.
Edit a template
You can edit the content and settings of all the document templates in your system.
- Go to Practice > Practice Settings > Document Templates > Template List
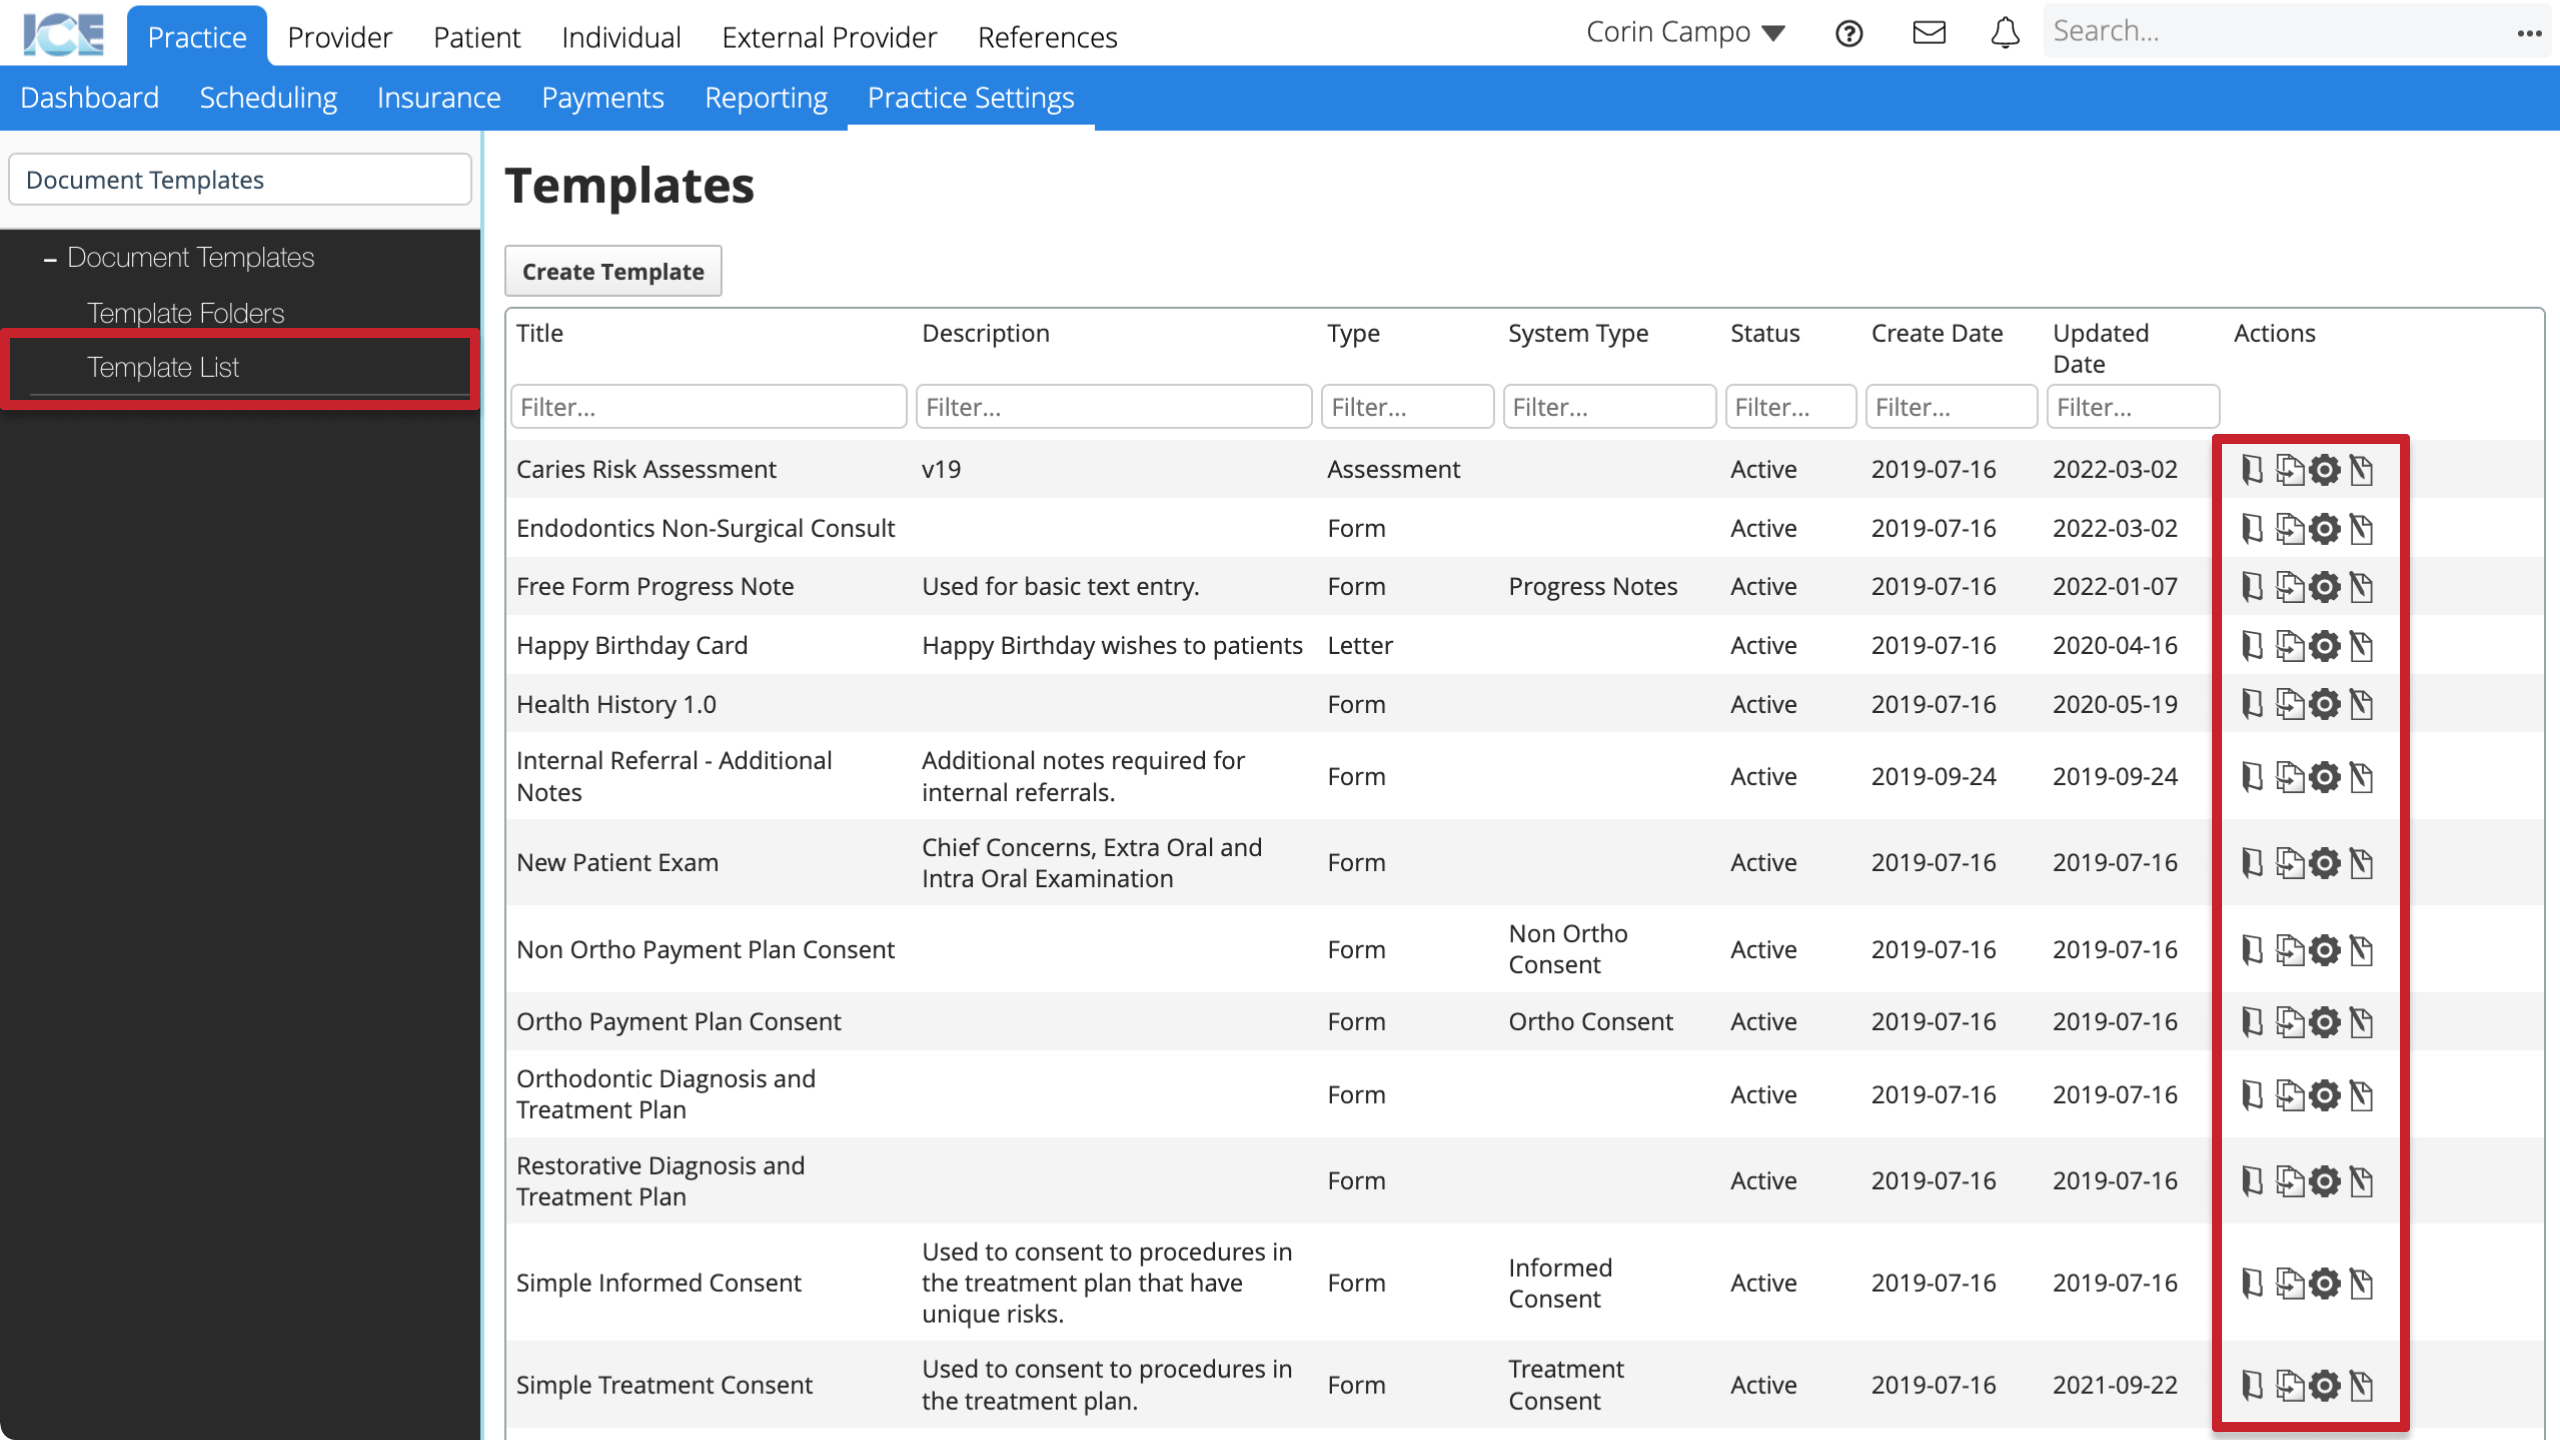
- Select one of the icon buttons in the Actions column to:
 View the folder(s) a template is in.
- Duplicate a template and all its sections.
 Edit the content of a template
- To learn more, see Configure template content.
 Edit the settings of your template.
- To learn more, see Create a template.
Configure template content
Every document template contains one or more sections that may include text, questions, and images.
When you save changes to the content of a template, only new documents created from the template receive your changes. Previously filled out documents are not affected by changes to a template.
- Go to Practice > Practice Settings > Document Templates > Template List
- Select in the Actions column of the template you want to configure
- The Edit Template screen loads for the template
The sections below describe all the tools you have for configuring a document template.
Plan document summary
Before you add your first section, consider the Document Summary feature.
- You can configure a document template to present a summary view after it is filled out.
- This can be helpful when you want to highlight certain positive answers or sections from a much larger document.
- The summary only shows the sections, questions, and answers that were selected when the document was filled out.
- From the summary, you can still review the full document details to see what choices weren't selected or what fields were left blank.
- You define which sections, questions, and answers to include in the summary when you configure the template in Practice Settings.
To learn more about how users interact with a document summary, see Review a form summary.
If you don't want to use the Document Summary feature, leave all of the Include In Document Summary toggles set to the default No.
Add sections
Each section acts as a distinct group of questions or text within a template. You need at least one section to start adding questions.
You can drag and drop sections in order to re-order the content in your template.
- Select Add Section
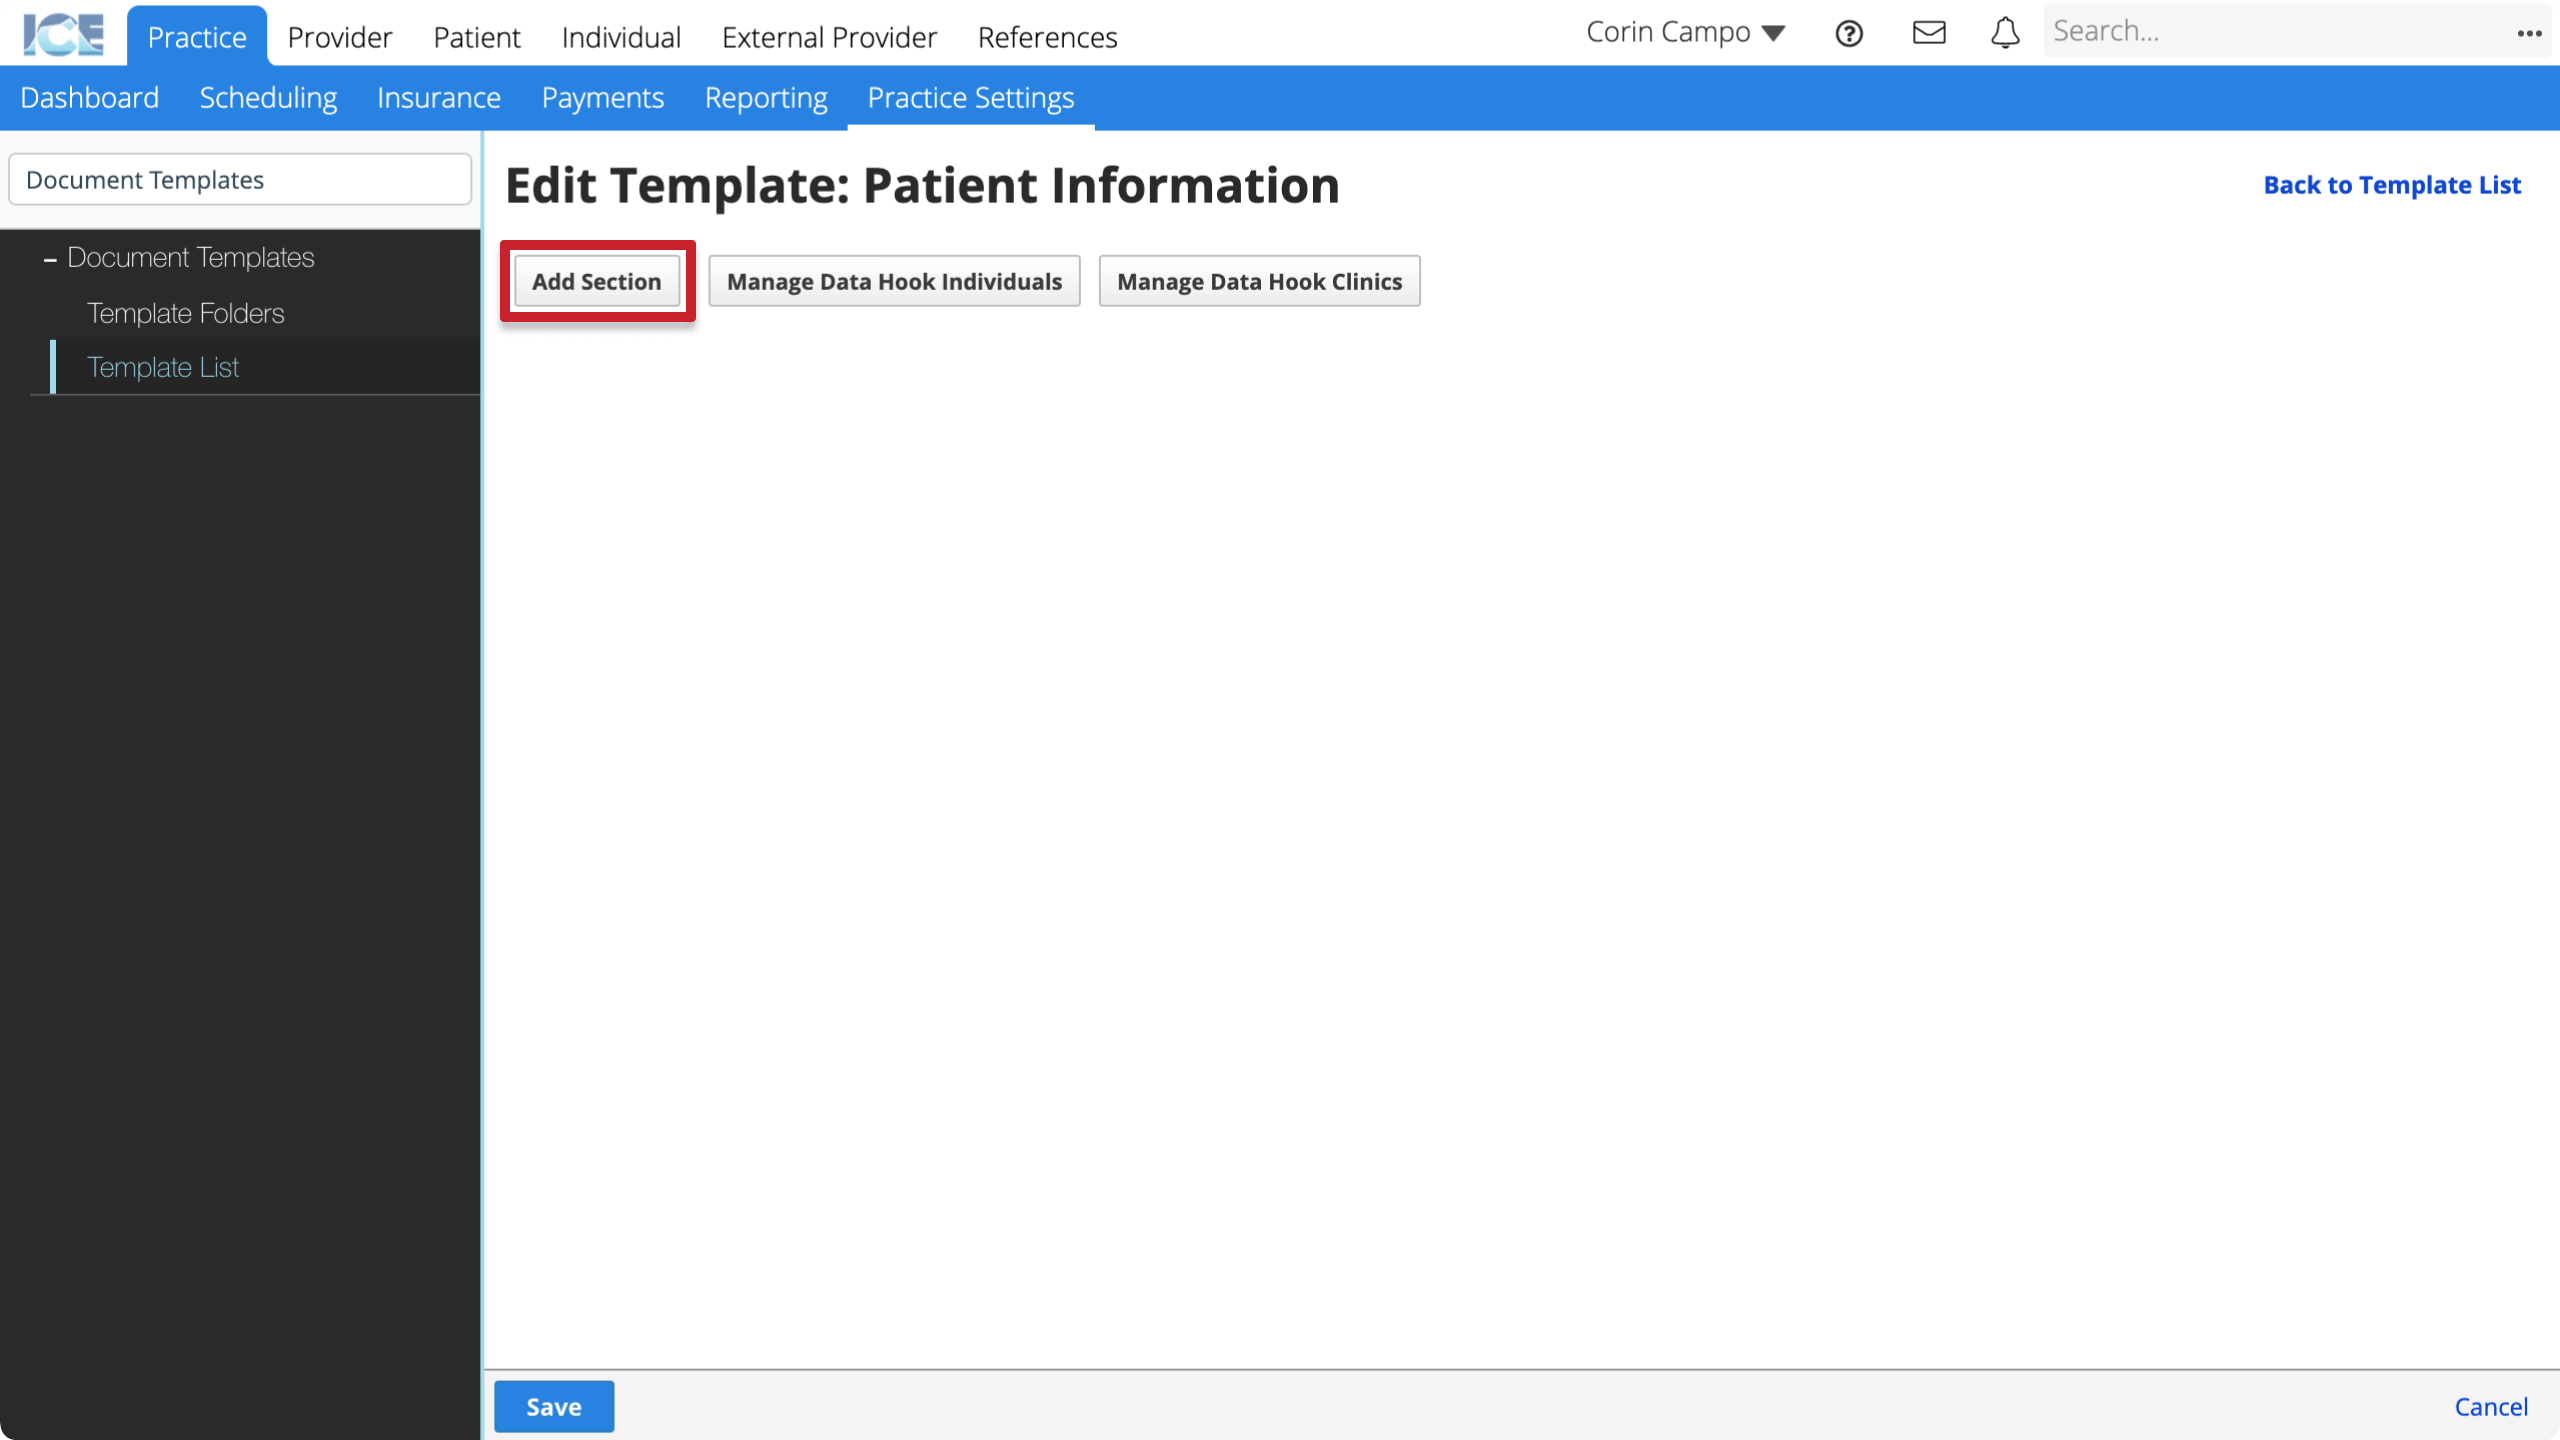
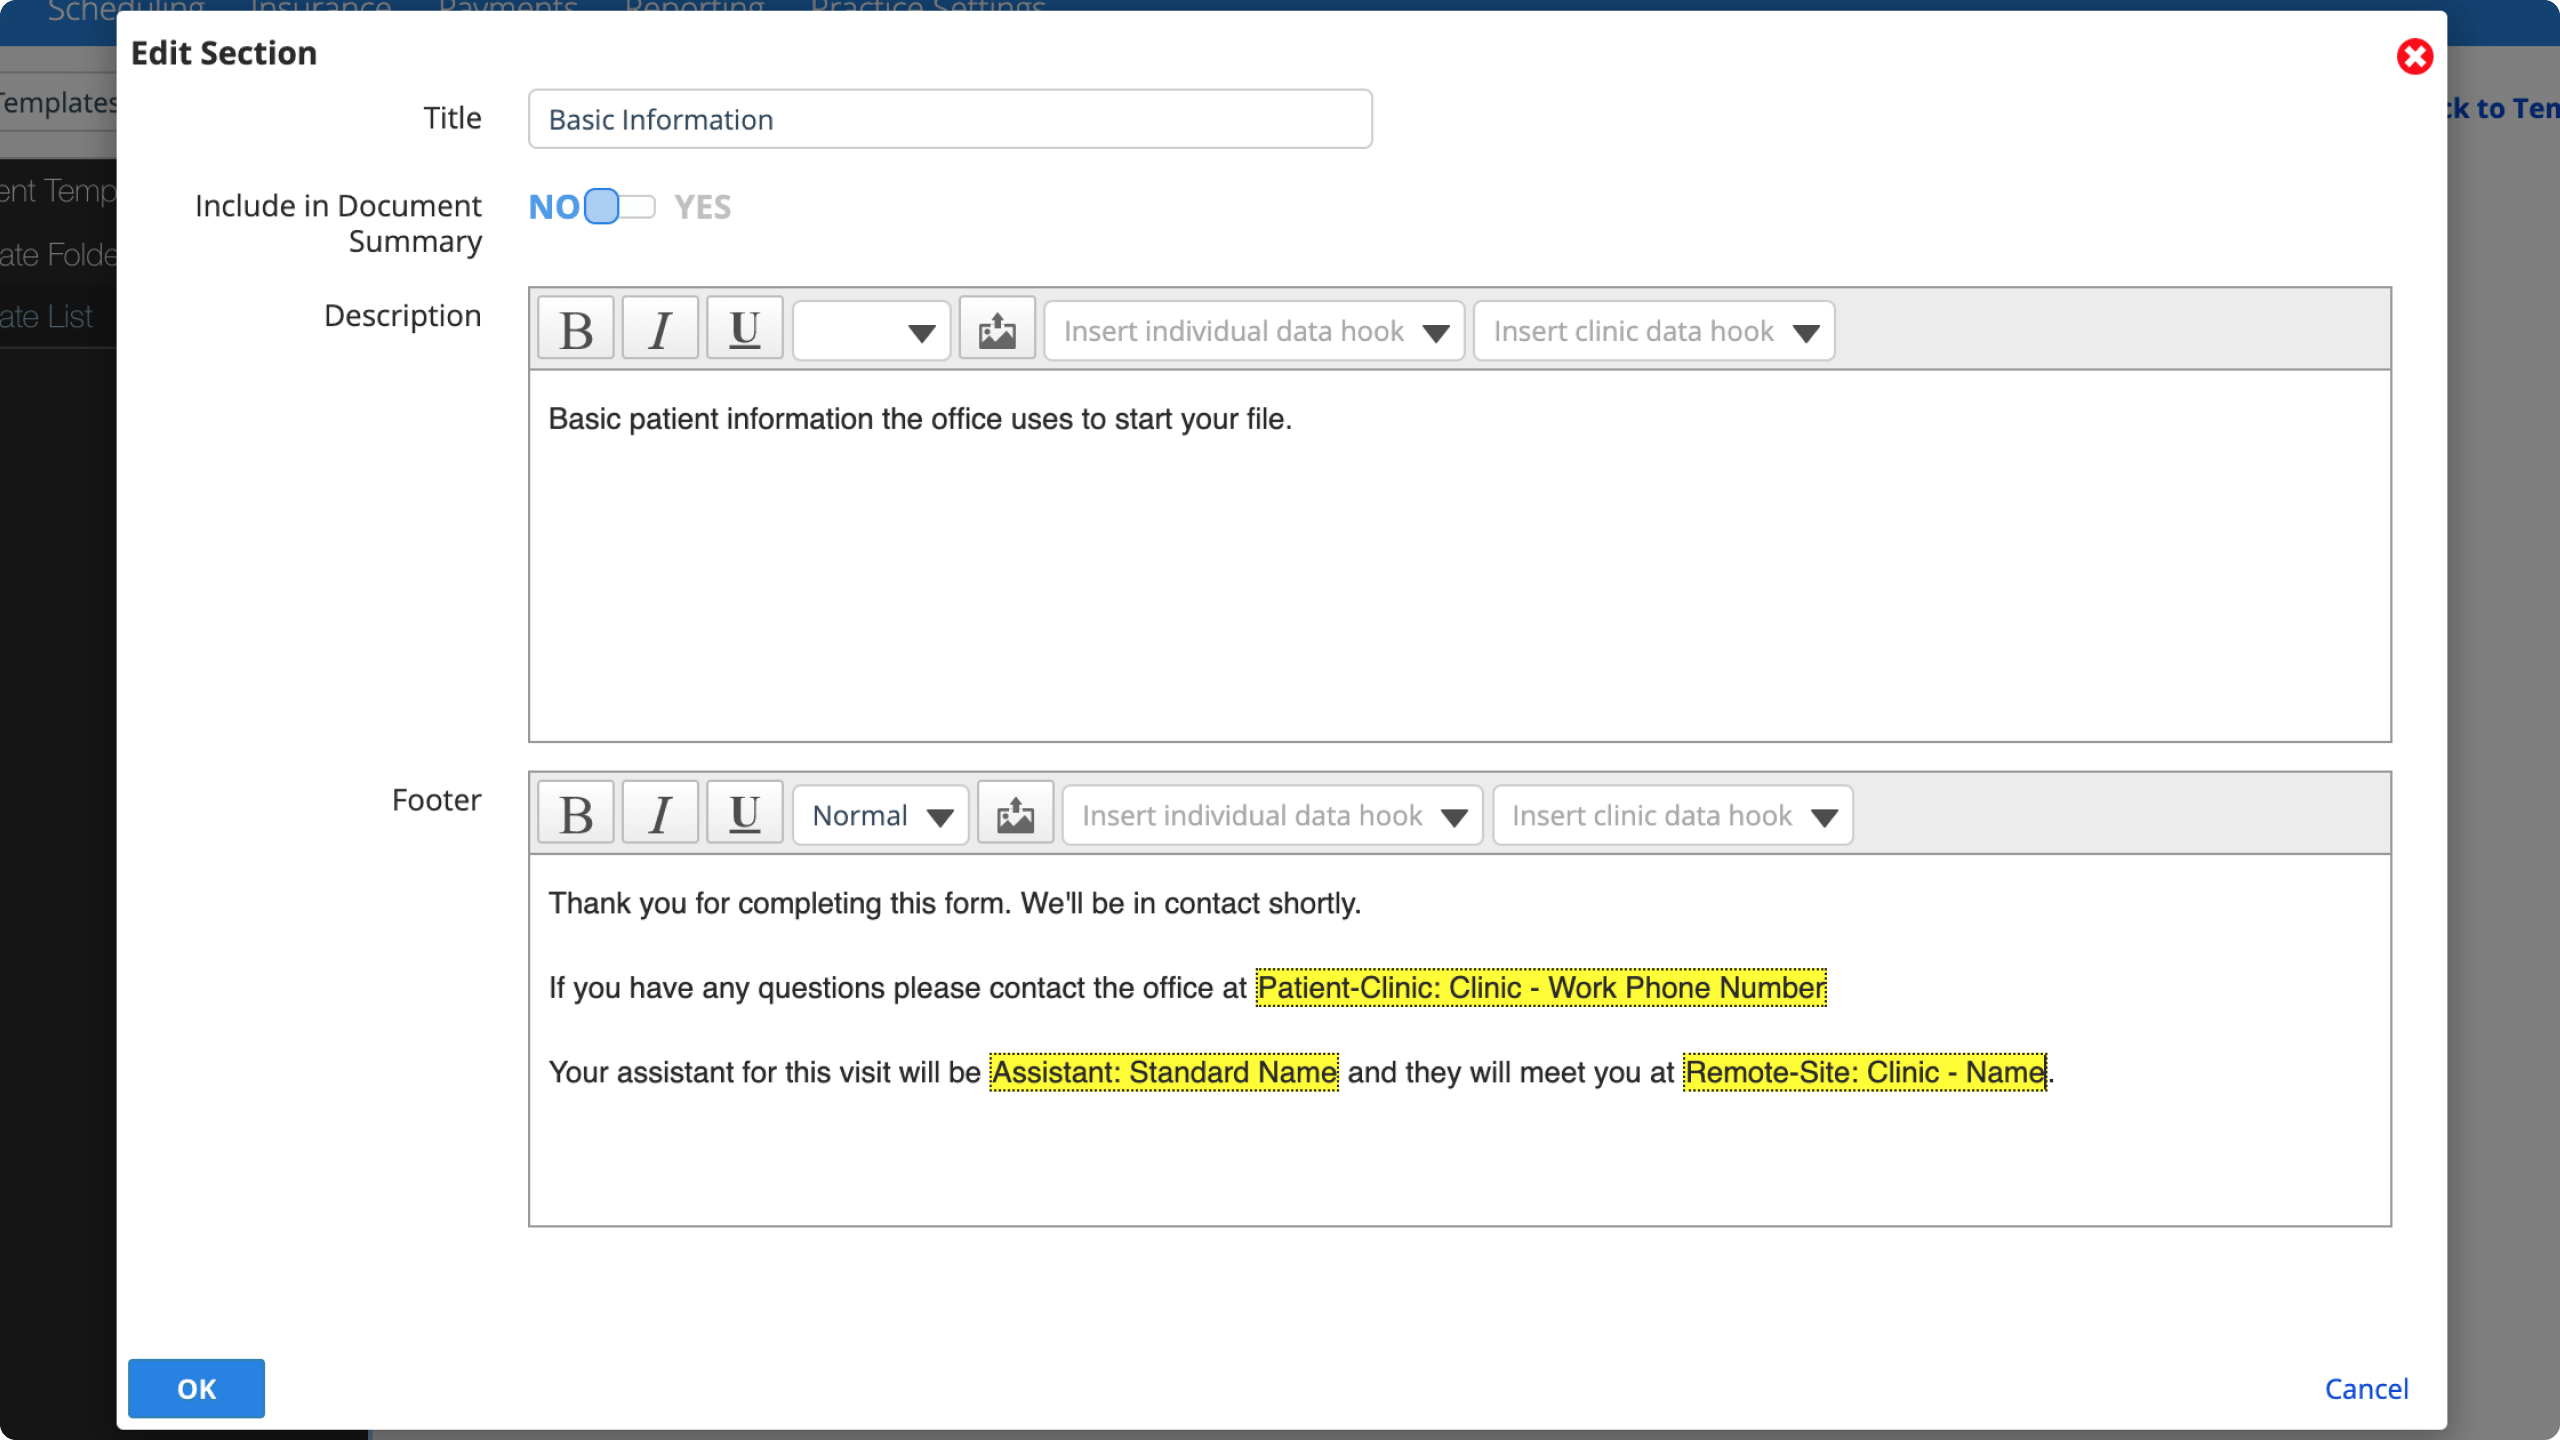
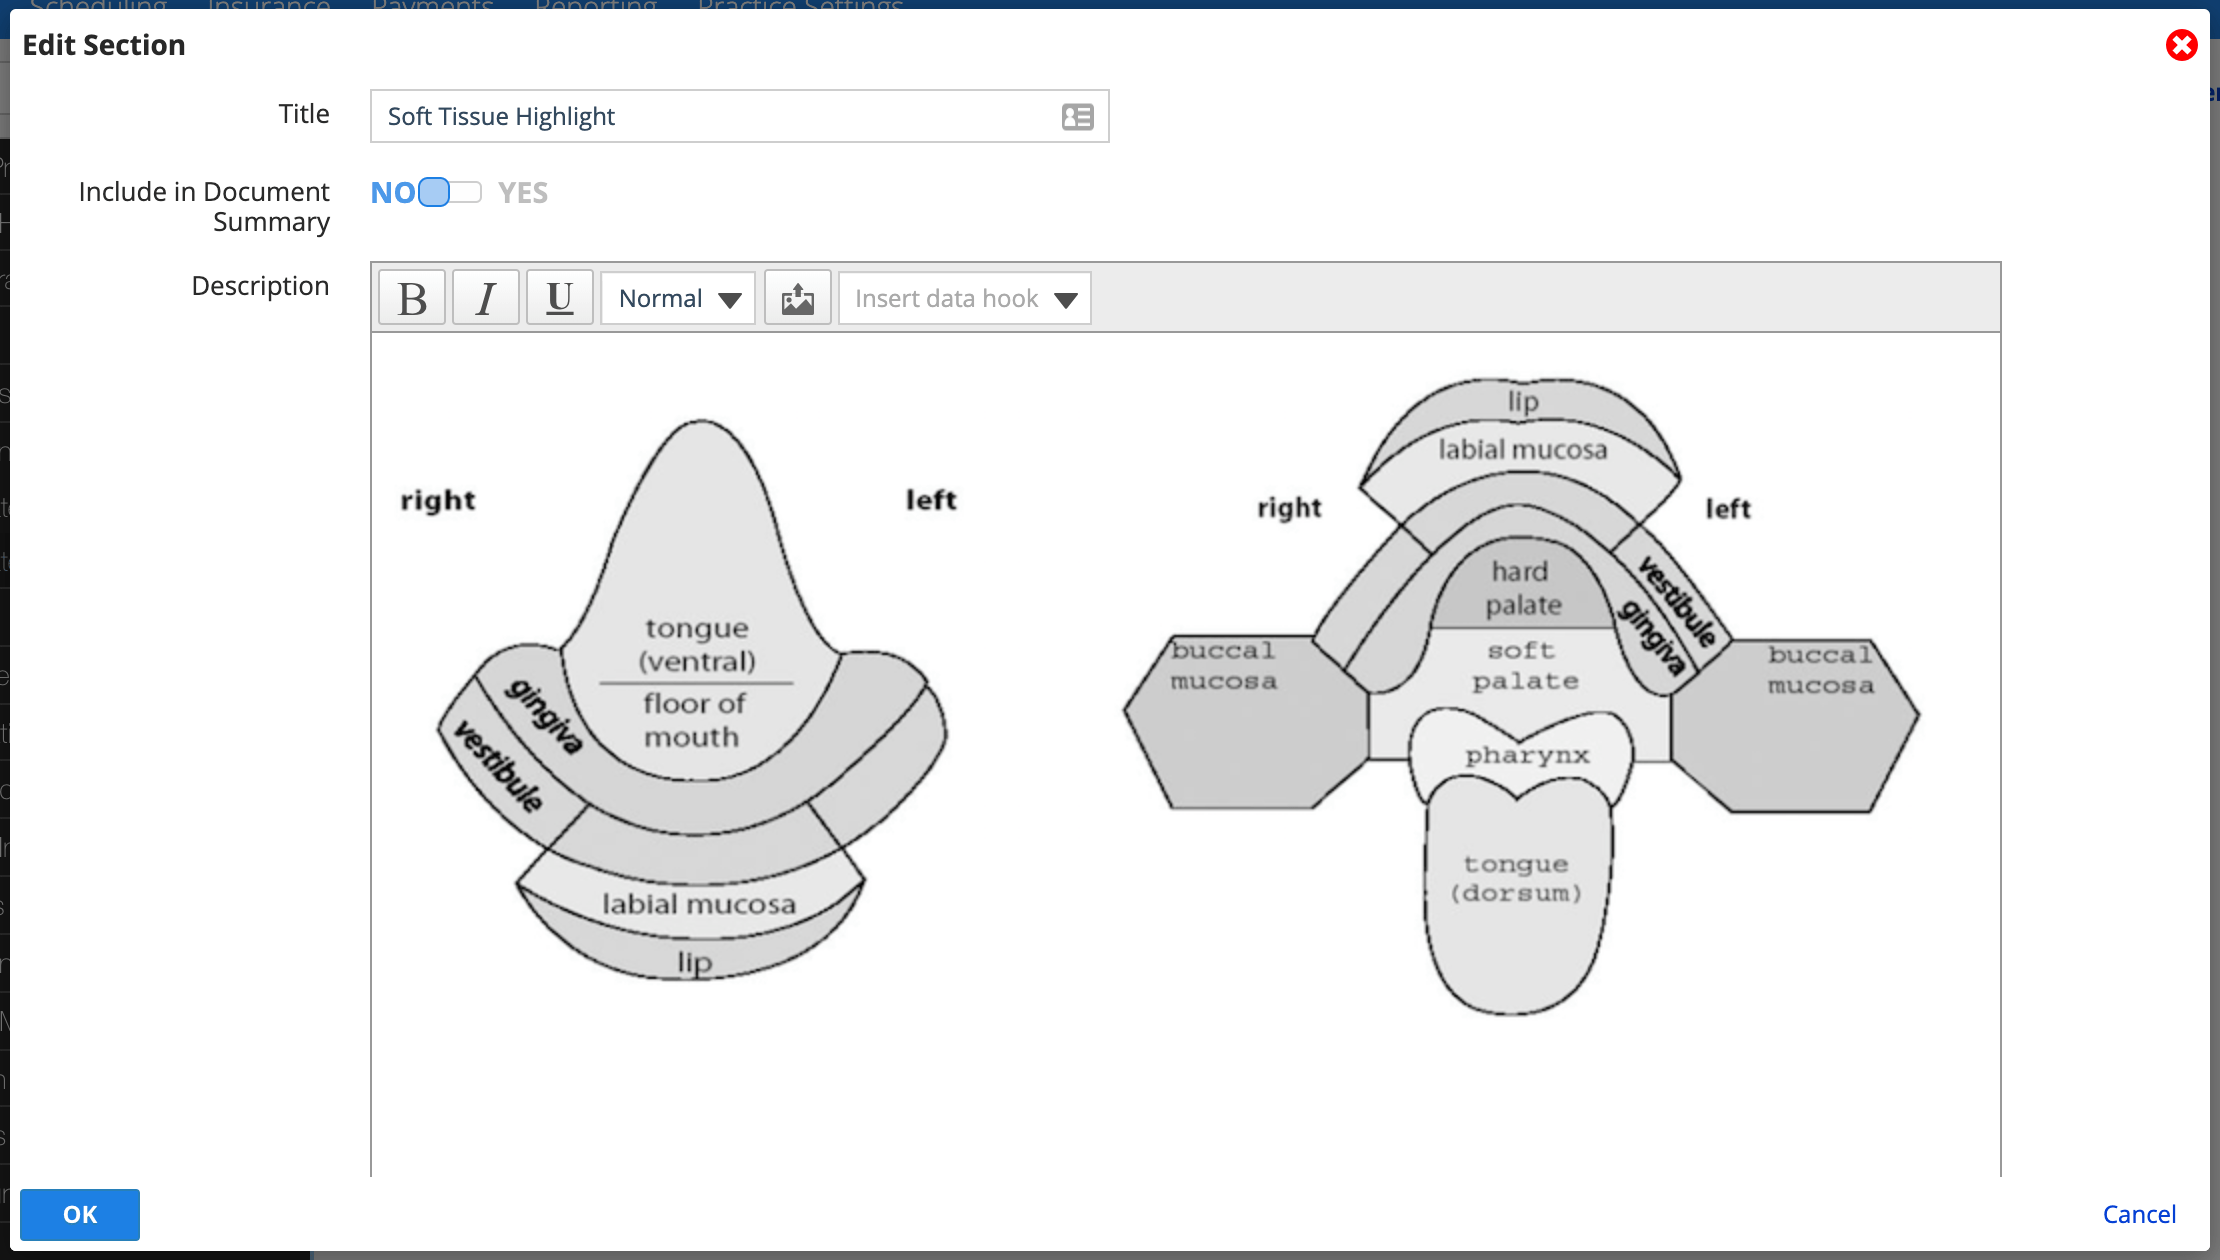
- In the Edit Section dialog edit the available fields
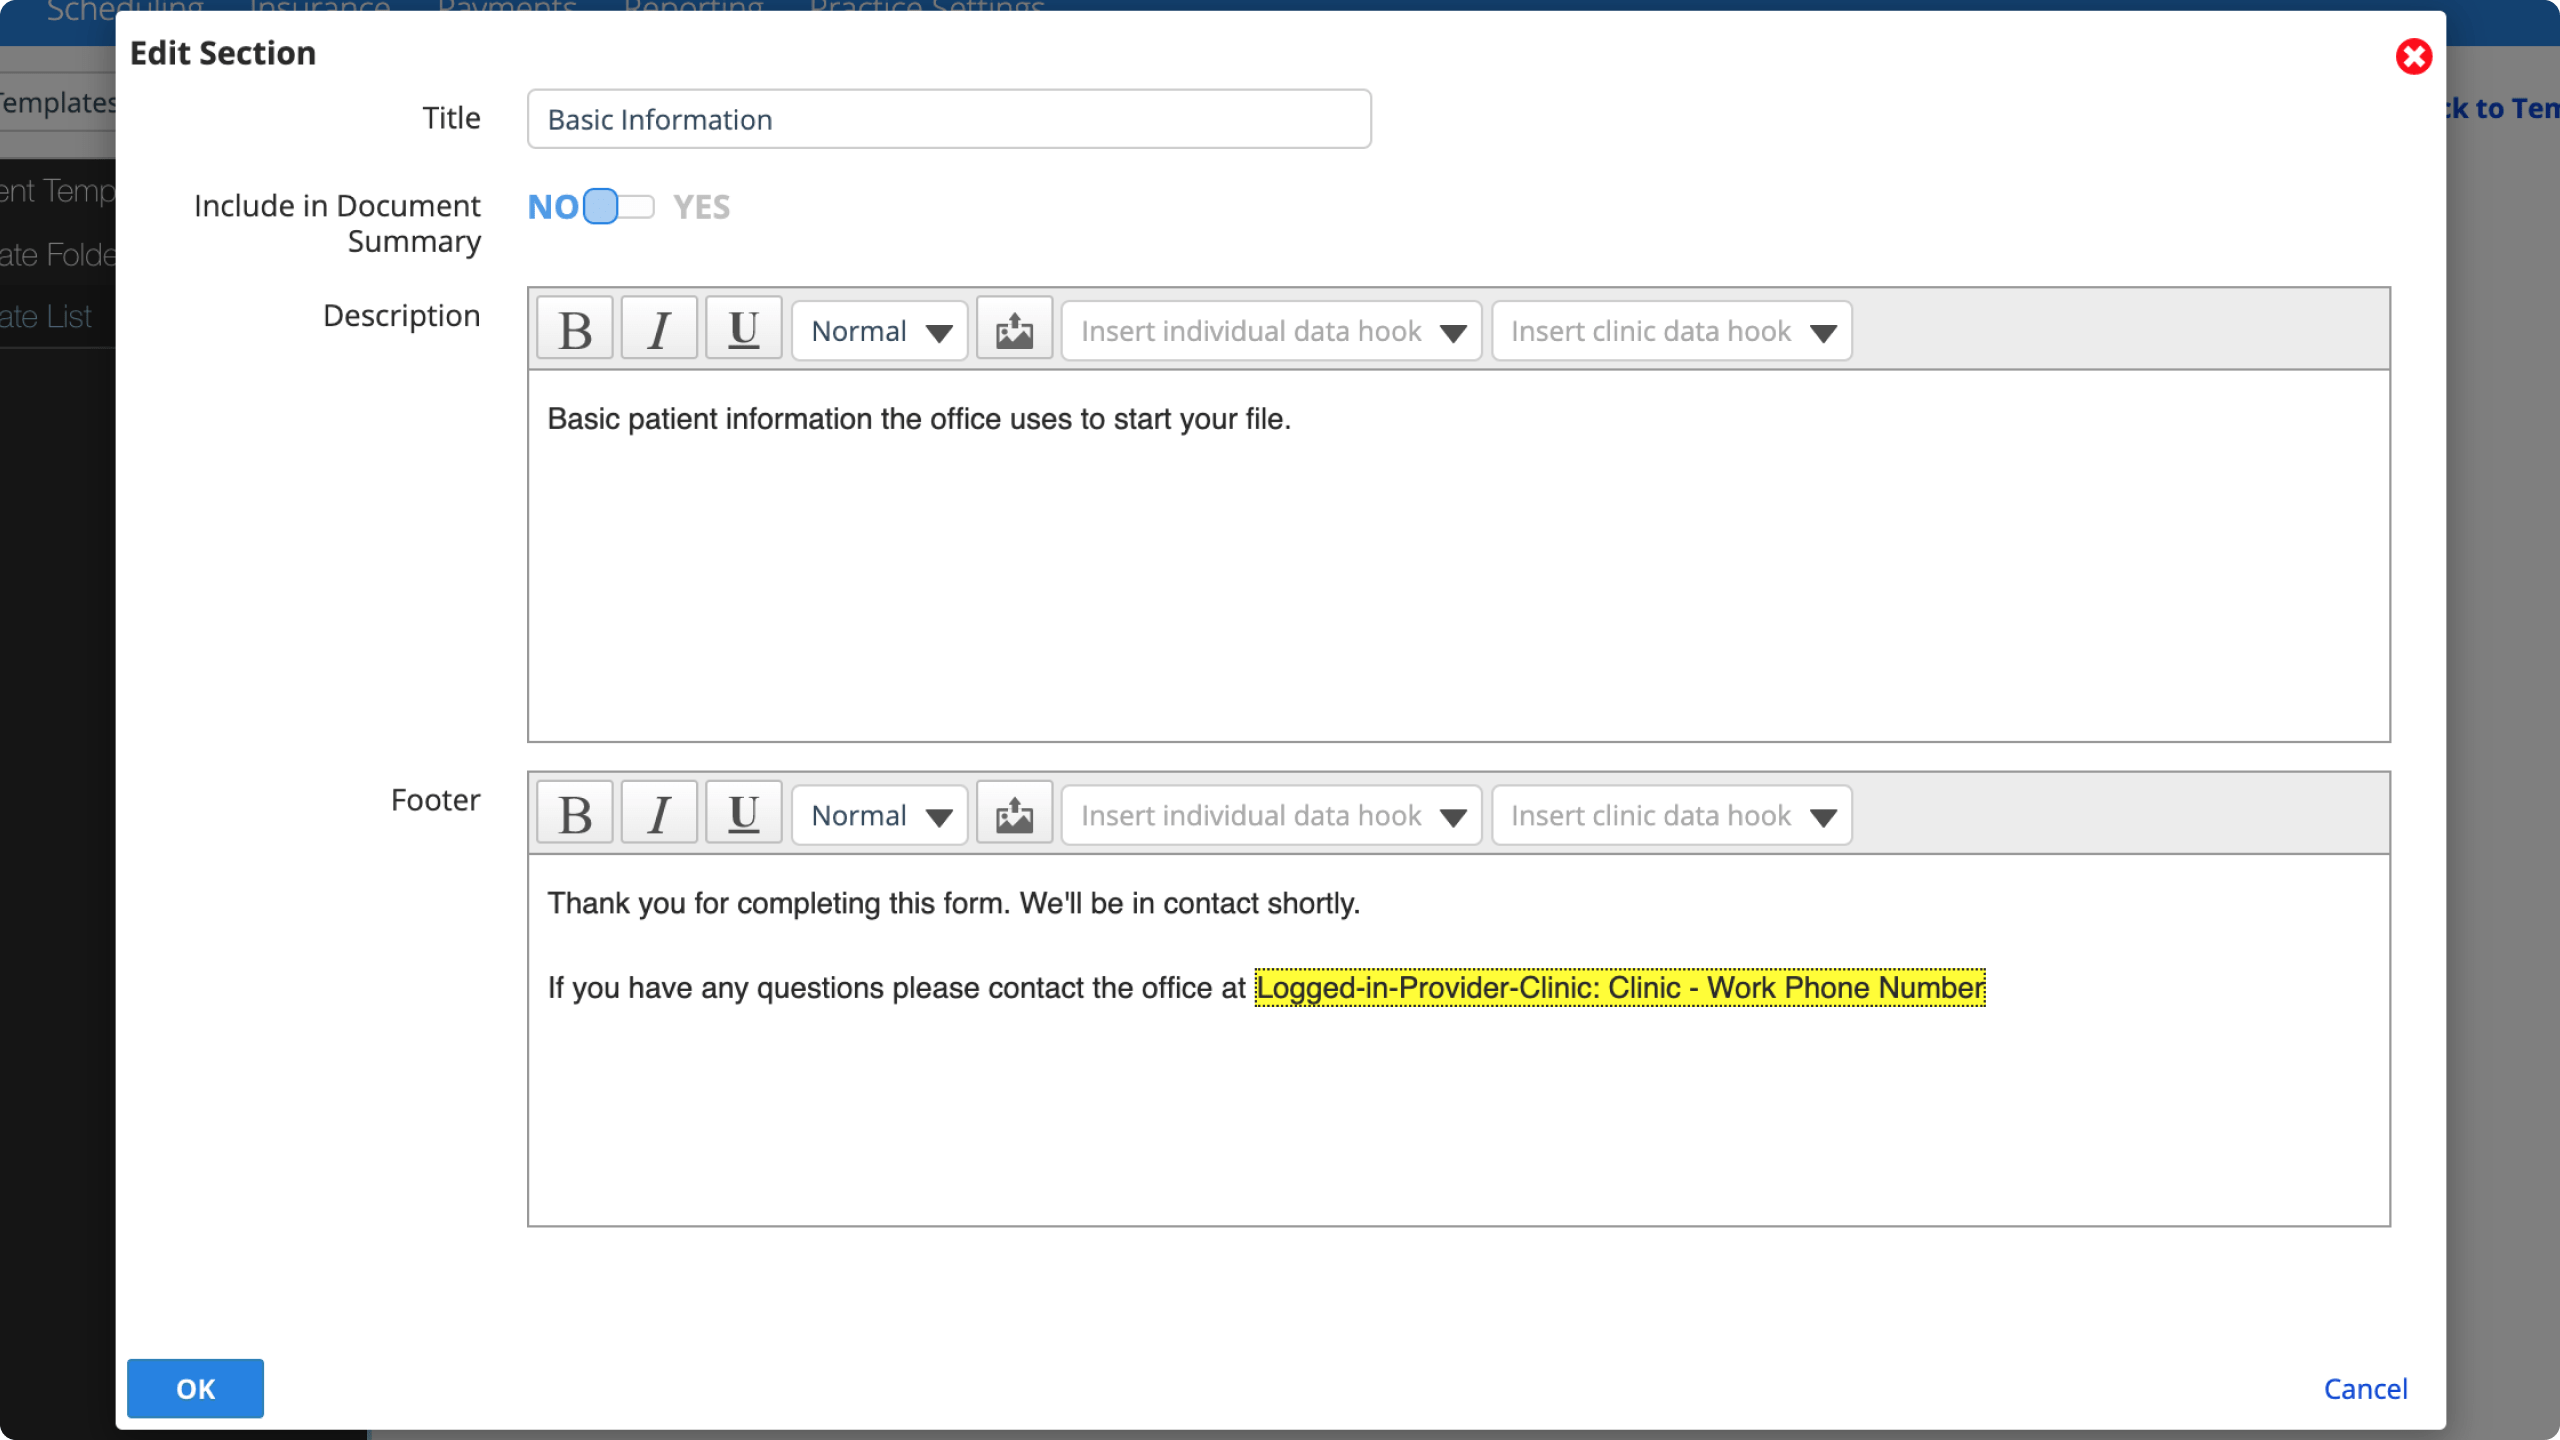
- Title: A heading-style title for the section.
- Include in Document Summary
- Toggle No if you don't want to use the document summary feature for this template or want this section excluded from the document summary.
- Toggle Yes if you want to use the document summary feature and want these section details to appear in the document summary.
- Description: Appears below the section title and before any questions. Enter text and any relevant data hooks.
- Footer: Appears below all questions in the section. Enter text and any relevant data hooks.
- Select OK
- Select Save to save your changes
After you add a section, hover over the section's title to see action buttons for that section.
- Use the action buttons to:
 Re-order this section inside the template by dragging and dropping the arrow.
- Edit the section title, description, or footer.
 Add a question to the section. To learn more, see Add questions below.
- Duplicate the section and its questions.
 Delete the section and its questions.
Add questions
After you add a section, you can add a question to the template.
You can also add branching questions, so a new question appears when someone selects a specific choice. To learn more, see Add branching questions.
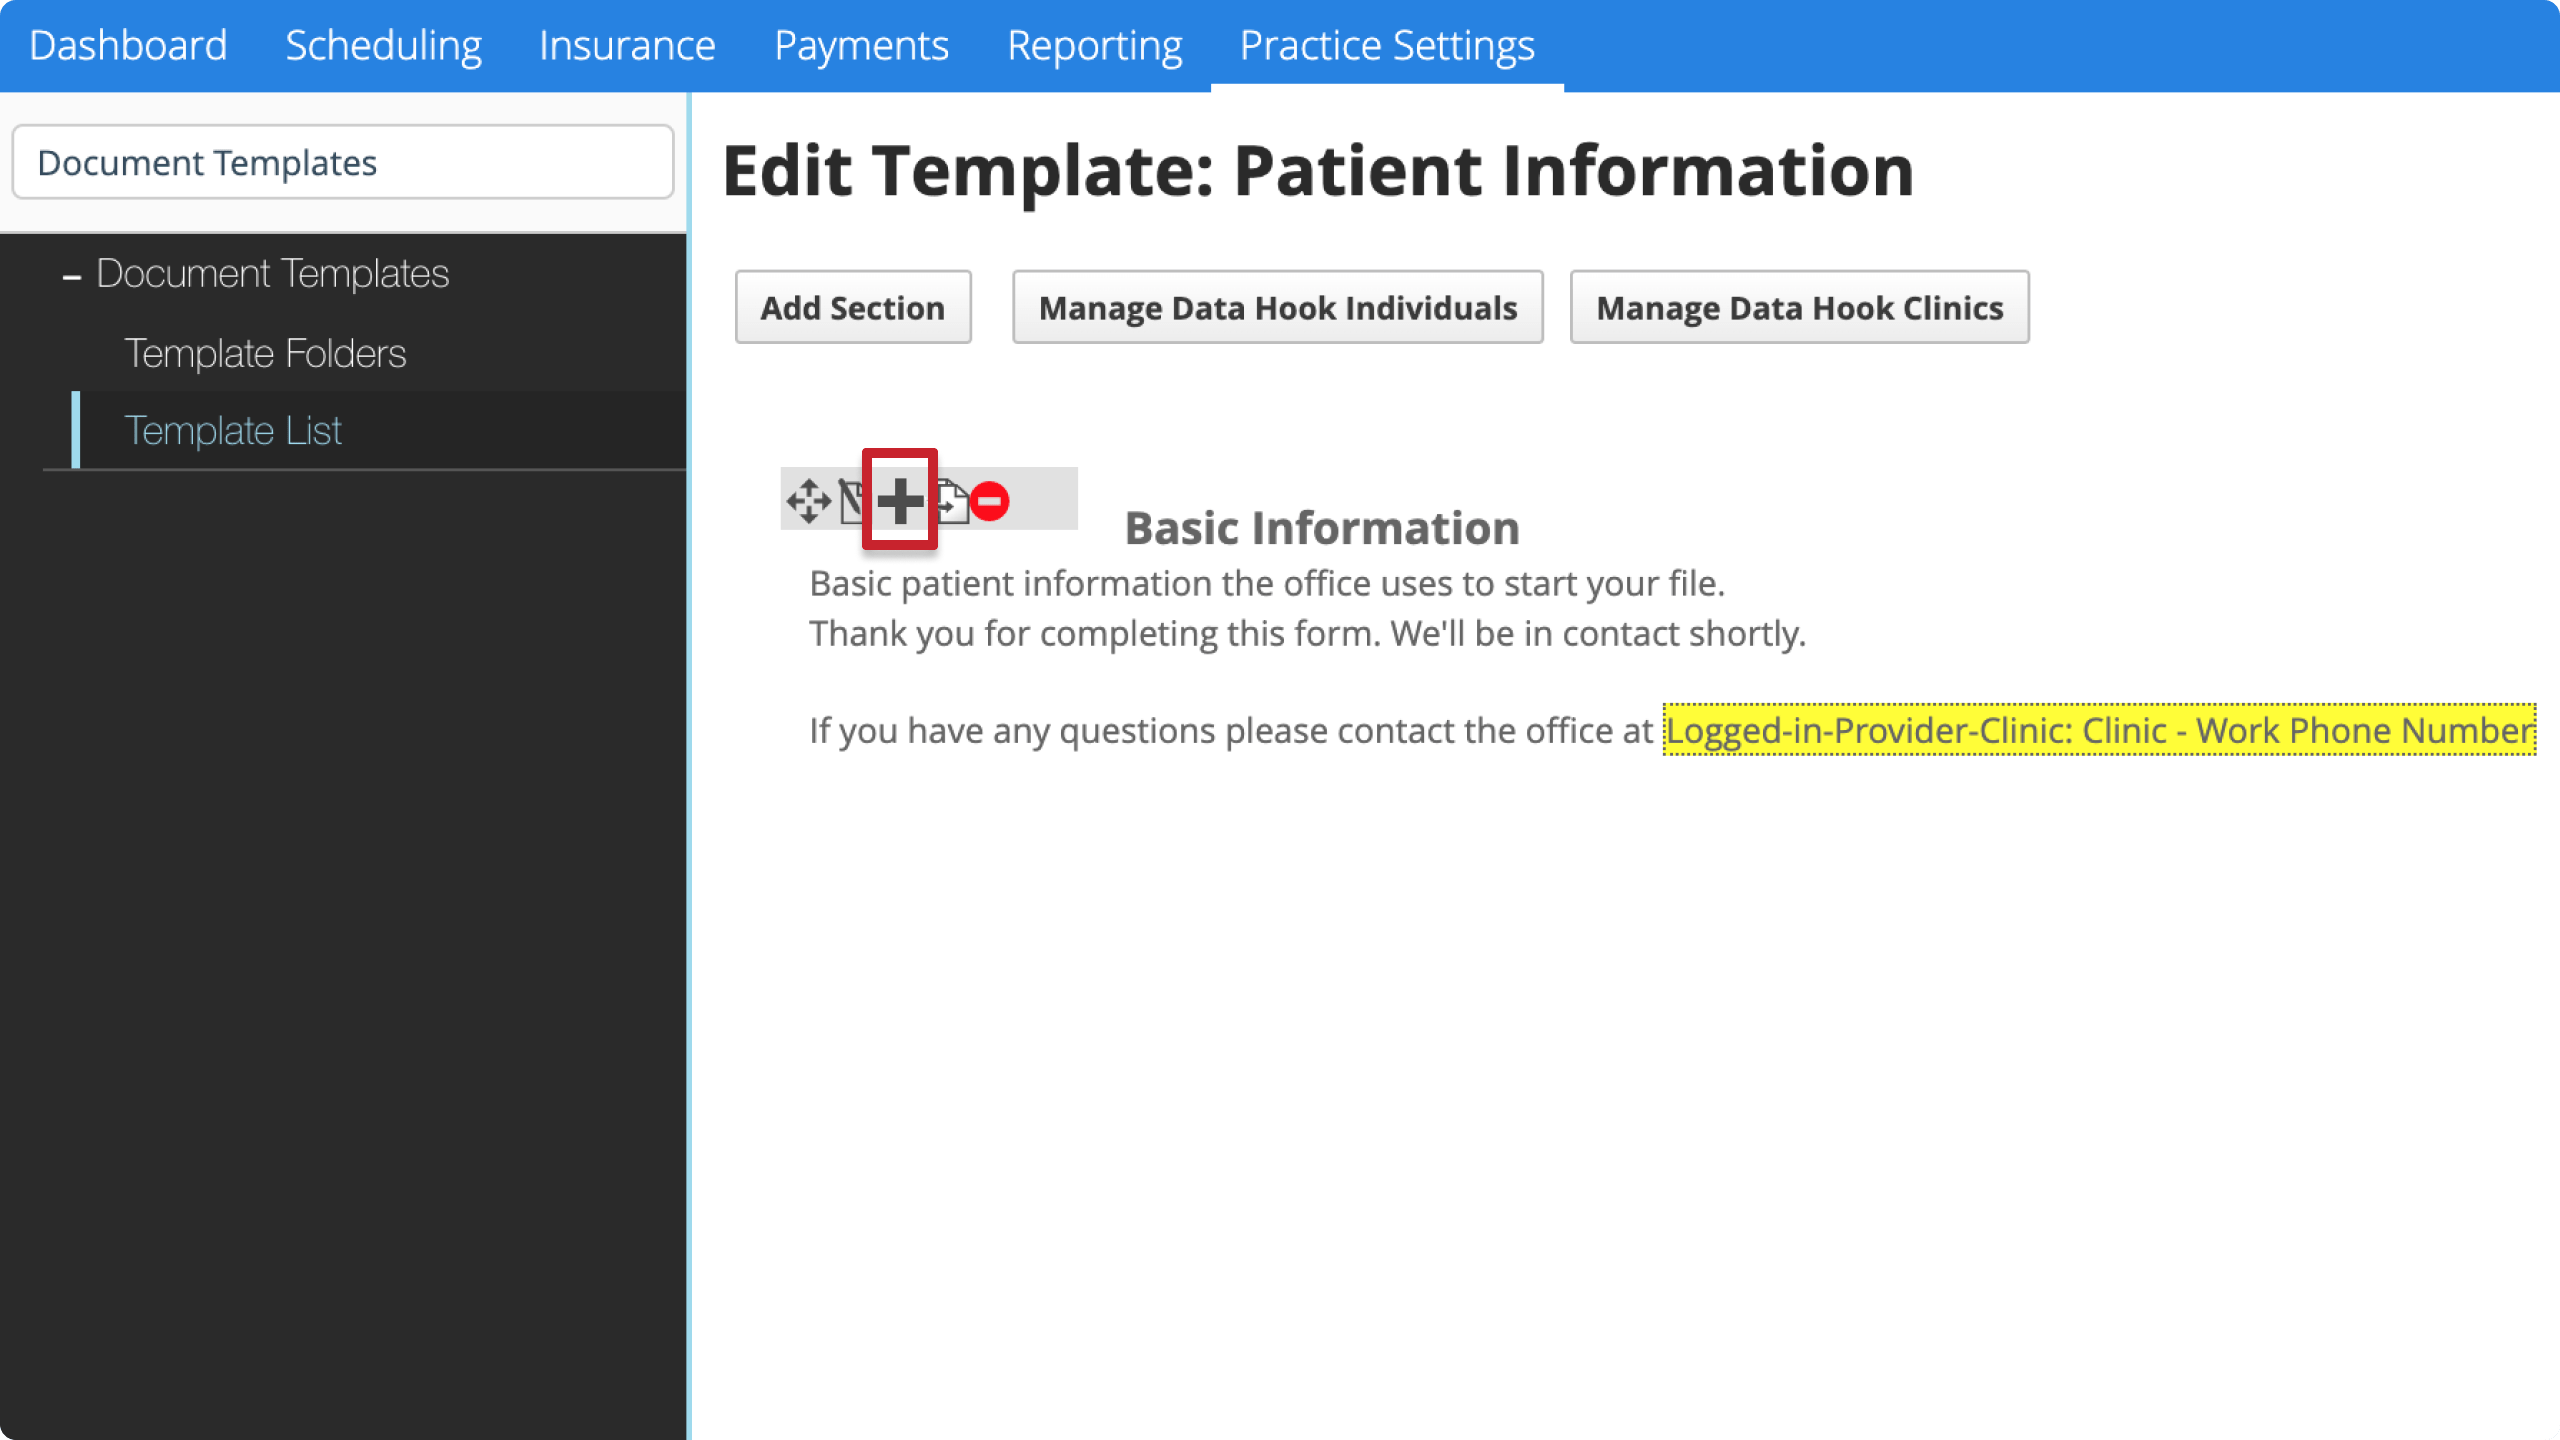
- Hover over the section you want to add a question to and select
- In the New Question Window specify:
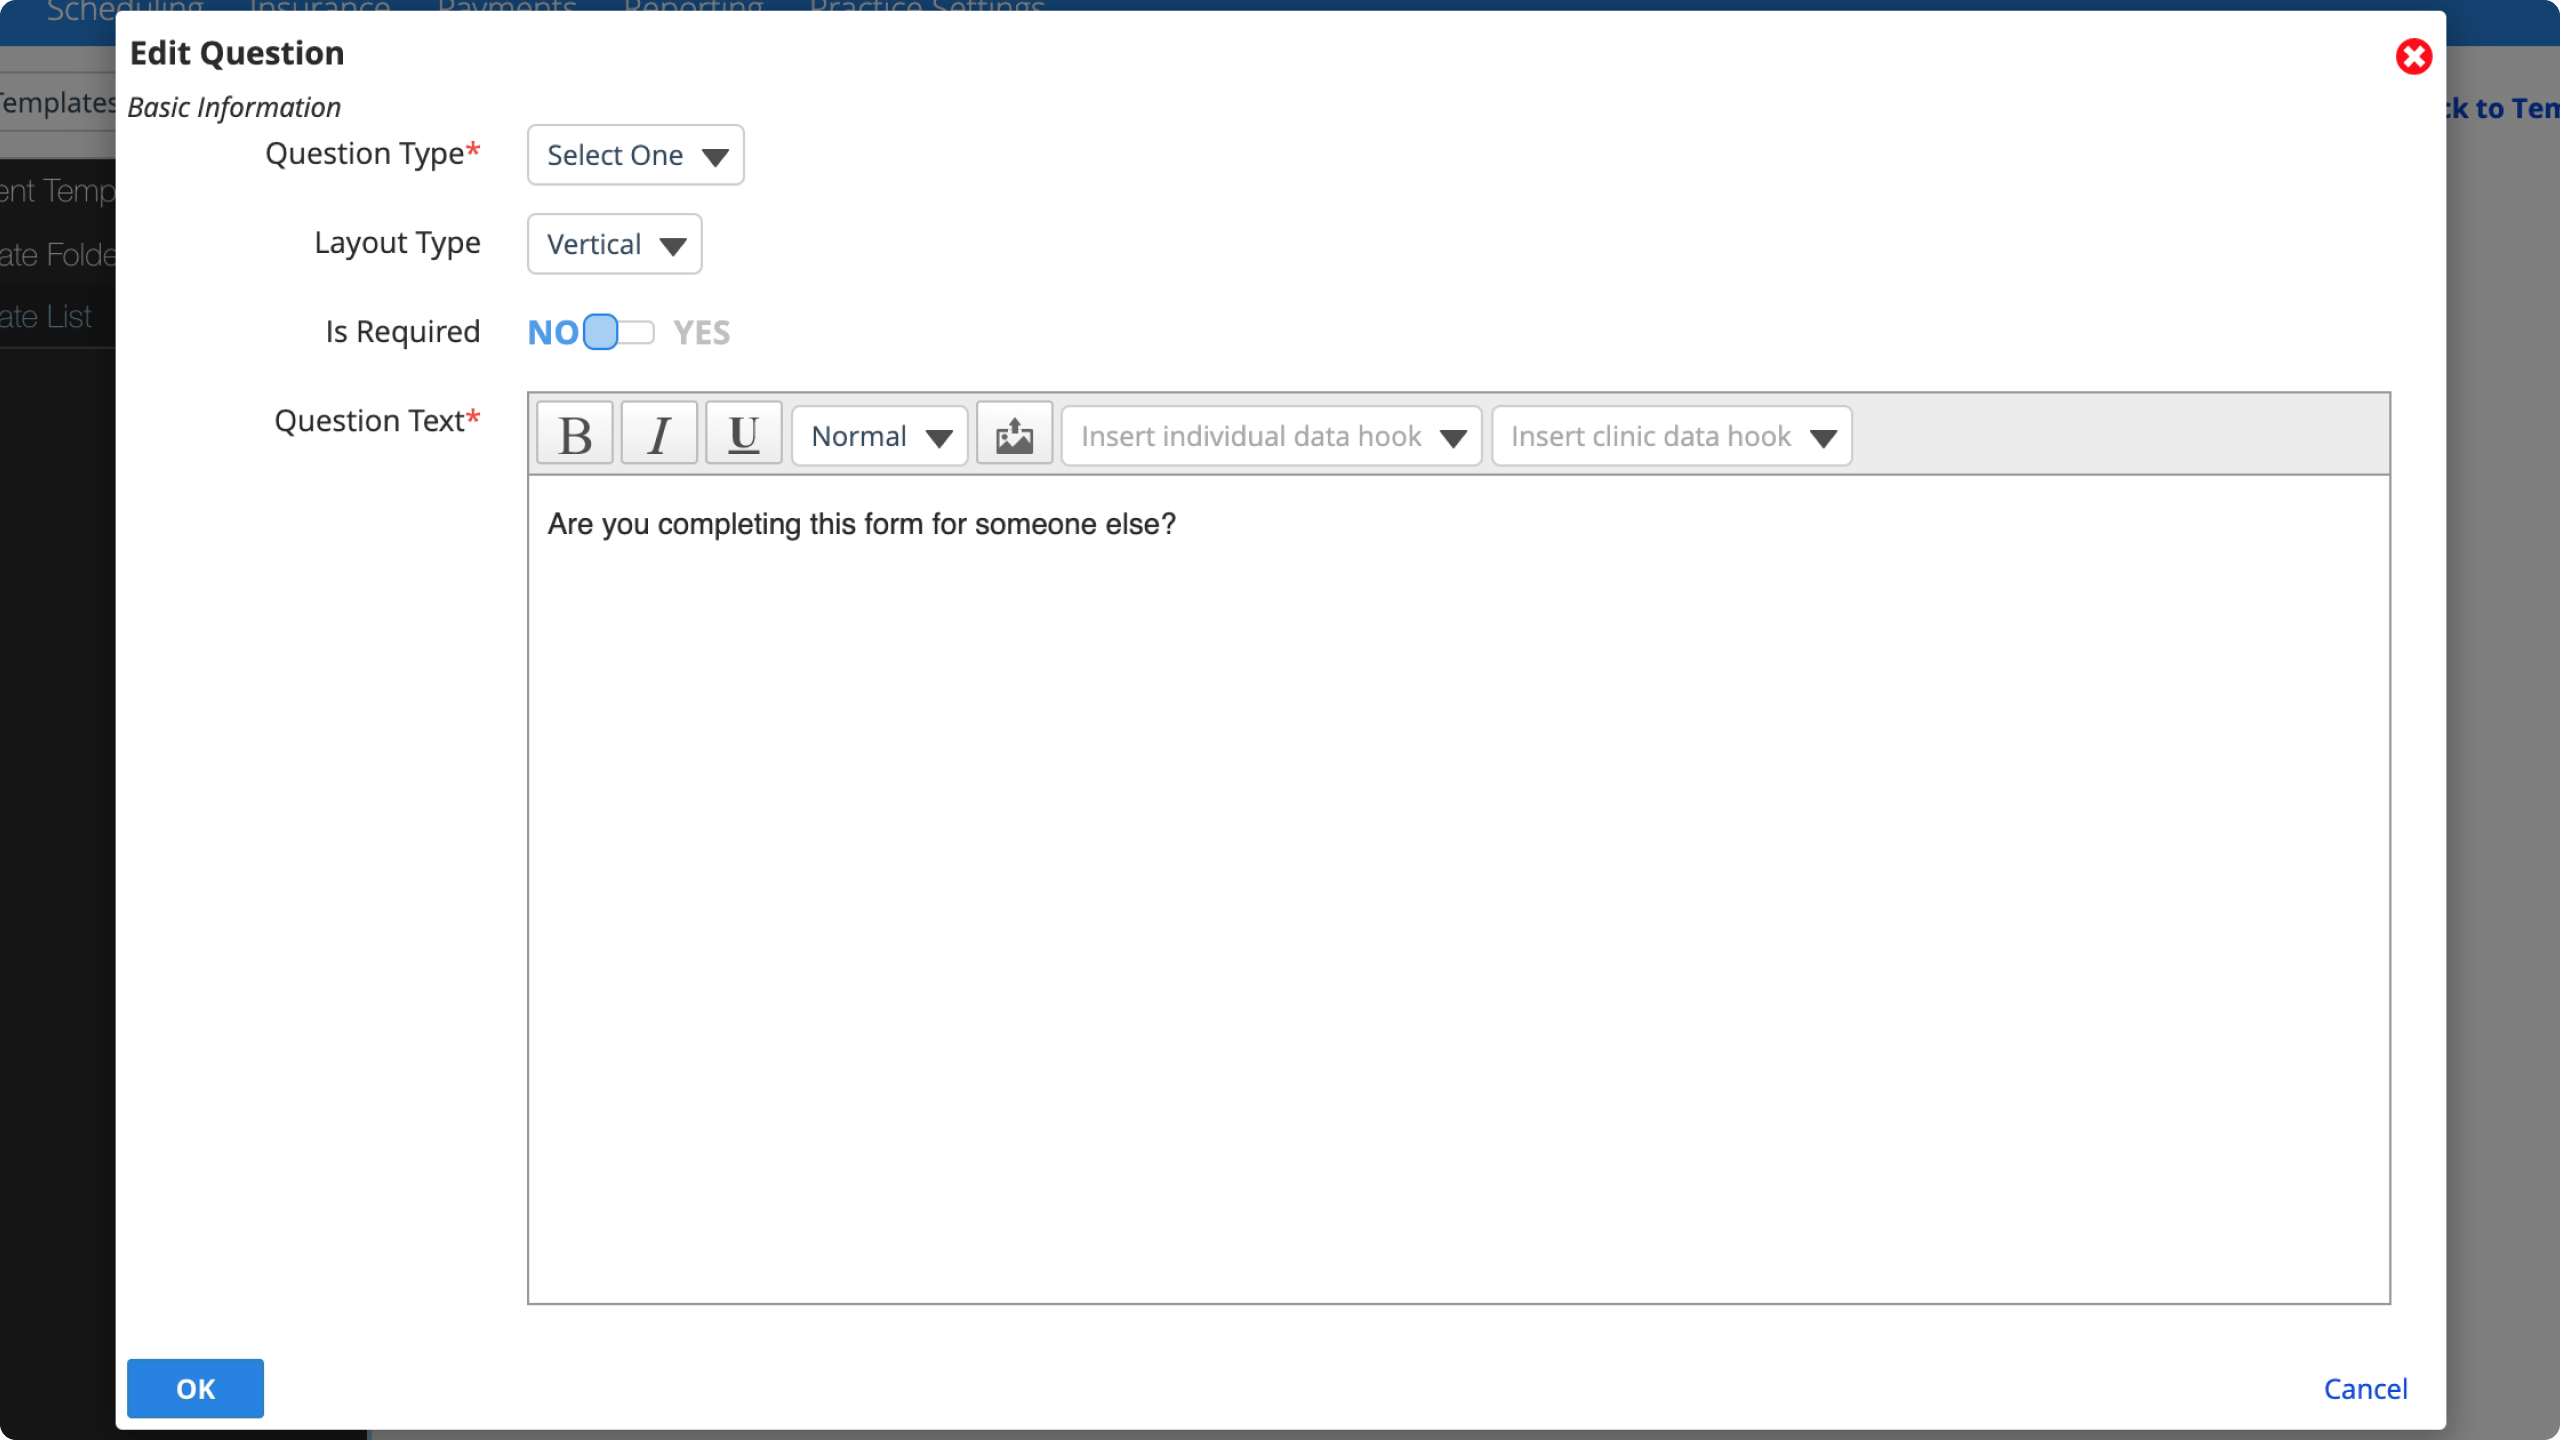
- Question Type: You can choose from 11 different Question Types:
- Consent Table: Used for treatment and informed consent forms. Shows treatment plan details of the procedures a user selects when they create a consent from this template. You can choose if the table shows various cost estimates.
- Standard Fee Estimate: The base fee taken from the fee schedule. Only shown if patient has a PPO policy.
- PPO Adjustment Estimate: The expected fee difference if the patient has a PPO policy.
- Patient Estimate: The expected cost split for the patient, based on fee and policy settings.
- Insurance Estimate: The expected cost split for insurance, based on fee and policy settings.
- Total Estimate: The sum of the patient and insurance estimates. The table has totals for each line, each phase, and one for all selected treatment.
- Date: You can select a single date.
- Drop-Down: You can select only one option, in drop-down format.
- Editable Text: Enter text that can be edited when someone fills out the form. Only text highlighted with the Insert Placeholder Text button is editable.
- Grid: You can create columns, rows and allow users to enter data into the cells.
- Medication Search: You can search and select Medication when filling out the document.
- Payment Plan Schedule: Used for payment plan consent forms. Shows a summary of the payment plan schedule dates and charges.
- Select Any: You can select more than one option.
- Select One: You can select only one option, in radio button format.
- Signature: You can enter a signature.
- When adding a signature field for a patient, we recommend adding a signature field for a witness as well.
- This is particularly important if patients are signing documents while a provider is logged in the system.
- The witness field helps confirm that the patient's signature is attributable to them. Particularly if the patient is not logged in themselves when signing.
- When adding a signature field for a patient, we recommend adding a signature field for a witness as well.
- User Input: You can allow users to enter data.
- Consent Table: Used for treatment and informed consent forms. Shows treatment plan details of the procedures a user selects when they create a consent from this template. You can choose if the table shows various cost estimates.
- Layout Type: You can use 4 different layouts for each question:
- Inline: Answers to a question appear to the right of the question, on the same line
- Horizontal: Answers to a question appear below the question, all on the same line.
- Vertically: Answers to a question appear below the question, each on a new line.
- Flow: Answers to a question appear below the question and multiple questions can appear on one line.
- Is Required: You can configure which questions require an answer when the document is filled out
- Question Text: Enter the question text and add any relevant data hooks
- Question Type: You can choose from 11 different Question Types:
- Select OK
- Select Save to save your changes
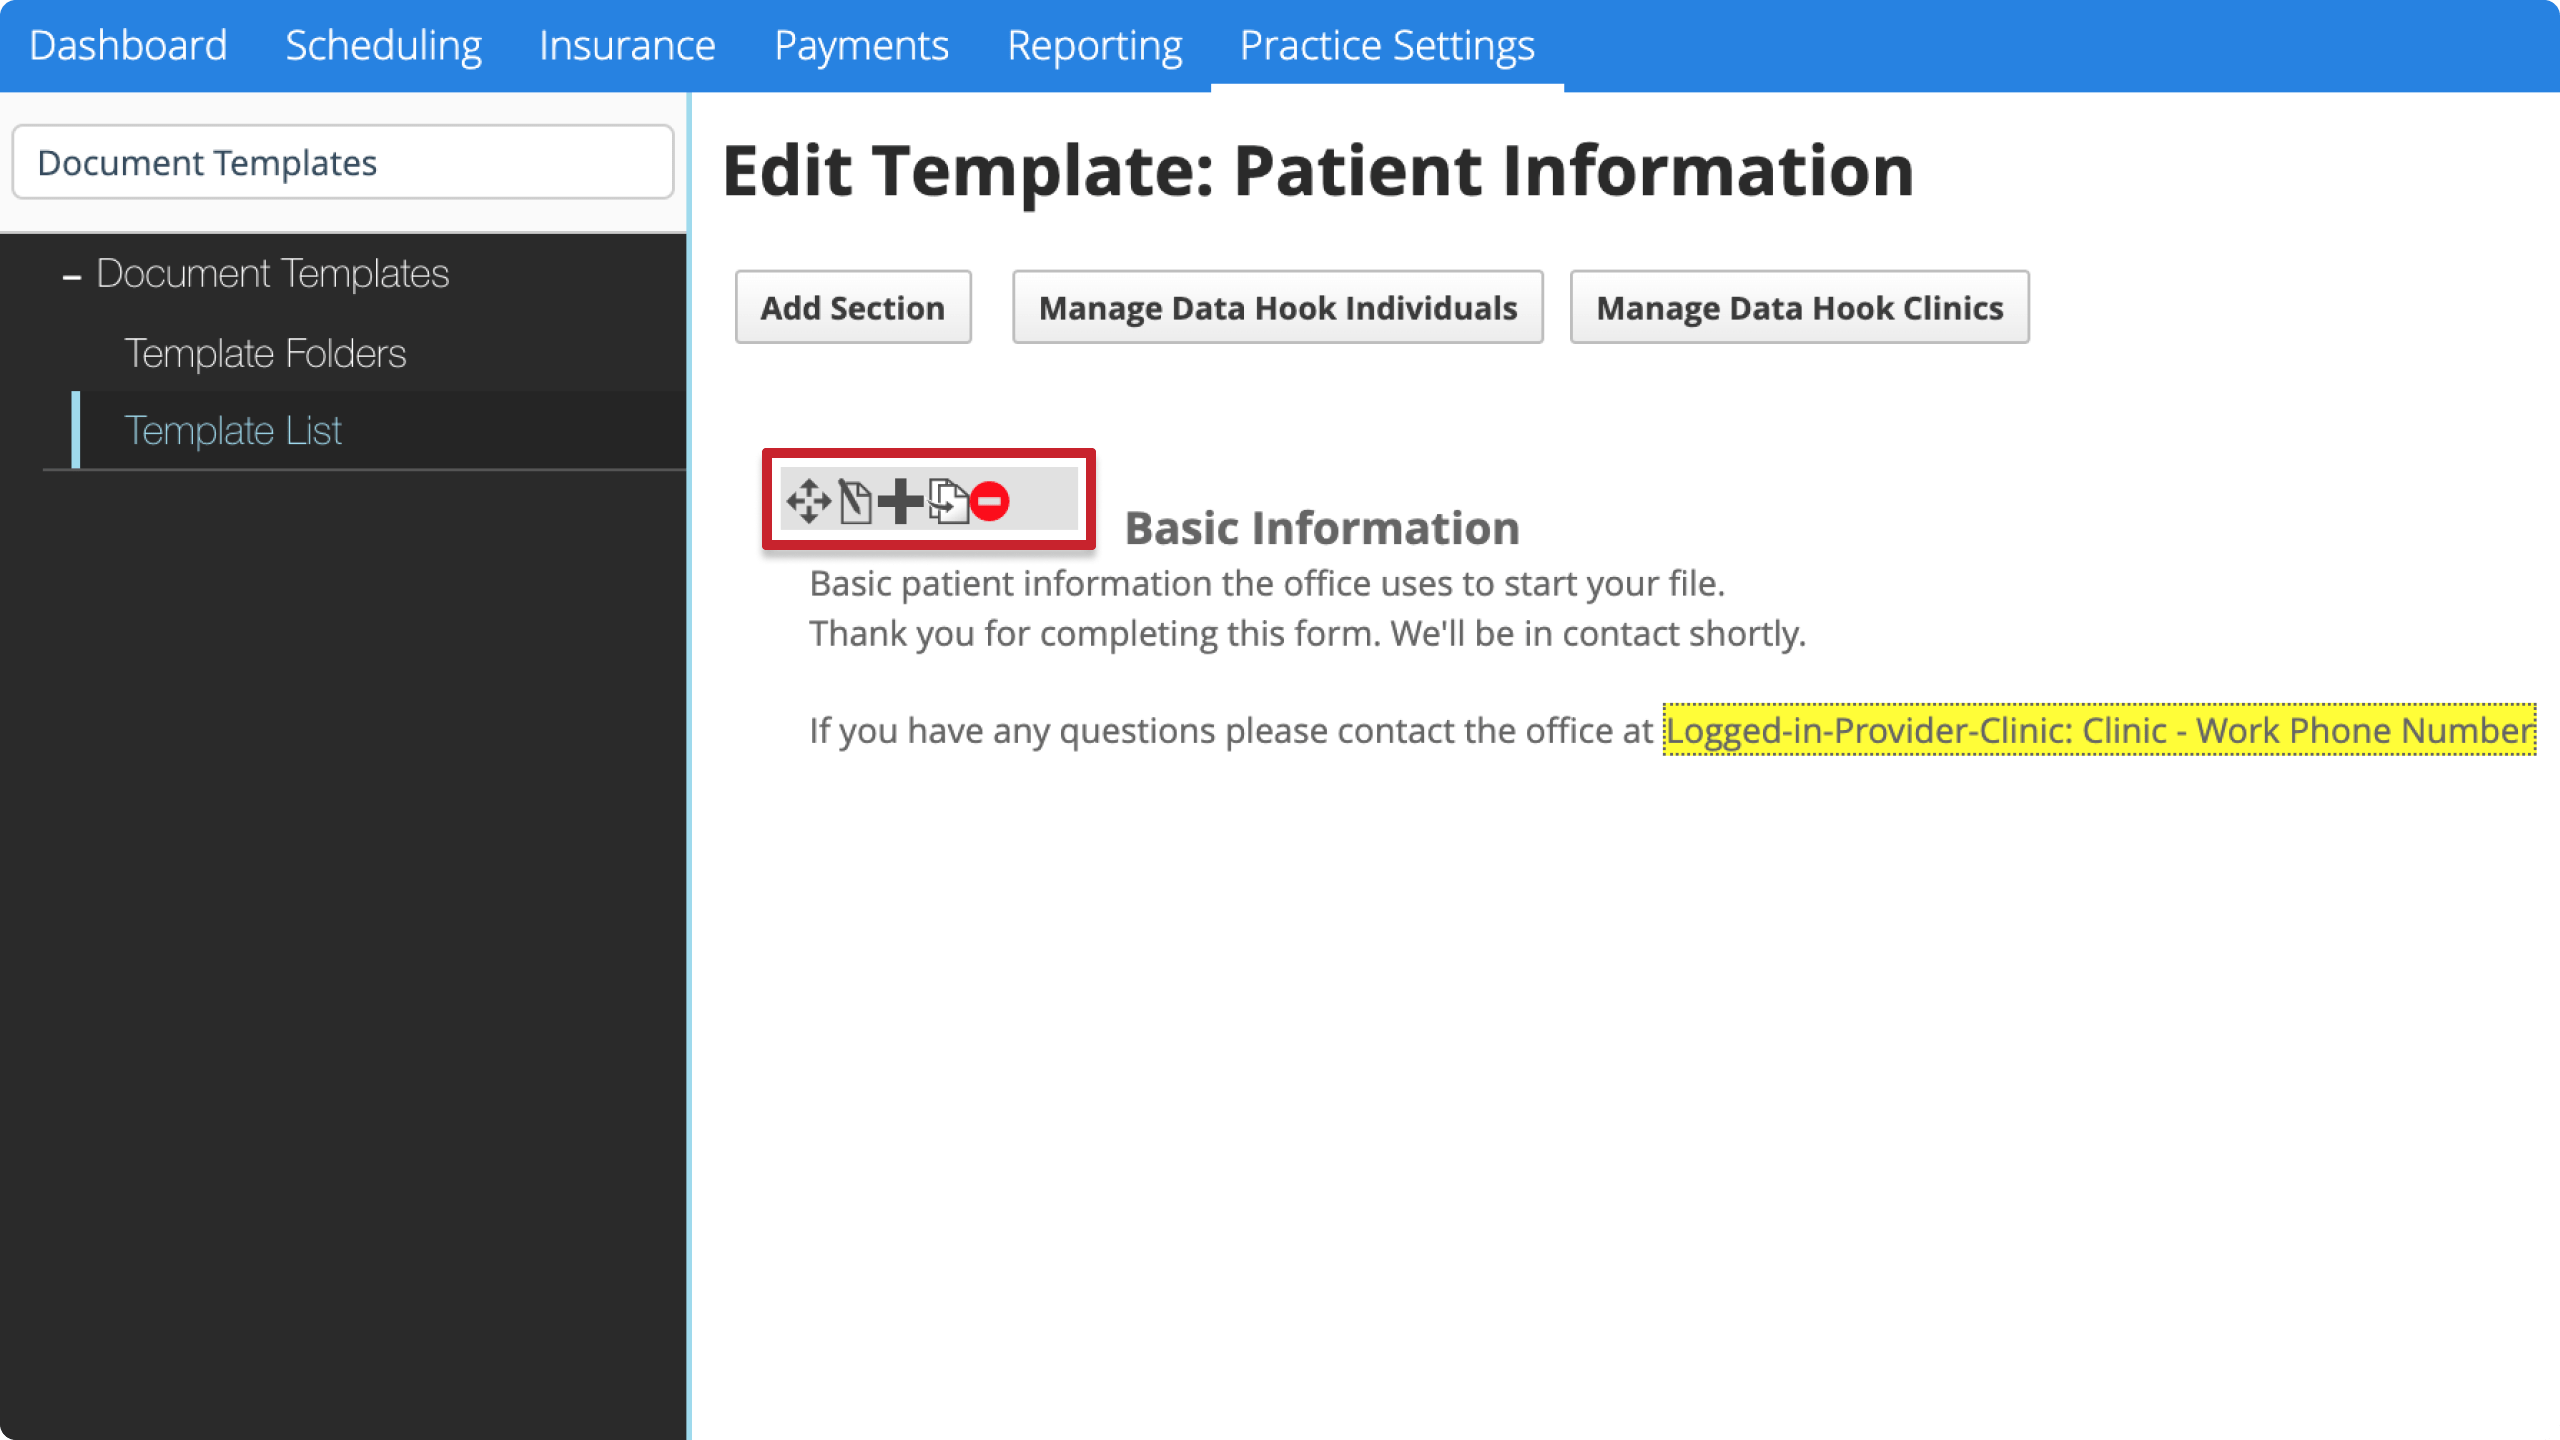
After you add a question, hover over the question's text to see action buttons for that question.
- Use the action buttons to:
- Re-order this question inside the section by dragging and dropping the arrow.
- Edit the question text, type, or settings.
- Add a choice to the question. To learn more, see Add choices below.
- Duplicate the question and its choices. The system adds it to the bottom of the section.
- Delete the question and its choices.
Add choices
Add choice options to Select One, Select Any, or Drop-Down type questions.
- Hover over the question you want to add a choice to and select
- Optional: Score
- Only available if document type is assessment. Define the numerical value of a choice. If a user chooses this answer when filling out an assessment, the system uses the score value to calculate an assessment's total score.
- Optional: Health Facts
- This allows you to display the patient's answer as an alert in the patient sidebar. To learn more, see Add health facts
- Include in Document Summary
- Toggle No if you don't want to use the document summary feature for this template or do want this choice and question excluded from the document summary.
- Toggle Yes if you want to use the document summary feature and want this choice and question to appear in the document summary if it is selected.
- Enter the choice text and any relevant data hooks
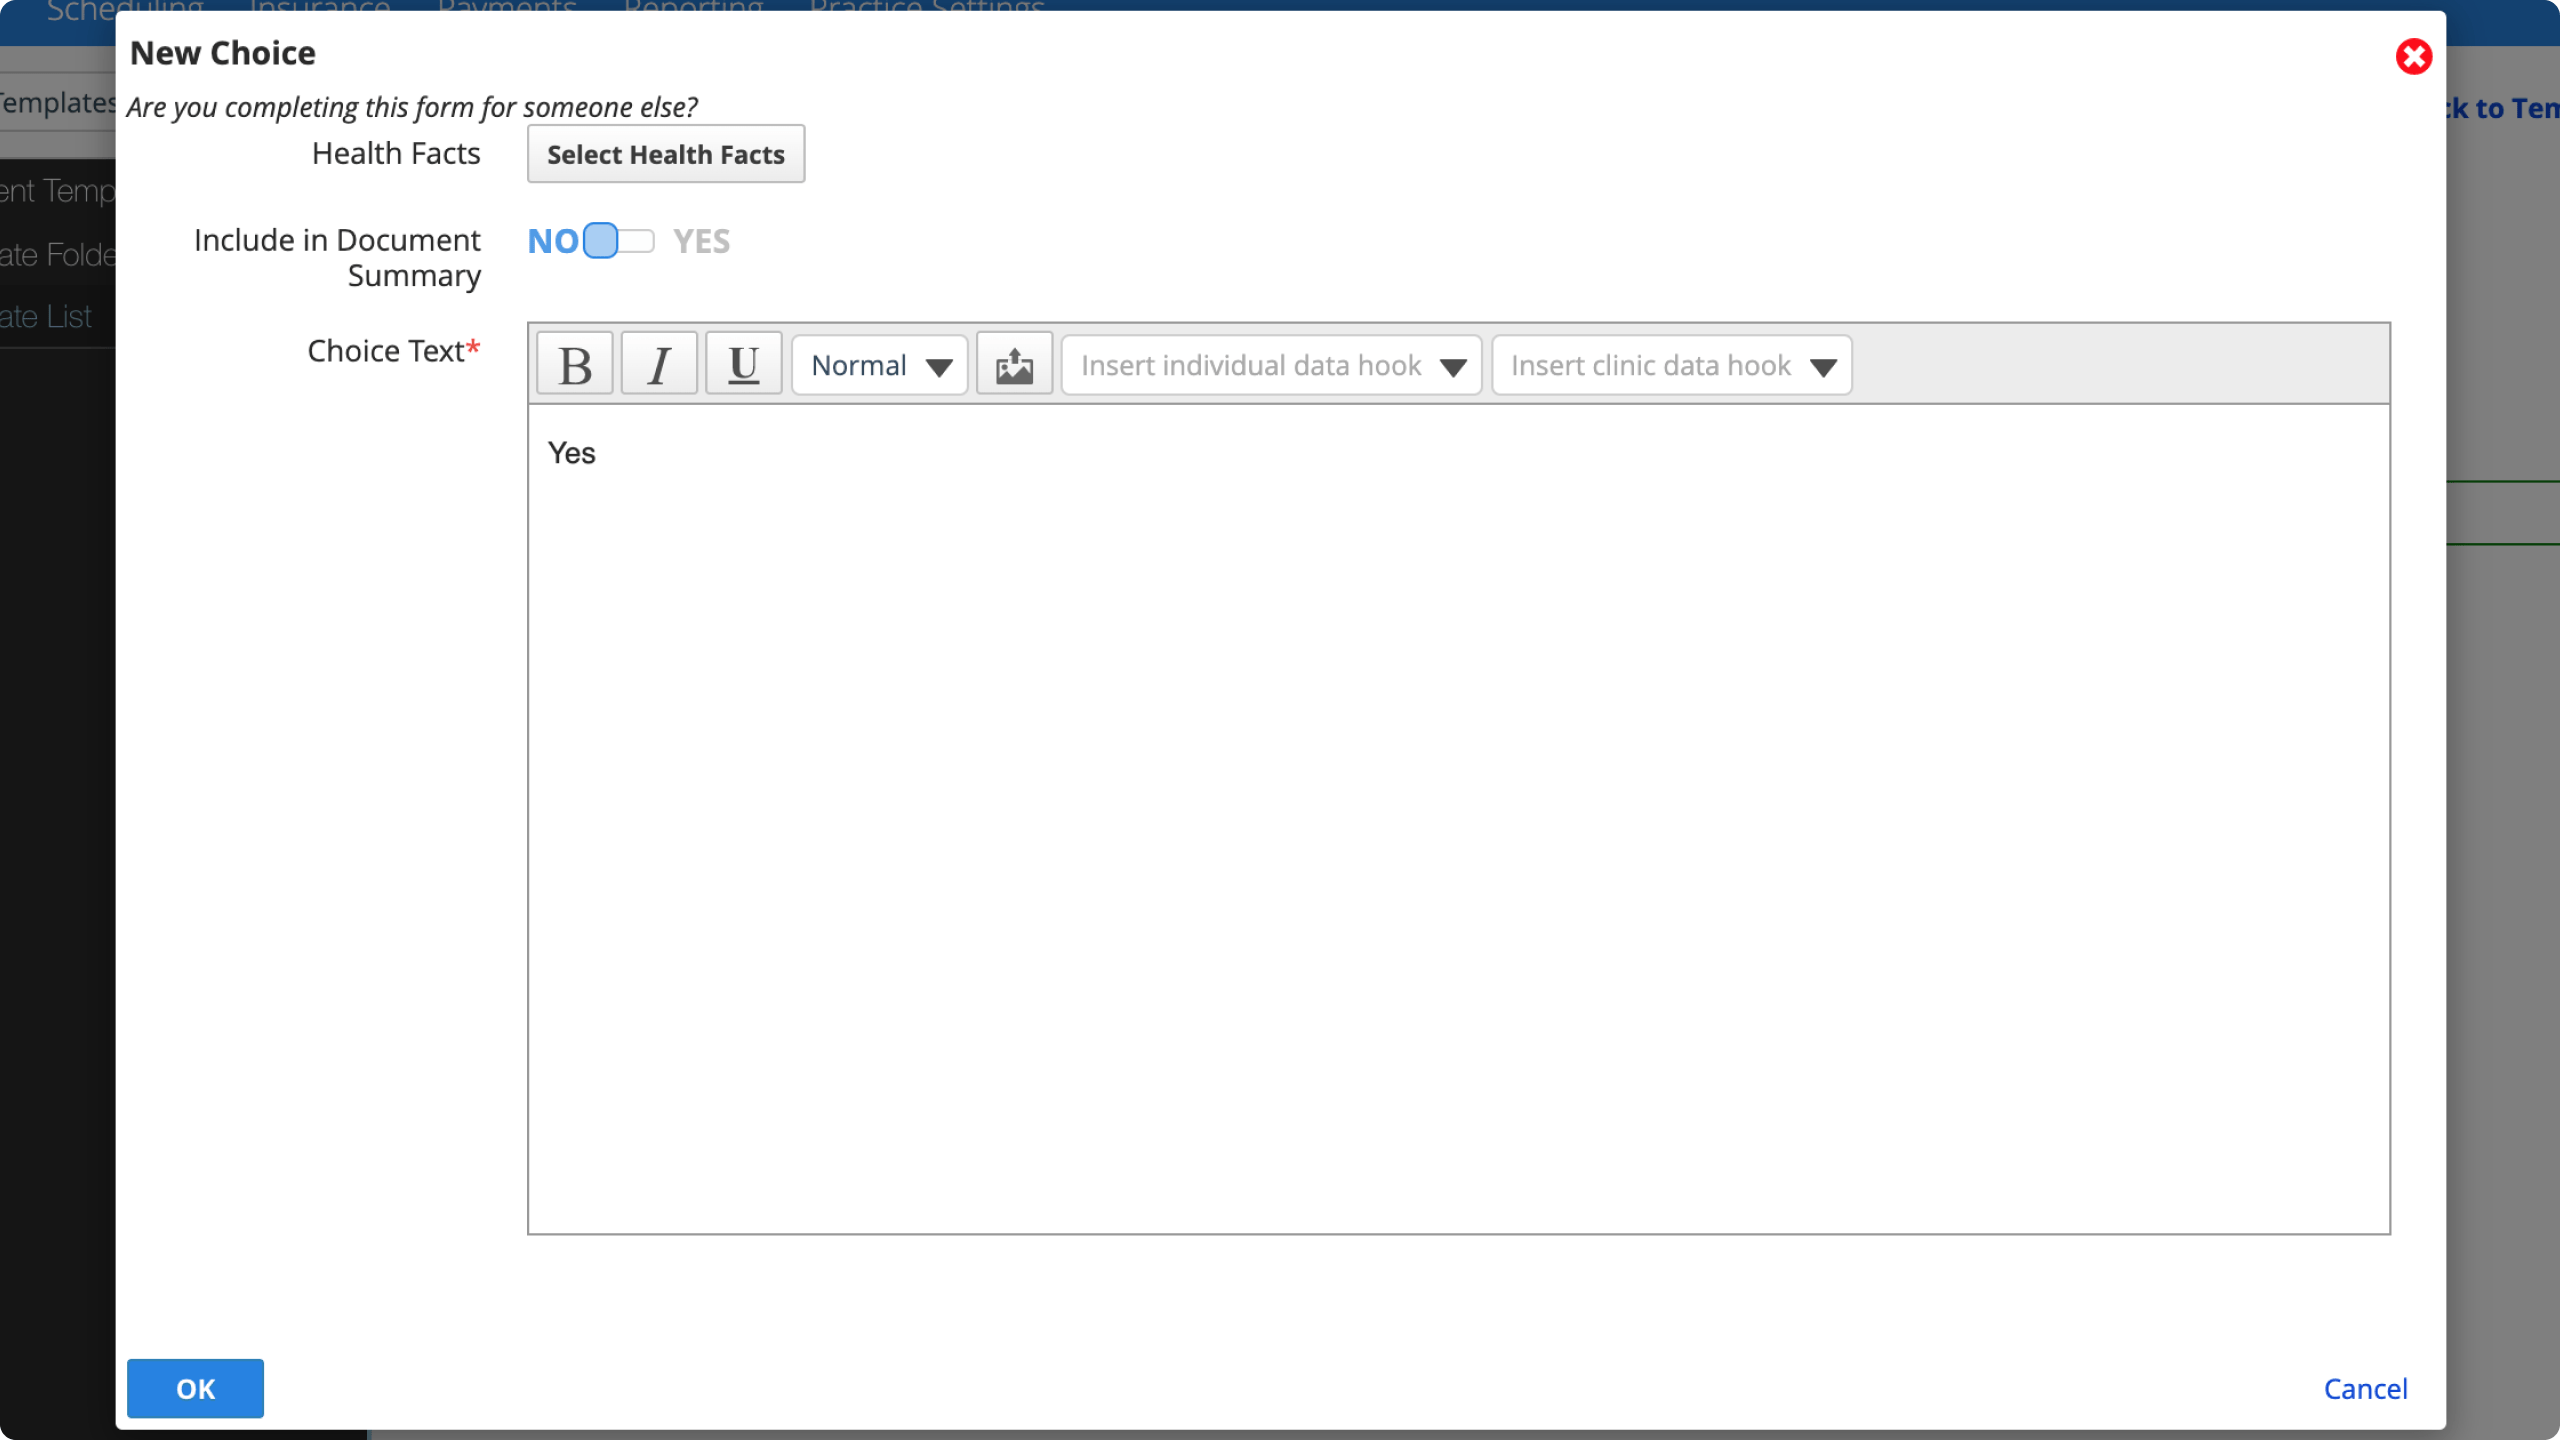
- The question that this choice is for appears in the top left of the New Choice window.
- Select OK
- Select Save to save your changes
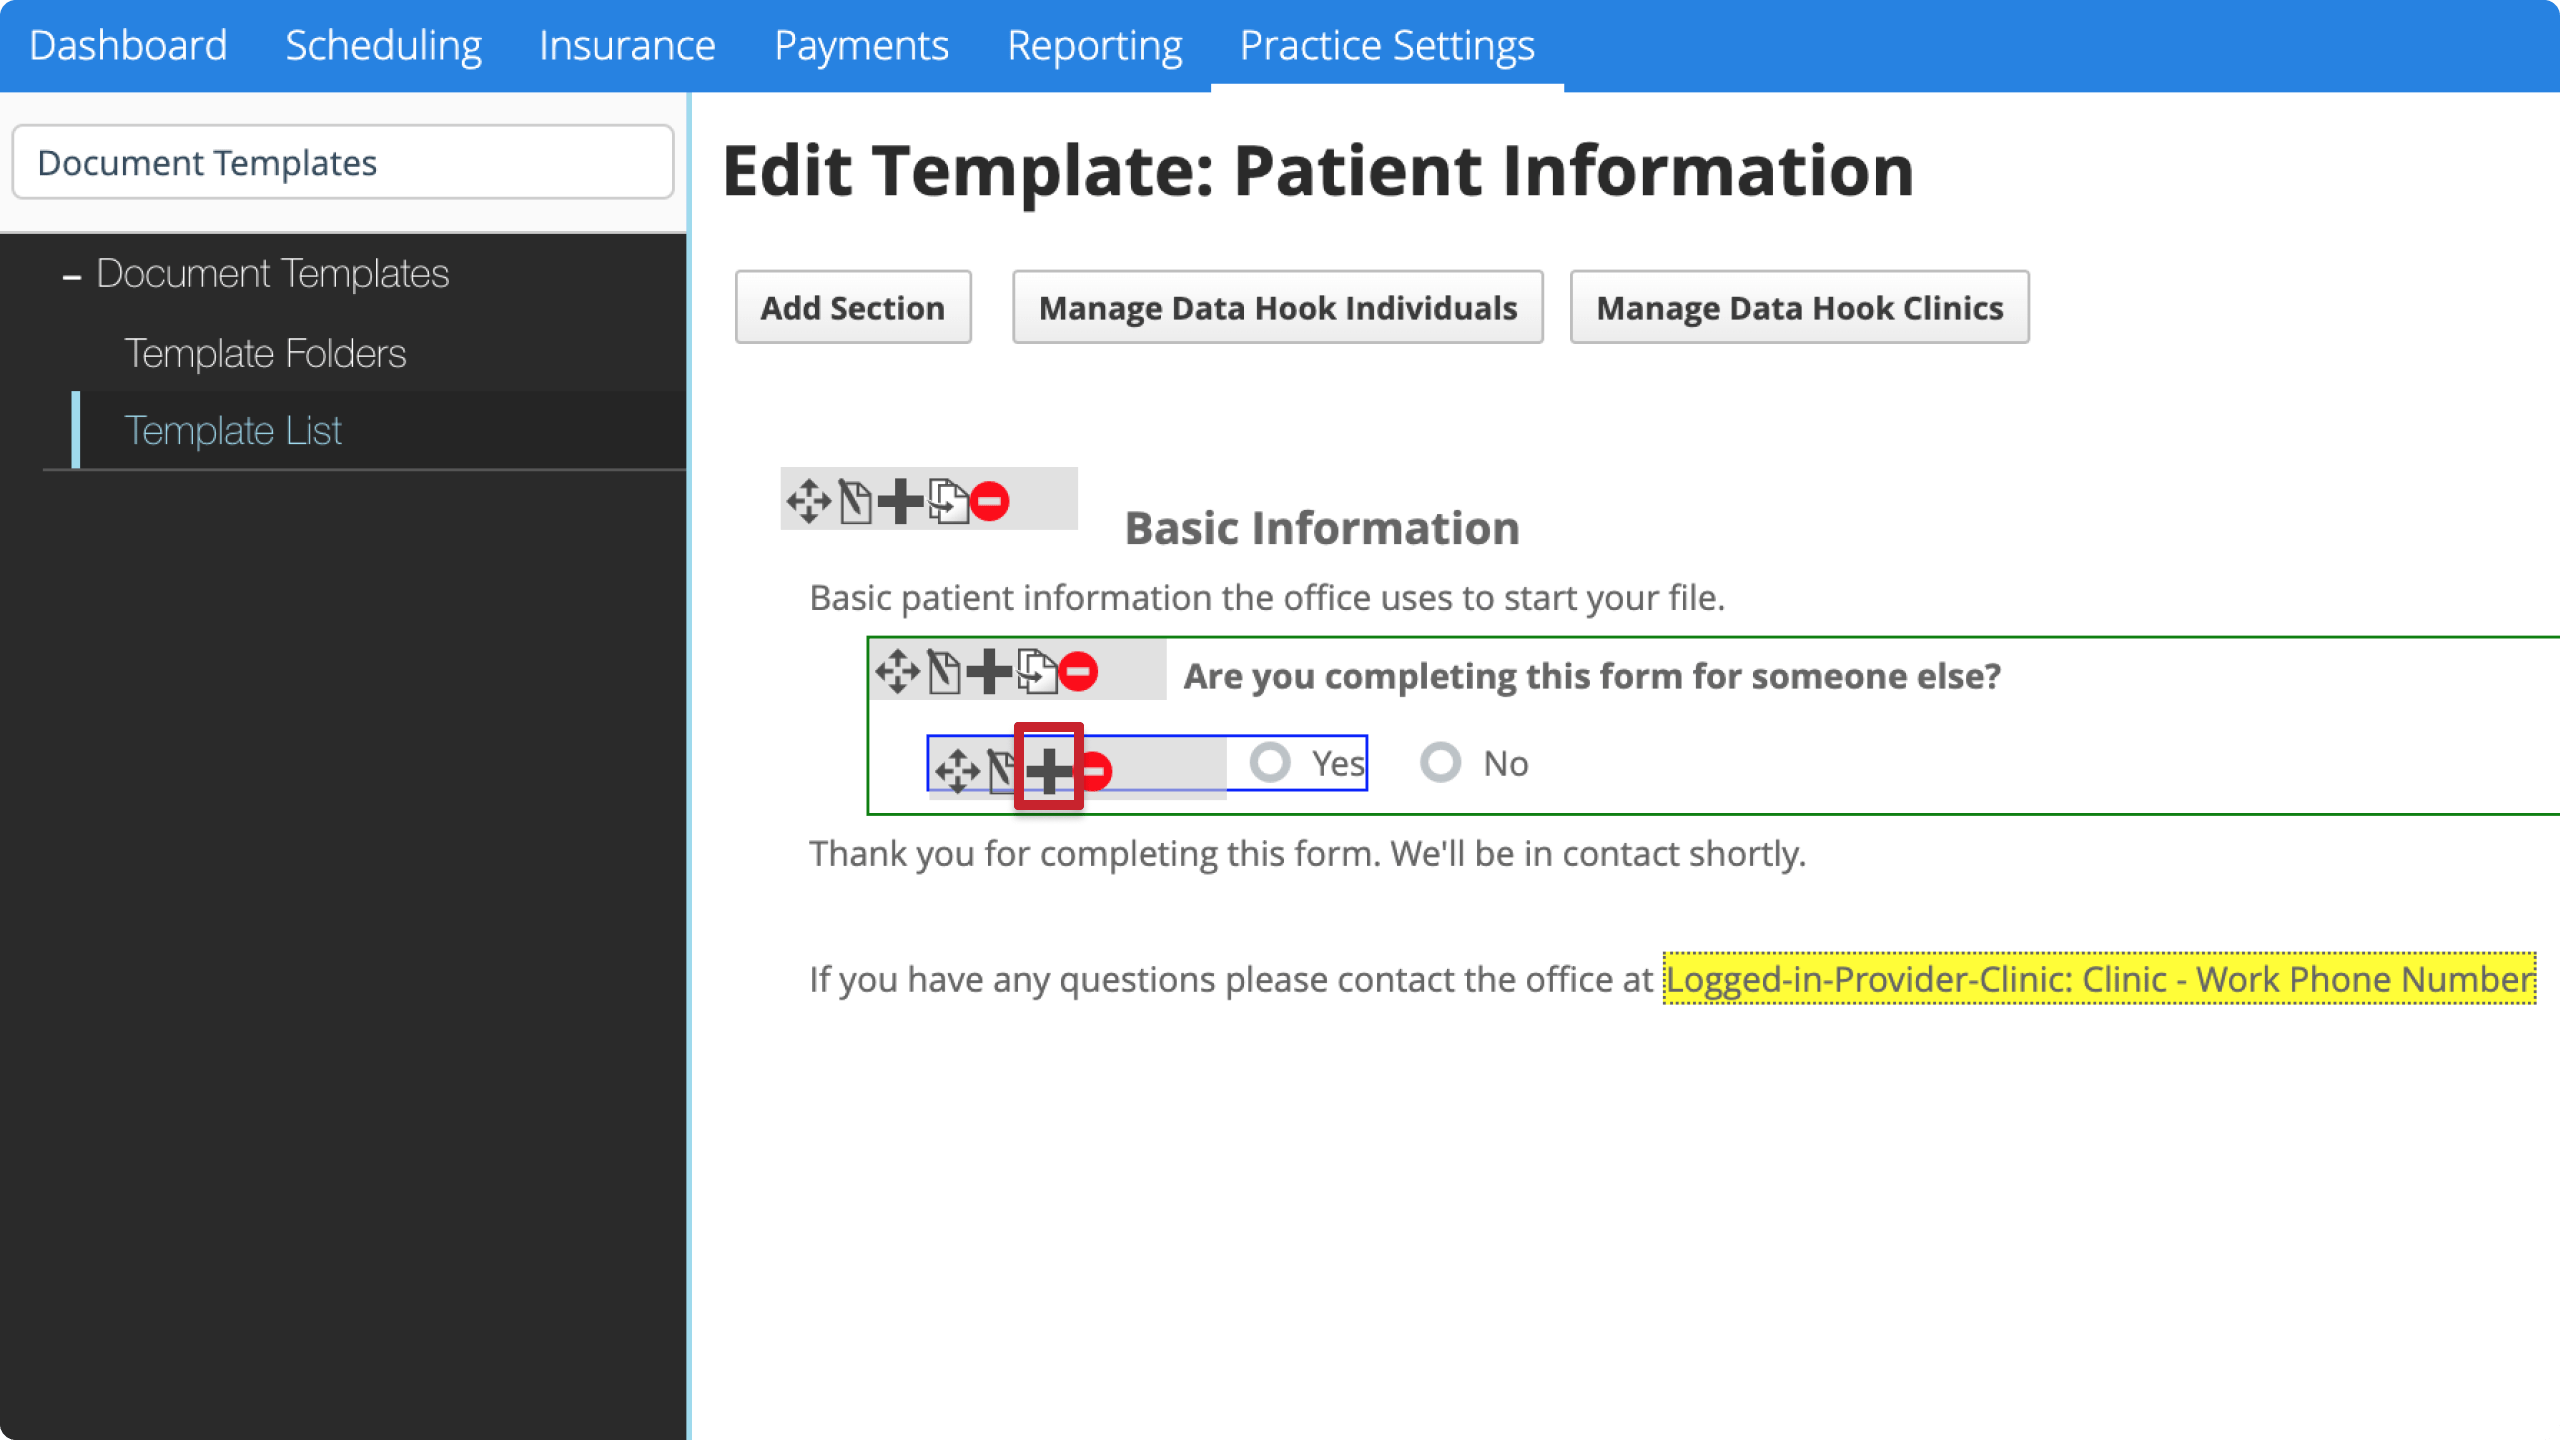
After you add a choice, hover over the choice's text to see action buttons for that choice.
- Use the action buttons to:
- Re-order this choice inside the question by dragging and dropping the arrow.
- Edit the choice text and settings.
- Add a branching question for the choice. To learn more, see Add branching questions below.
- Delete the choice.
Add branching questions
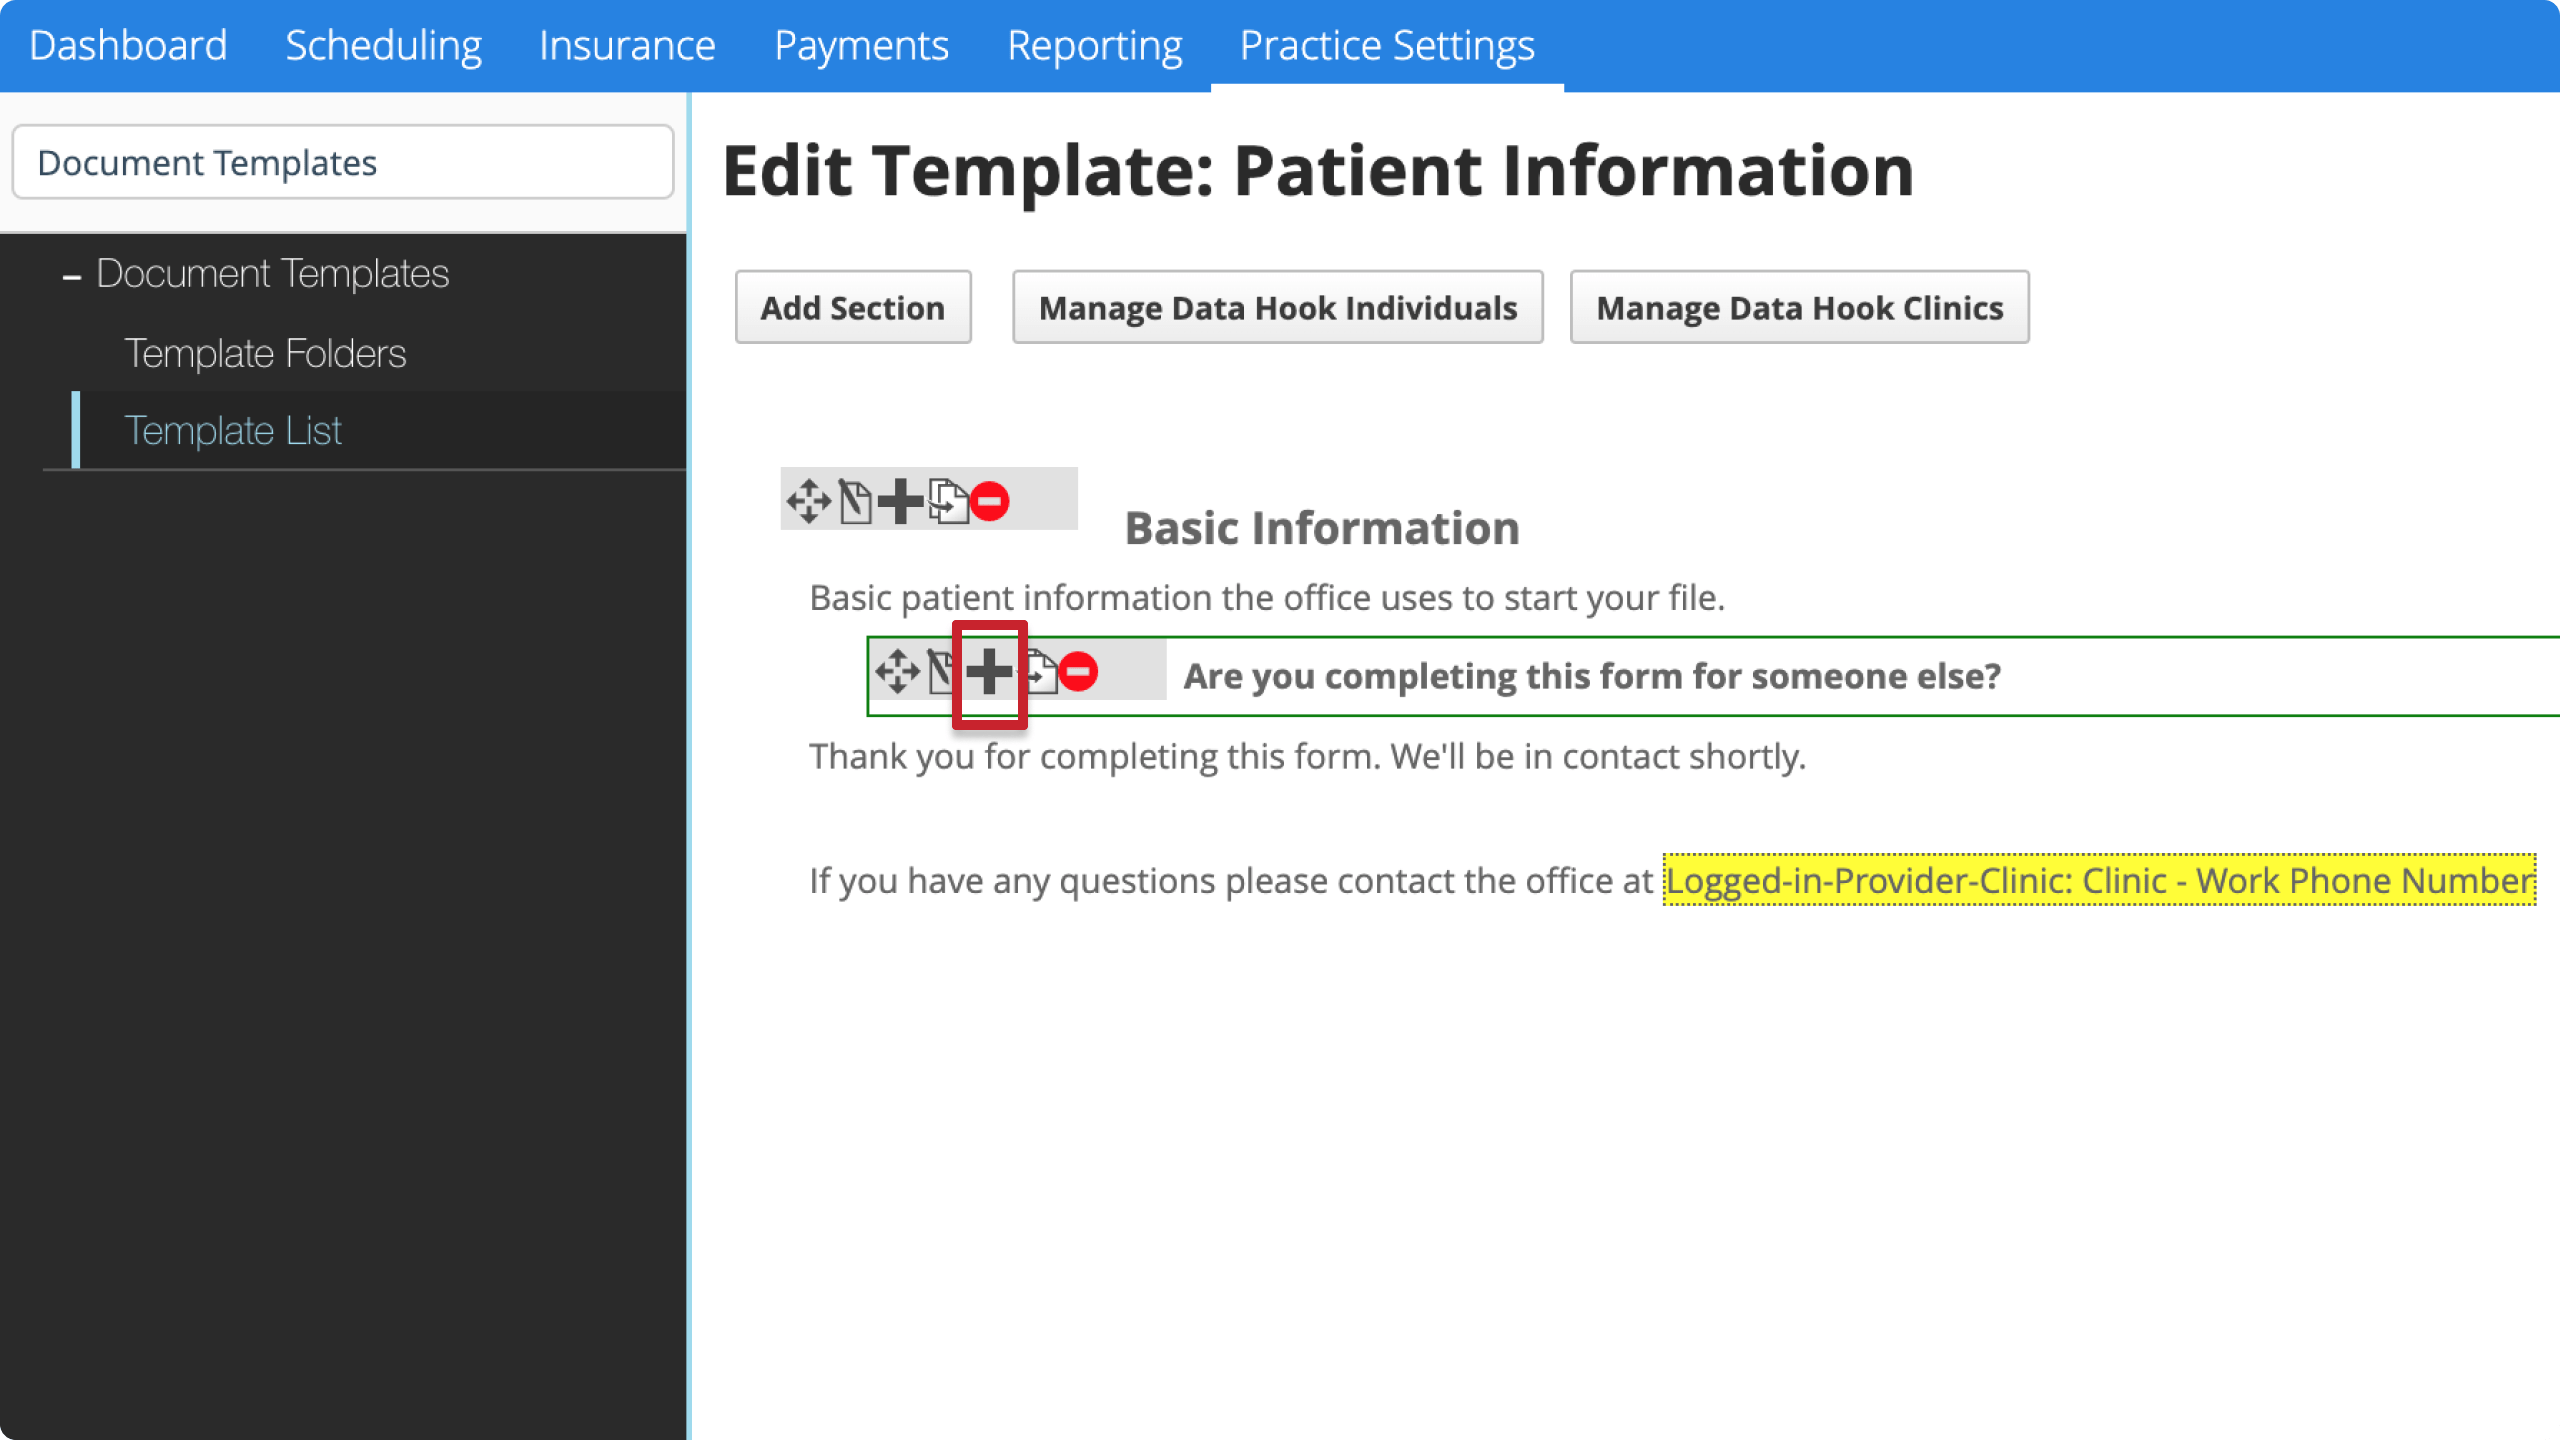
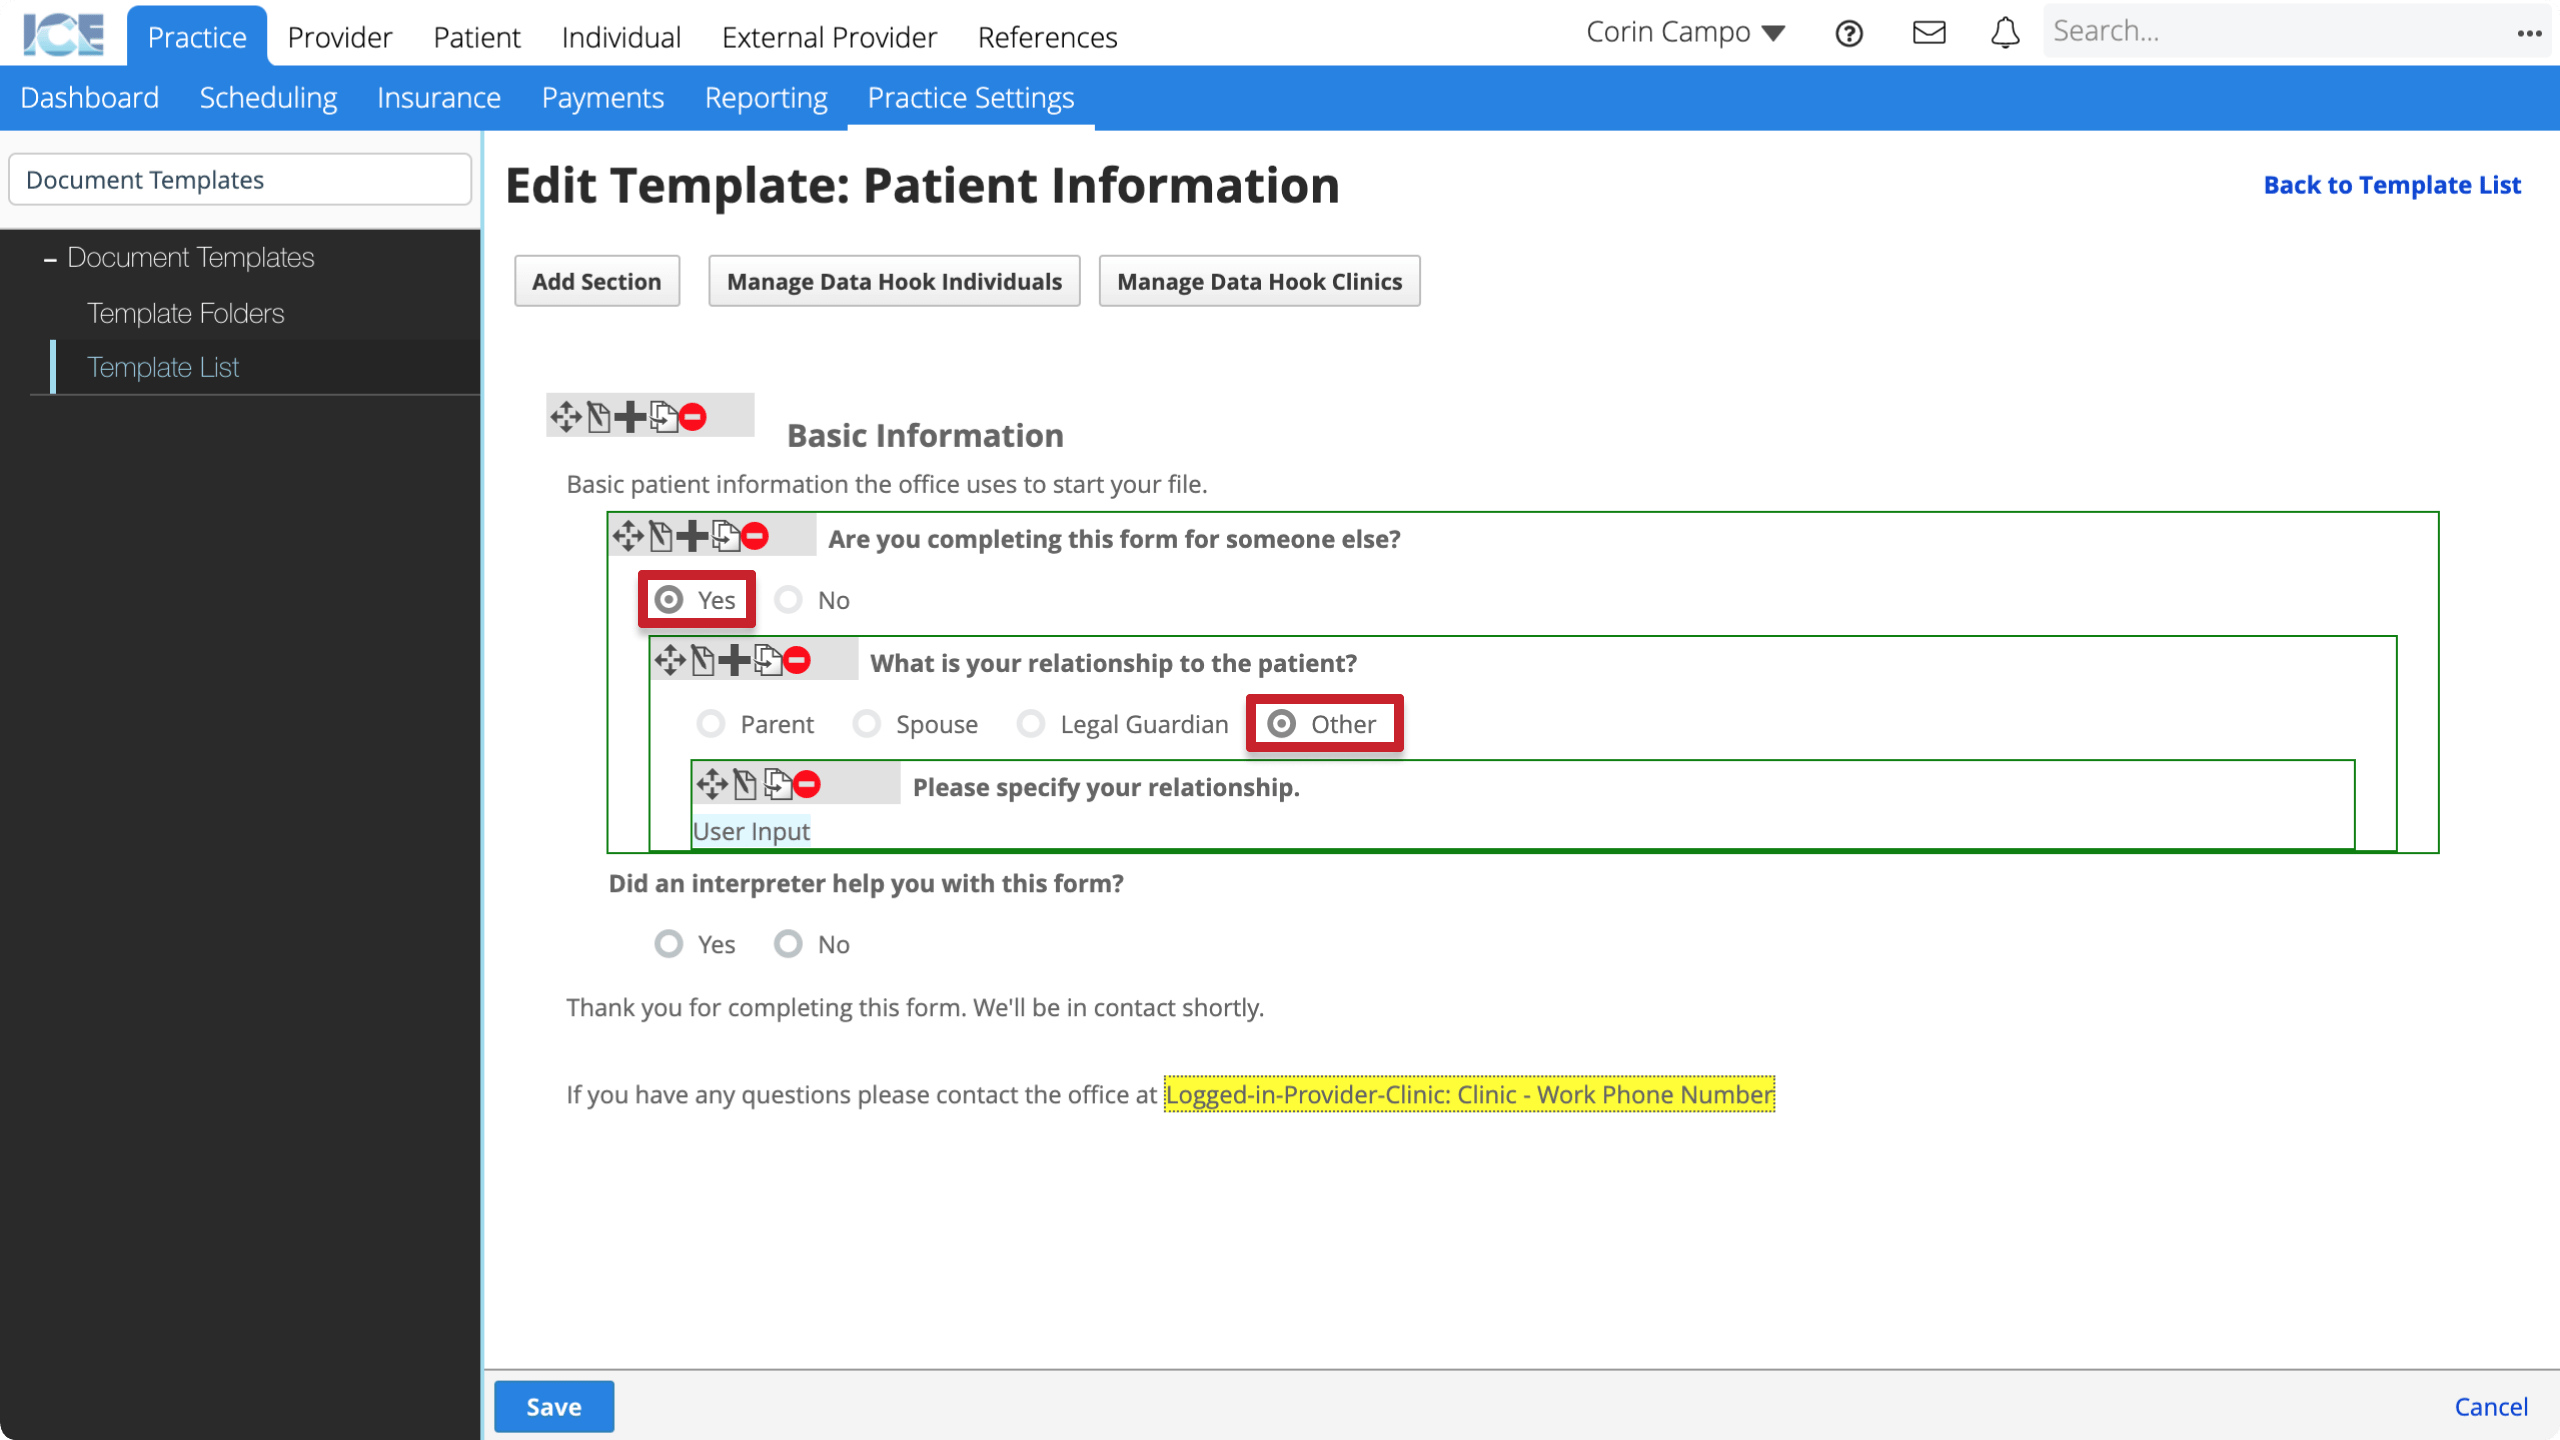
You can configure a question that only appears after someone selects a specific choice.
For example, if the user answers "Yes" to "Are you completing this form for someone else?", show follow up questions about their relationship to the patient.
- Hover over the choice you want to trigger a branching question and select
- Enter the branching question

- The choice that triggers this branching question appears in the top left of the Edit Question window.
- Add choices for the branching question
- Select Save to save your changes
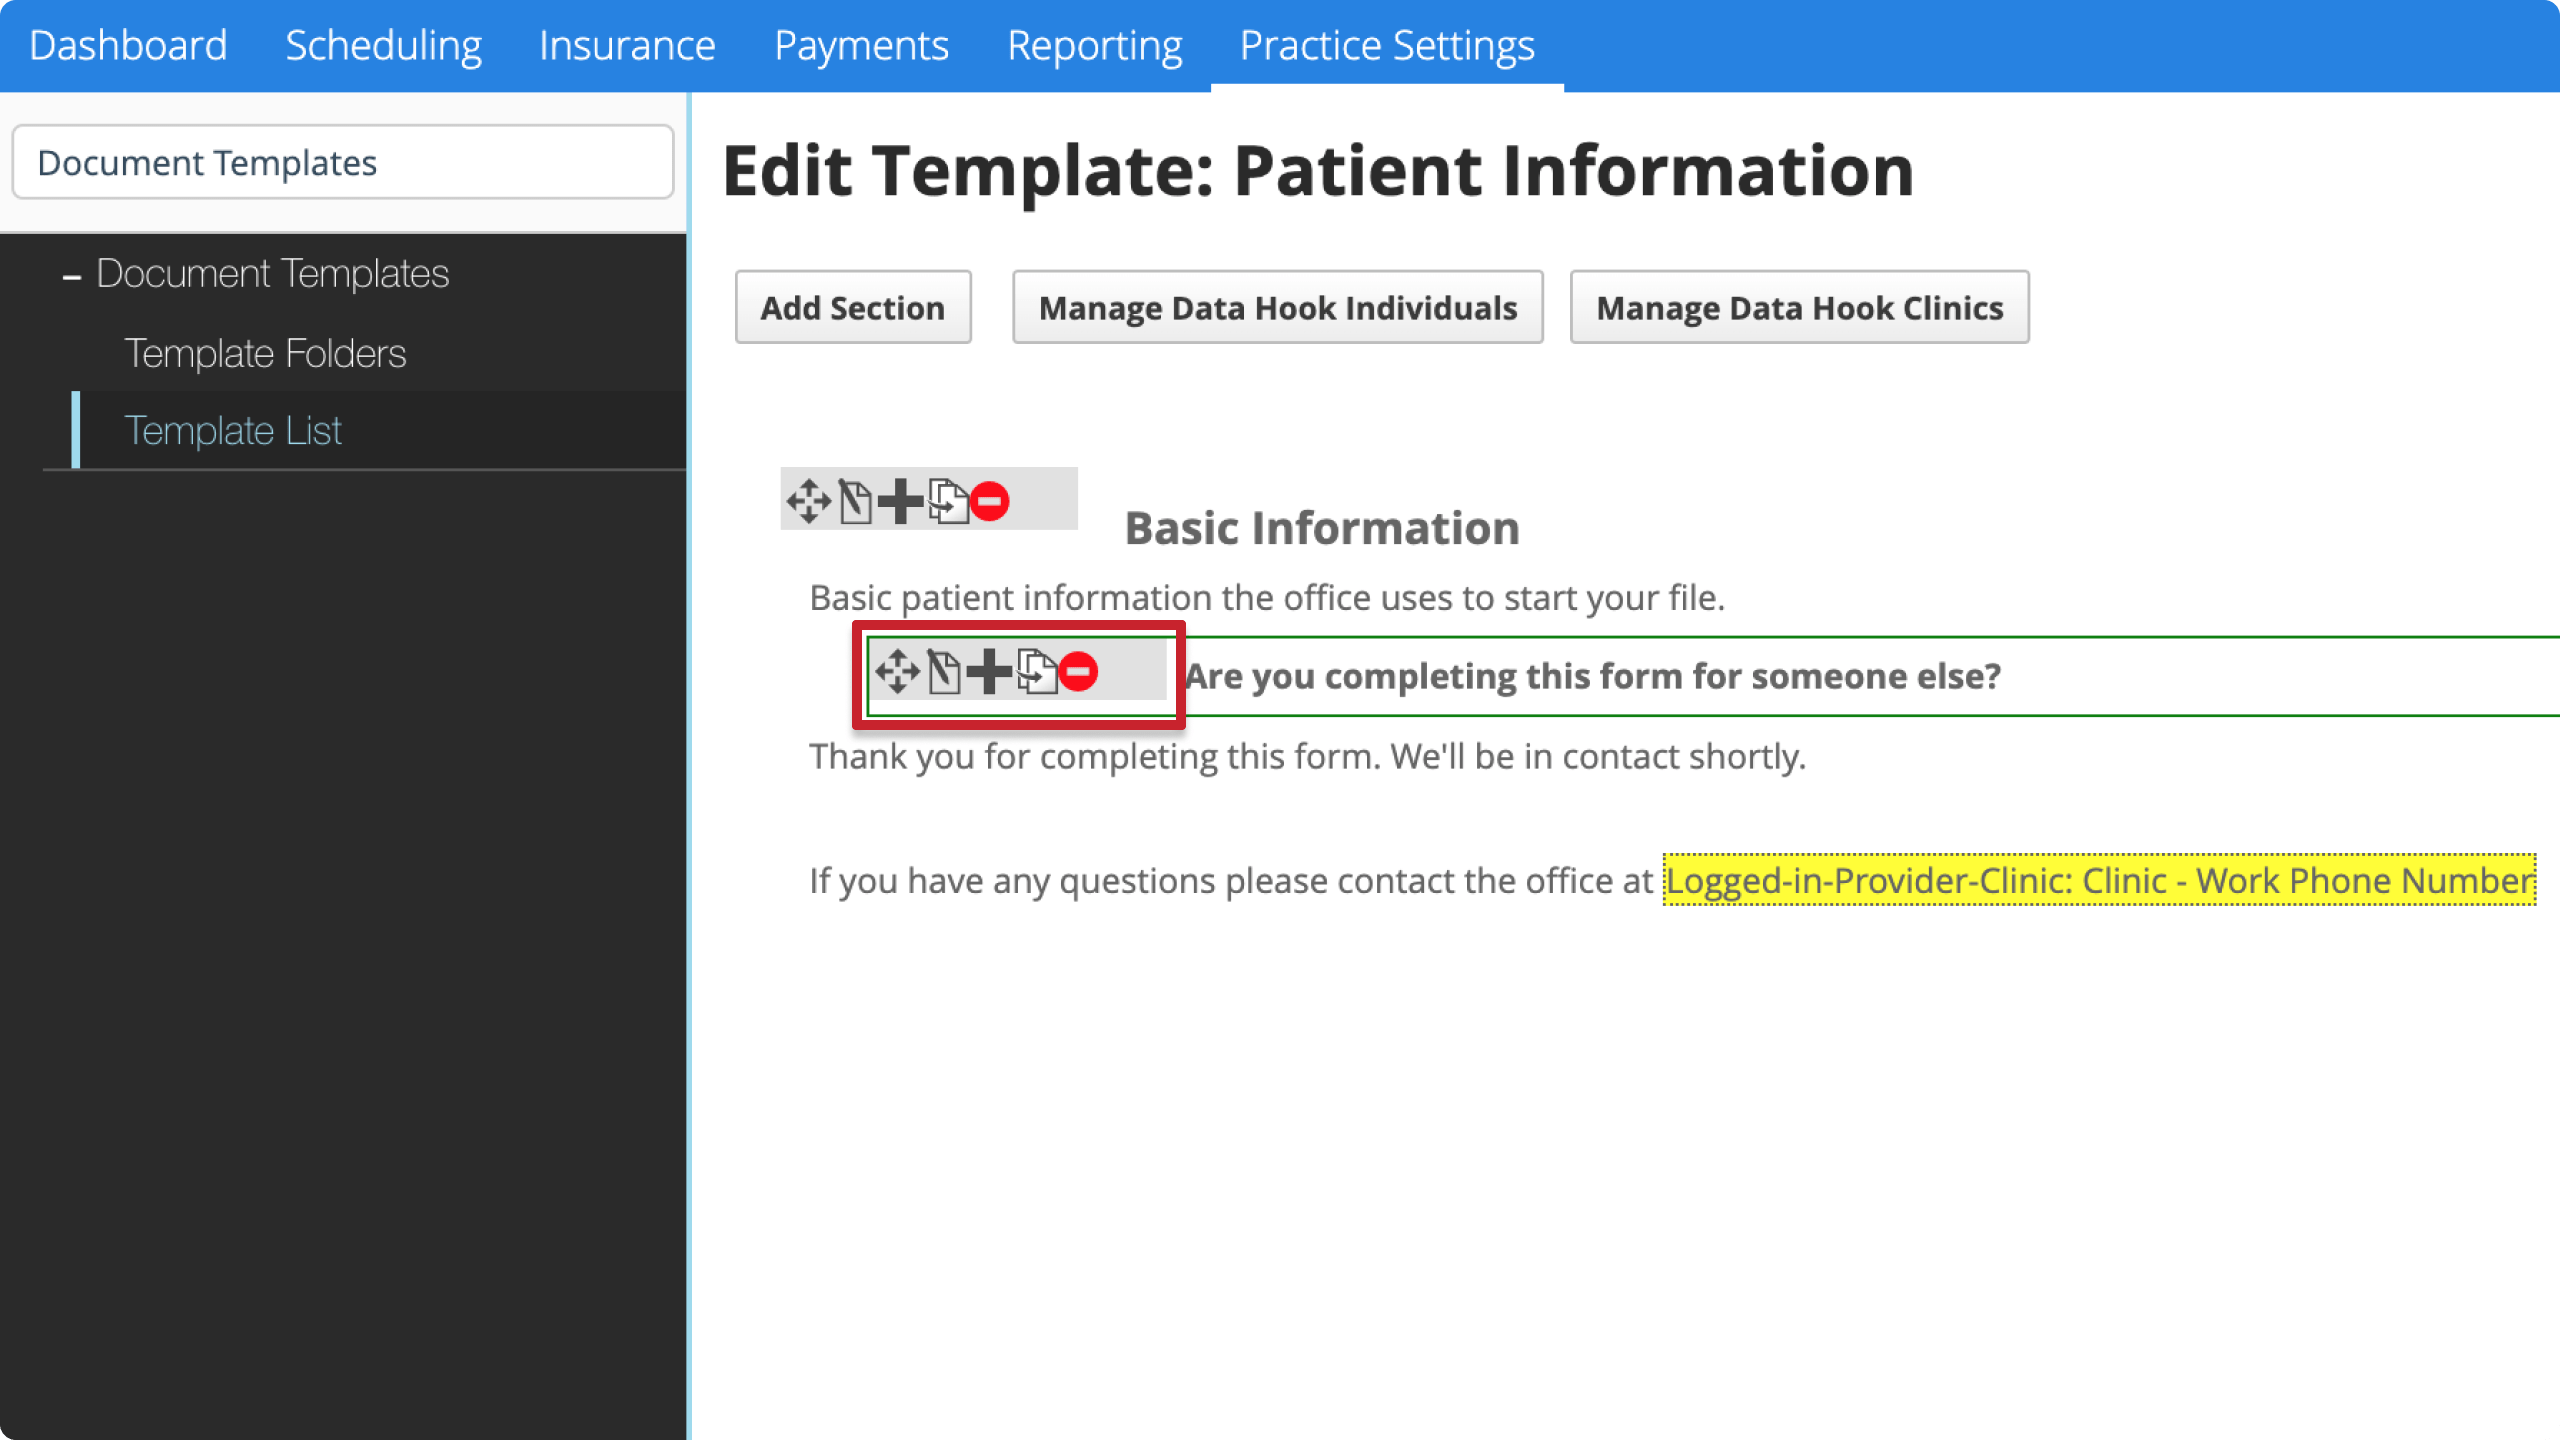
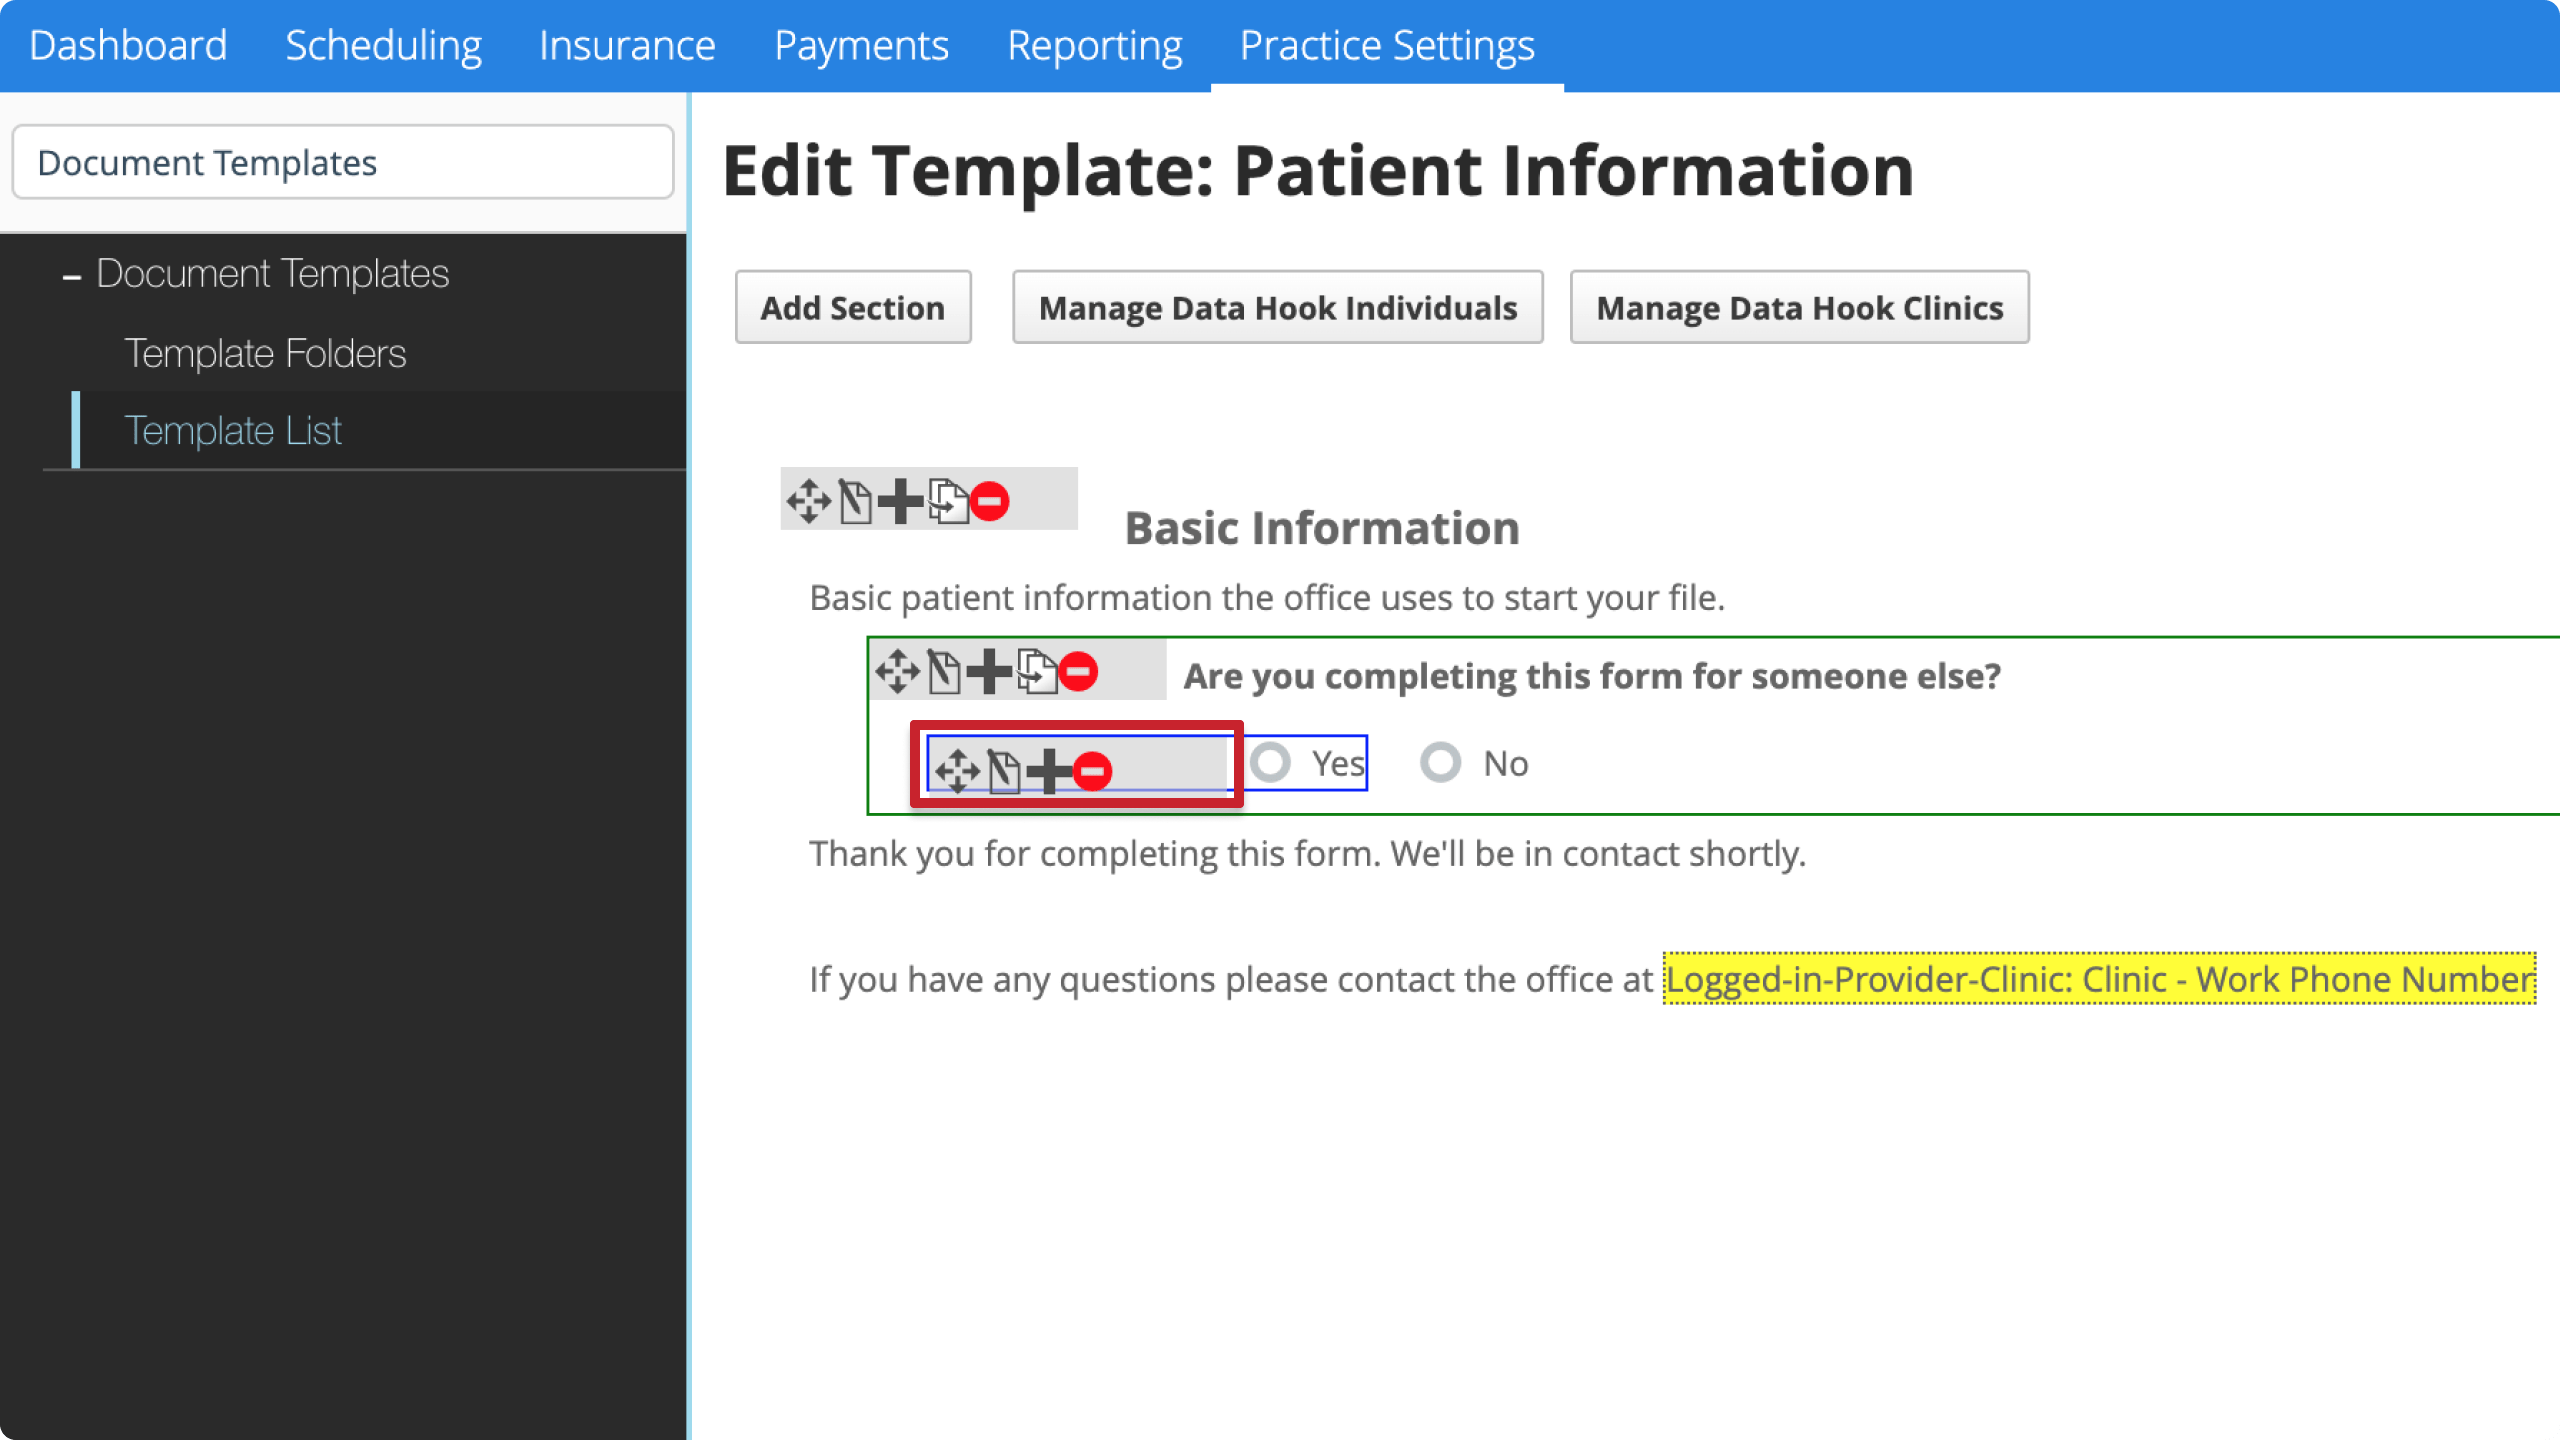
In the document template editor, branching questions are indented below the question they're connected to.
To see which choice triggers a branching question, hover the branching question and look at the choices above. The system highlights the connected choice(s).
Add images
You can add images to the text fields of sections, questions, or choices in a template.
When a user fills out the document, they can annotate images you added to the template.
- Hover over the section, question, or choice you want to add an image to and select
- Select
 from the text editor toolbar
- Locate the file on your computer and select Open
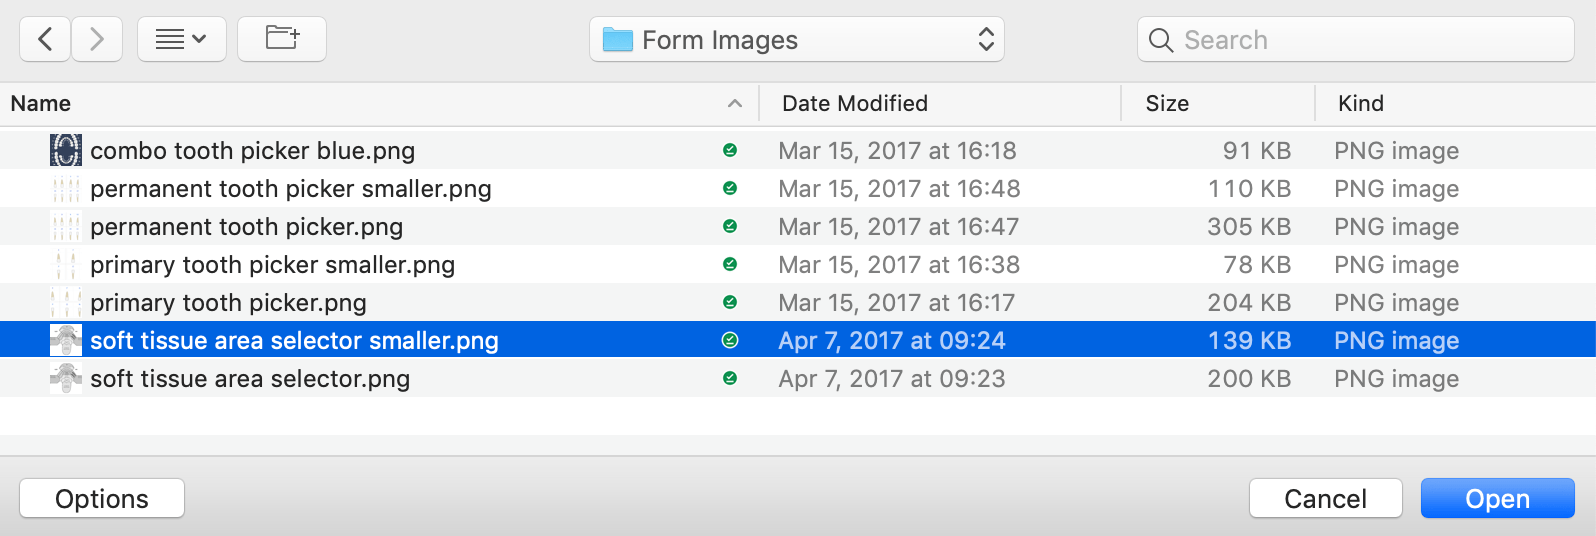
- The image appears inside the text field
- Select OK
- Select Save to save your changes
To remove an image, place your cursor after the image in the section, question, or choice text editor, and press delete or backspace on your keyboard.
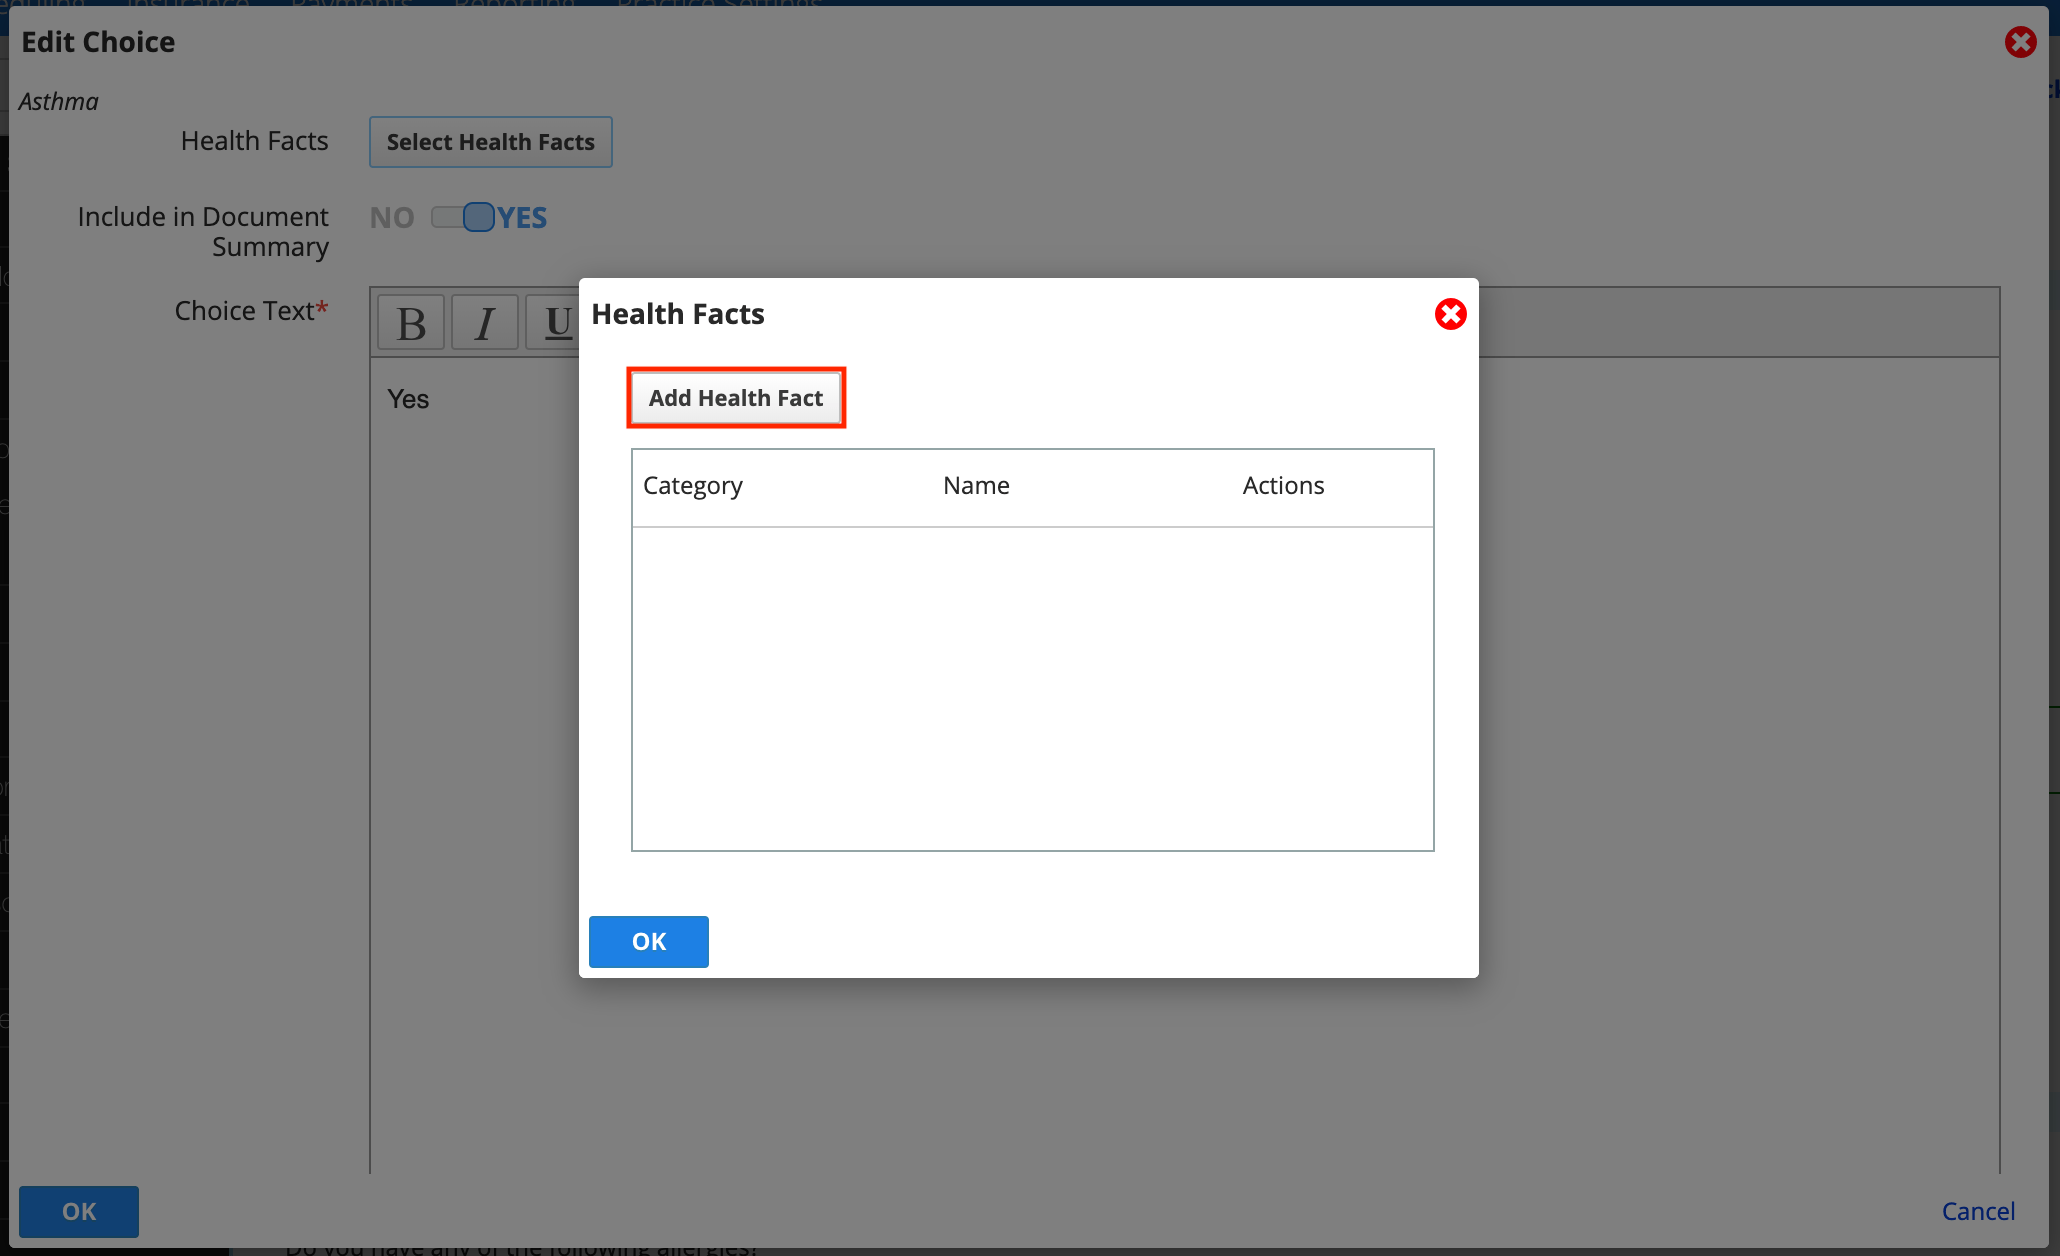
Add health facts
You can configure a choice to add a health fact to the patient's record if that choice is selected in a document and the document is locked.
Health facts may be a medication, condition, or allergy.
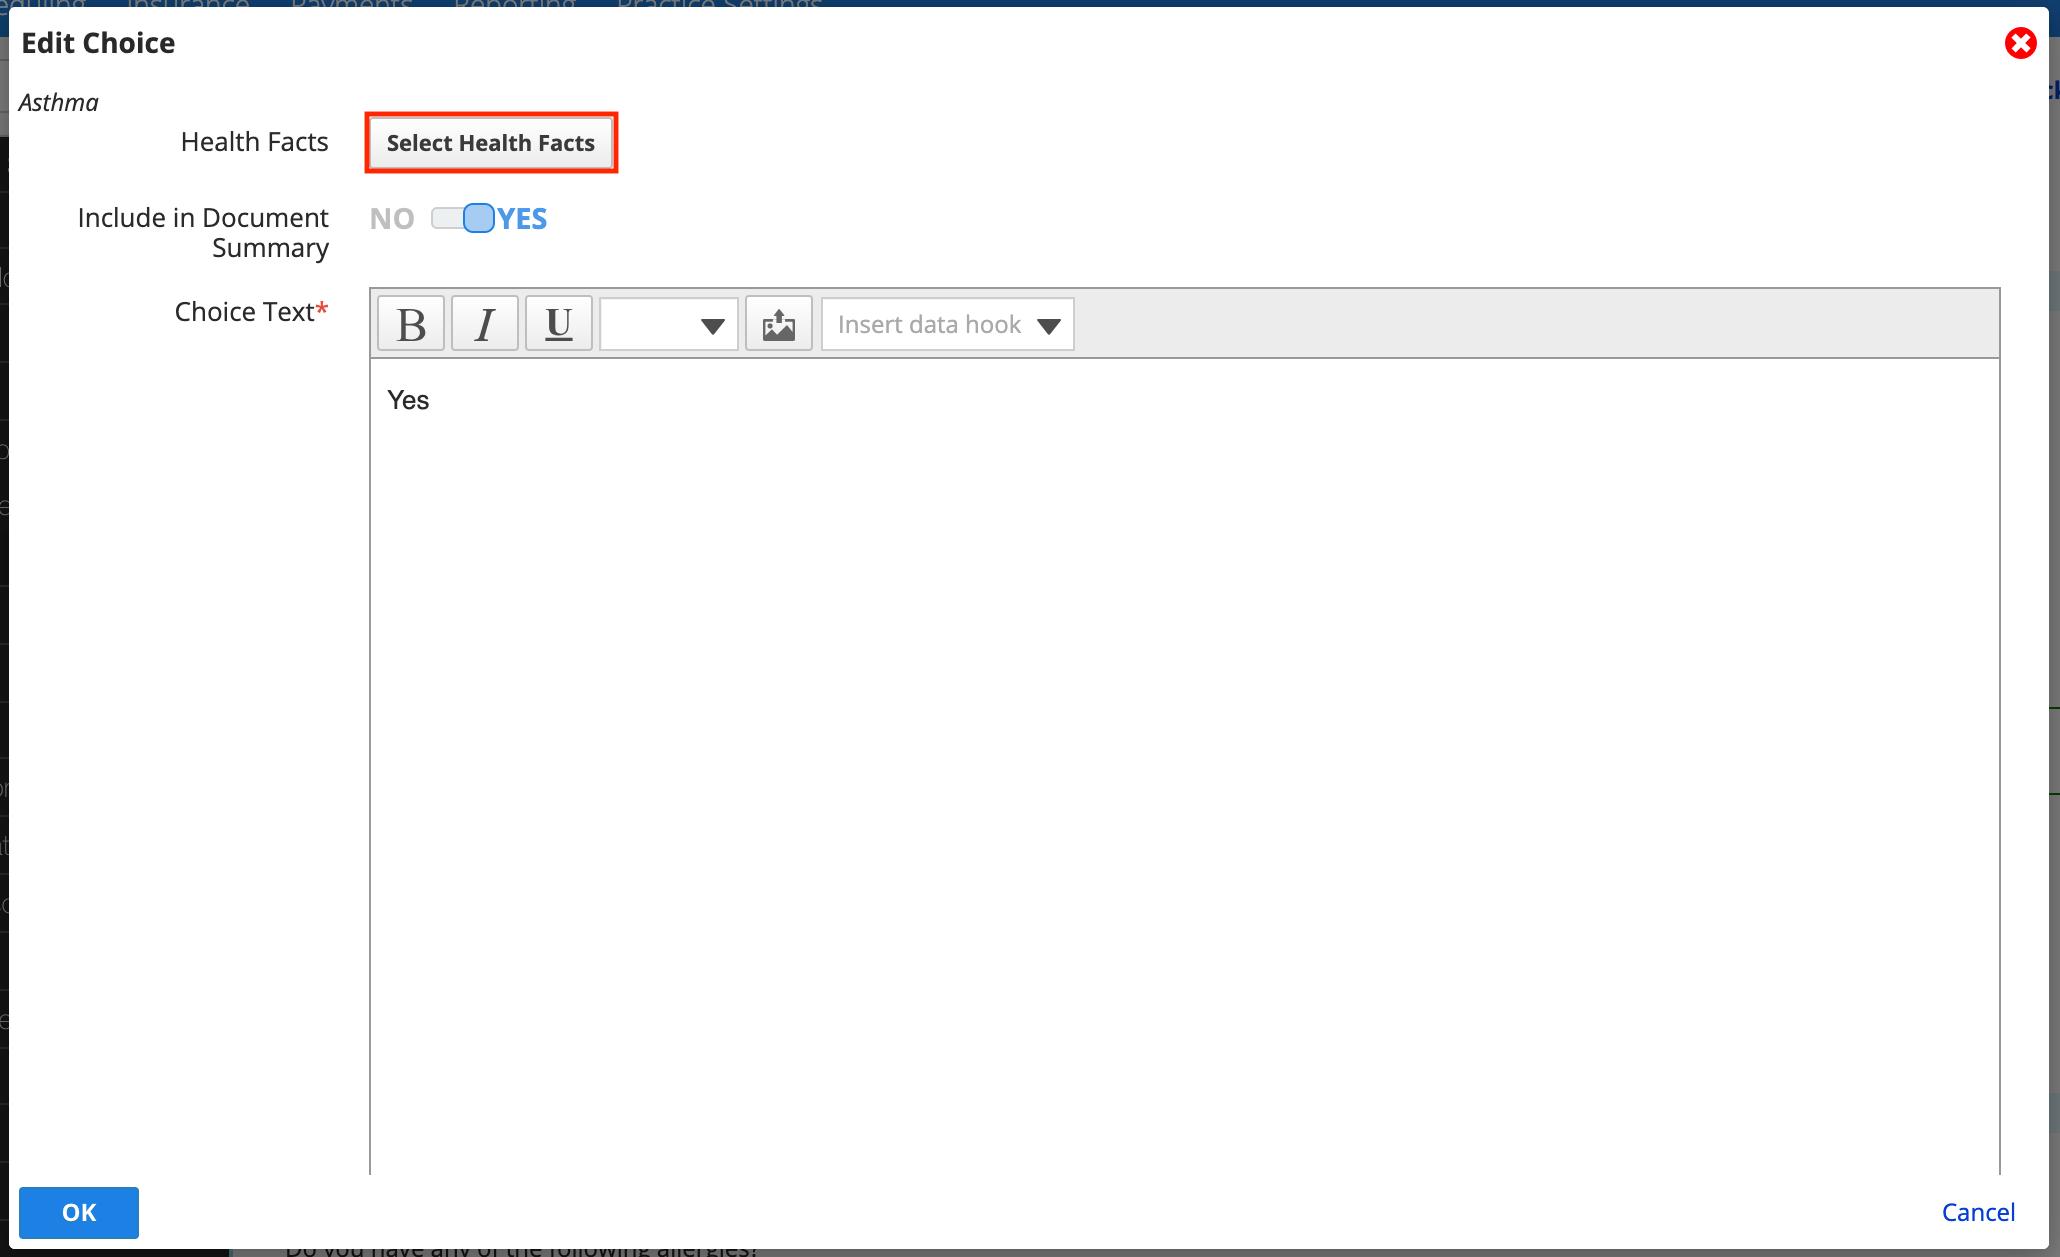
For example, for the question "Asthma" configure the choice "Yes" to add an Asthma Condition to the patient's health fact list.
- Hover over the choice you want to add a health fact to and select
- Select Select Health Facts
- Select Add Health Fact
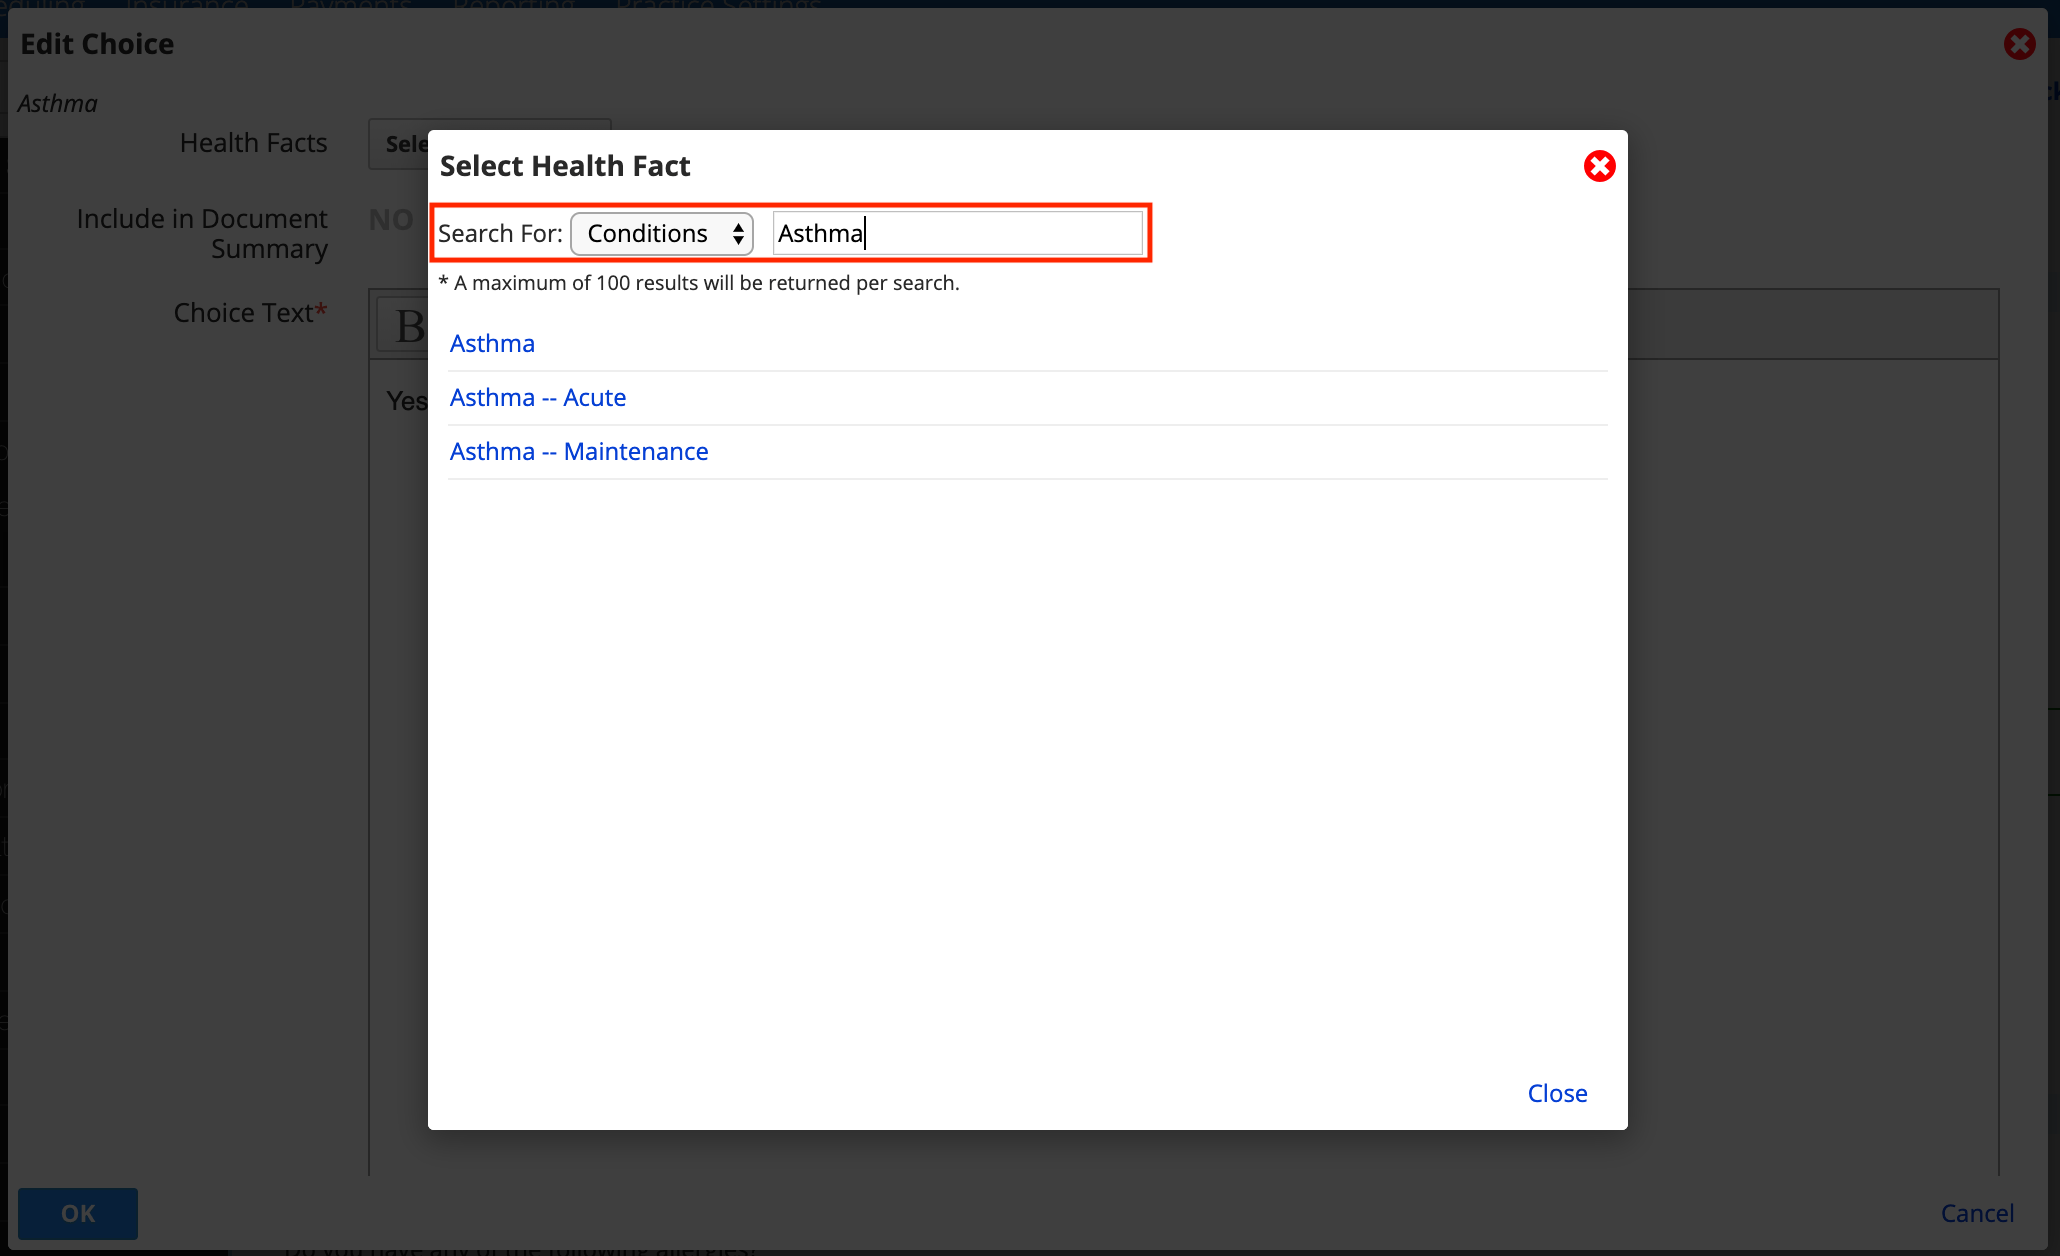
- Select the category of health fact you want to add from the drop-down menu
- Type the condition, medication or allergy you are searching for and select it from the list below
- Select OK from the Health Facts window
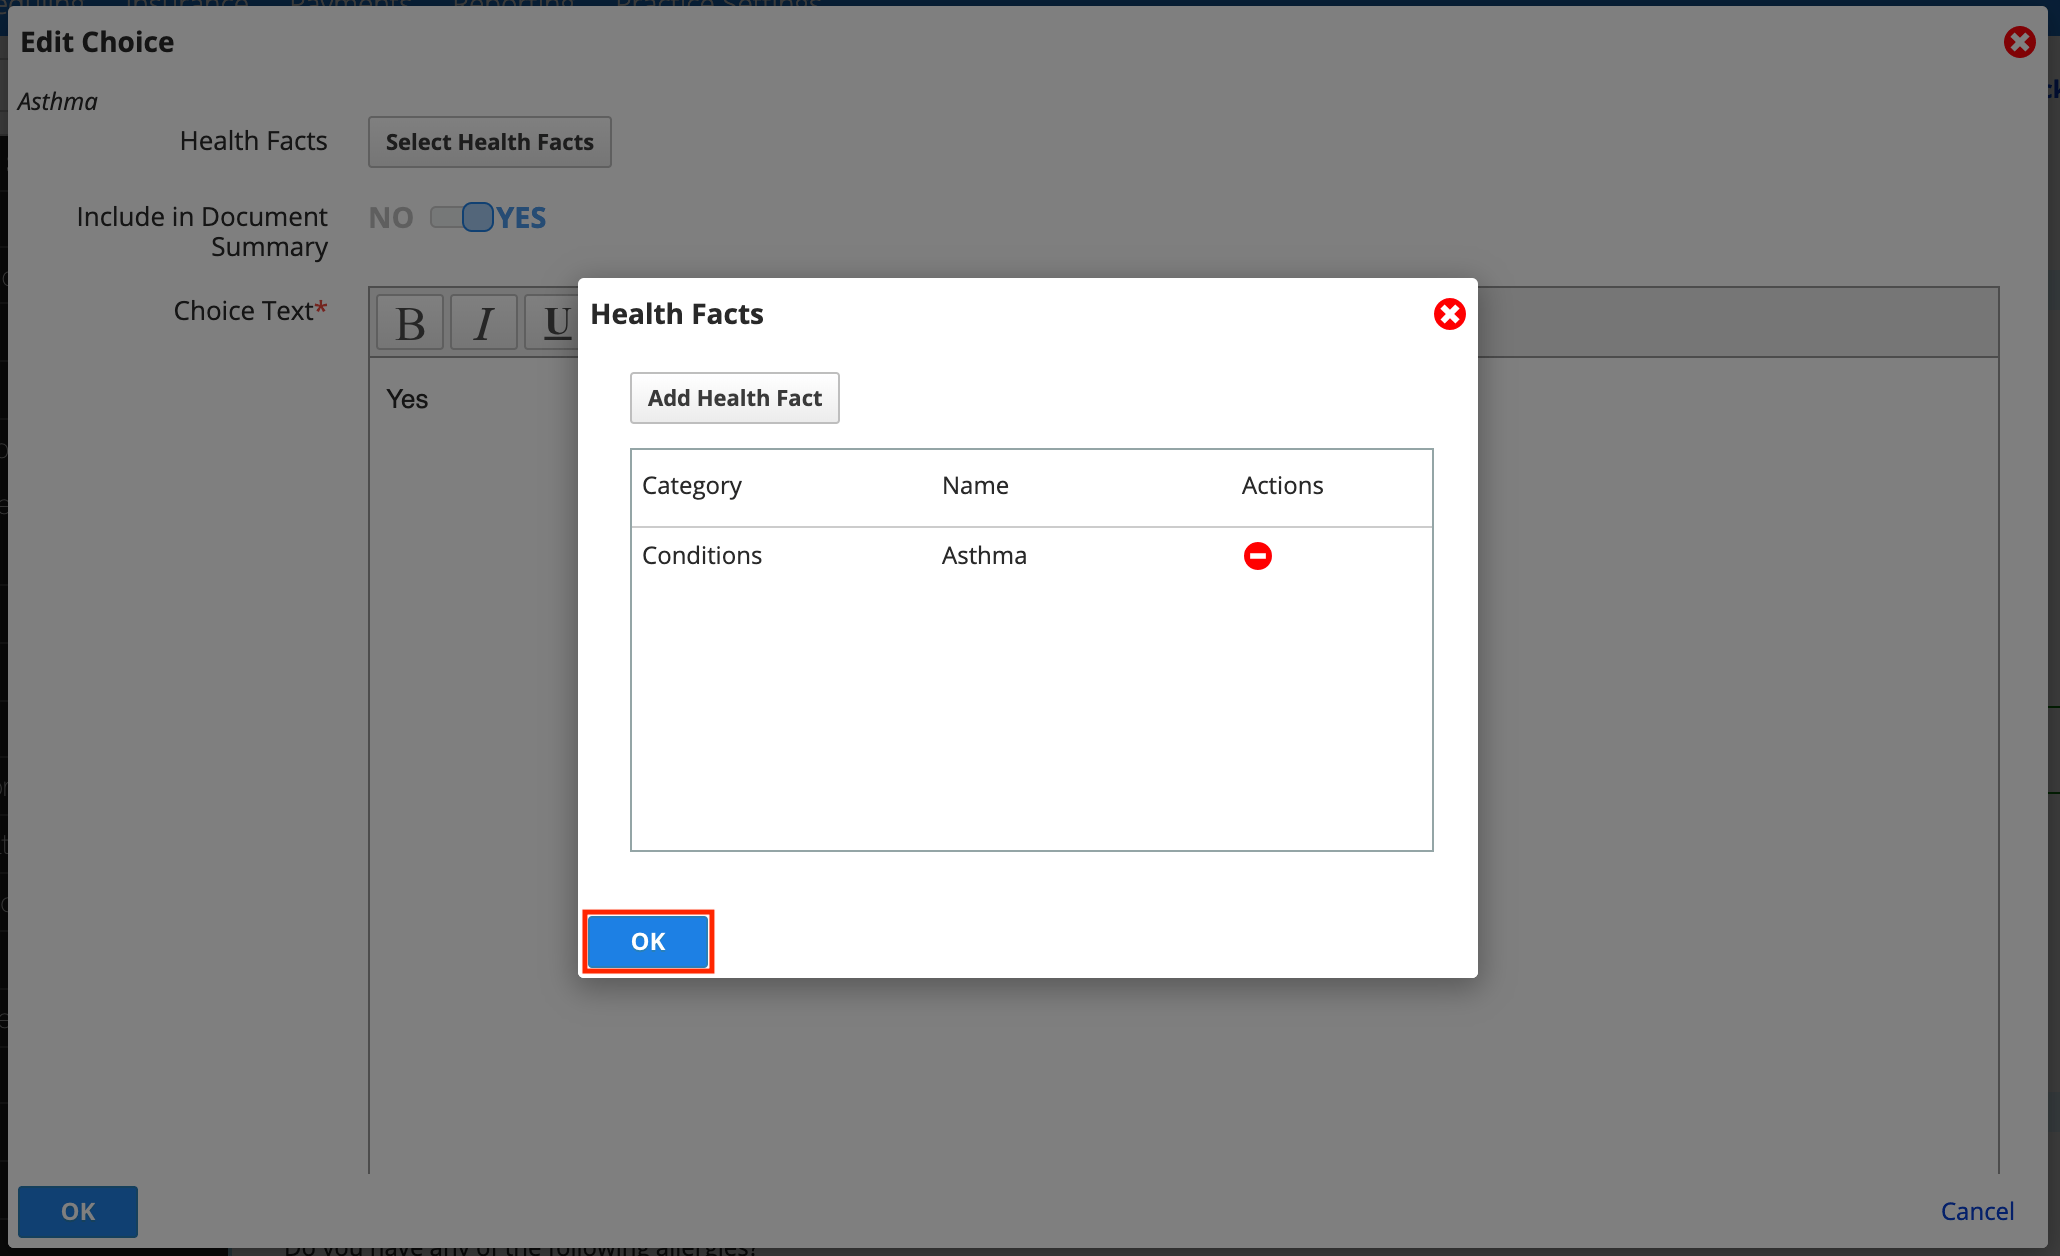
- Select OK from the Edit Choice window
- Select Save to save your changes
To remove a health fact, select ![]() in the Actions column.
in the Actions column.
Insert data hooks
You can add data hooks to question text, choice text, and section descriptions.
A data hook is a small bit of standardized information that appears in a document and changes depending on who the document is about.
For example, you can insert an address data hook that pulls the address of a patient when you fill out a form on their record.
With data hooks you can:
- Reduce the time people spend typing into a form. Instead the document autofills information that is already stored elsewhere in the system.
- Personalize documents without having to create multiple copies of the same template with small differences for each provider or clinic.
By default you can have data hooks for the patient, logged-in-provider, and their primary clinics.
In addition, you can configure custom data hook individuals or clinics so the person filling out the form has to choose a person or clinic to pull data from. To learn more, see Add custom data hook individuals and clinics below.
- Hover over the section, question, or choice where you want to insert a data hook and select
- Select Insert individual data hook or Insert clinic data hook
- Choose the type of data you want to insert
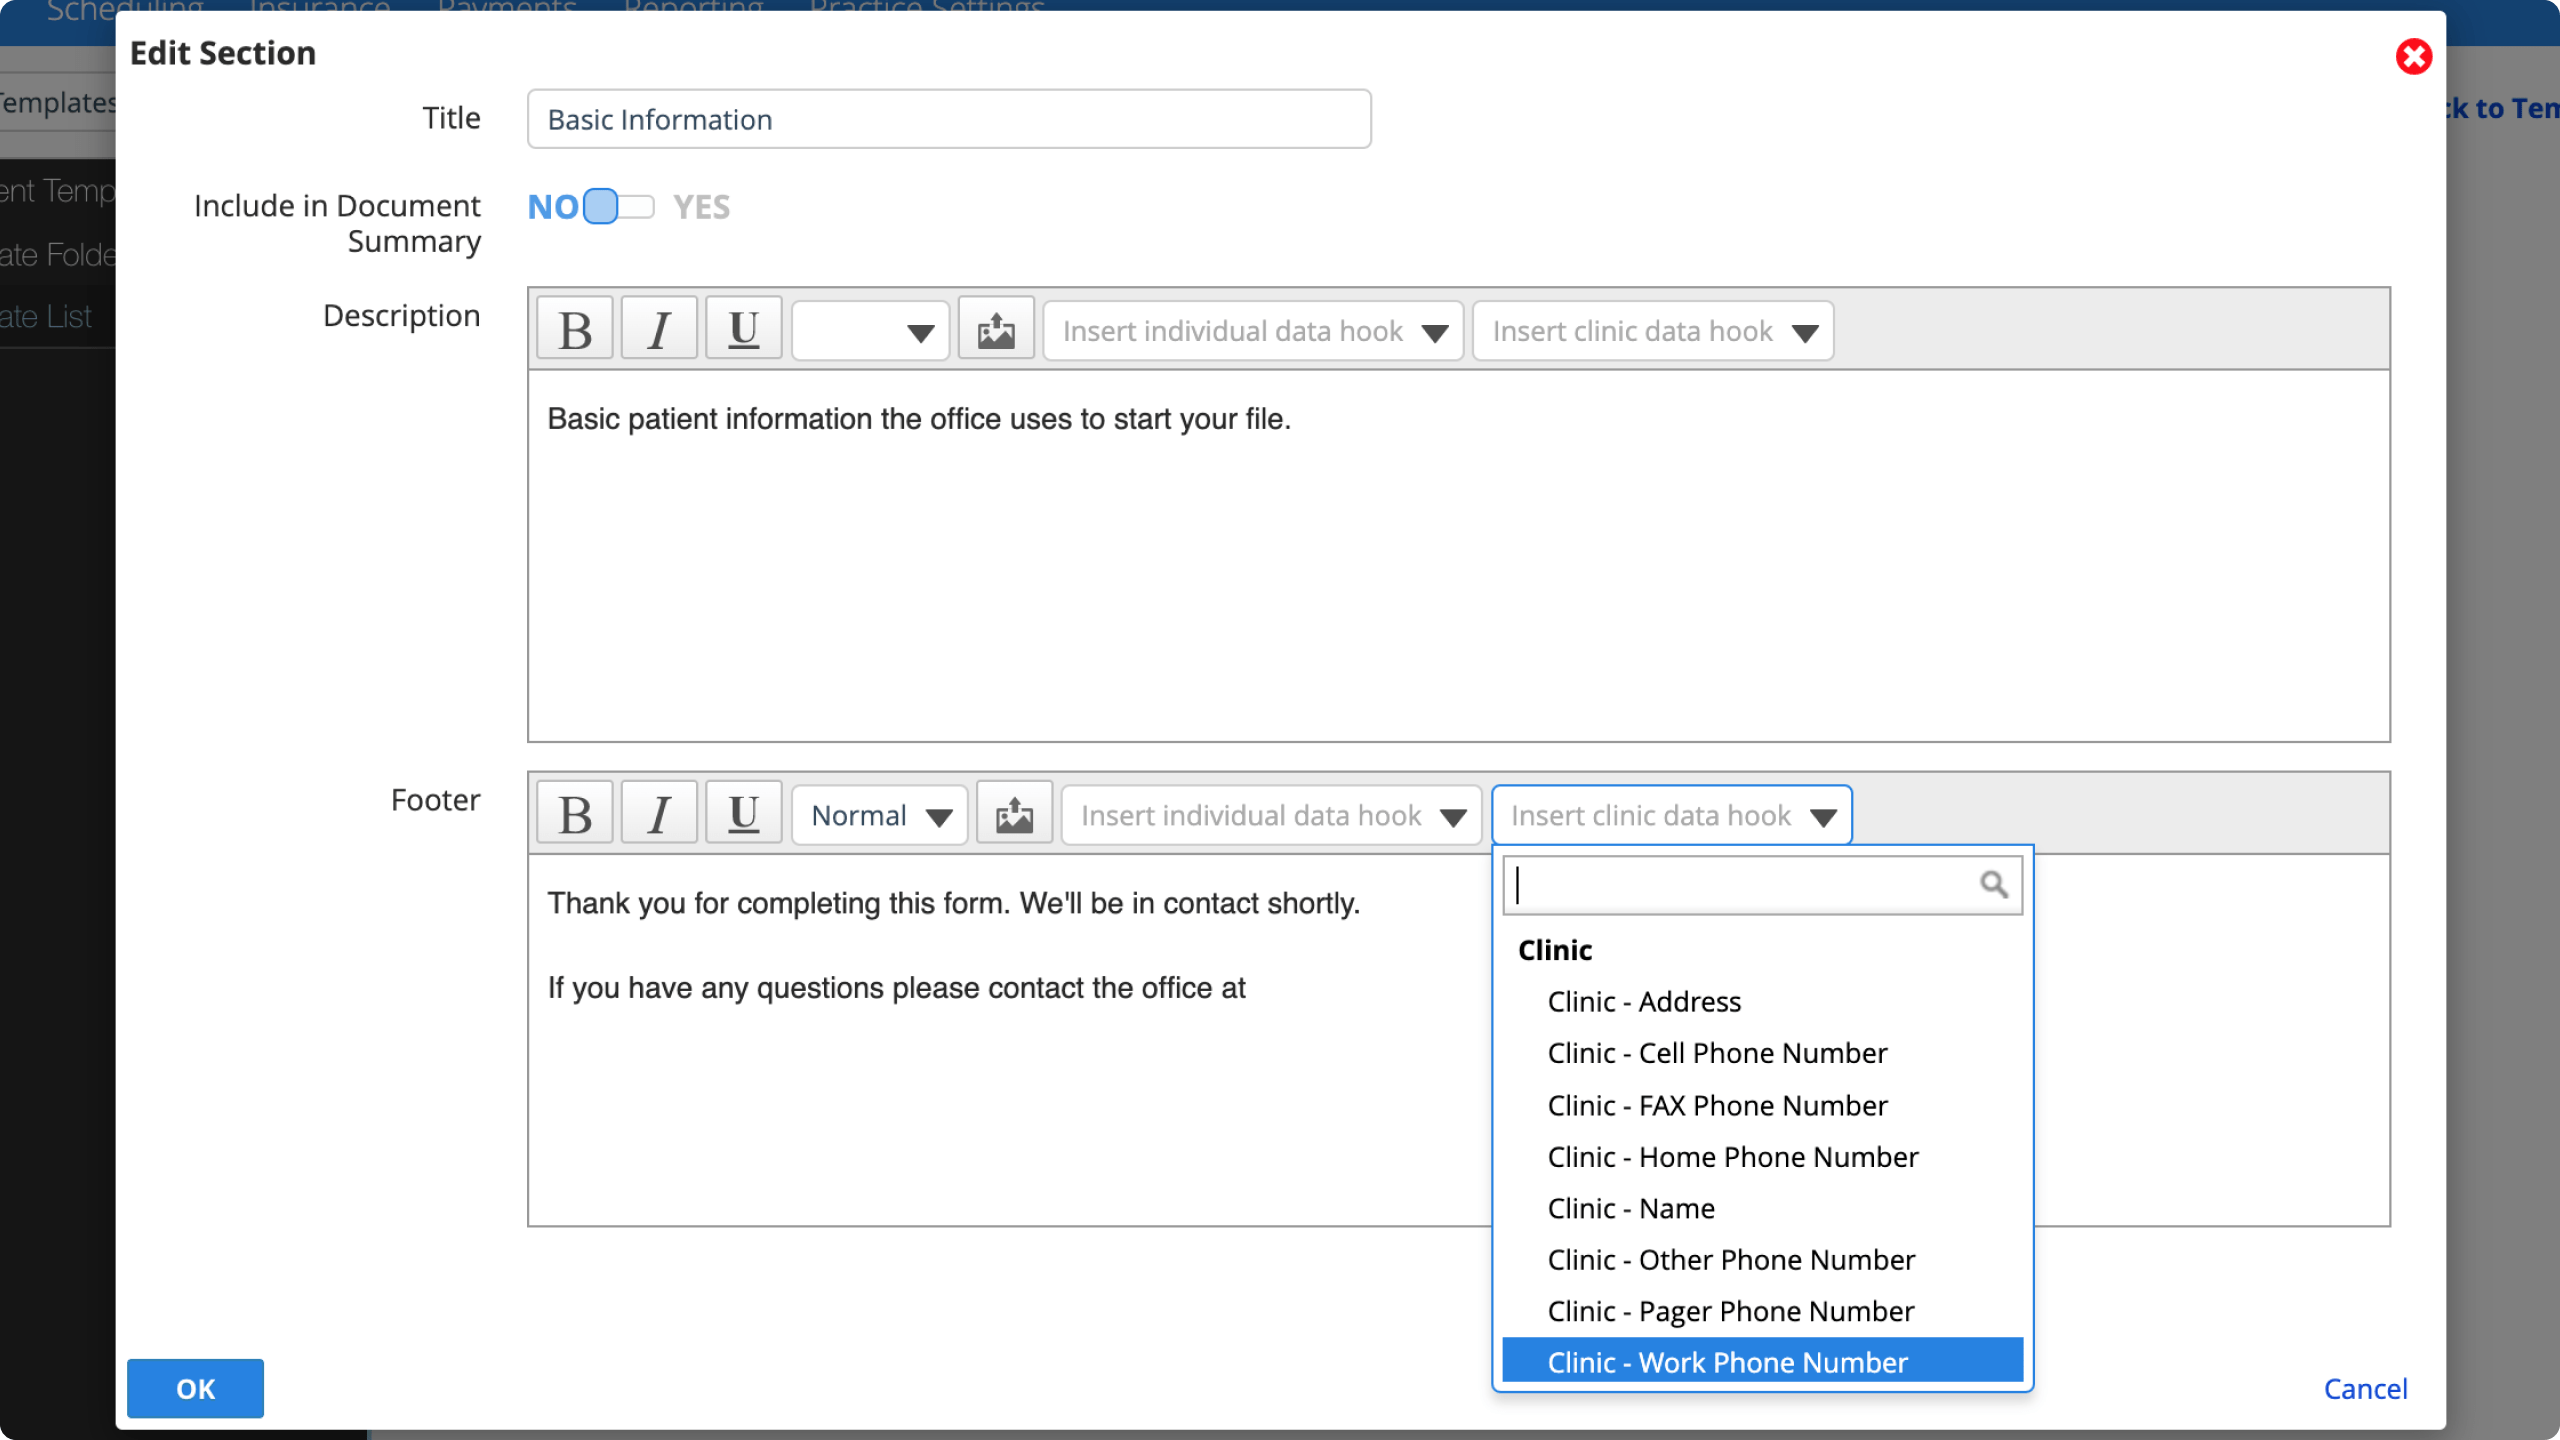
- Choose the person or clinic type you want this data hook to pull from
- Select OK
- The data hook appears in the text field
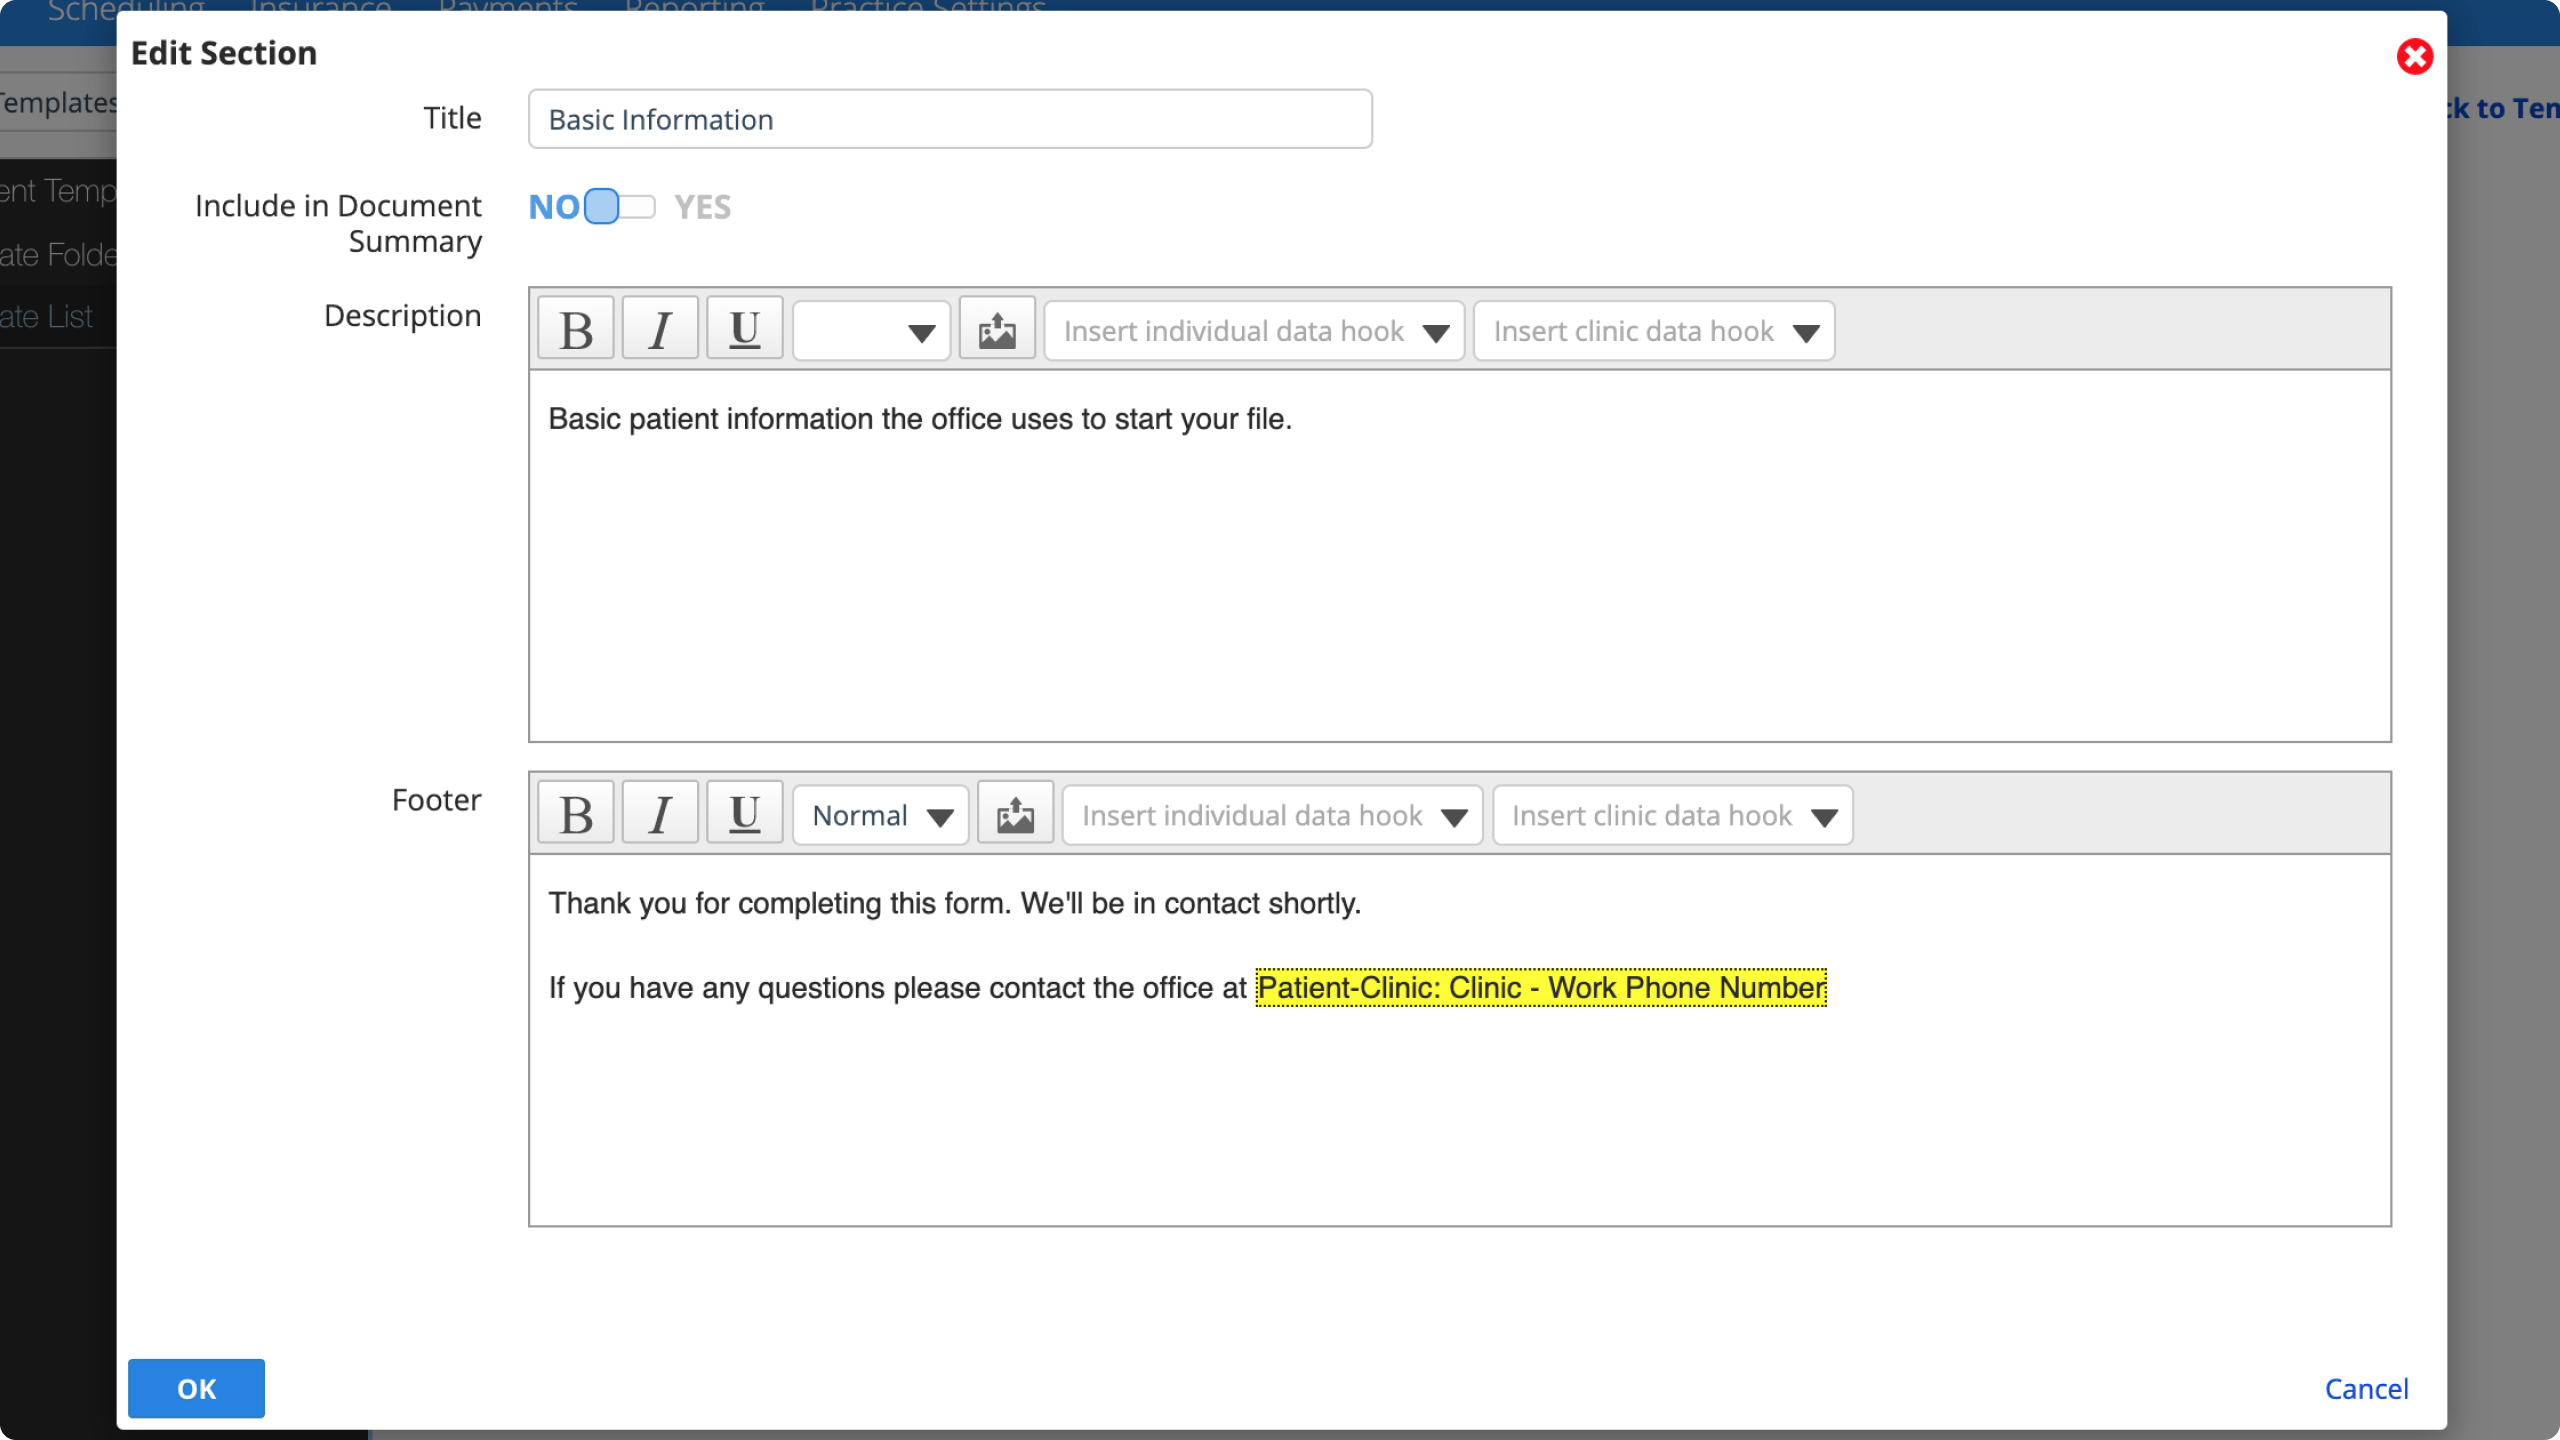
- Data hooks in the template editor are highlighted in yellow with a placeholder label that describes the type of data and where it pulls from.
- When someone fills out a copy of this document, data hook text is not highlighted in yellow.
- Select OK
- Select Save to save your changes
To remove a data hook, place your cursor after the yellow placeholder in the section, question, or choice text editor, and press delete or backspace on your keyboard.
Afterwards, when someone fills out a document with custom individual or clinic data hooks, they must choose the people or clinics before filling out the rest of the document.
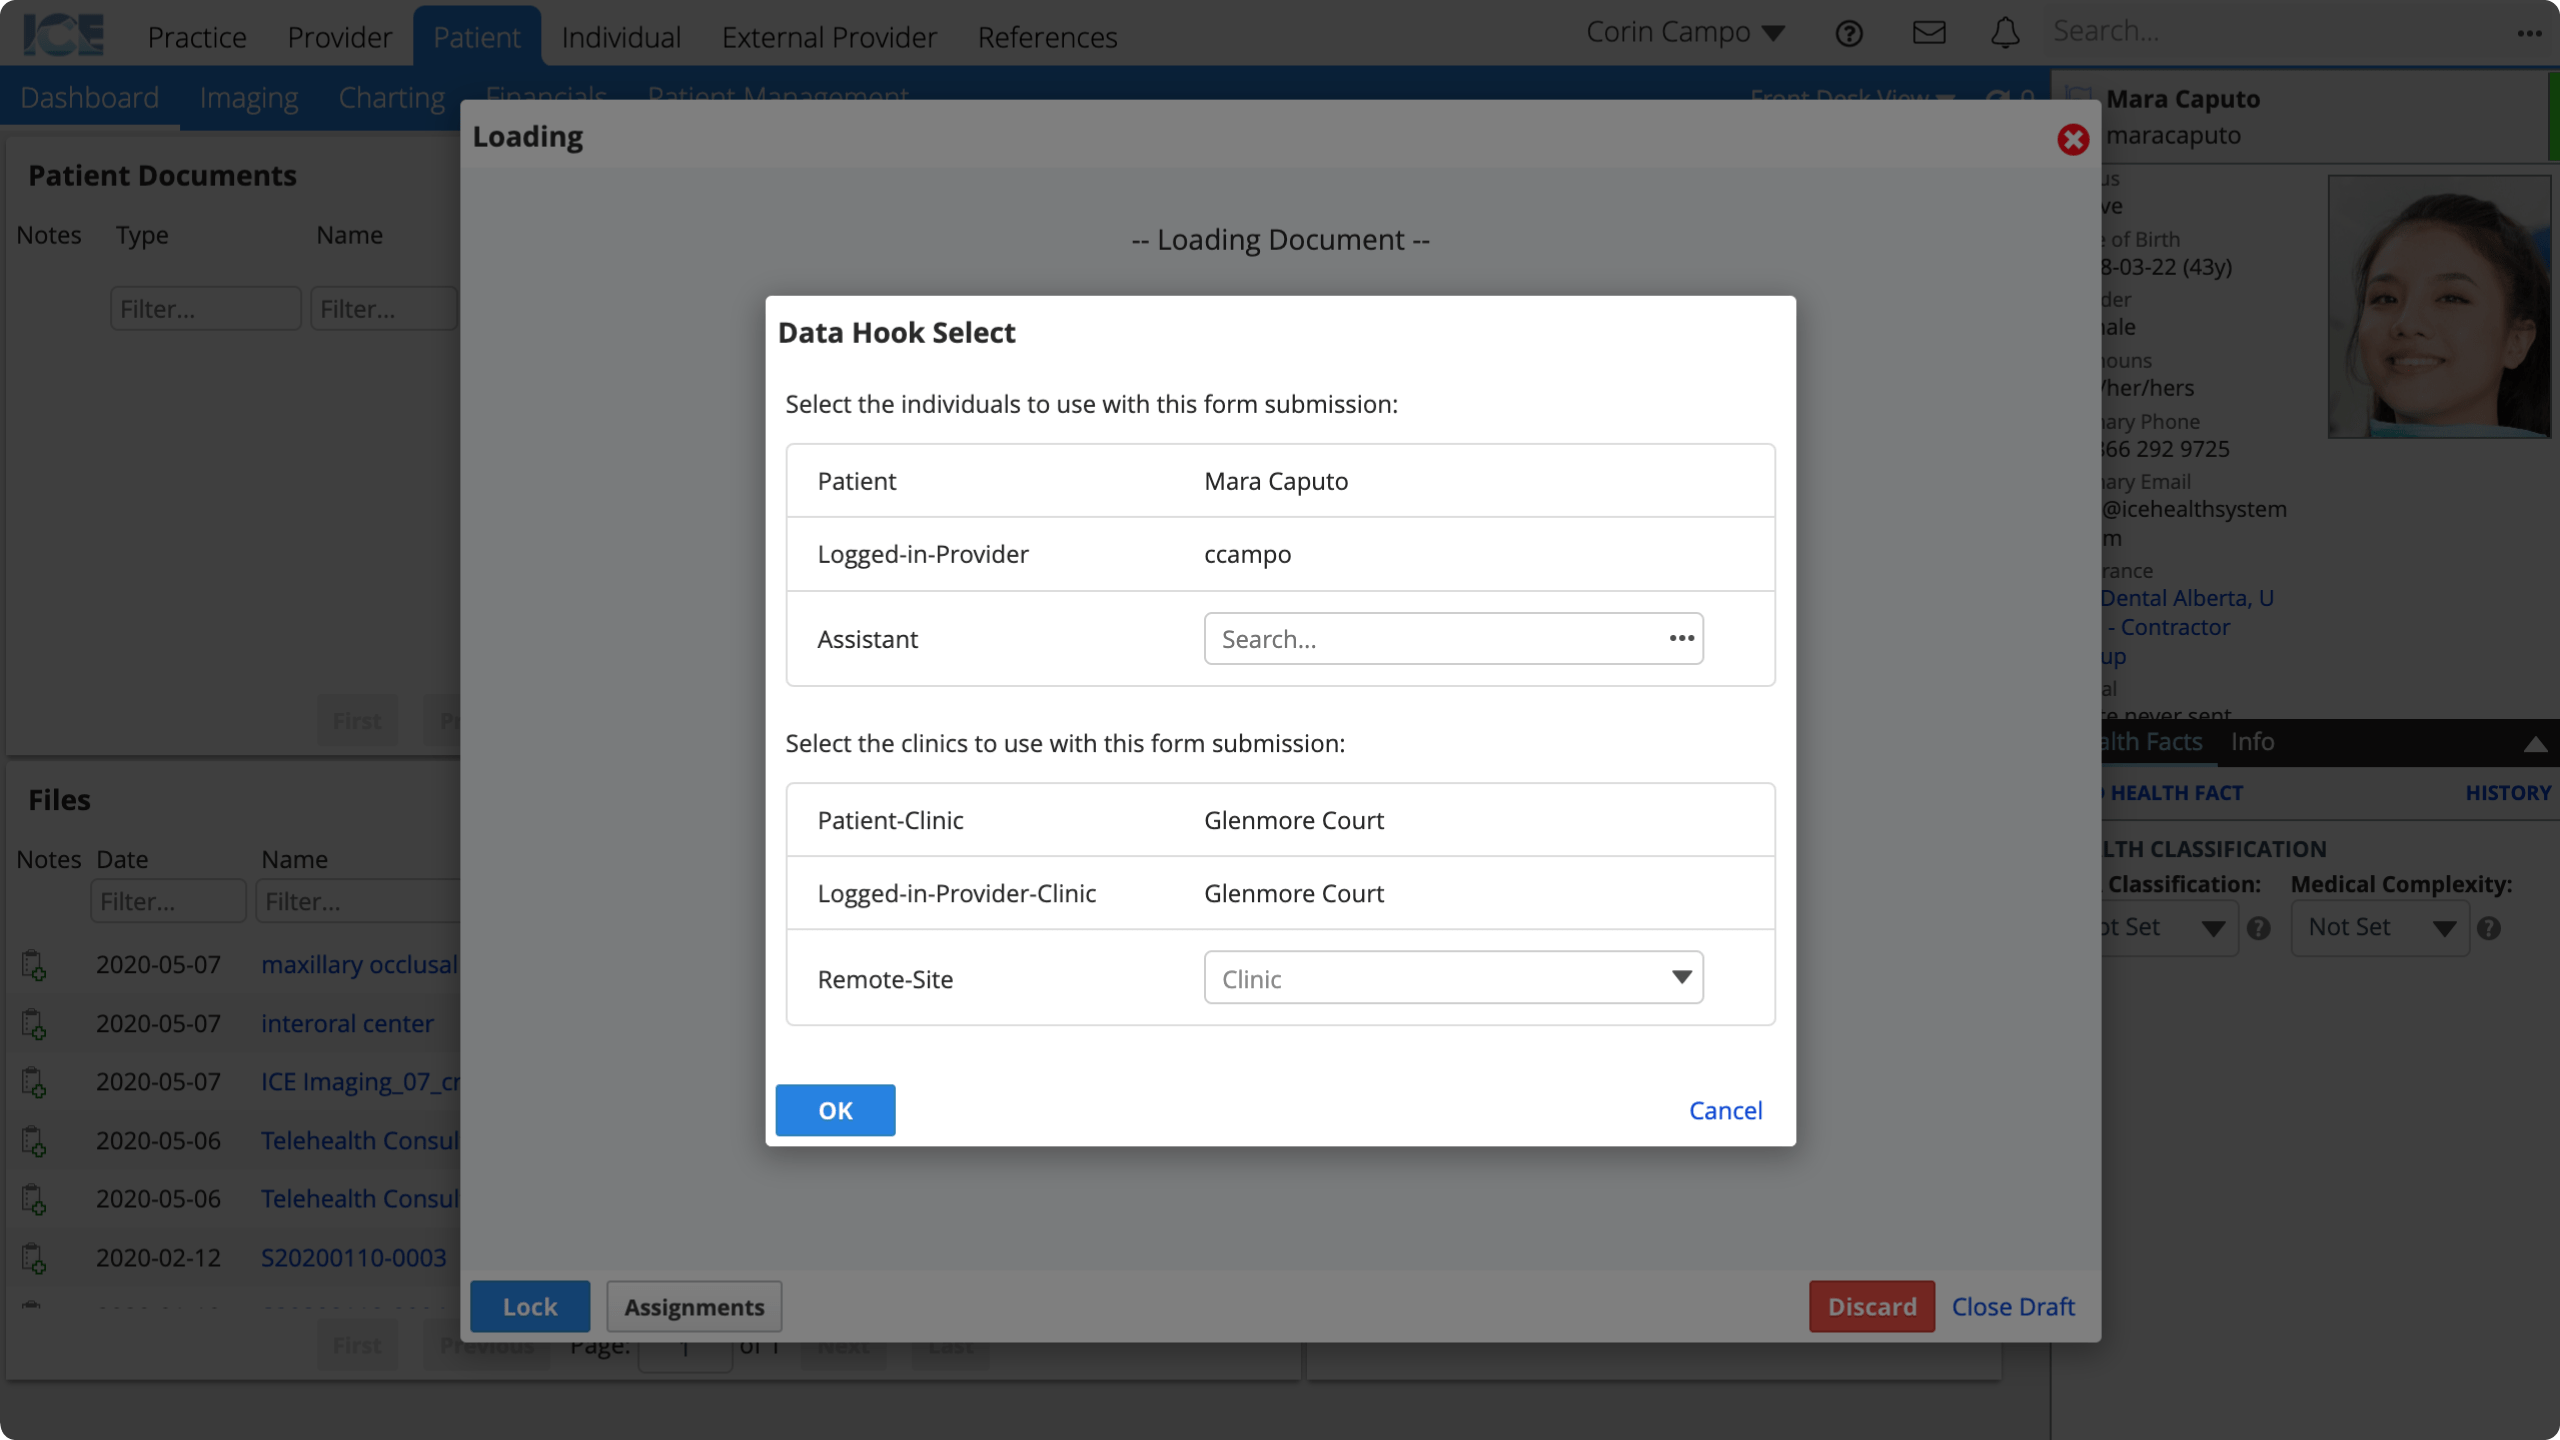
- Individual search includes patient, provider, external provider, or individual records in the system.
Add custom data hook individuals and clinics
Normally, you can only pull data from the provider filling out the form, the patient the form is about, and their primary clinics.
But with custom data hook individuals and clinics, you can pull data from people or clinics that a user chooses at the time they fill out a new copy of the document template.
You can also run reports on the data hook individuals associated with a document submission.
Example: Custom data hooks in a remote site assessment form
My form is used by students who provide treatment with assistance at remote sites. I want to create one form that they can all use, even if they aren't all at the same sites and aren't always working with the same people.
I configured two custom data hook types:
- an Assistant data hook individual
- a Remote Site data hook clinic
So that when the student fills out this document from a patient record, they must choose:
- who the Assistant is
- the clinic where the Remote Site is
Then the system automatically fills out the configured data hooks from the person's record and the clinic's record:
- Assistant's name, user ID, and speciality
- Remote Site's name, address, and contact email
These data points appear throughout the document and the student doesn't have to type out each one themselves. I can also run reports to find the documents associated with a specific Assistant or Remote Site.
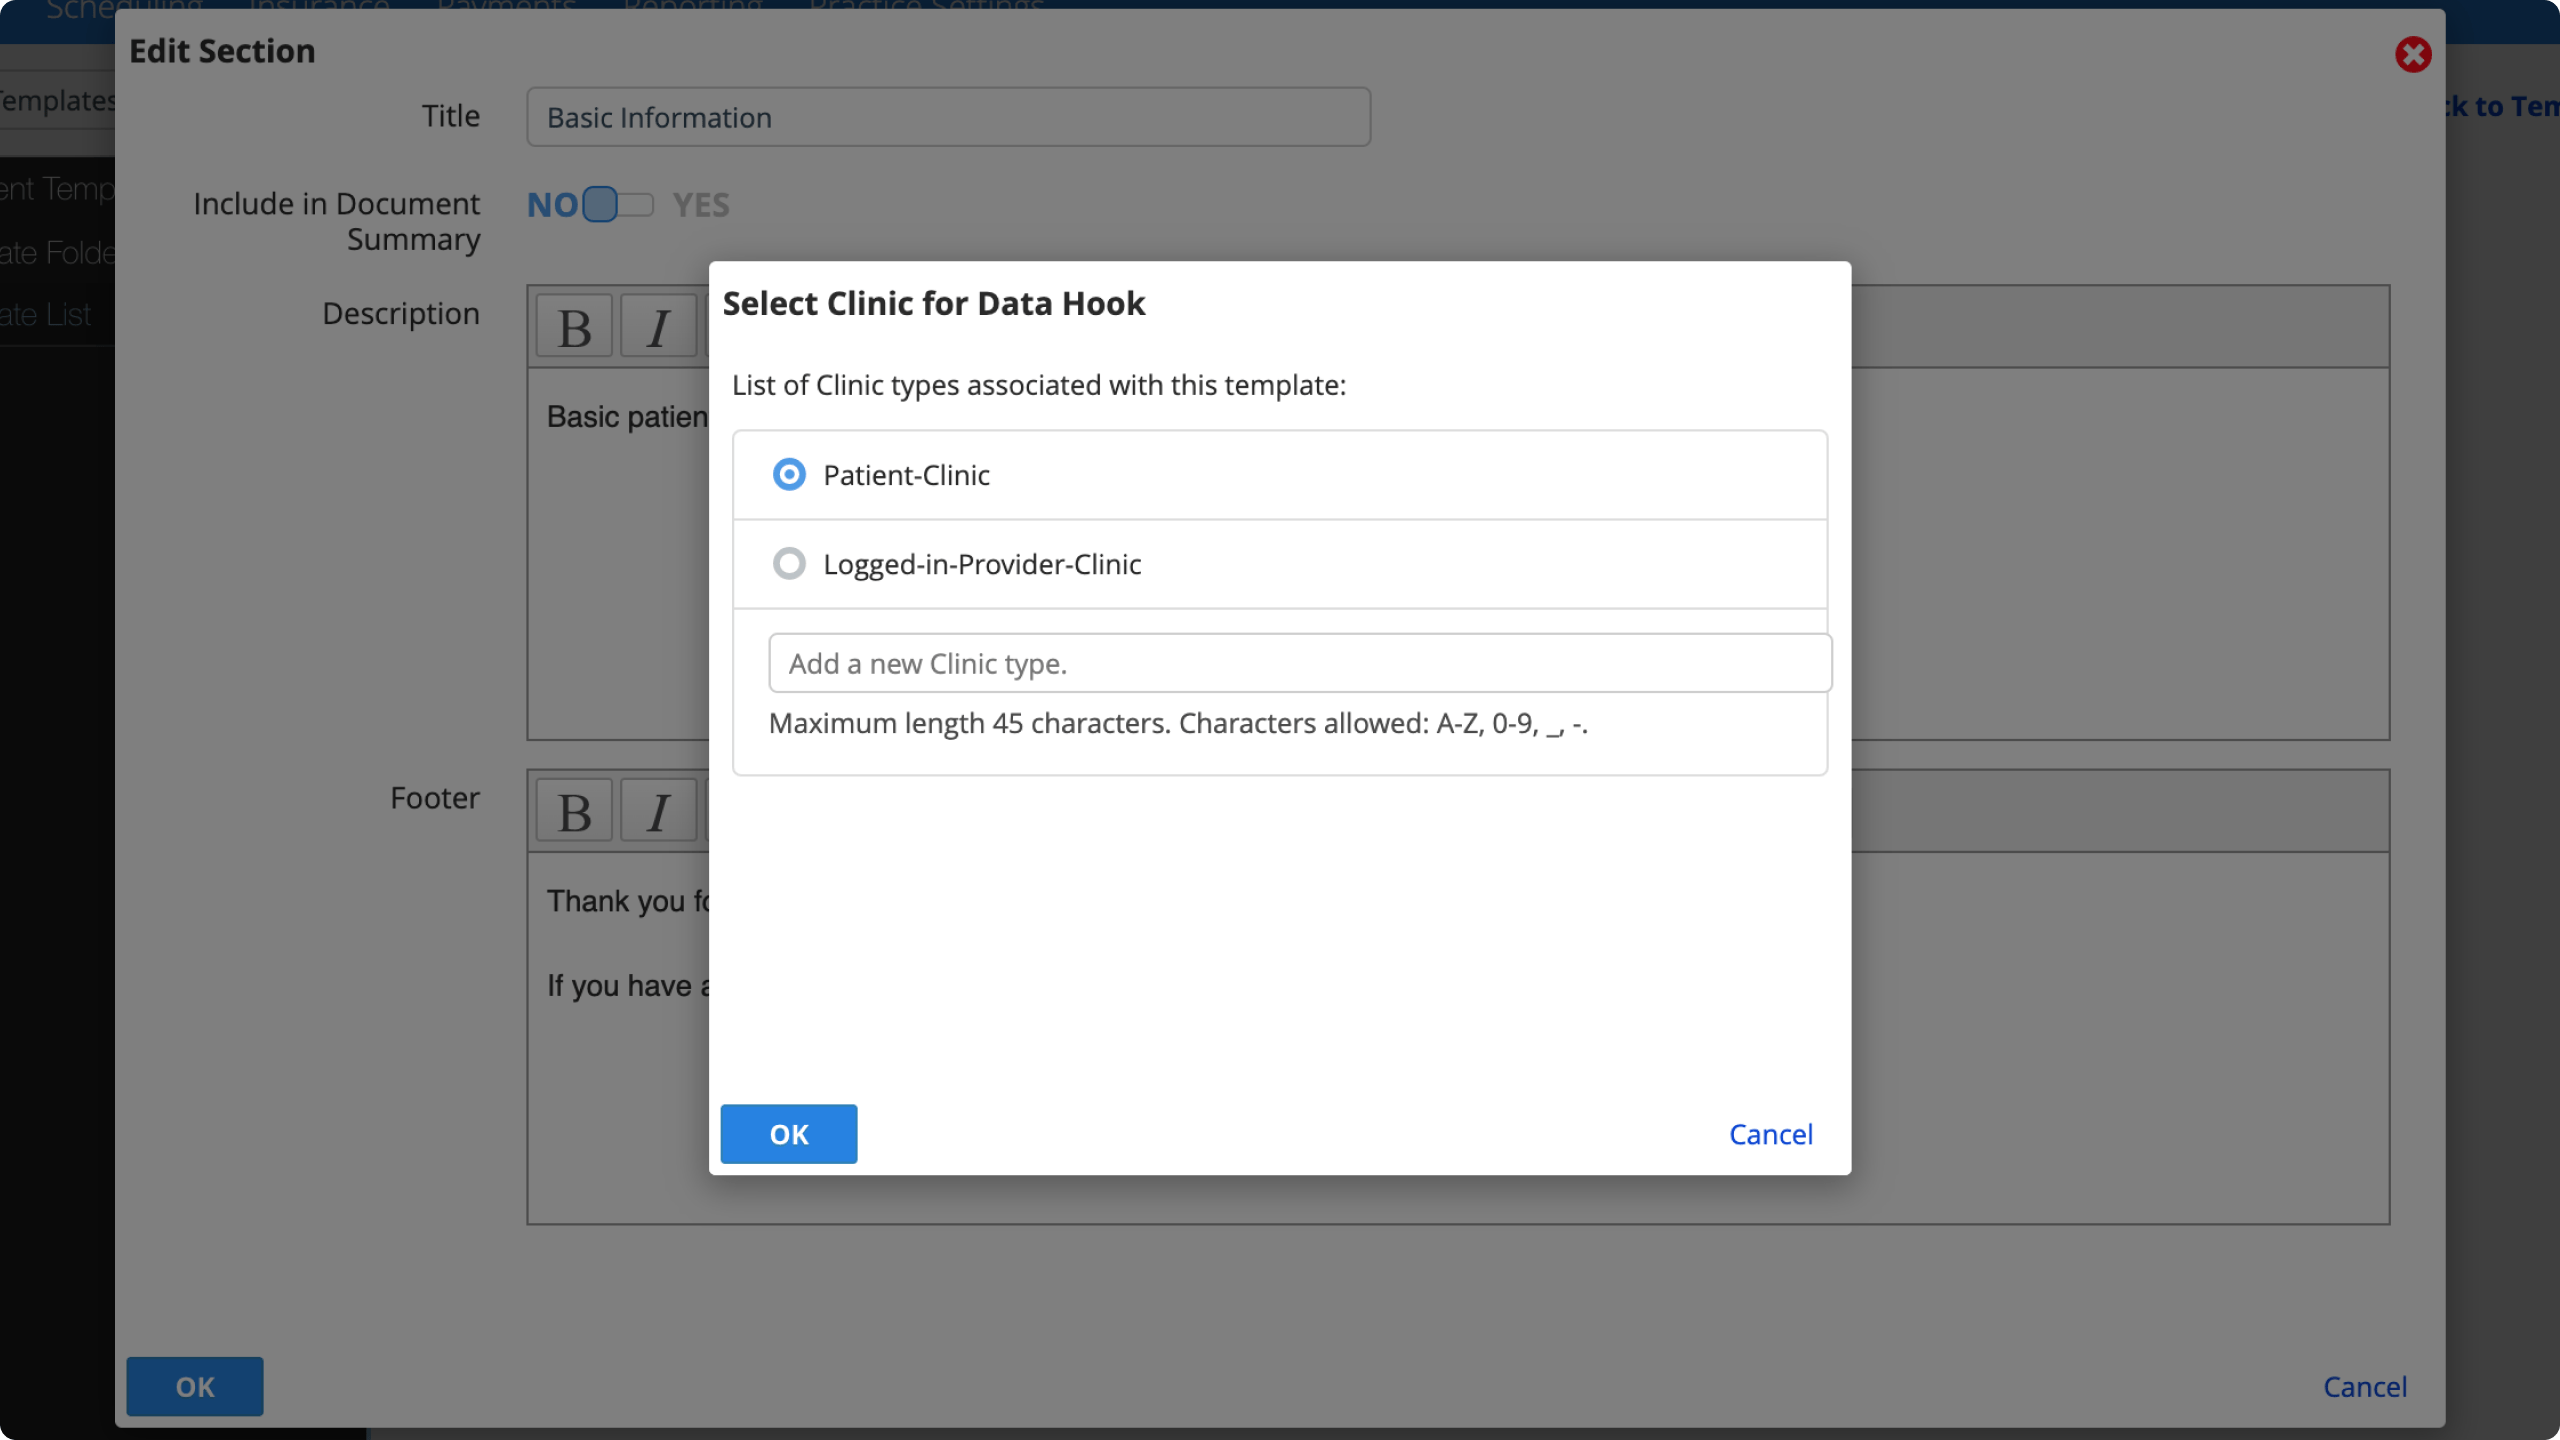
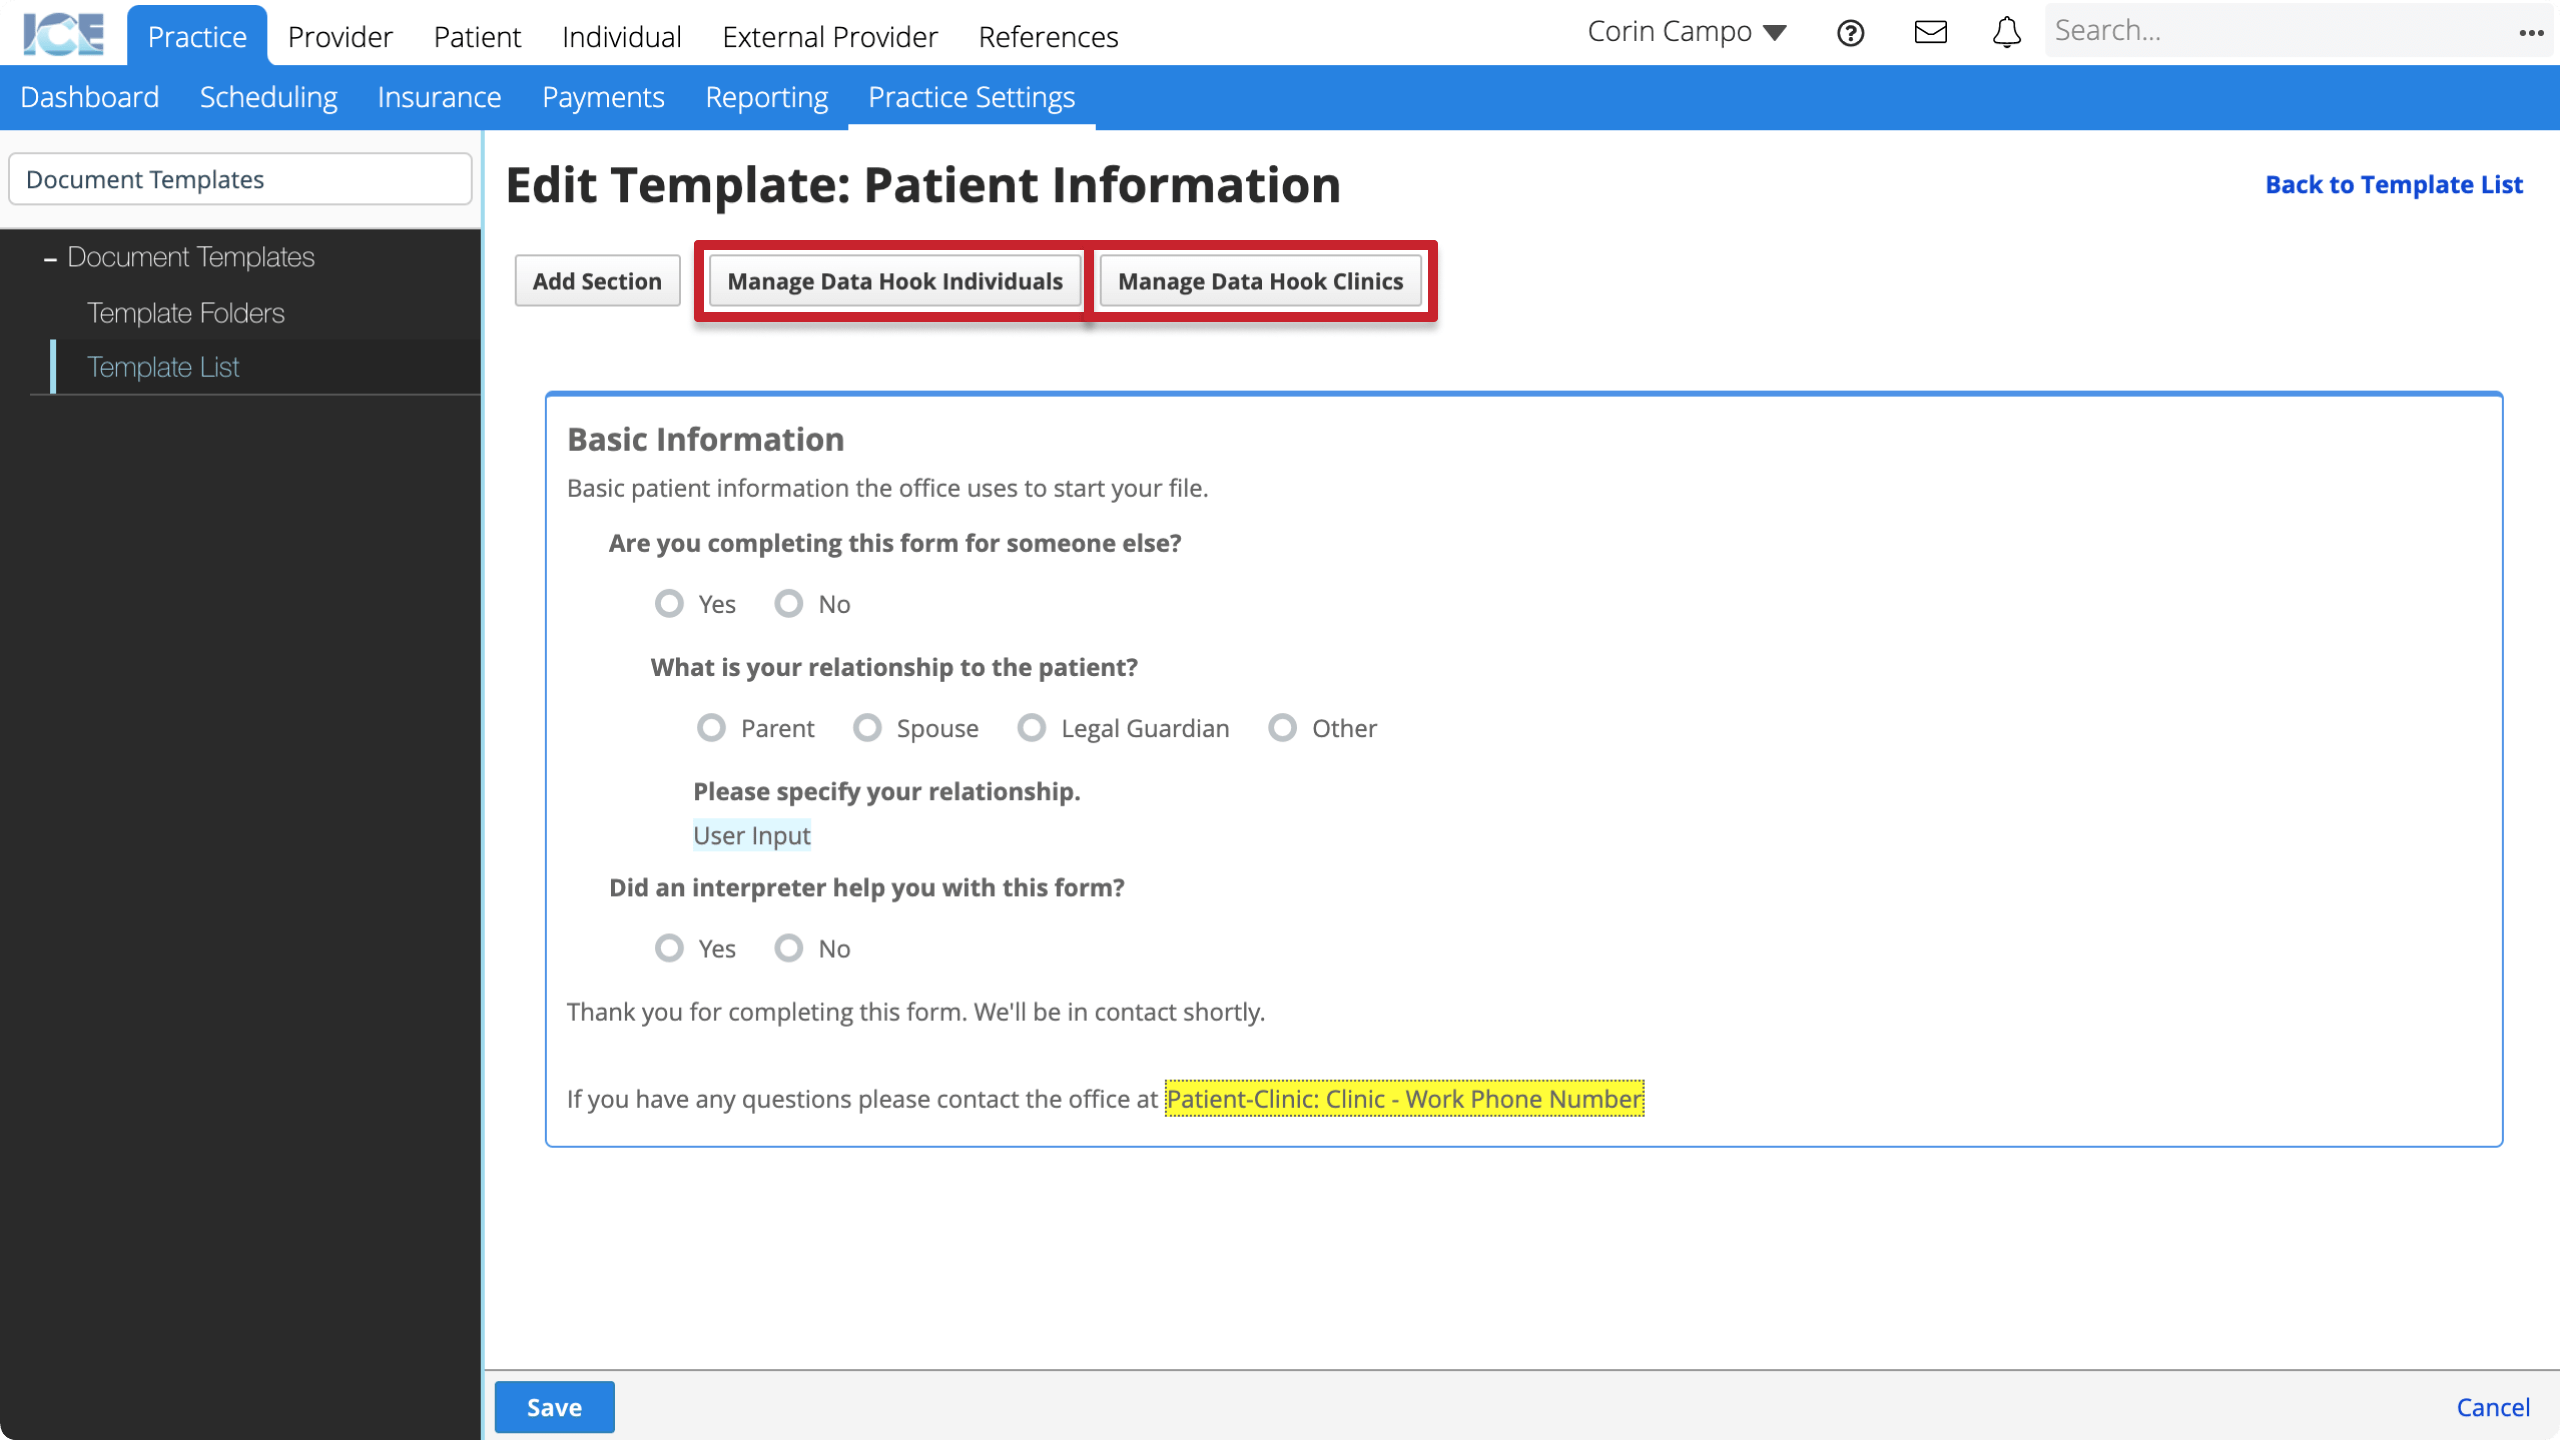
- Select Manage Data Hook Individuals or Manage Data Hook Clinics
- In the Add a new text field, describe the type of person or clinic whose data you want to pull
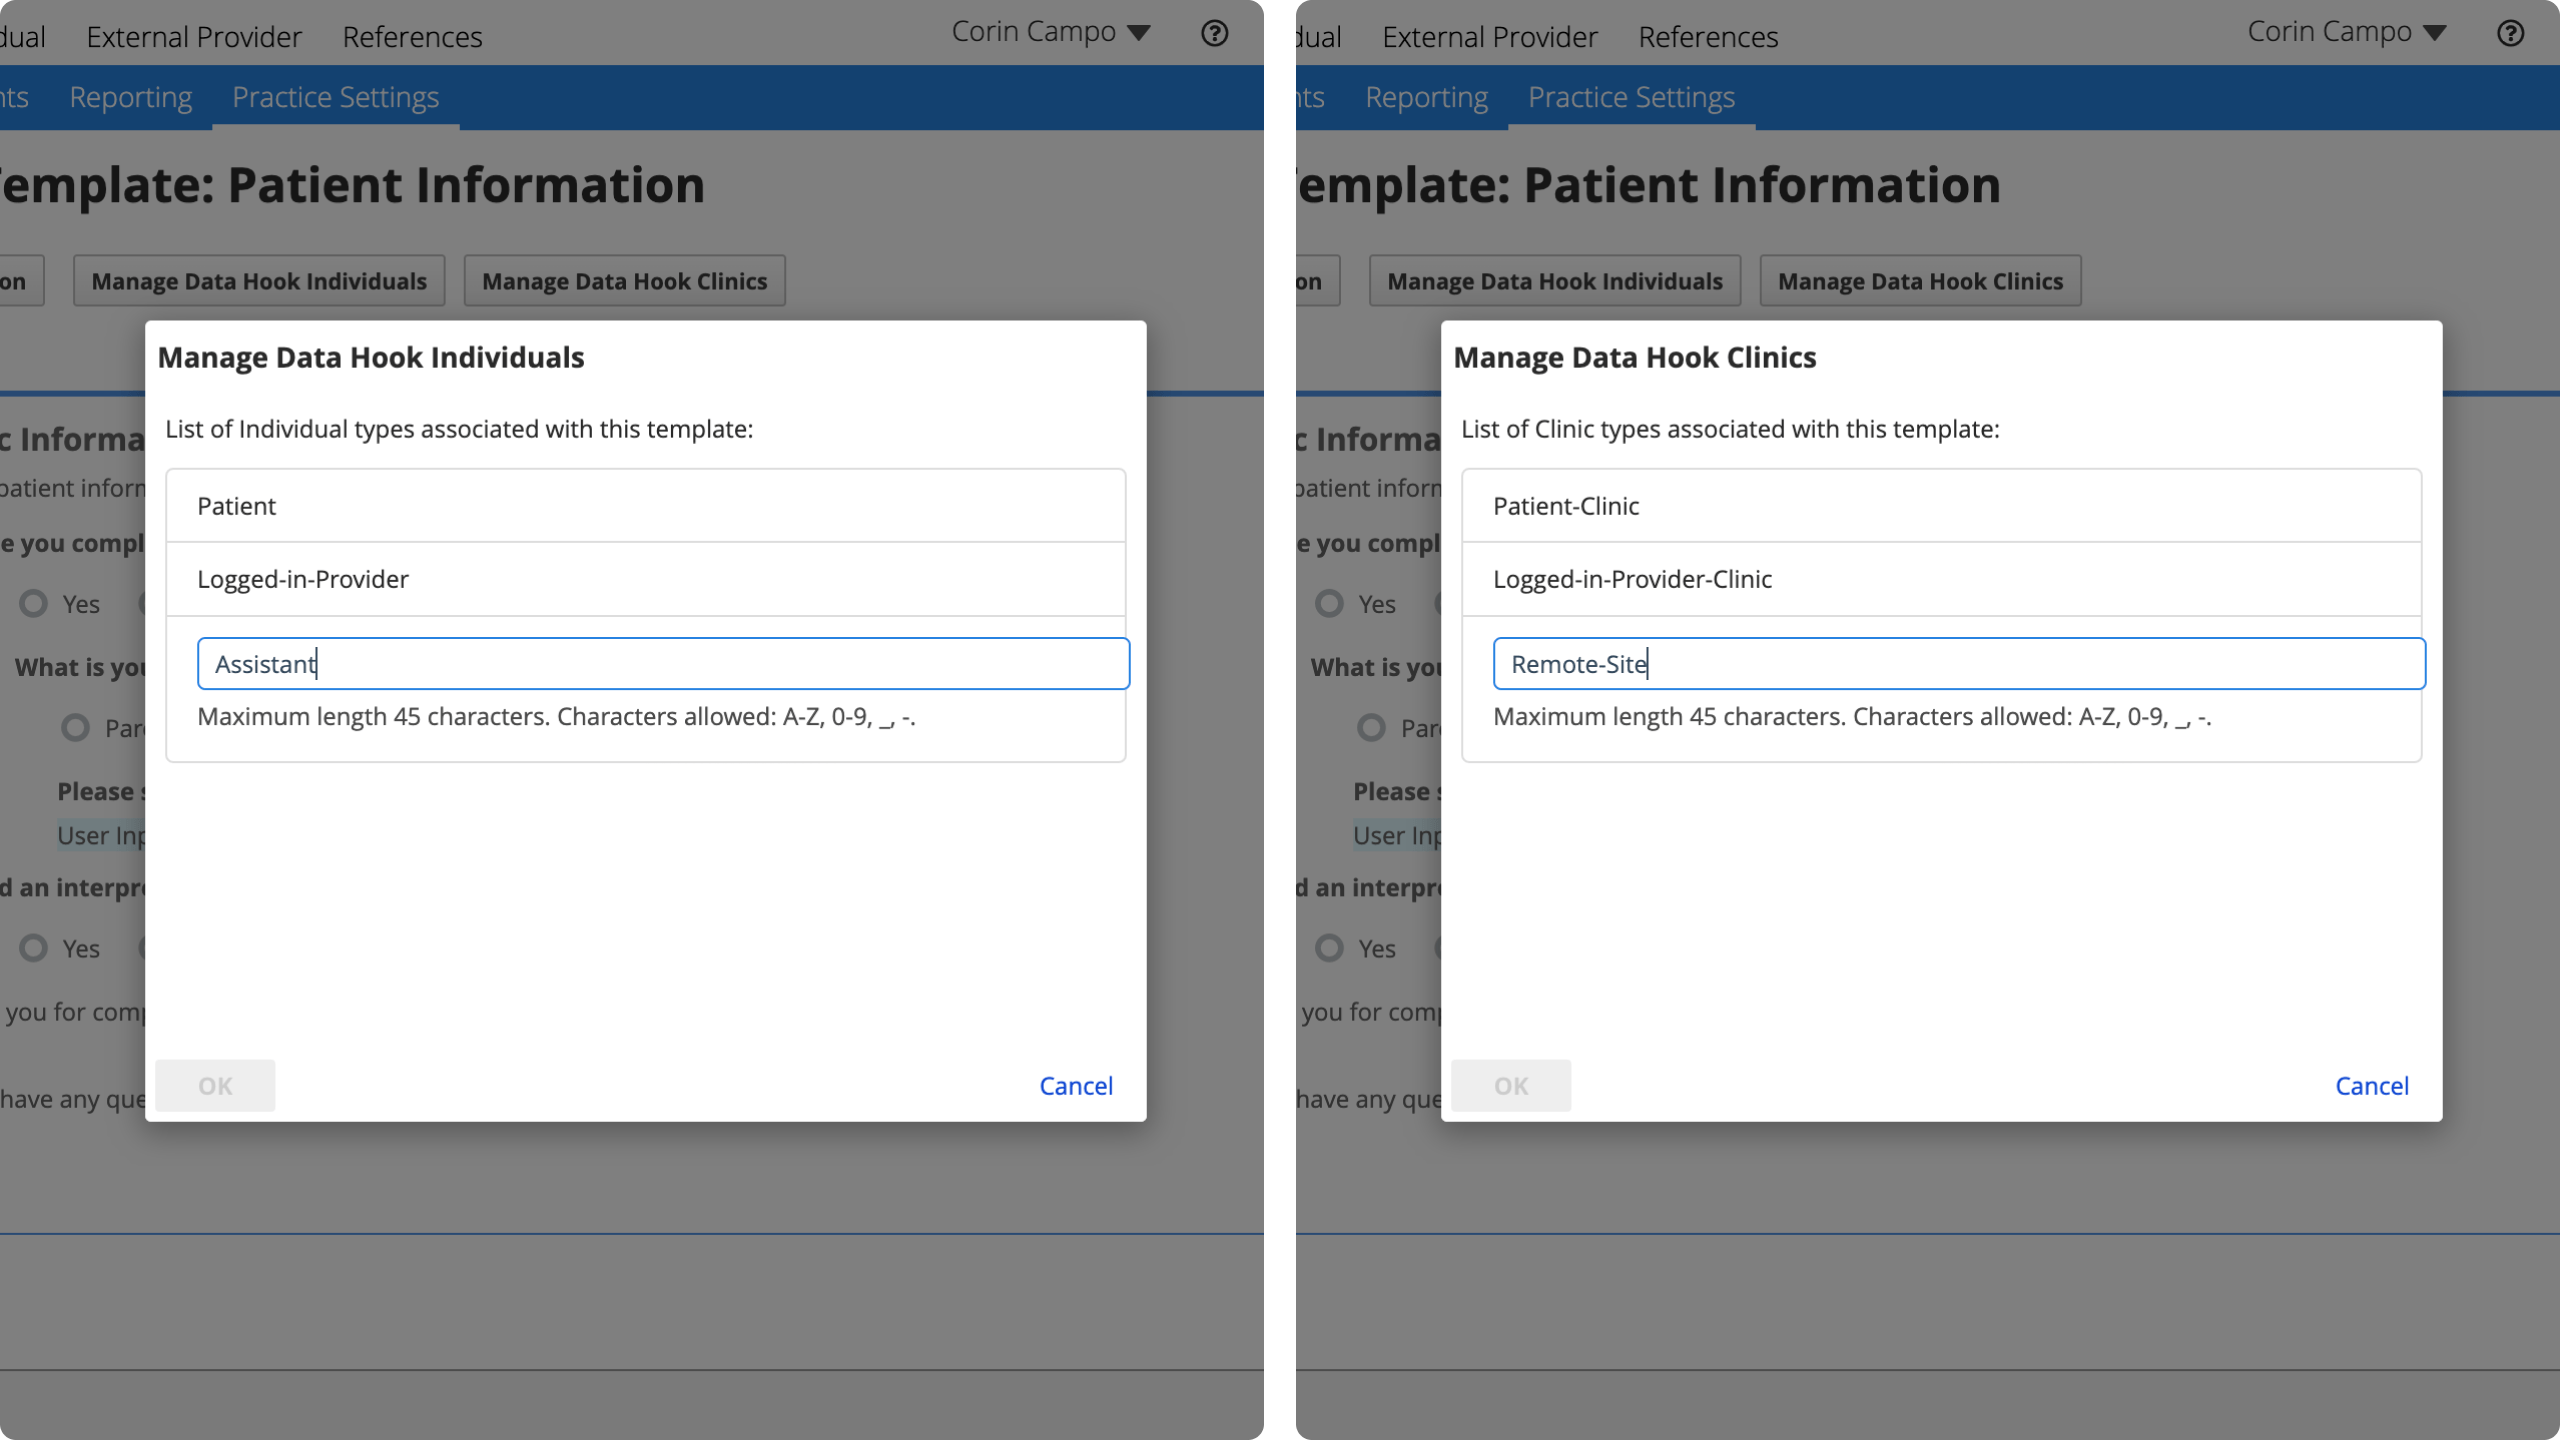
- Click outside the text field or press enter, return, or tab on your keyboard to enter your new type
- Select OK
- Select Save to save your changes
To remove a custom data hook individual type or clinic type from the template, select Manage Data Hook Individuals or Manage Data Hook Clinics and select ![]() beside the entry you want to delete.
beside the entry you want to delete.
Now when you insert a data hook into one of this template's text fields, you can set the new individual type or clinic type as the source the system pulls from.
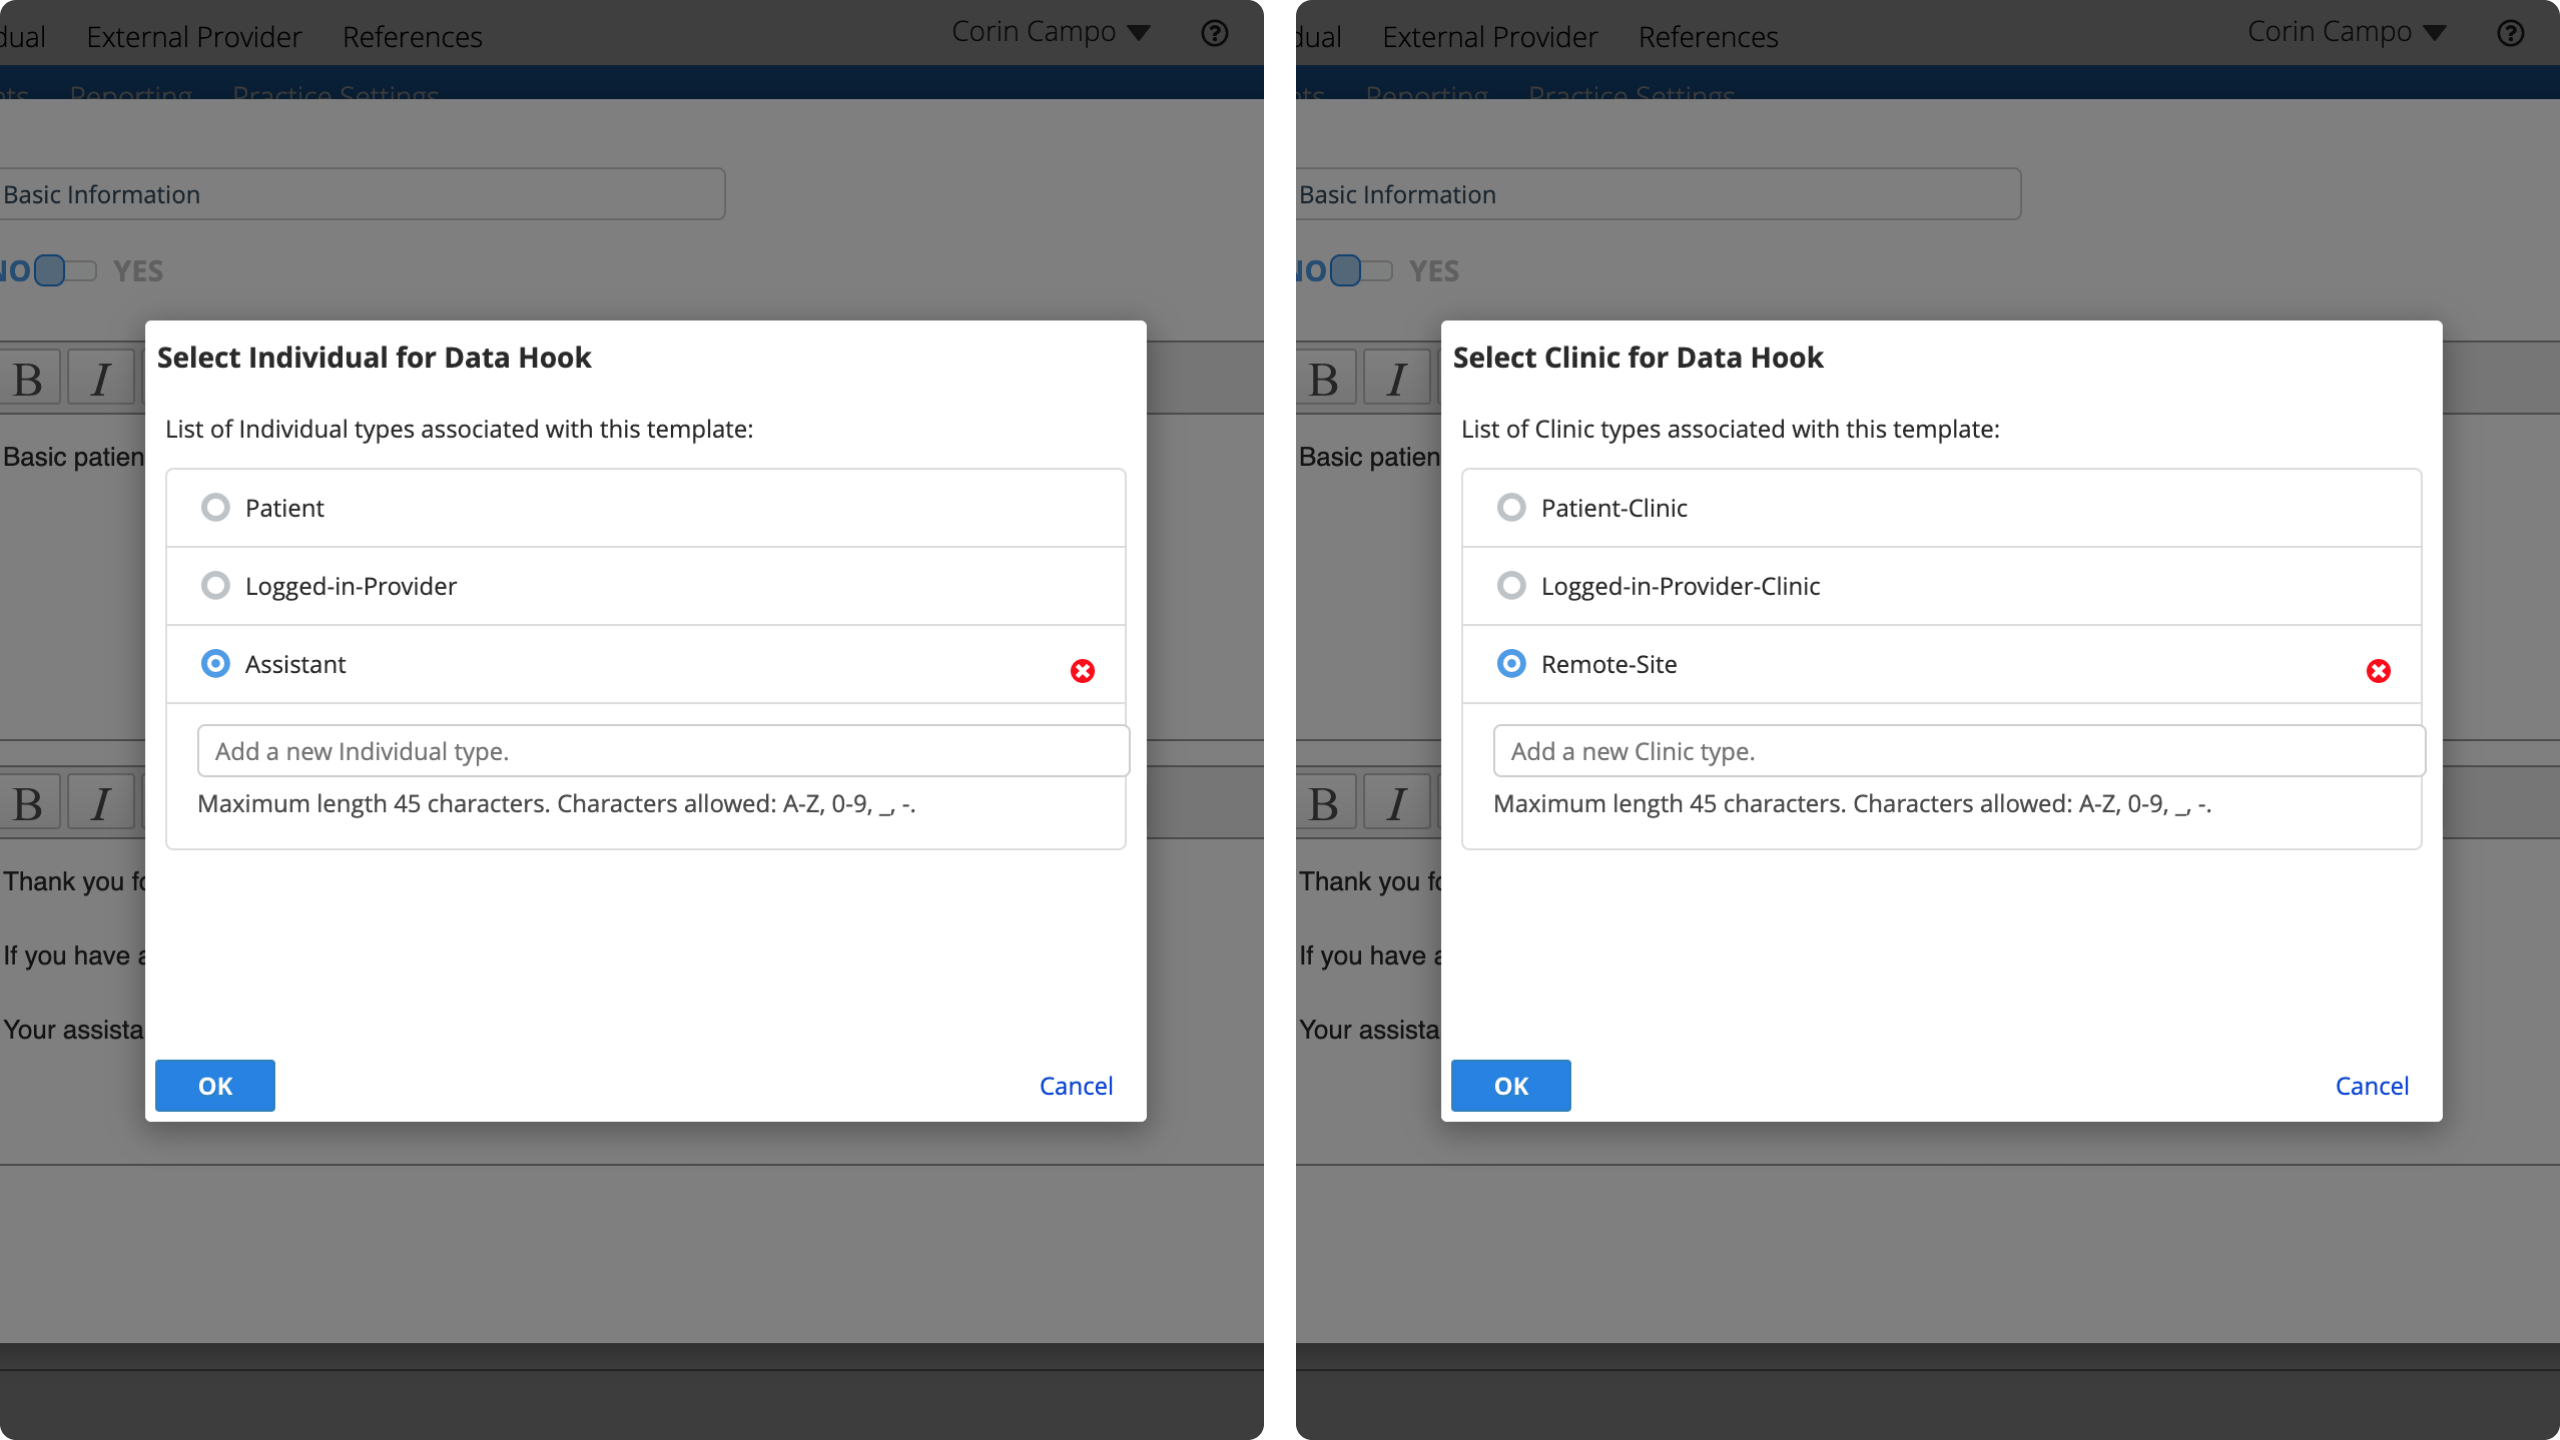
- The person who fills out a copy of this template later gets to choose which specific individual or clinic record to pull from for each custom type. You cannot choose a specific record at the template level.
The data hook placeholder also shows the new type in the data hook description.