Manage insurance payers and policies
You can configure the insurance payers and policies the system uses to generate insurance claims and coverage estimates.
For example, you can configure:
- Policy type
- Coverage limits
- Percentage coverage by category
- Coverage exceptions for specific procedures
- Preferred Provider Organization (PPO) fees
- And more
After you configure an insurance policy, you can associate the policy to a patient's record. To learn more, see Add insurance to a patient.
To access insurance management options, go to Practice > Insurance > Policies and Payers
Payer > Address > Policy
The system organizes insurance information into three levels:
- Payer
- Address
- Policy
A payer can may have one or more addresses, and each address can have one or more policies.
So before you can create an insurance policy, you must configure or already have a payer and address.
The configuration options are more specific as you move from Payer > Address > Policy so you only have to configure details that are relevant to each level.
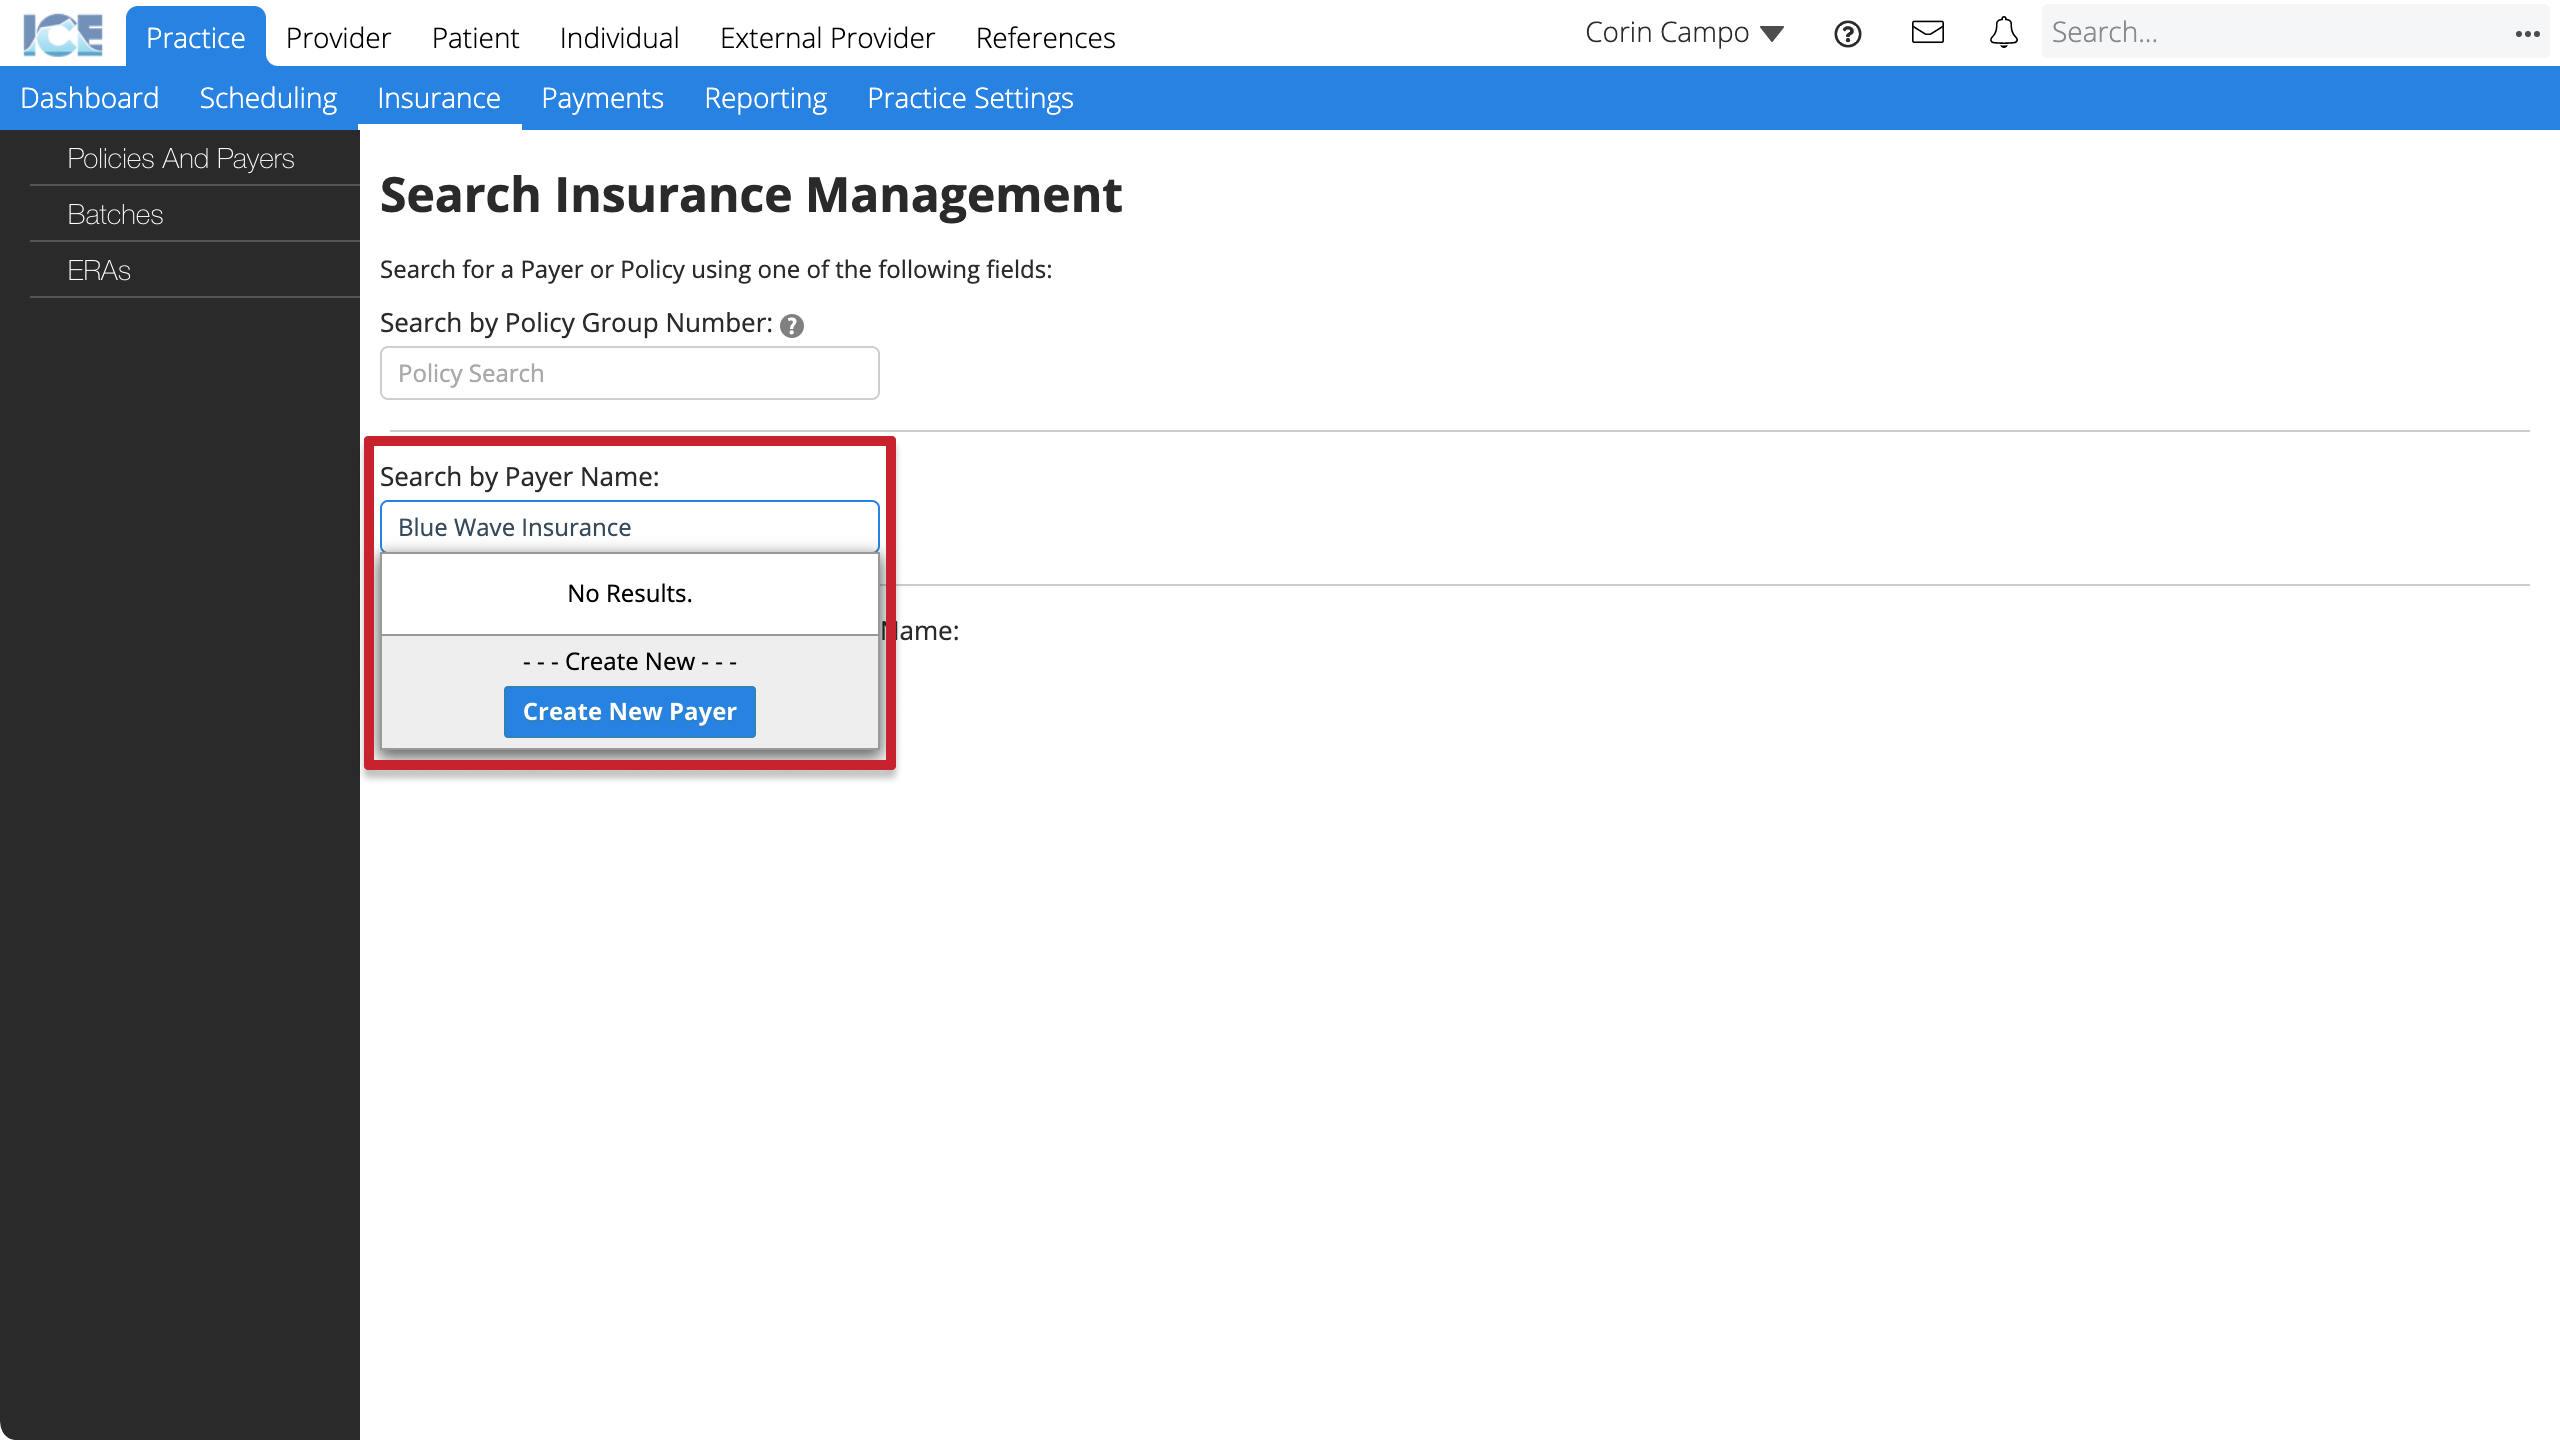
Create a payer
You need a configured insurance payer before you can configure a new insurance address or policy.
- Go to Practice > Insurance > Policies and Payers
- Select the Search by Payer Name field
- Enter the insurance payer's name
- Confirm that the payer doesn't already exist and select Create New Payer
- Enter the required information
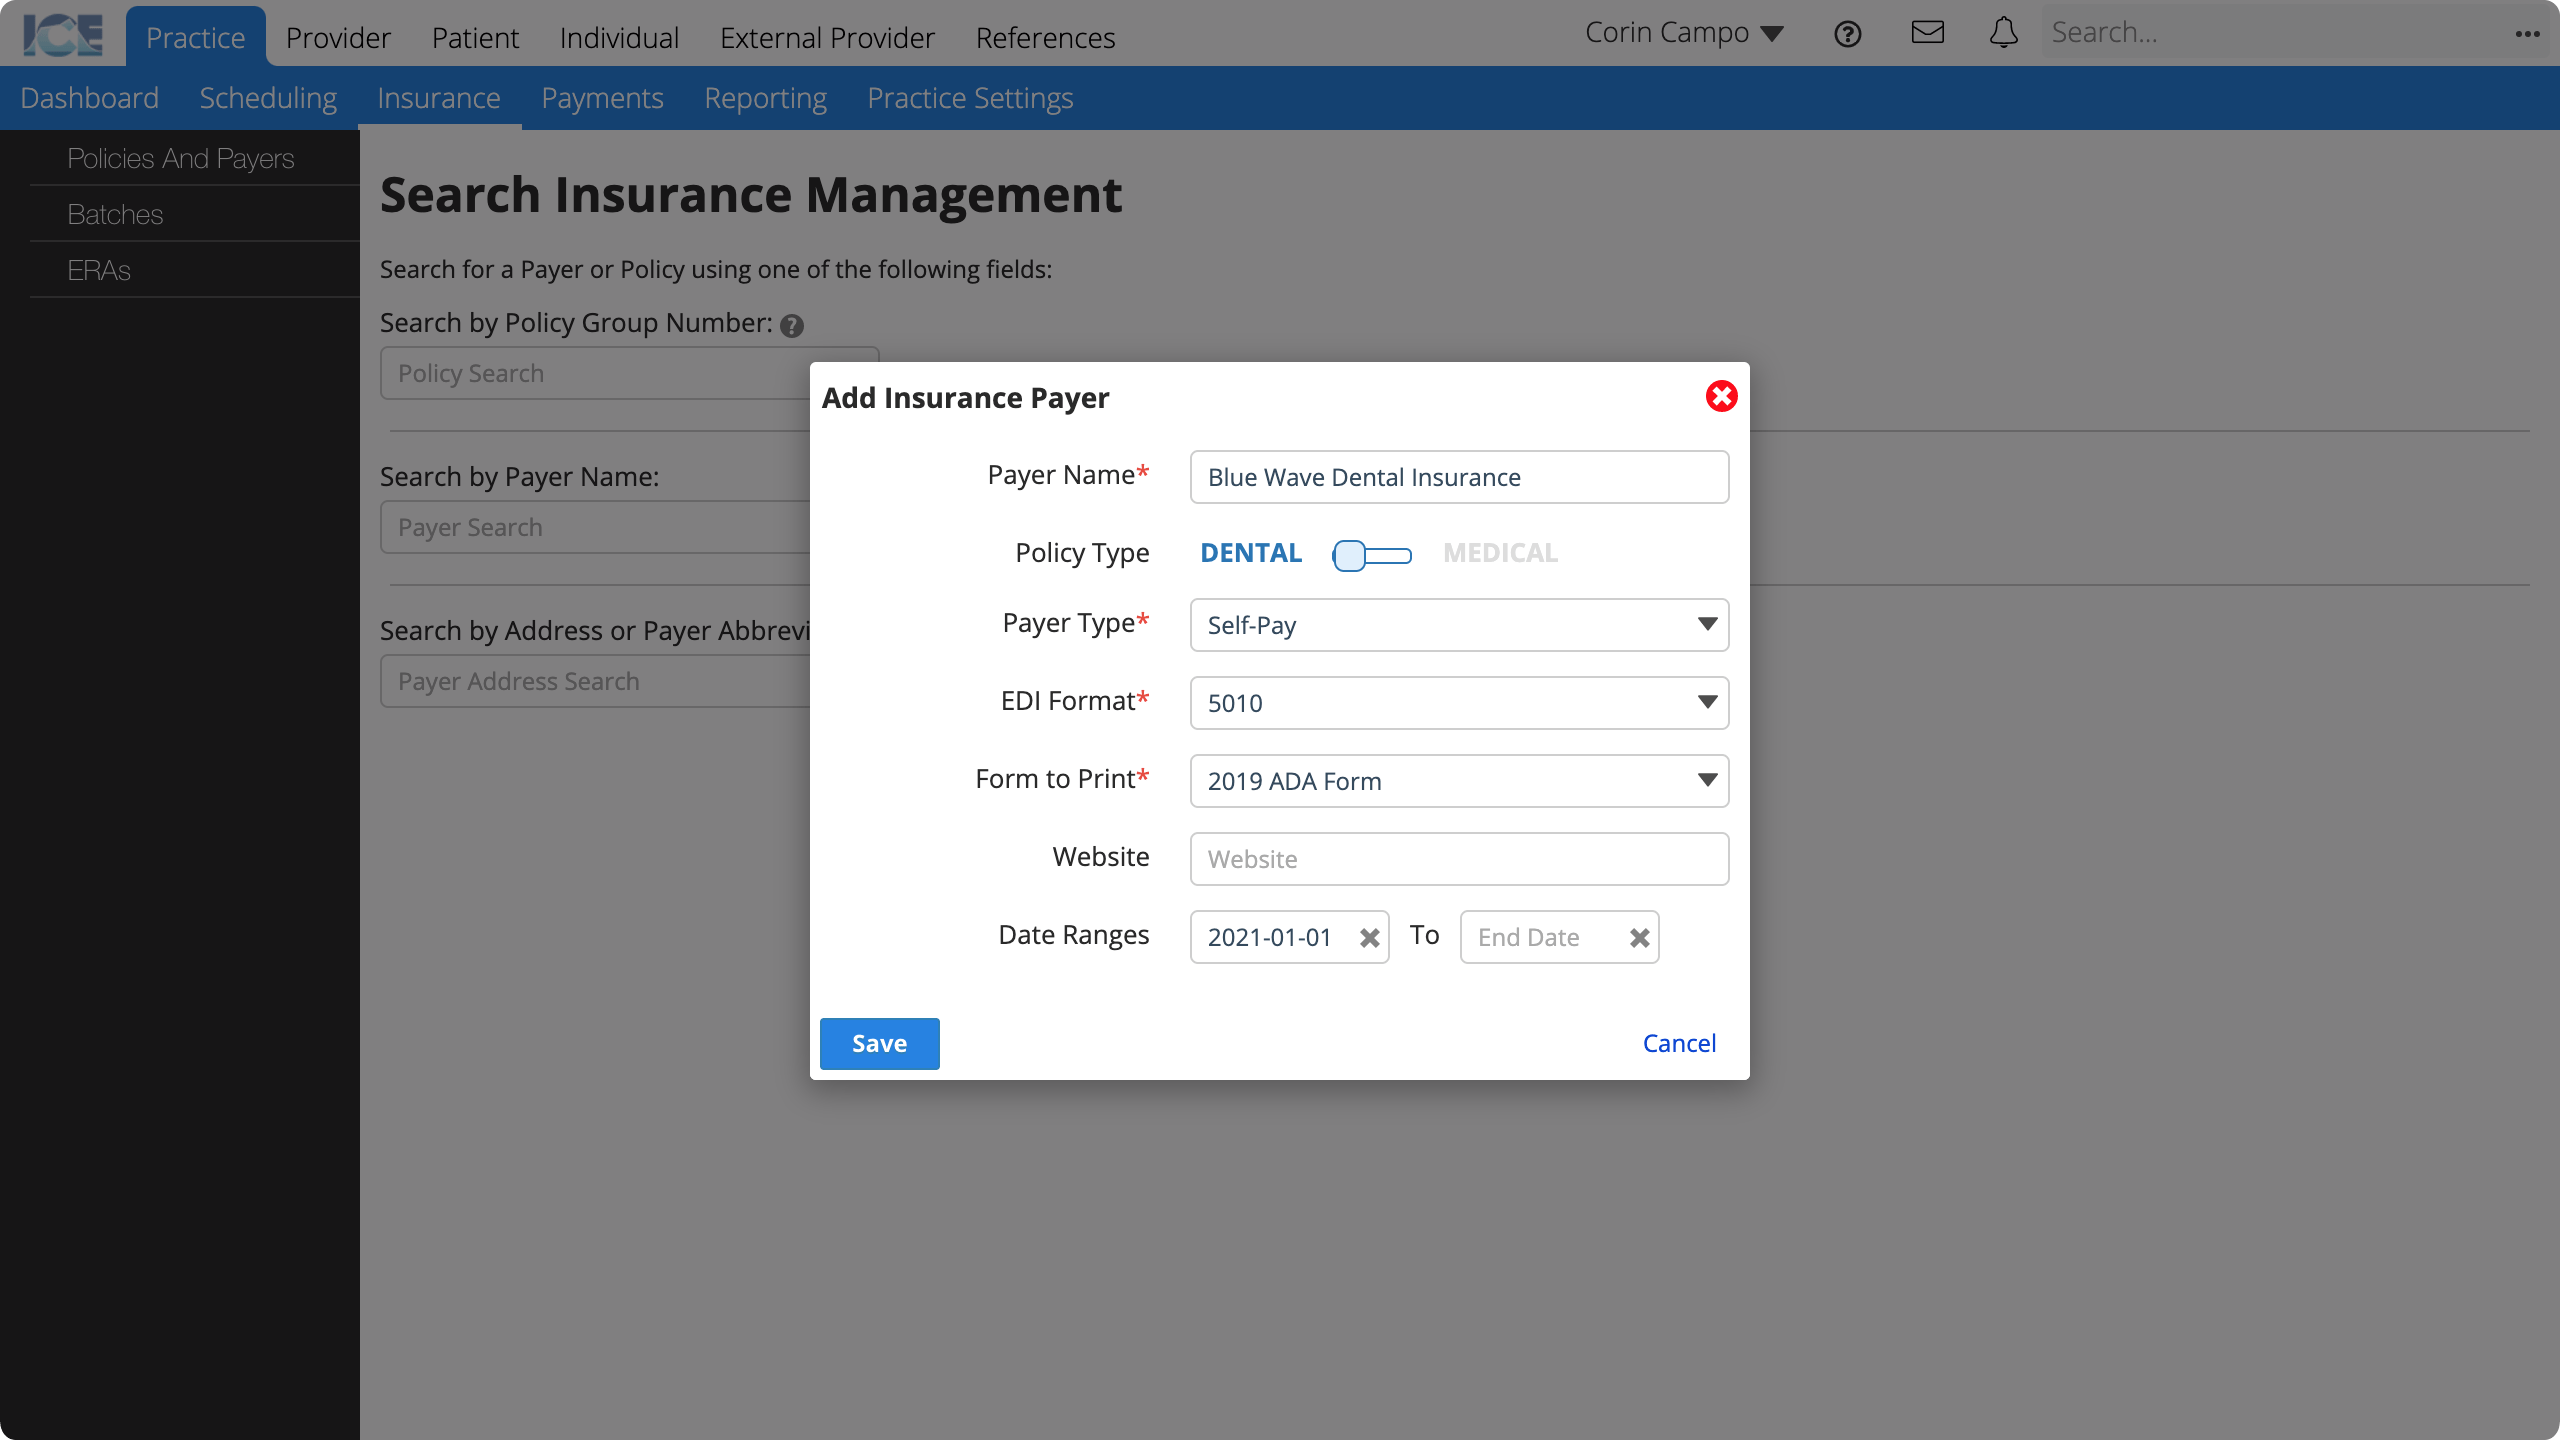
- Payer Name: The name that appears throughout the system.
- Policy Type: Is this a dental or medical payer?
- Payer Type: A description used for reporting and data filtering.
- EDI Format: Electronic Data Interchange (EDI) format used for exchanging electronic claims information with the clearing house.
- Form to Print: The form template used for creating paper claims as PDFs.
- Website: The payer's website for looking up contact info or other details.
- Date Ranges: When is this payer available to be used in the system for generating and submitting claims?
- Inactive or expired payers still appear in historical references.
- Select Save
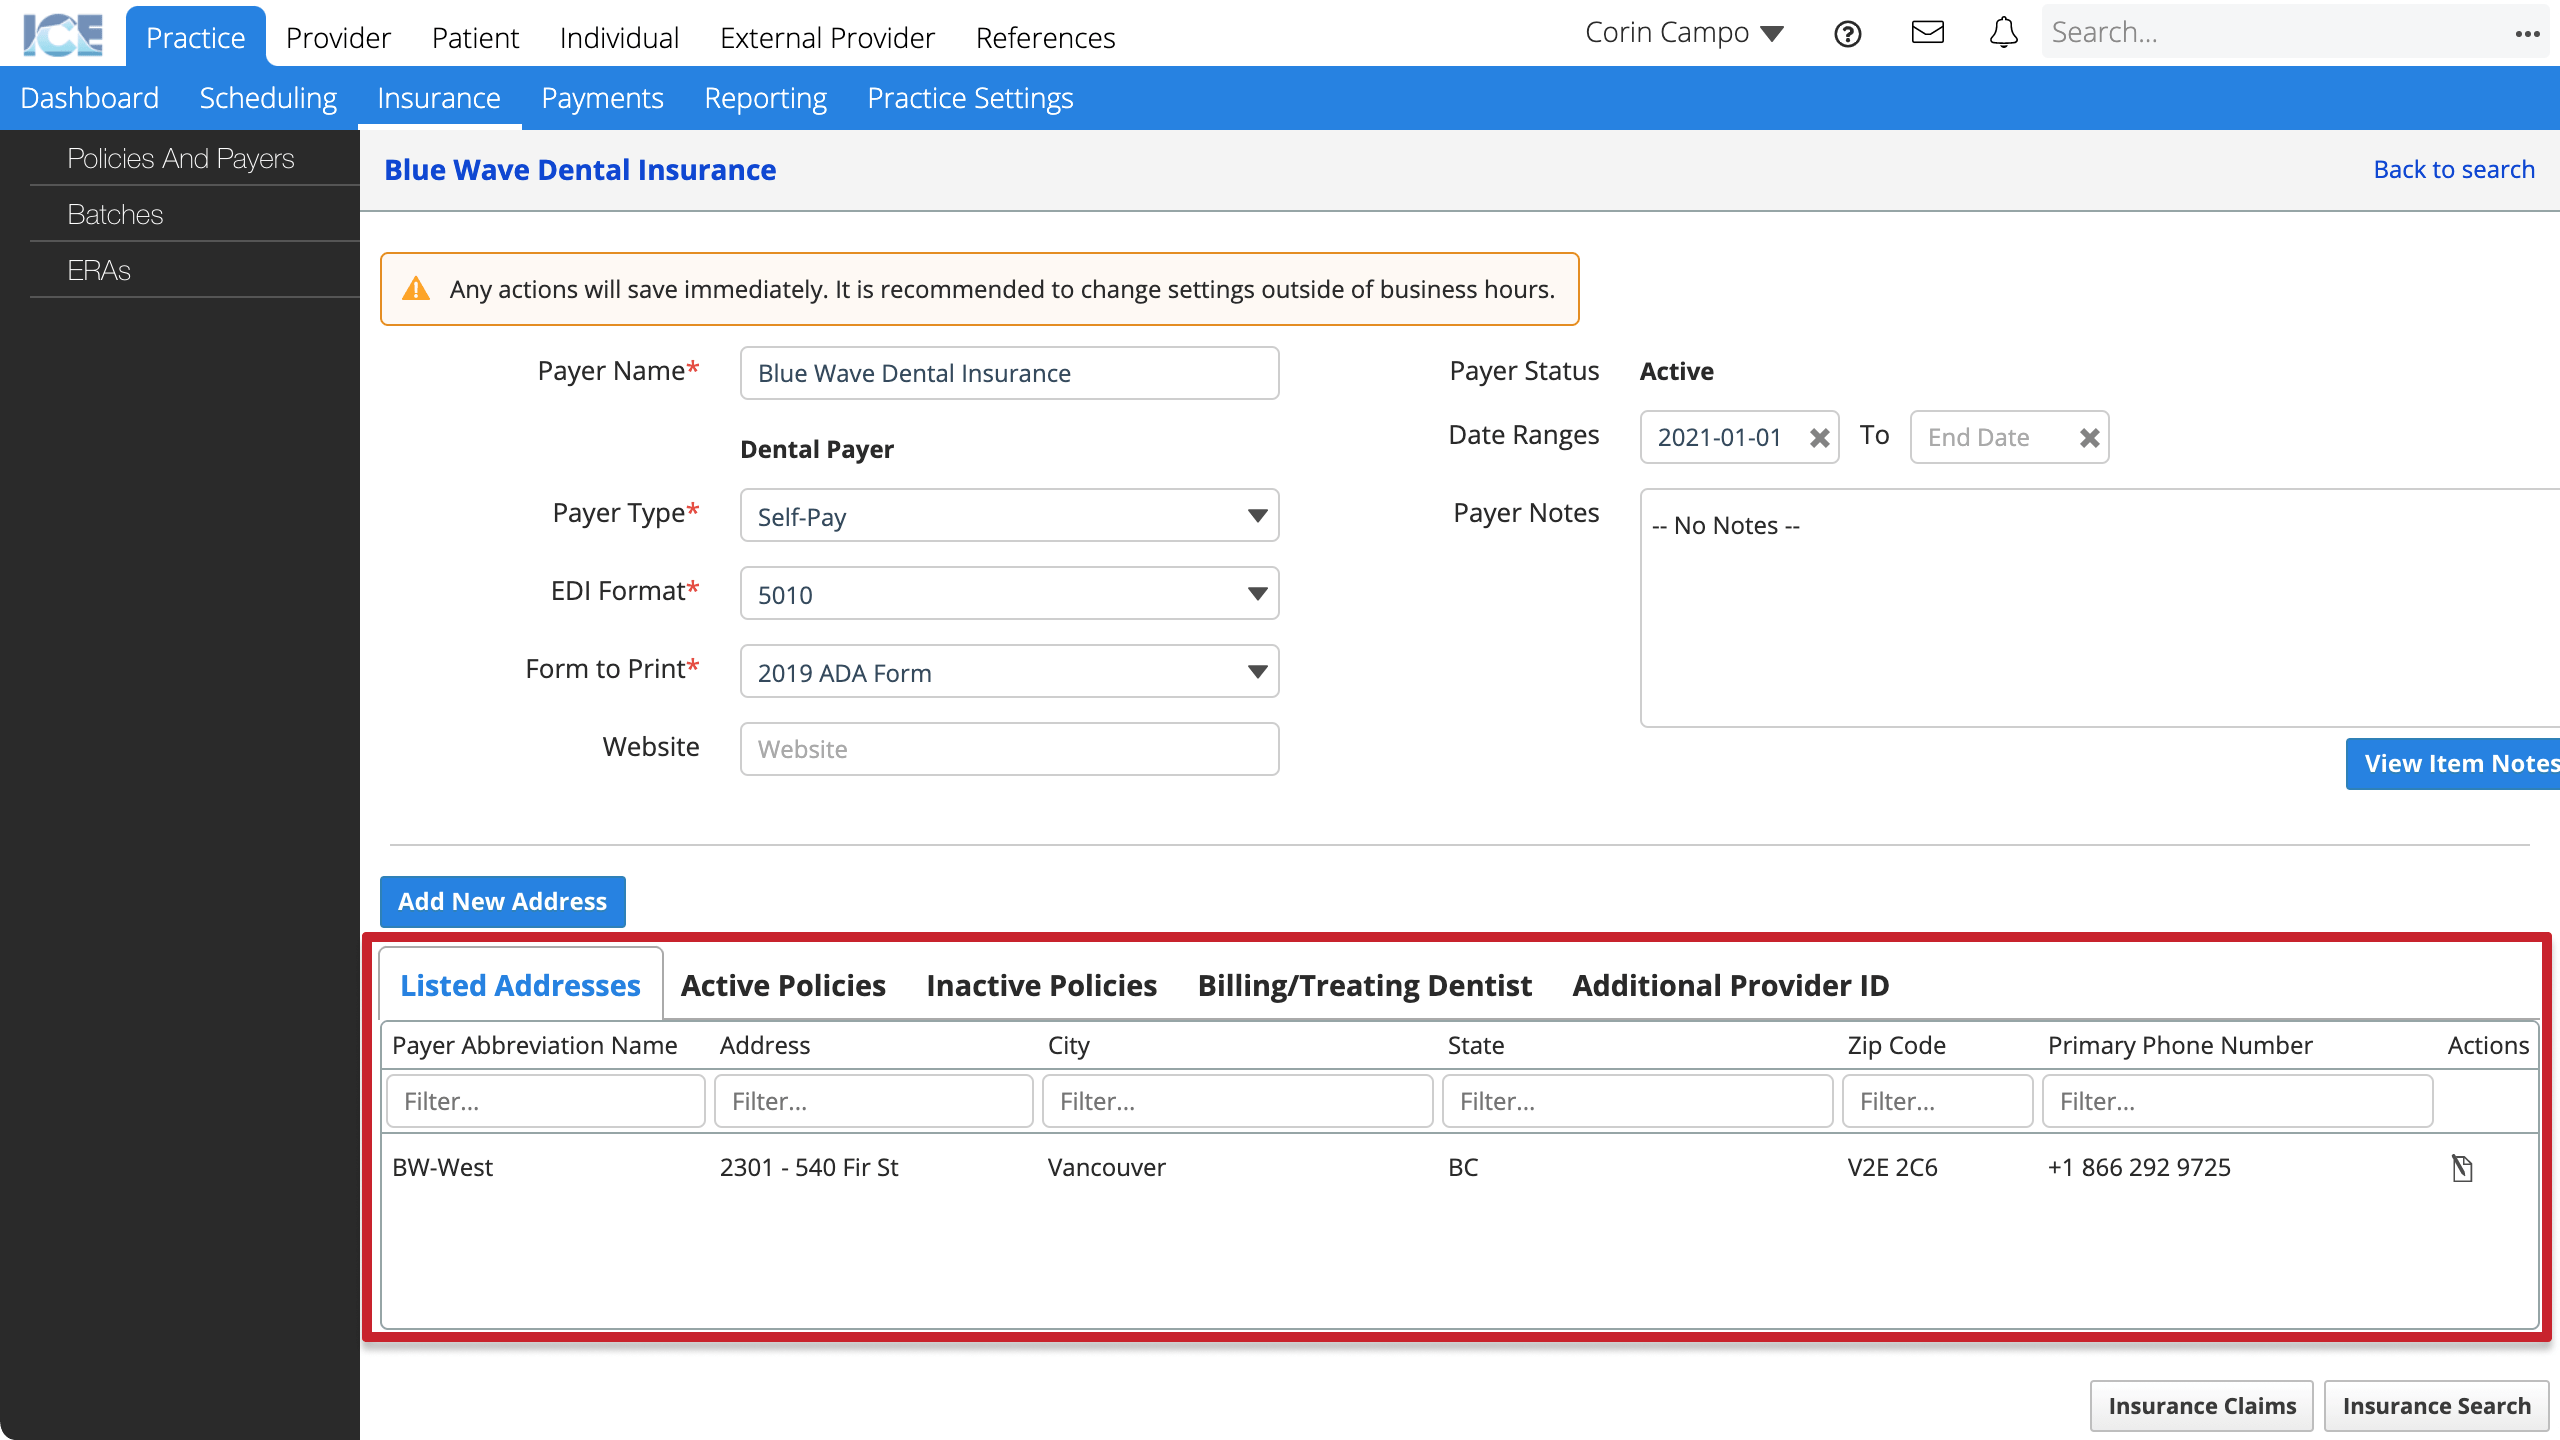
- The insurance payer's screen loads so you can:
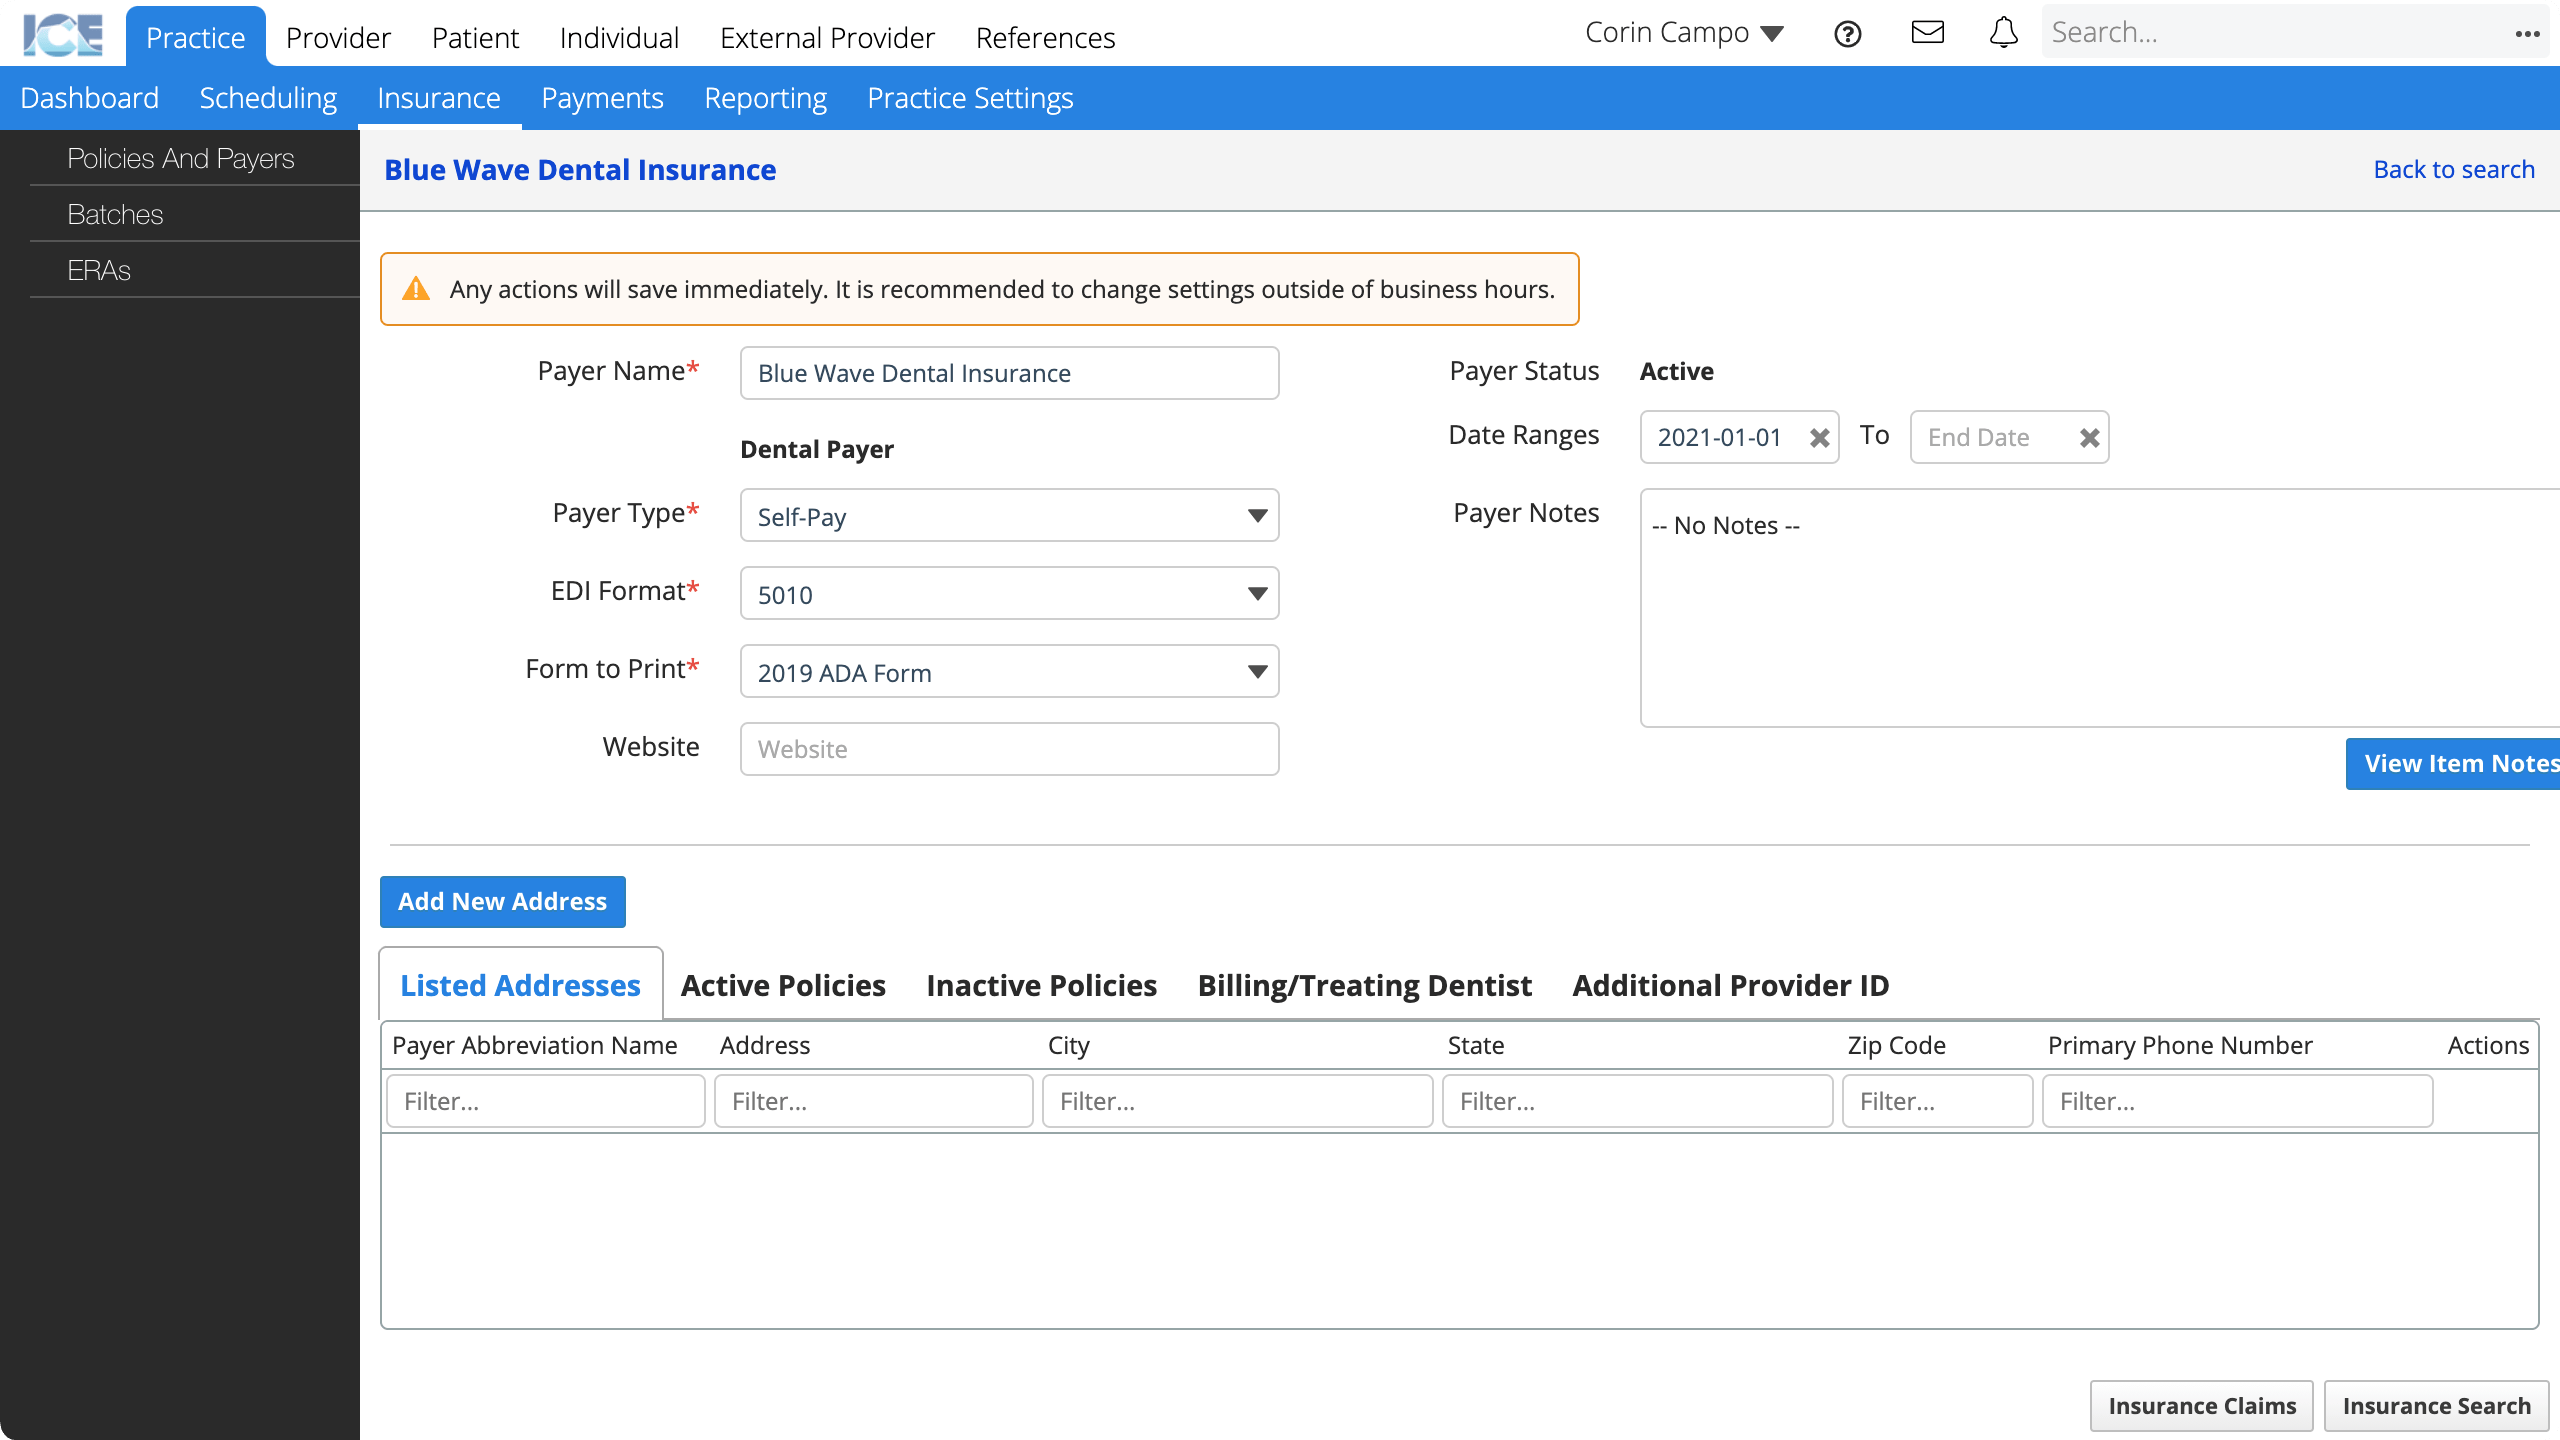
- Update payer details.
- Select Add New Address to: Create a payer address.
- Select Listed Addresses to: View, or edit the payer's addresses.
- Select Active Policies or Inactive Policies to: View or edit the payer's policies.
- Select Billing/Treating Dentist to: Define a custom billing or treating dentist for the payer.
- Select Additional Provider ID to: Define additional provider IDs for the payer.
- Select Insurance Claims to: View claims for the payer.
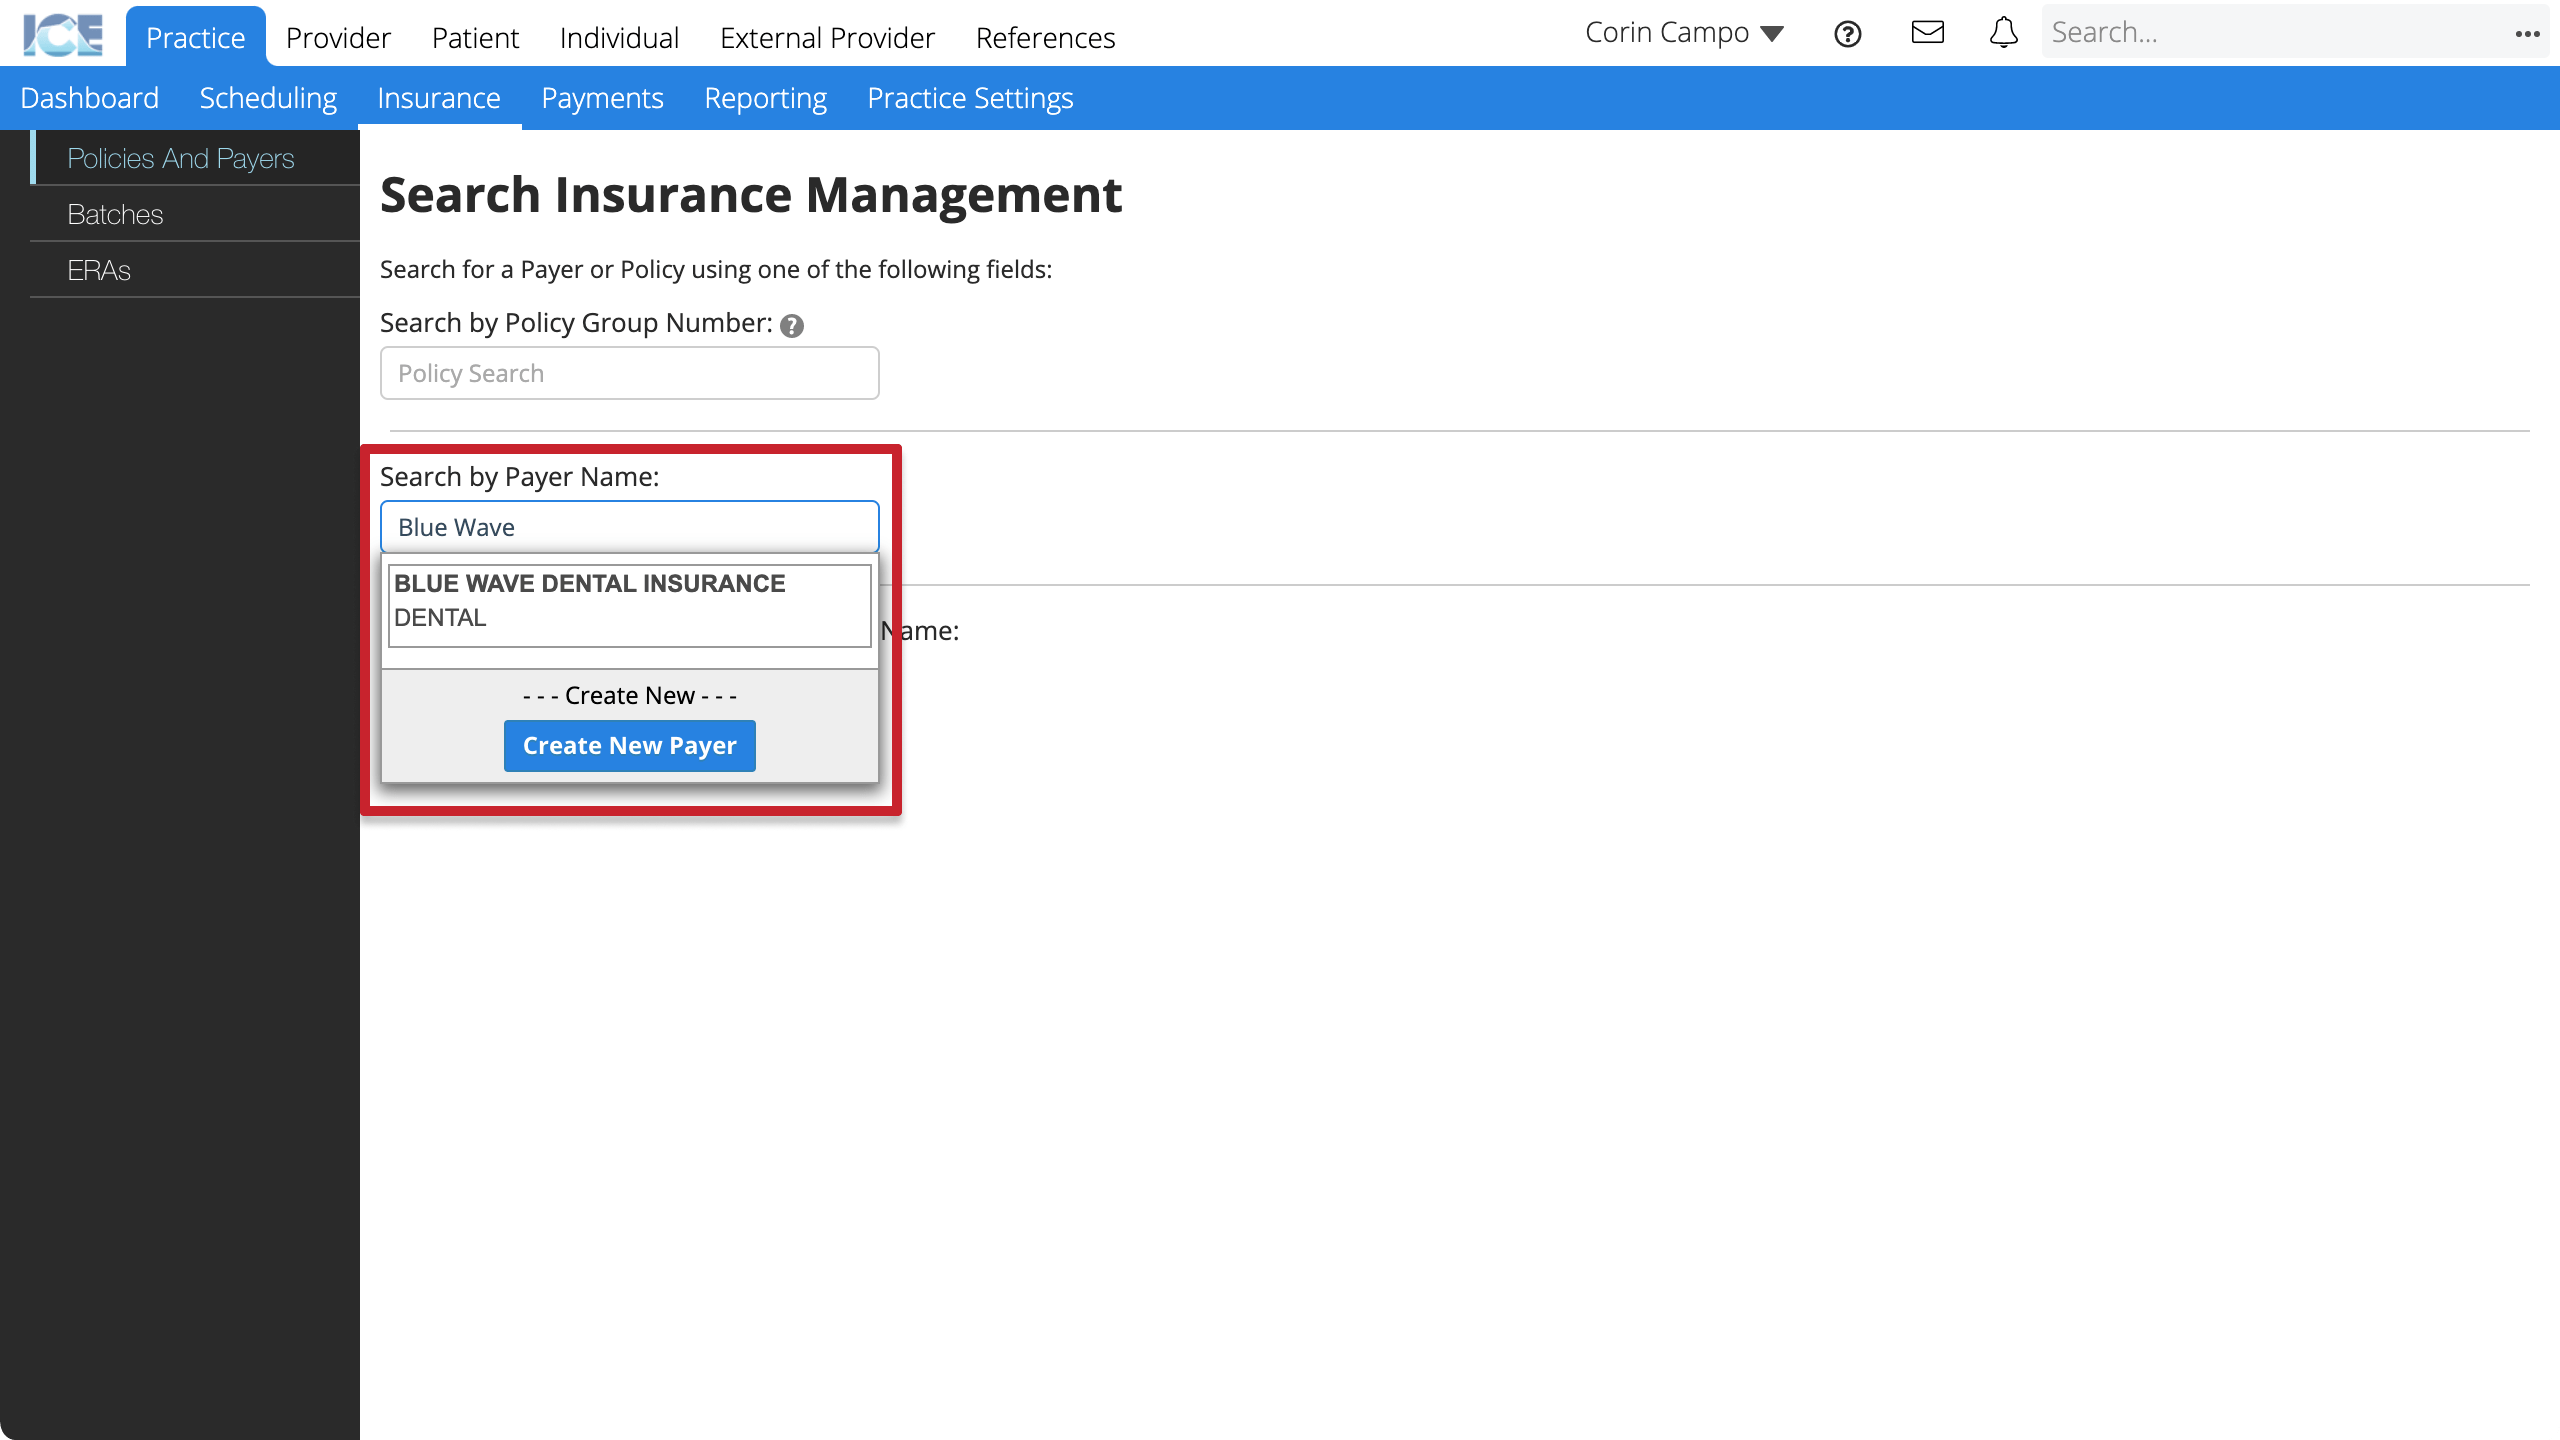
To review or edit an existing insurance payer's details, go to Practice > Insurance > Policies and Payers and select the Search by Payer Name field to search and select a payer.
Create a payer address
You need a configured insurance payer before you can configure a new insurance address.
After you have an insurance address, you can configure a new insurance policy.
- Go to Practice > Insurance > Policies and Payers
- Select the Search by Payer Name field
- Search and select the name of the payer you want to create an address for
- Select Add New Address
- Enter the required information
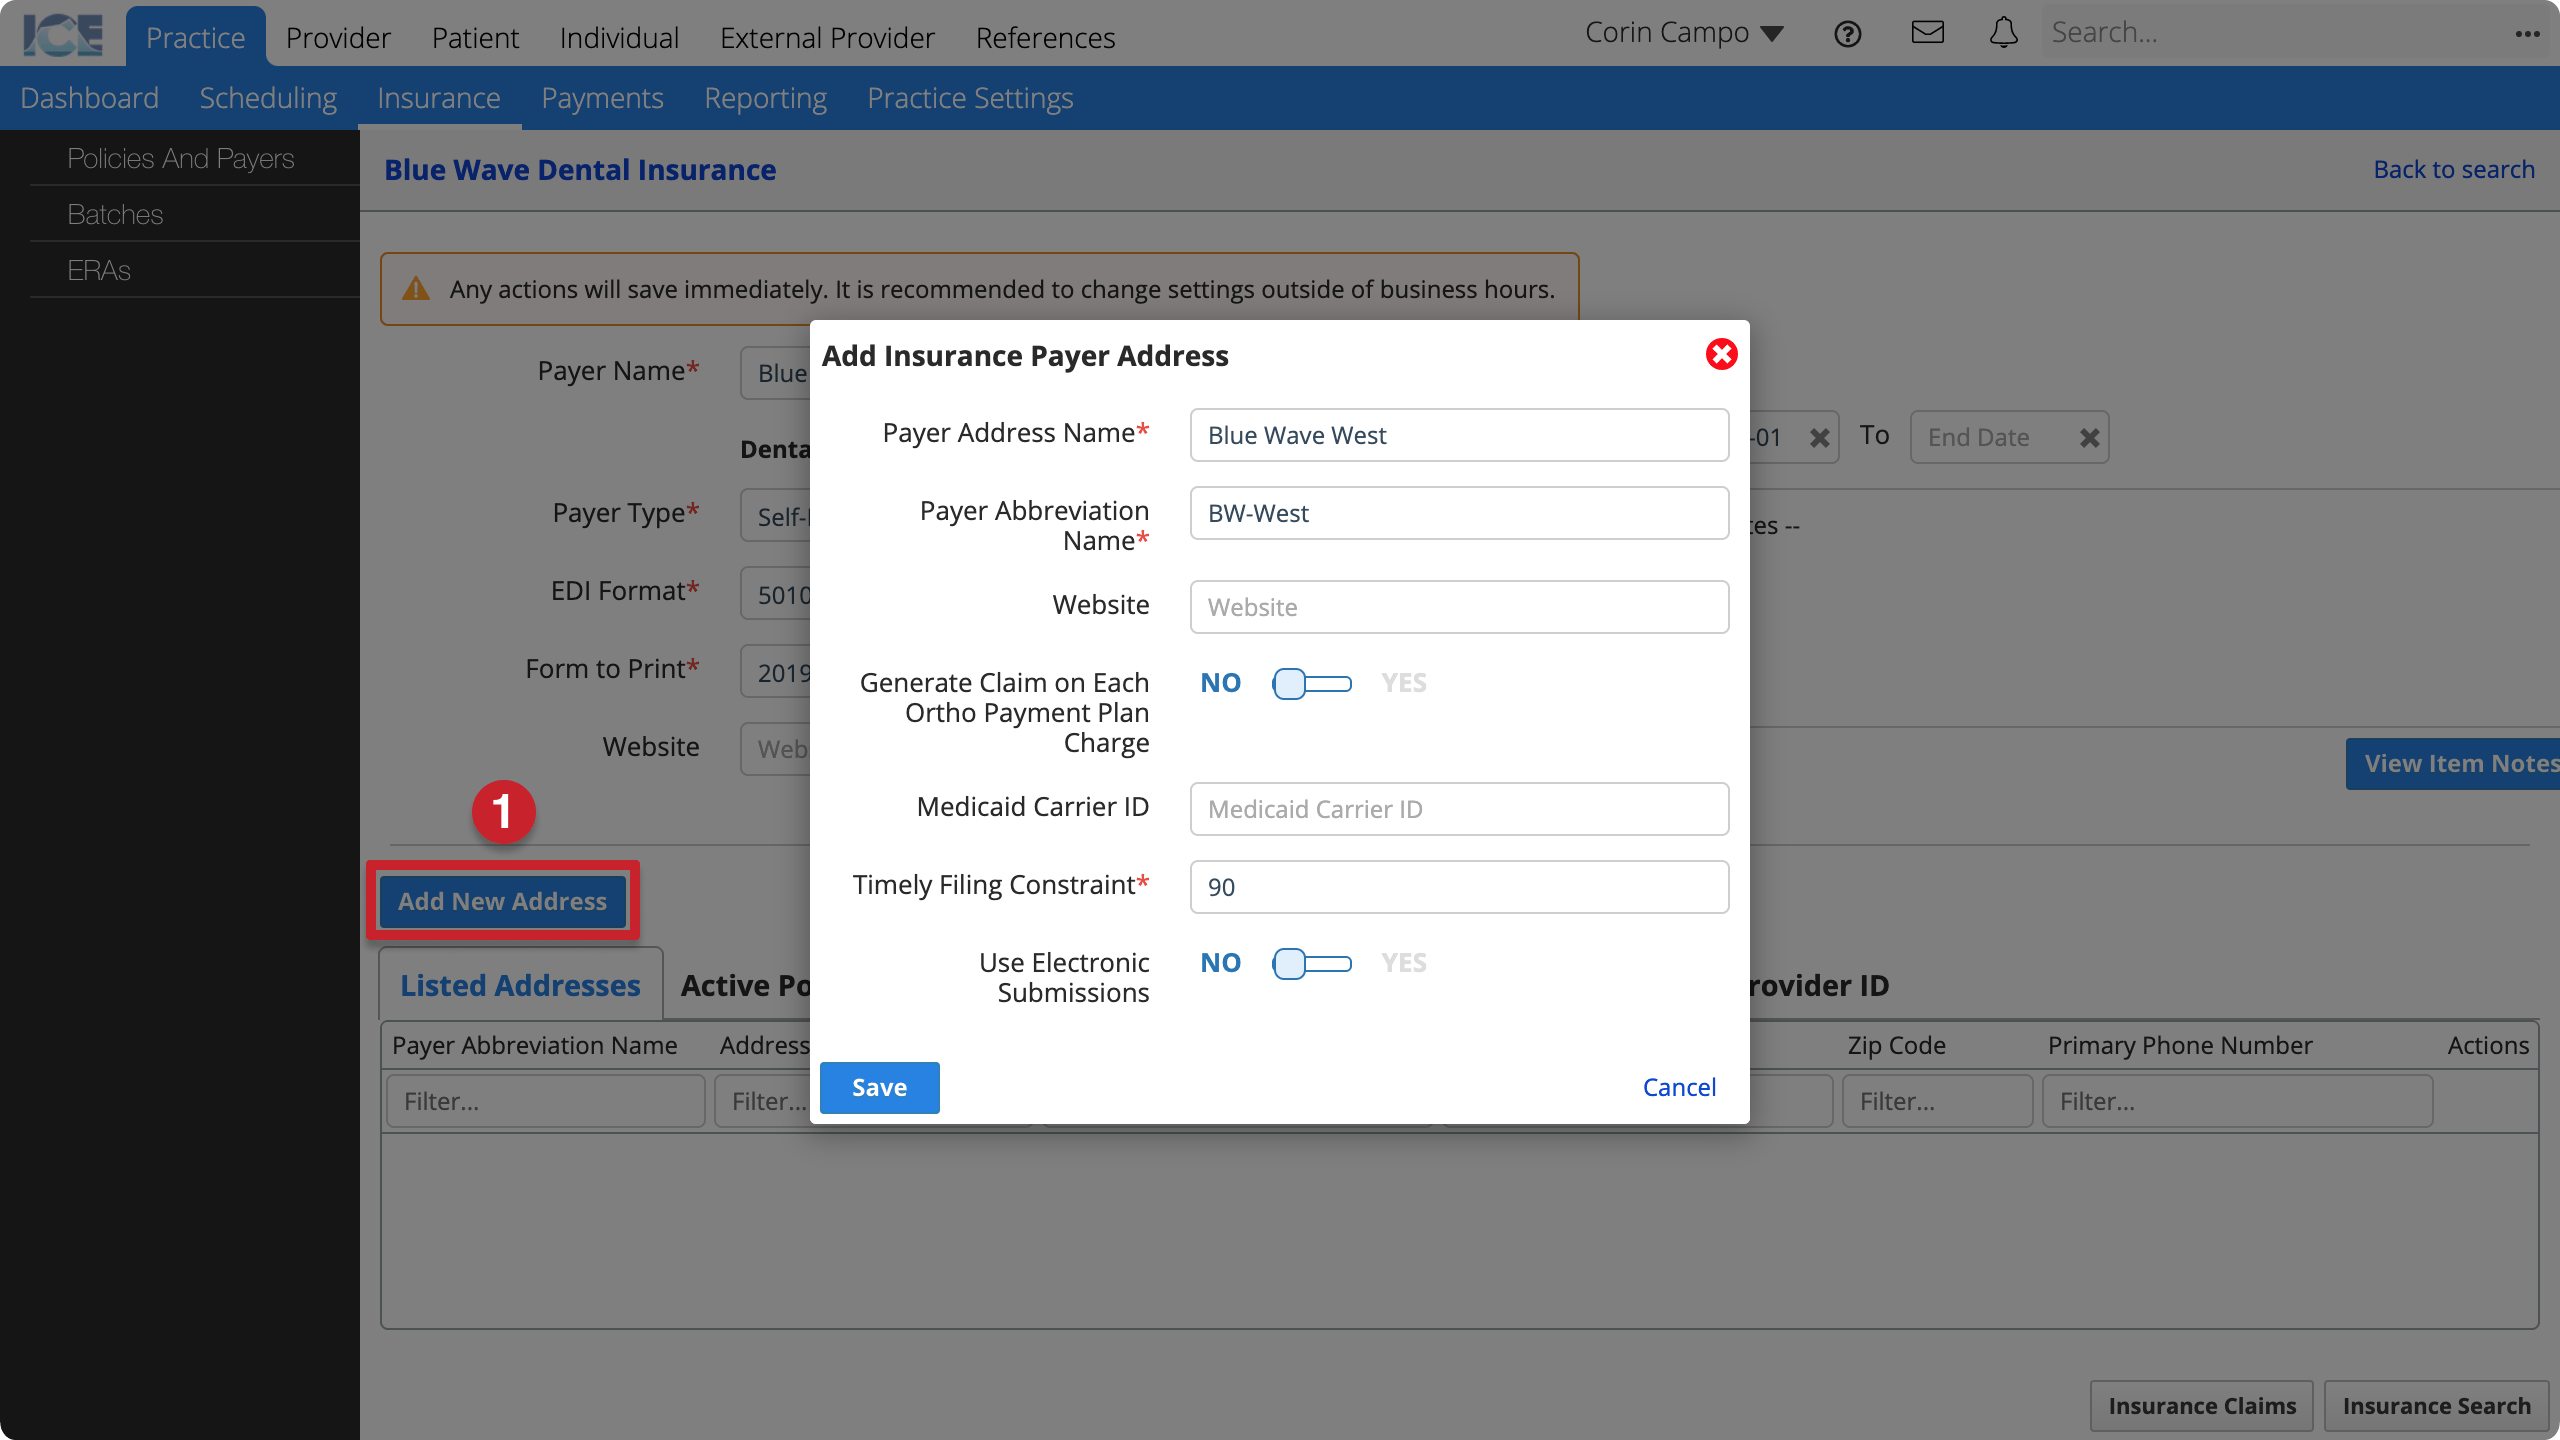
- Payer Address Name: The name that appears on claims and throughout the system.
- Payer Abbreviation Name: A shorter name that appears in search results and when space is limited.
- Website: The payer's website for looking up contact info or other details.
- Generate Claim on Each Ortho Payment Plan Charge: If no, the system only auto-generates one claim with the full cost of the orthodontic procedure to submit to insurance.
- Medicaid Carrier ID: Used for claims submission and reporting.
- Timely Filing Constraint: How many days does the payer address allow for filing a claim?
- The system requires billing staff to include a delay reason with claims filed after this day limit.
- Use Electronic Submissions: Do you submit claims electronically to this payer address?
- Select Save
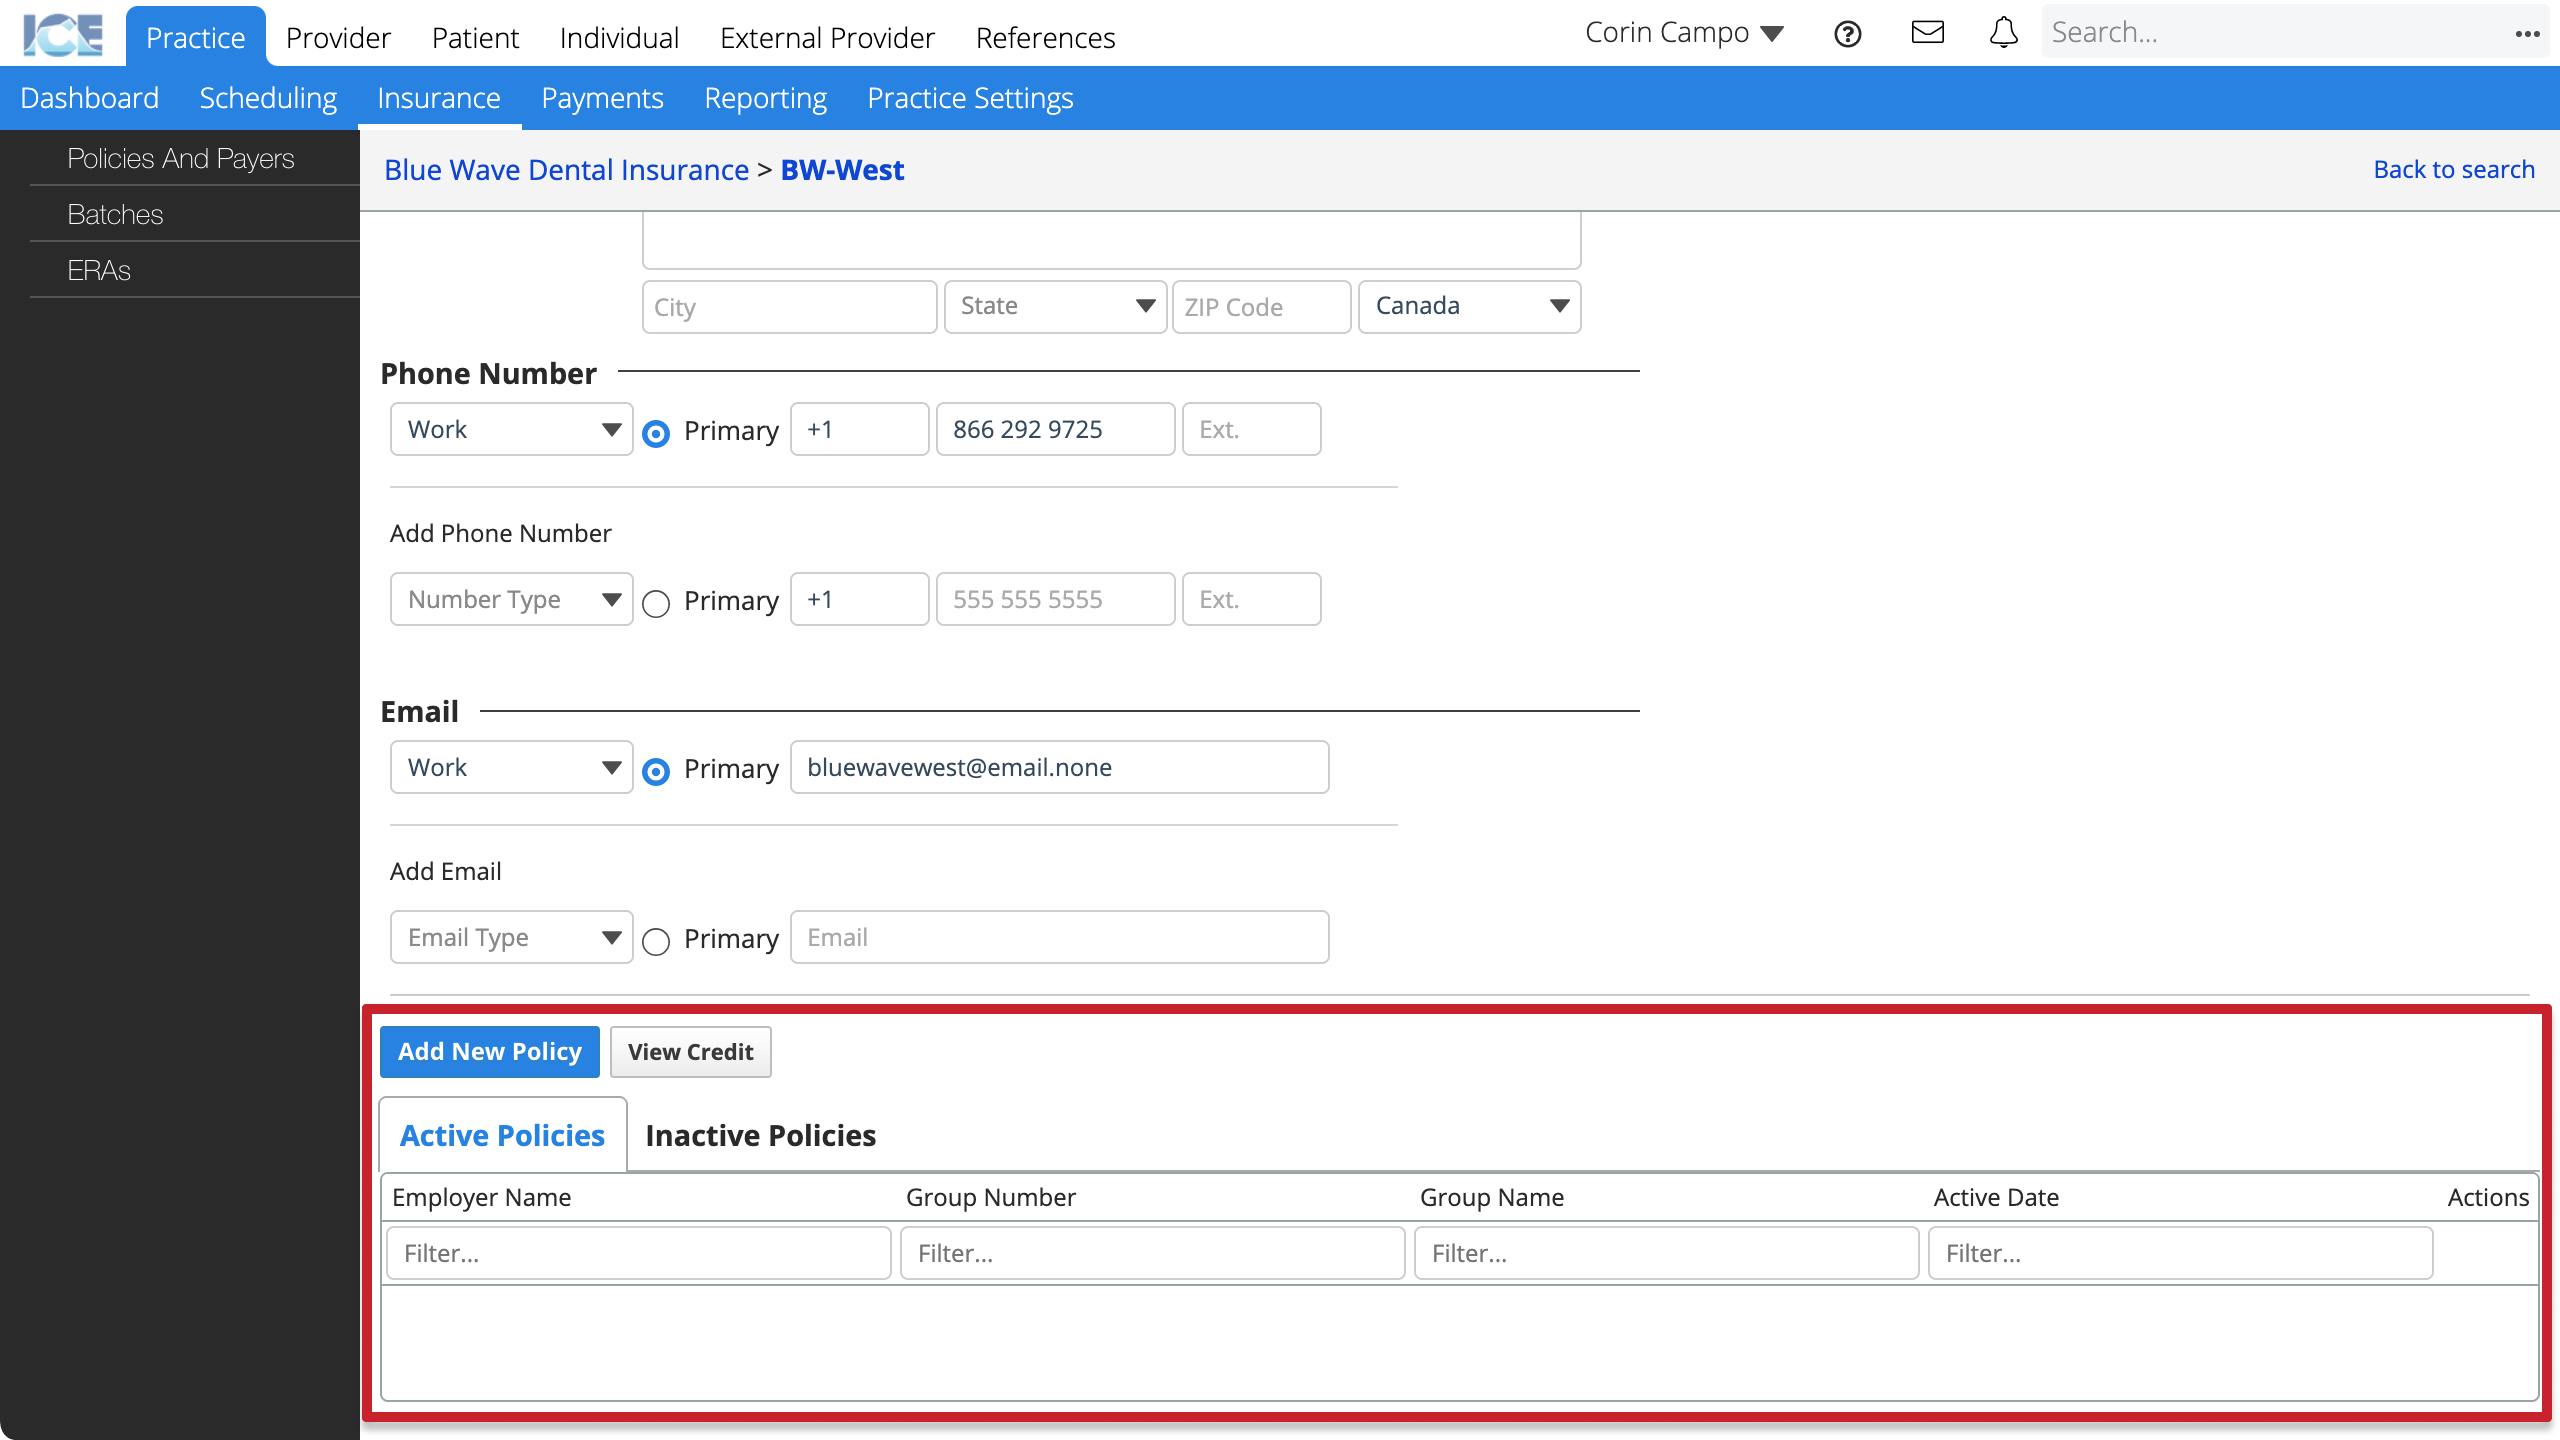
- The payer address' screen loads so you can:
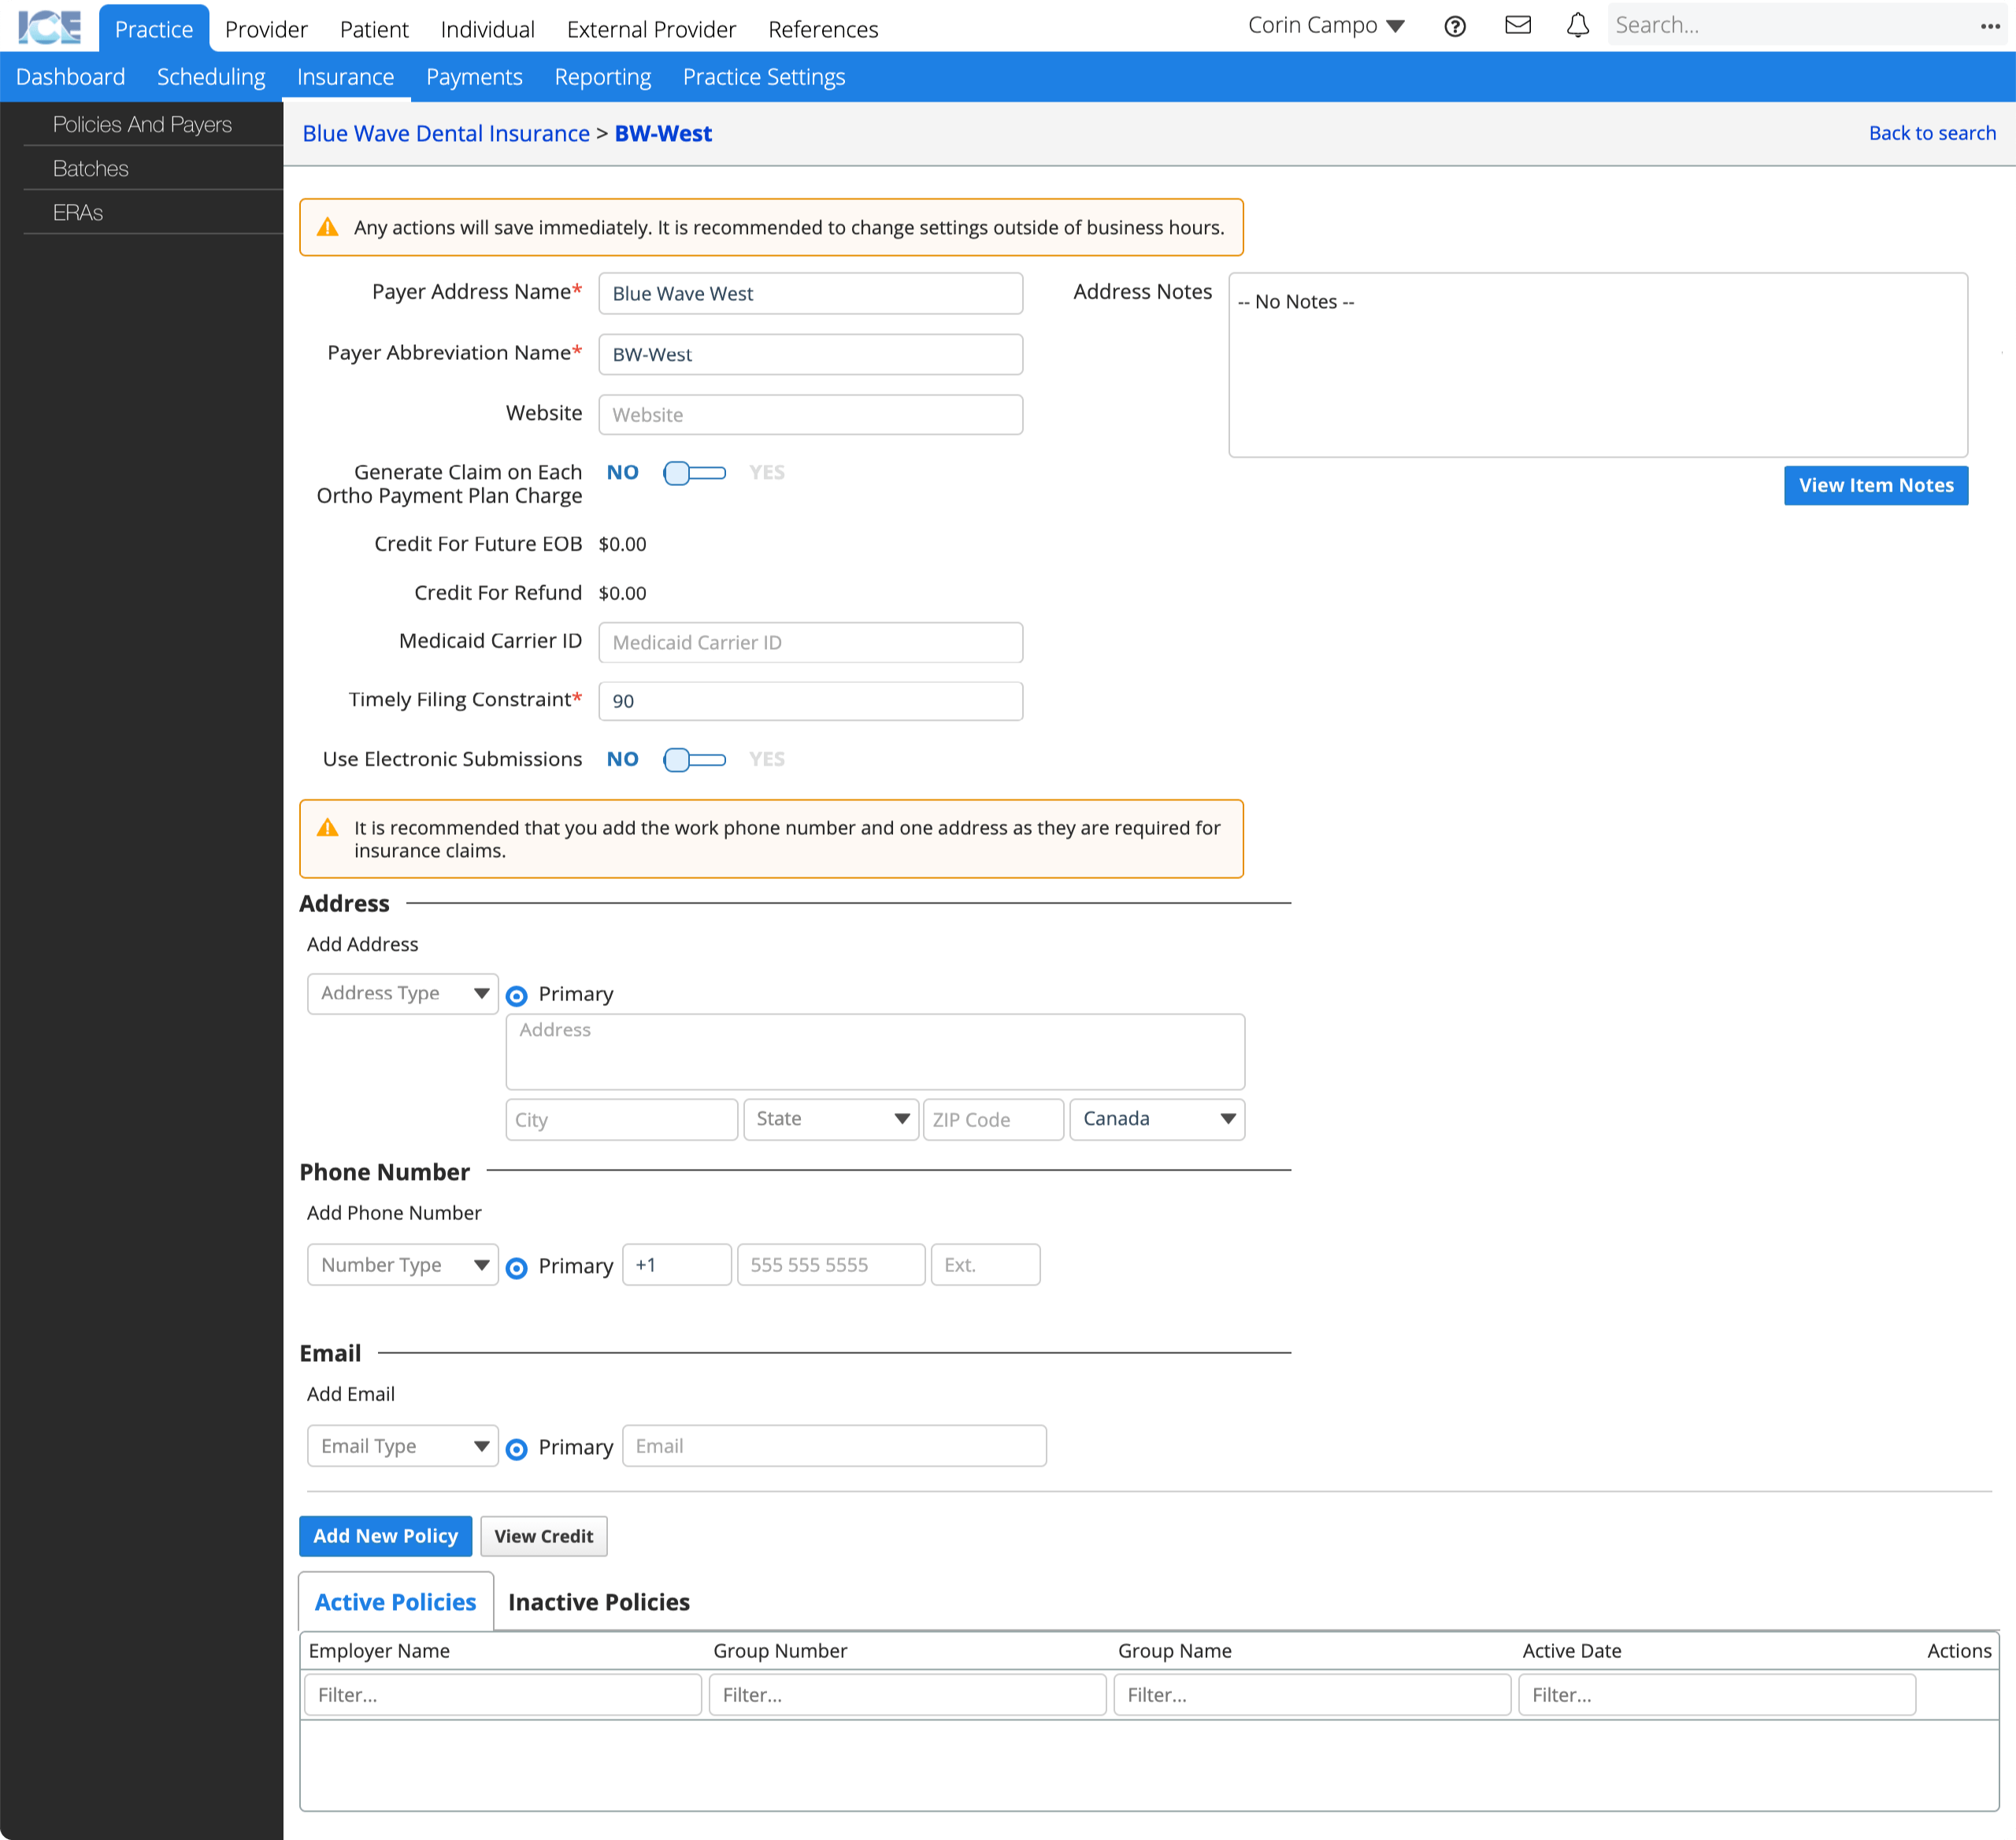
- Update payer address details.
- Add address, phone, and email contact methods.
- Select Add New Policy to: Create a policy.
- Select View Credit to: View pending credits and refunds for this payer address.
- Select Active Policies or Inactive Policies to: View or edit the payer address' policies.
To review or edit an existing insurance payer address' details, go to Practice > Insurance > Policies and Payers and select the Search by Address or Payer Abbreviation Name field to search and select a payer address.
Create a policy
You need a configured insurance payer and address before you can configure a new insurance policy.
After you configure an insurance policy, you can associate the policy to a patient's record. To learn more, see Add insurance to a patient.
If you already have a similar insurance policy for the same payer, you can reduce data entry by duplicating the existing policy and updating its details. To learn more, see Duplicate a policy below.
- Go to Practice > Insurance > Policies and Payers
- Select the Search by Payer Name field
- Search and select the name of the payer you want to create a policy for
- Scroll down to the Listed Addresses table on the payer screen
- Select
 beside the address you want to create a policy for
 - Scroll down to the Active Policies table on the payer address screen
- Select Add New Policy
- Enter the required information
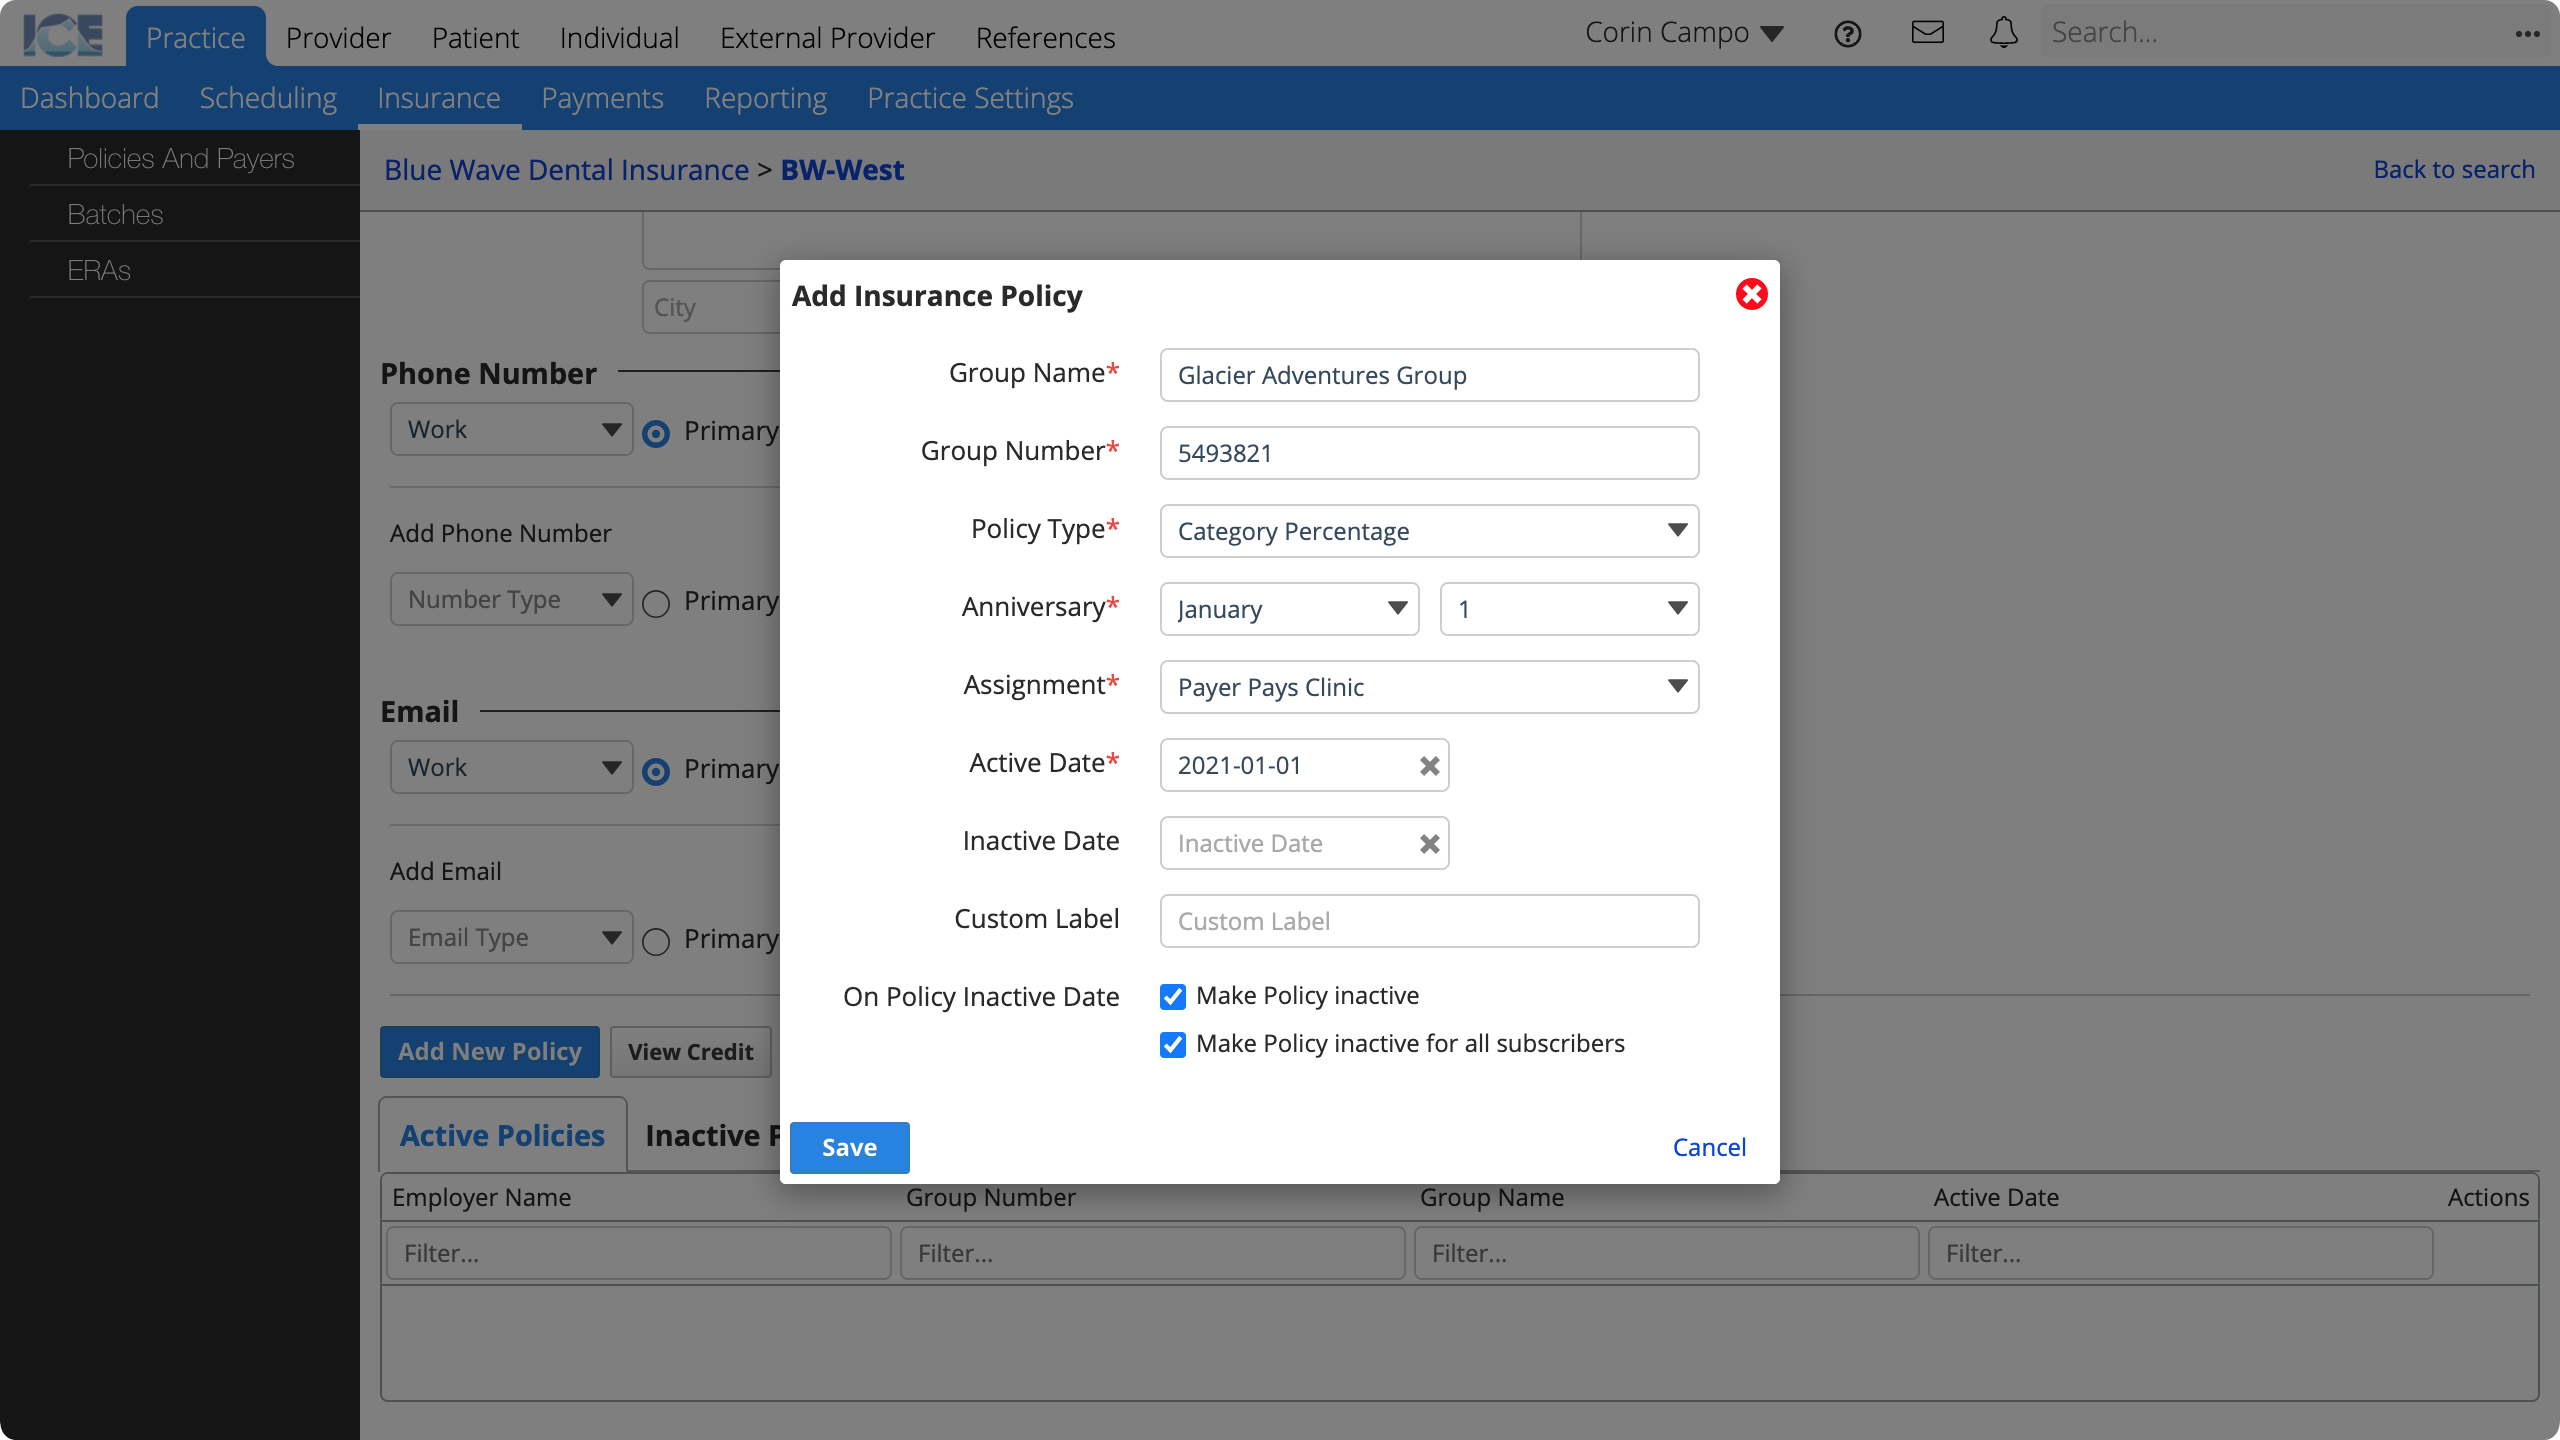
- Group Name: The policy's group name that appears on claims and throughout the system.
- Group Number: The policy's group number that appears on claims and throughout the system.
- Policy Type: Is this a Capitation, Category Percentage, Medicaid, or PPO Percentage policy?
- If you select Medicaid, you must also choose a Prior Authorization form template.
- If you select PPO Percentage, you must also choose:
- PPO Fee Schedule: The fees your practice agreed to charge to patients with this policy.
- Contractual Adjustment Code: When a procedure becomes billable for a patient with a PPO policy, the system creates a contractual adjustment for the difference between the PPO fee and the standard fee. Which contractual adjustment code should the system use?
- Anniversary: When do this policy's yearly limits reset?
- Assignment: Does the payer pay the clinic or the patient?
- Payer Pays Clinic: When a procedure is billed the system calculates an expected charge split between the patient and insurance.
- You can then create and submit claims to insurance and record payments from them.
- Payer Pays Patient. When a procedure is billed the system expects the patient to cover the entire cost.
- You can still create and print a Courtesy Claim for the patient that they can submit to insurance themselves.
- Payer Pays Clinic: When a procedure is billed the system calculates an expected charge split between the patient and insurance.
- Active Date: When is treatment eligible for coverage under this policy?
- Inactive Date: When is treatment no longer eligible for coverage under this policy?
- Custom Label: A short description used for policy search, filtering, and reporting.
- On Policy Inactive Date: How should the system handle this policy when it becomes inactive?
- Select Save
- The policy's screen loads so you can:
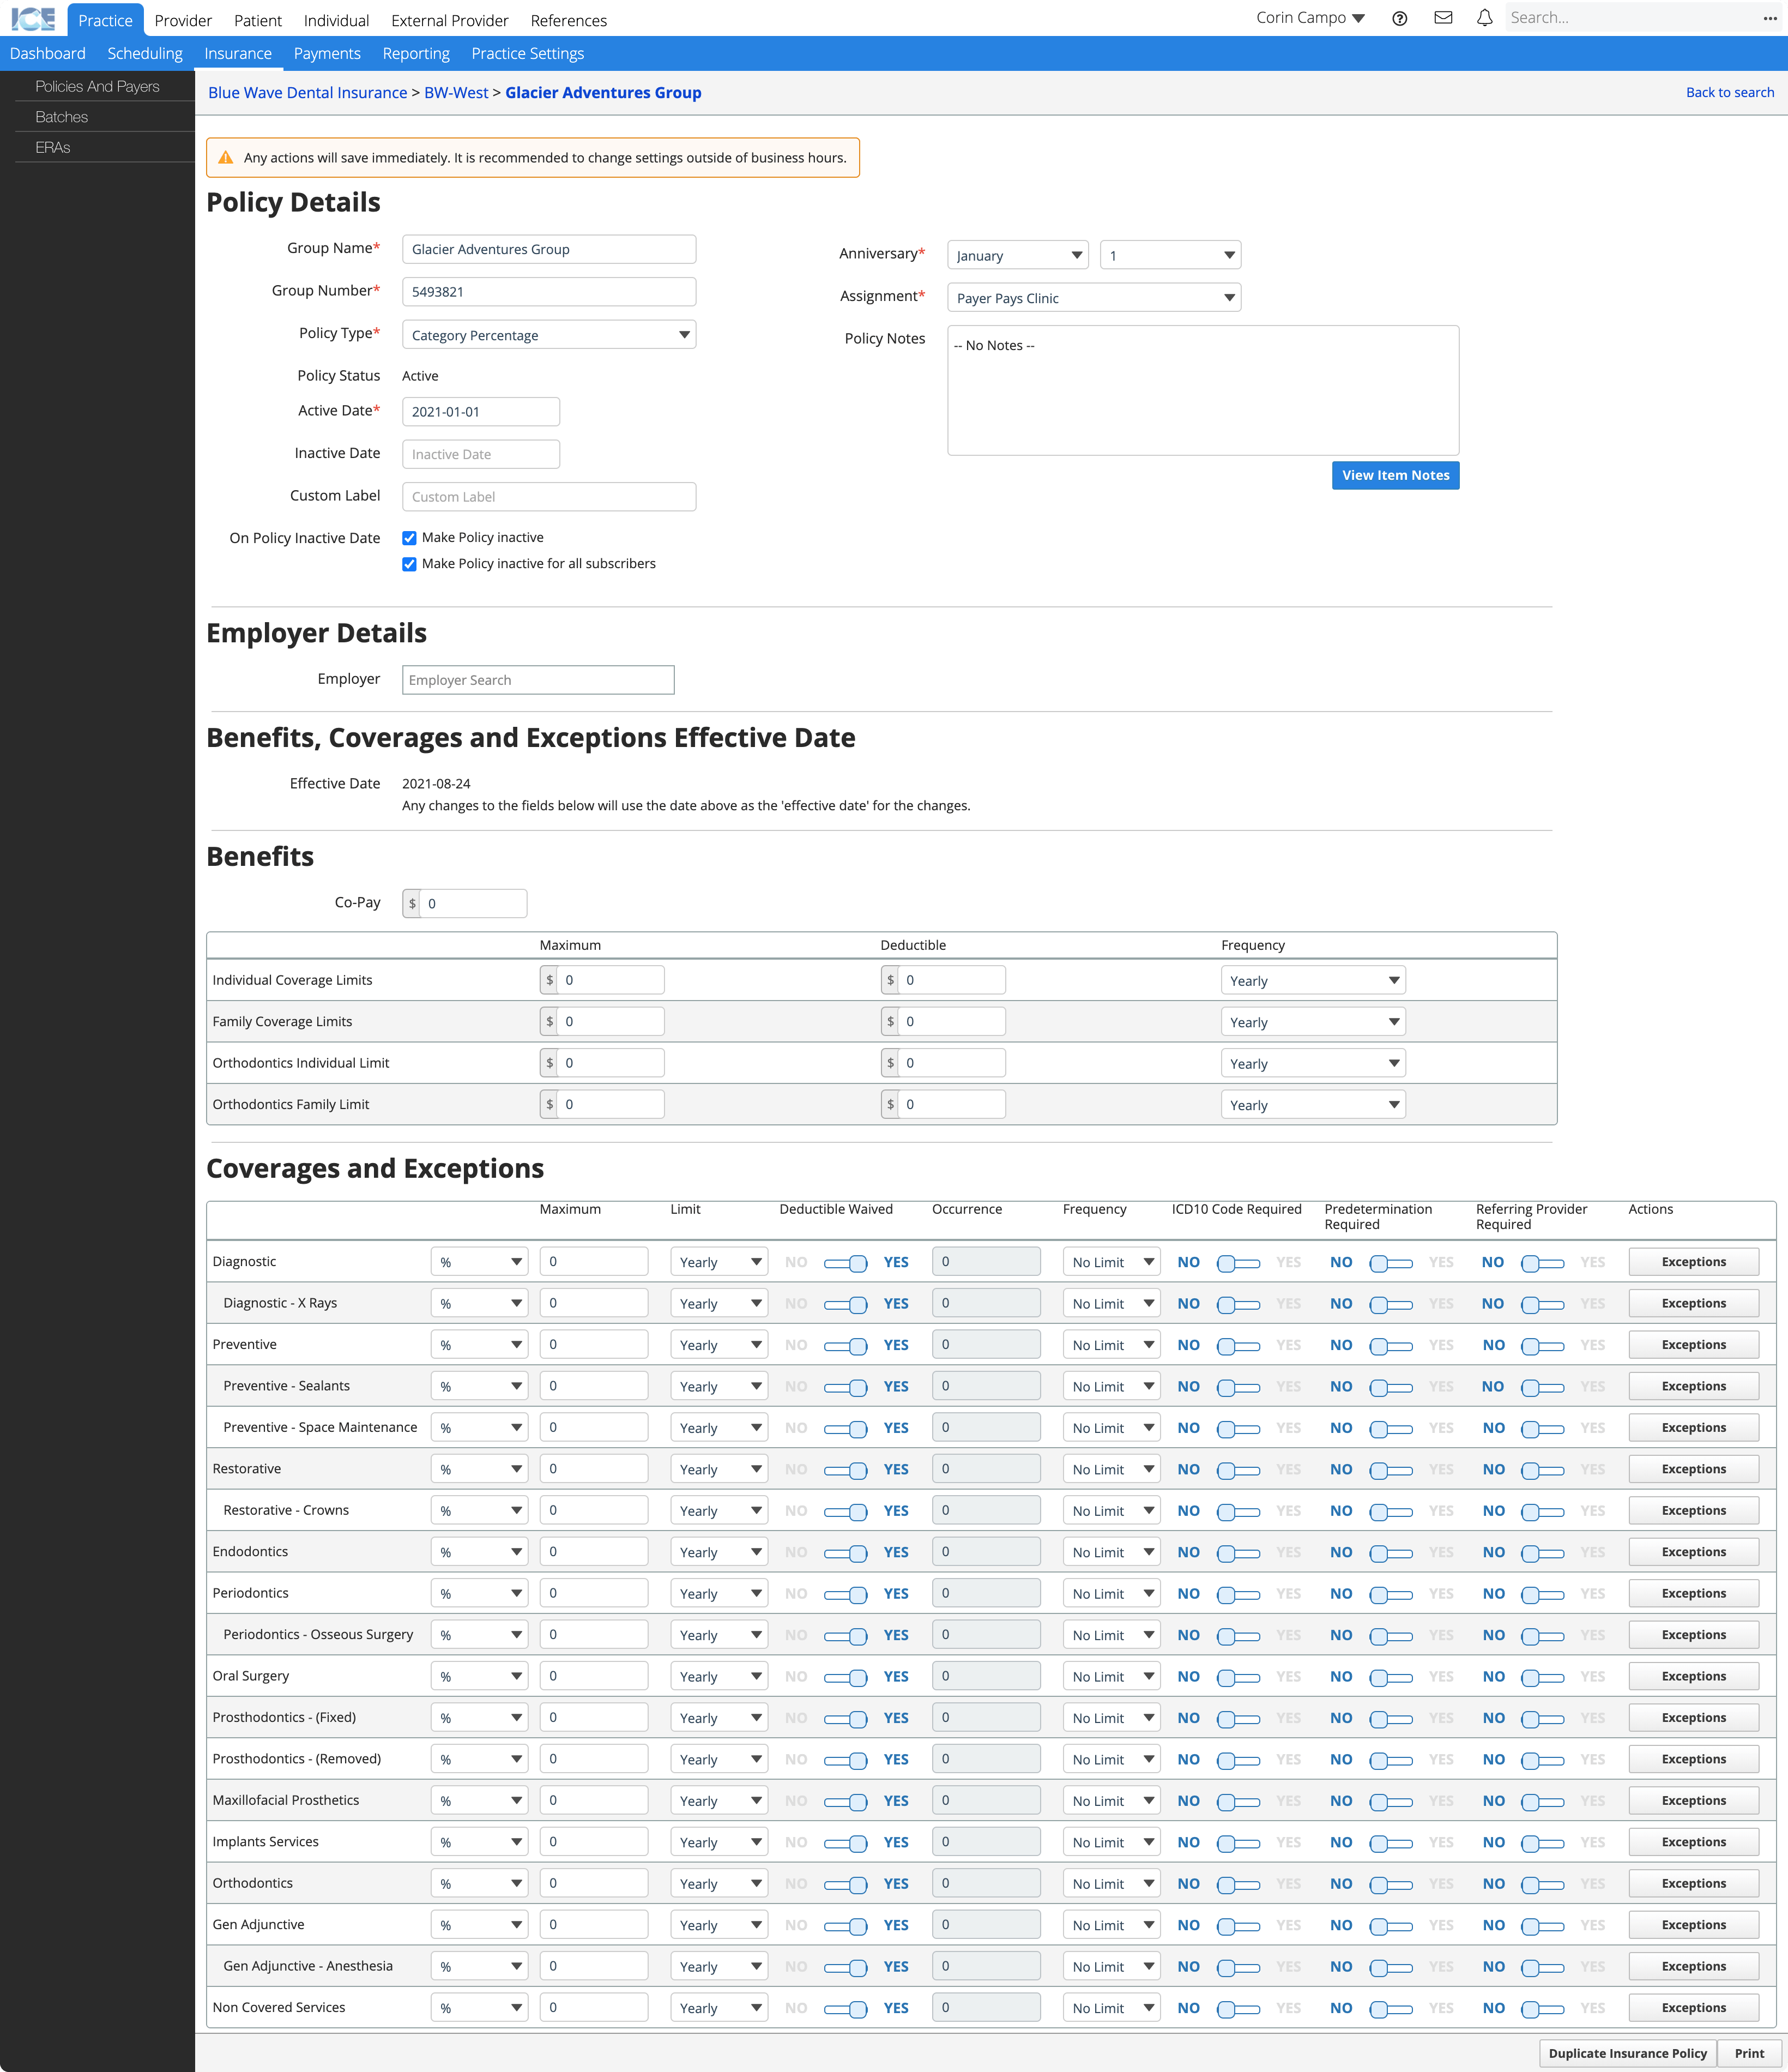
- Update policy details.
- Add employer details to the policy.
- Configure the policy's benefits, coverages and exceptions.
To review or edit an existing insurance policy, see View a policy below.
View a policy
You can open an insurance policy to review or edit its details.
- Go to Practice > Insurance > Policies and Payers
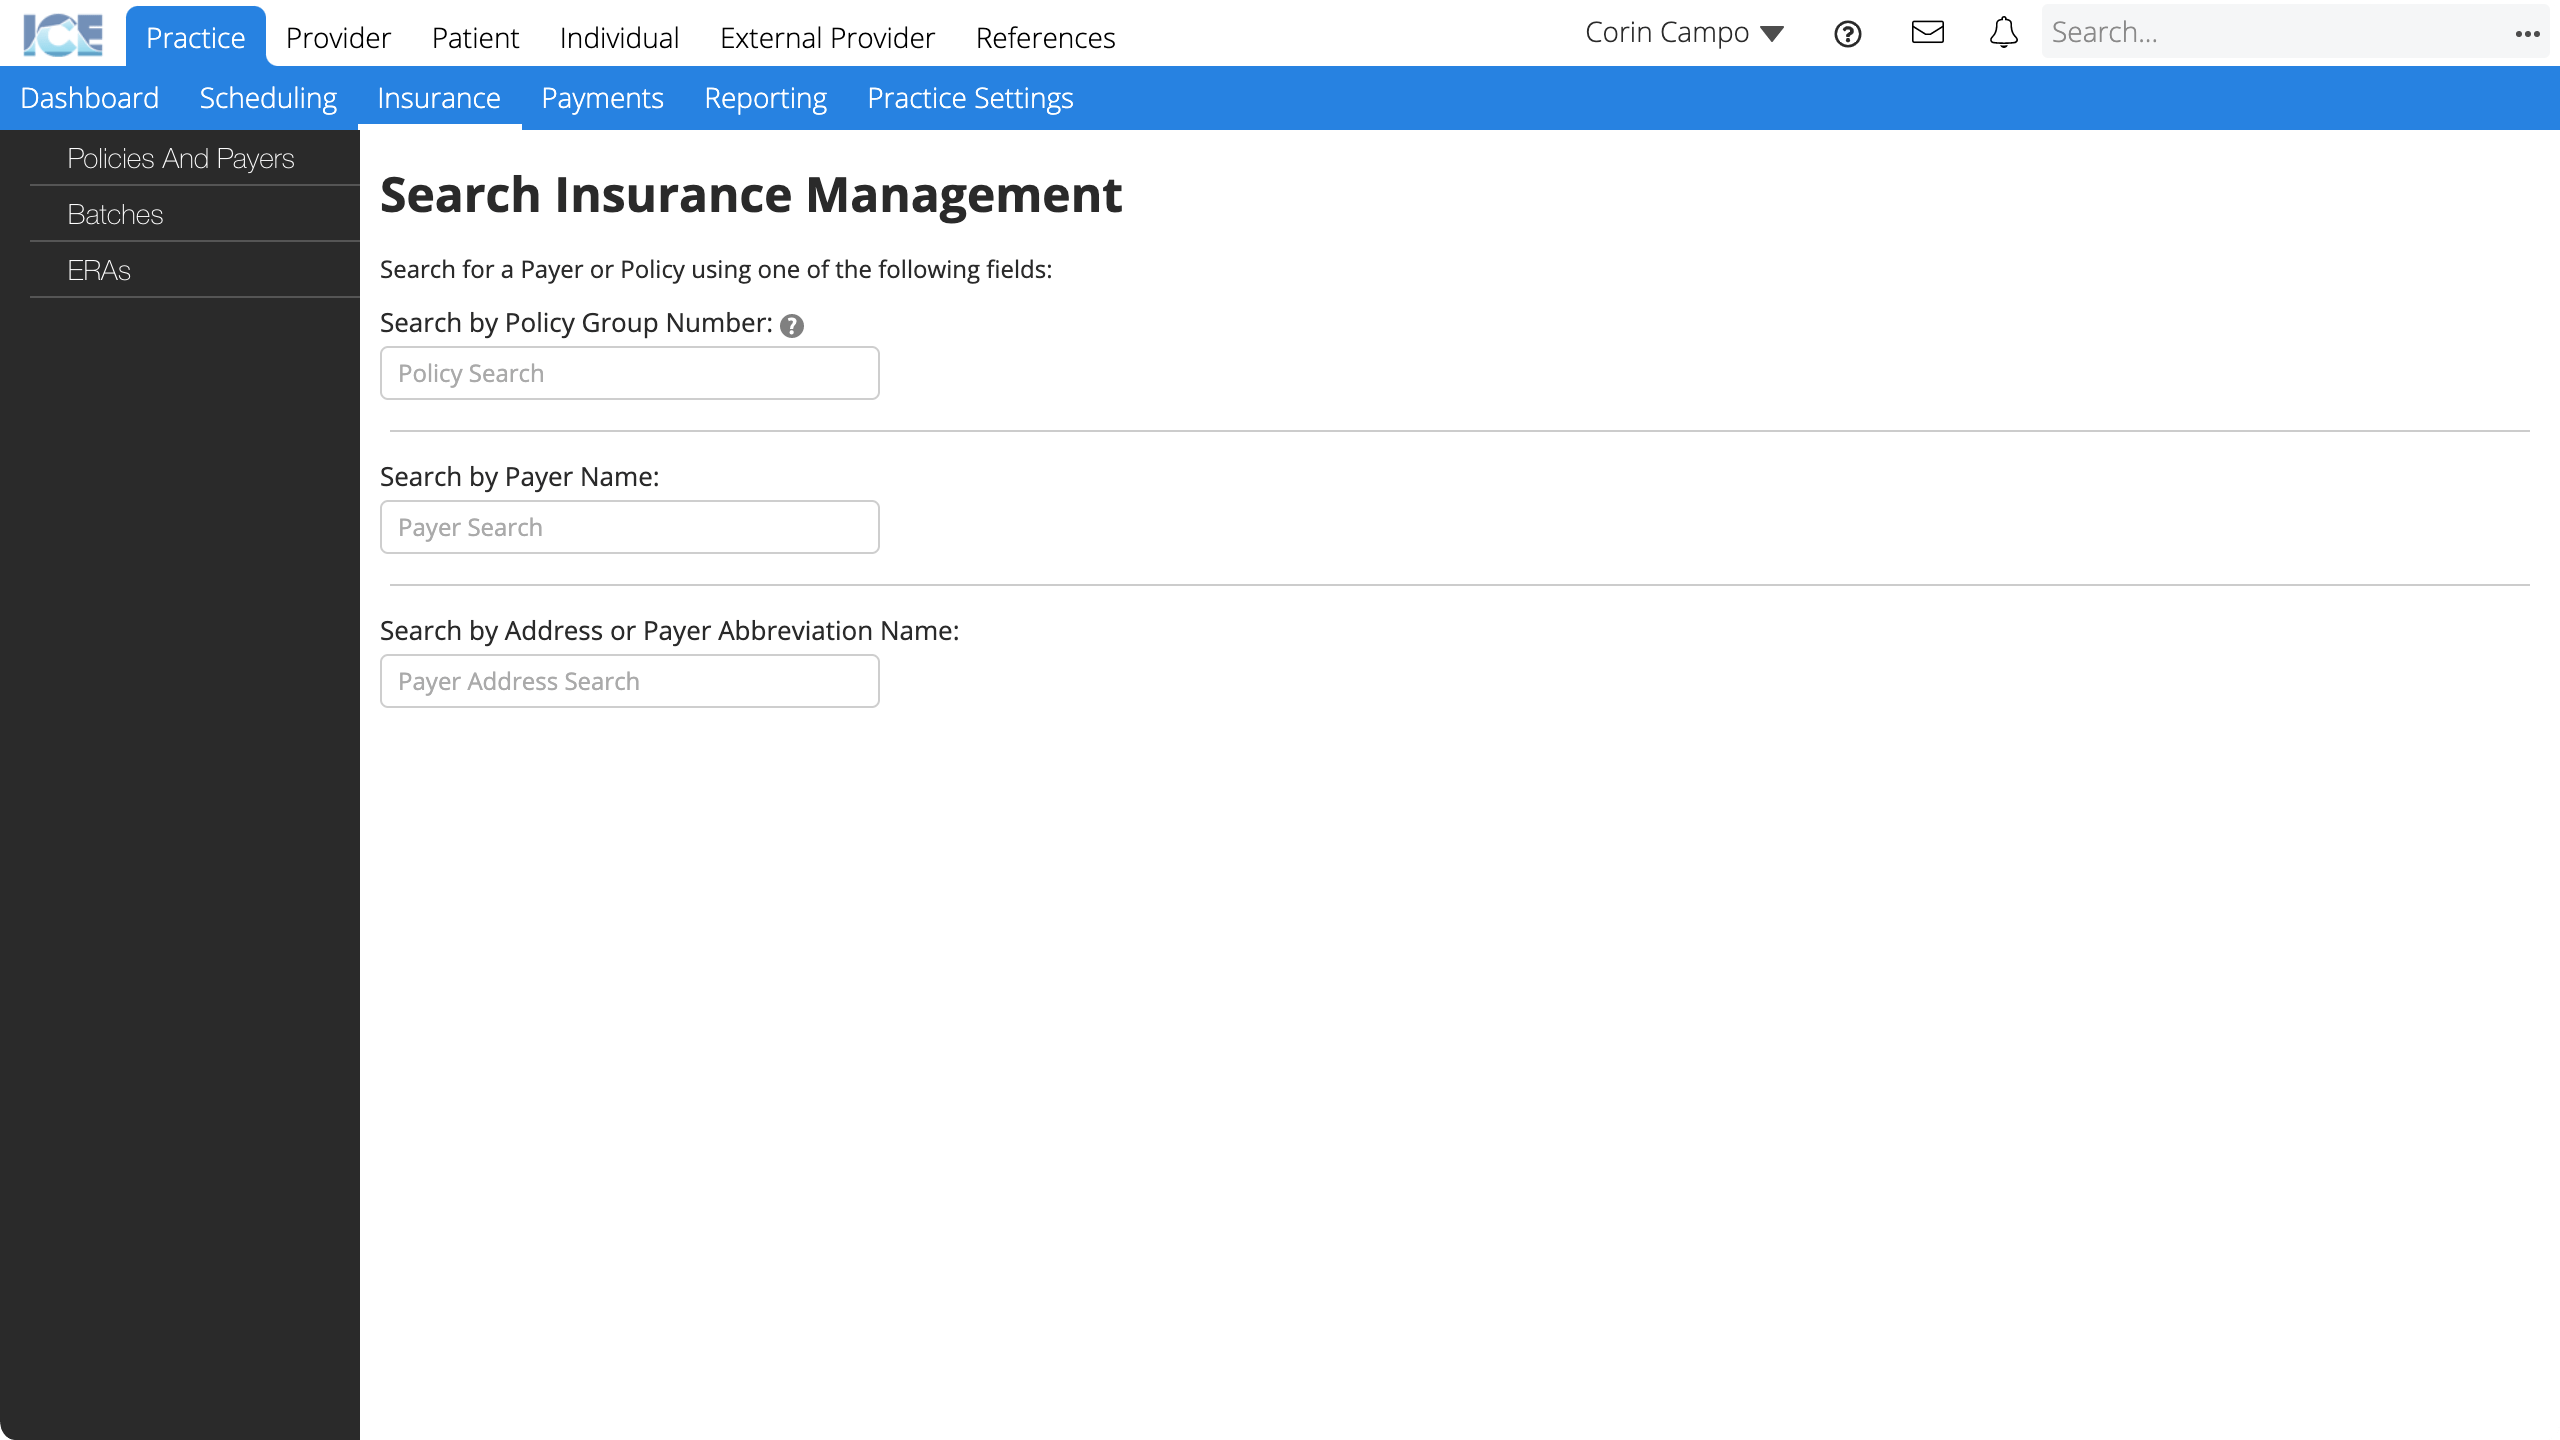
If you know the policy group number:
- Select the Search by Policy Group Number field
- Enter the policy group number
- Select the policy result you want to review
If you only know the policy's payer or payer address:
- Select the Search by Payer Name field and enter the payer's name
or
Select the Search by Address or Payer Abbreviation Name field and enter the abbreviation name - Select a result
- Scroll down to the Active Policies table

- Select beside the policy you want to review
Search * for payer or policy list
If you don't know the exact payer name or policy number, search for * to see a list of available results.
Configure policy coverage
After you create an insurance policy, you can configure the policy's benefit, coverage, and exception details.
You can return to this section and update benefit, coverage, and exception details over time as you learn more from the payer or if the policy coverage changes.
Exceptions improve accuracy
Exceptions are great for ensuring that the system calculates the most accurate coverage estimates when a clinician charts treatment or discusses options with the patient.
- Exceptions can include procedure-specific maximums, frequency limits, age requirements, predetermination requirements, and more.
- Fewer discrepancies between estimated and paid amounts means fewer adjustments by billing staff and fewer surprises for a patient.
- Go to Practice > Insurance > Policies and Payers
- Open the policy you want to configure
- For step-by-step instructions, see View a policy.
- Scroll down to the Benefits, Coverages, and Exceptions section at the bottom of the policy details
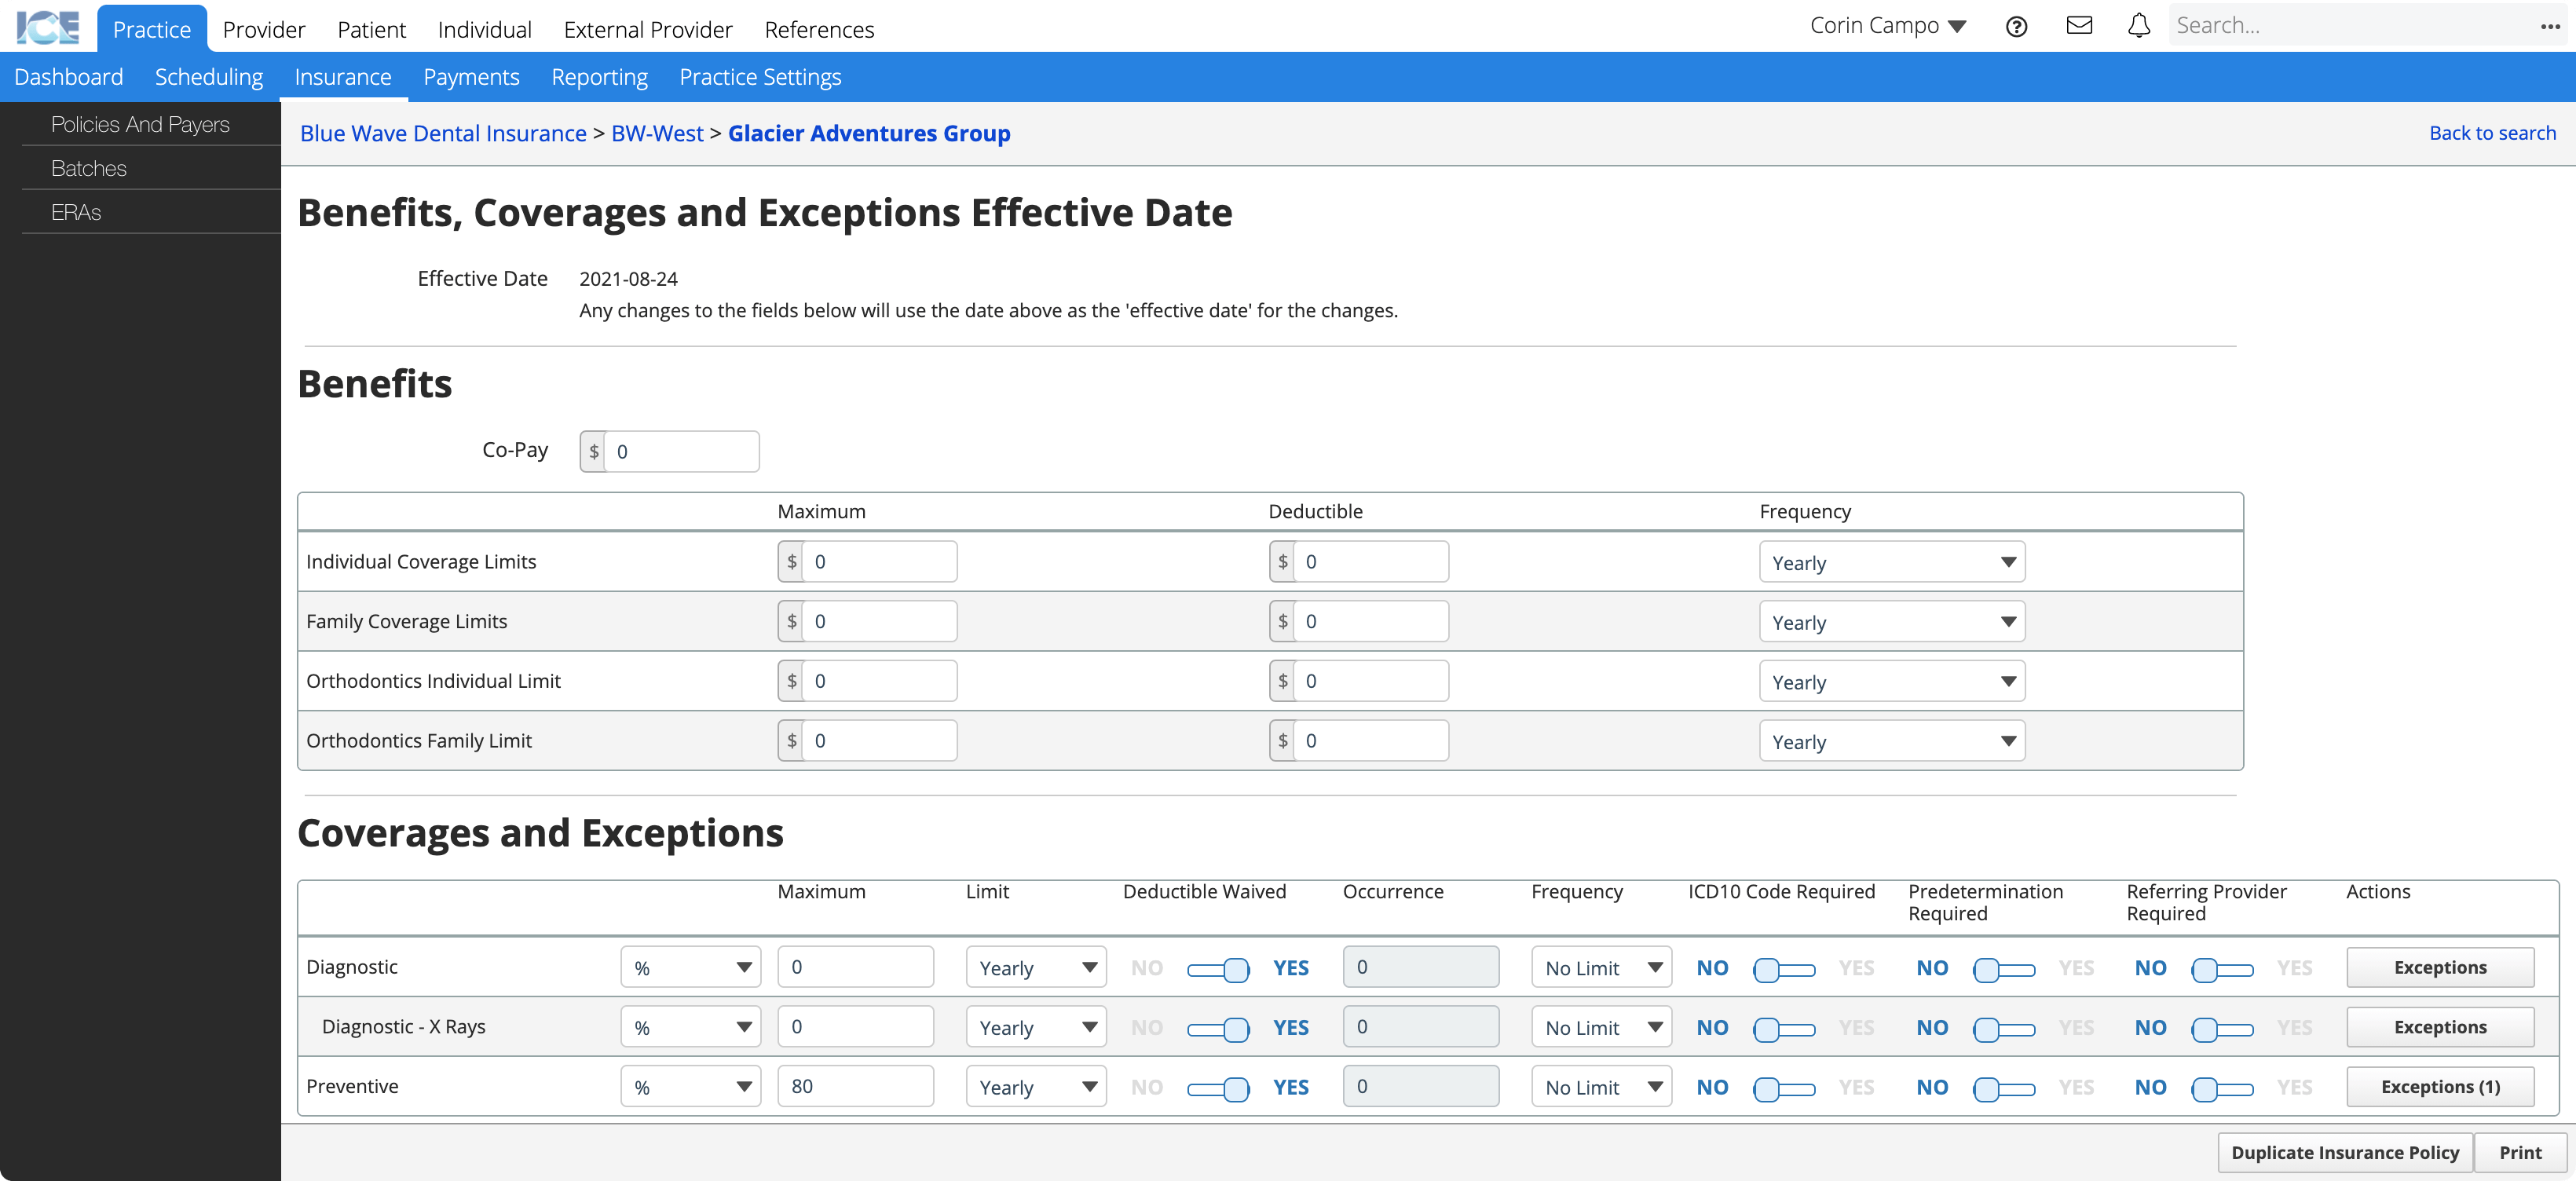
- Confirm the Effective Date for any changes you make
- Under Benefits, configure co-pay and the coverage limits by individual, family, and orthodontics
- Co-Pay: A fixed amount the patient must pay for each visit. Charged on the first billable procedure of the day.
- Maximum: The total maximum coverage amount the policy provides by year or lifetime.
- Deductible: A fixed amount the patient must pay per year before insurance provides coverage.
- Frequency: If there is a maximum coverage limit, is it set yearly or for the patient's lifetime?
- Under Coverages and Exceptions, configure the standard coverage values for procedures in each category
- Coverage Type: Is coverage by percentage or amount?
- Maximum: What is the max coverage percentage or amount for this category?
- Limit: If there is a max coverage amount for this category, is it set yearly or for the patient's lifetime?
- Deductible Waived: Is the deductible waived for this category?
- Occurrence: How many times can a patient be reimbursed for procedures in this category? Requires a frequency of yearly or lifetime.
- Frequency: If there is an occurrence limit, is it set yearly or for the patient's lifetime?
- Predetermination Required: Does this policy require a predetermination claim for all procedures in this category?
- ICD10 Code Required: Does this policy require an ICD10 diagnostic code submitted with all procedures in this category?
- Referring Provider Required: Does this policy require a referring provider submitted with all procedures in this category?
The system saves your changes automatically.
Configure a coverage exception
You can configure code-specific coverage exceptions for procedures that the policy defines special requirements or limits for.
For example, the policy covers most Preventive category procedures at 80% but doesn't cover fluoride treatment for patients older than 16.
The Exceptions button in the Coverages and Exceptions table displays a count of the exception rules configured for each category.
- Select Exceptions in the Actions column
- Select Add Exception
- Enter the required information
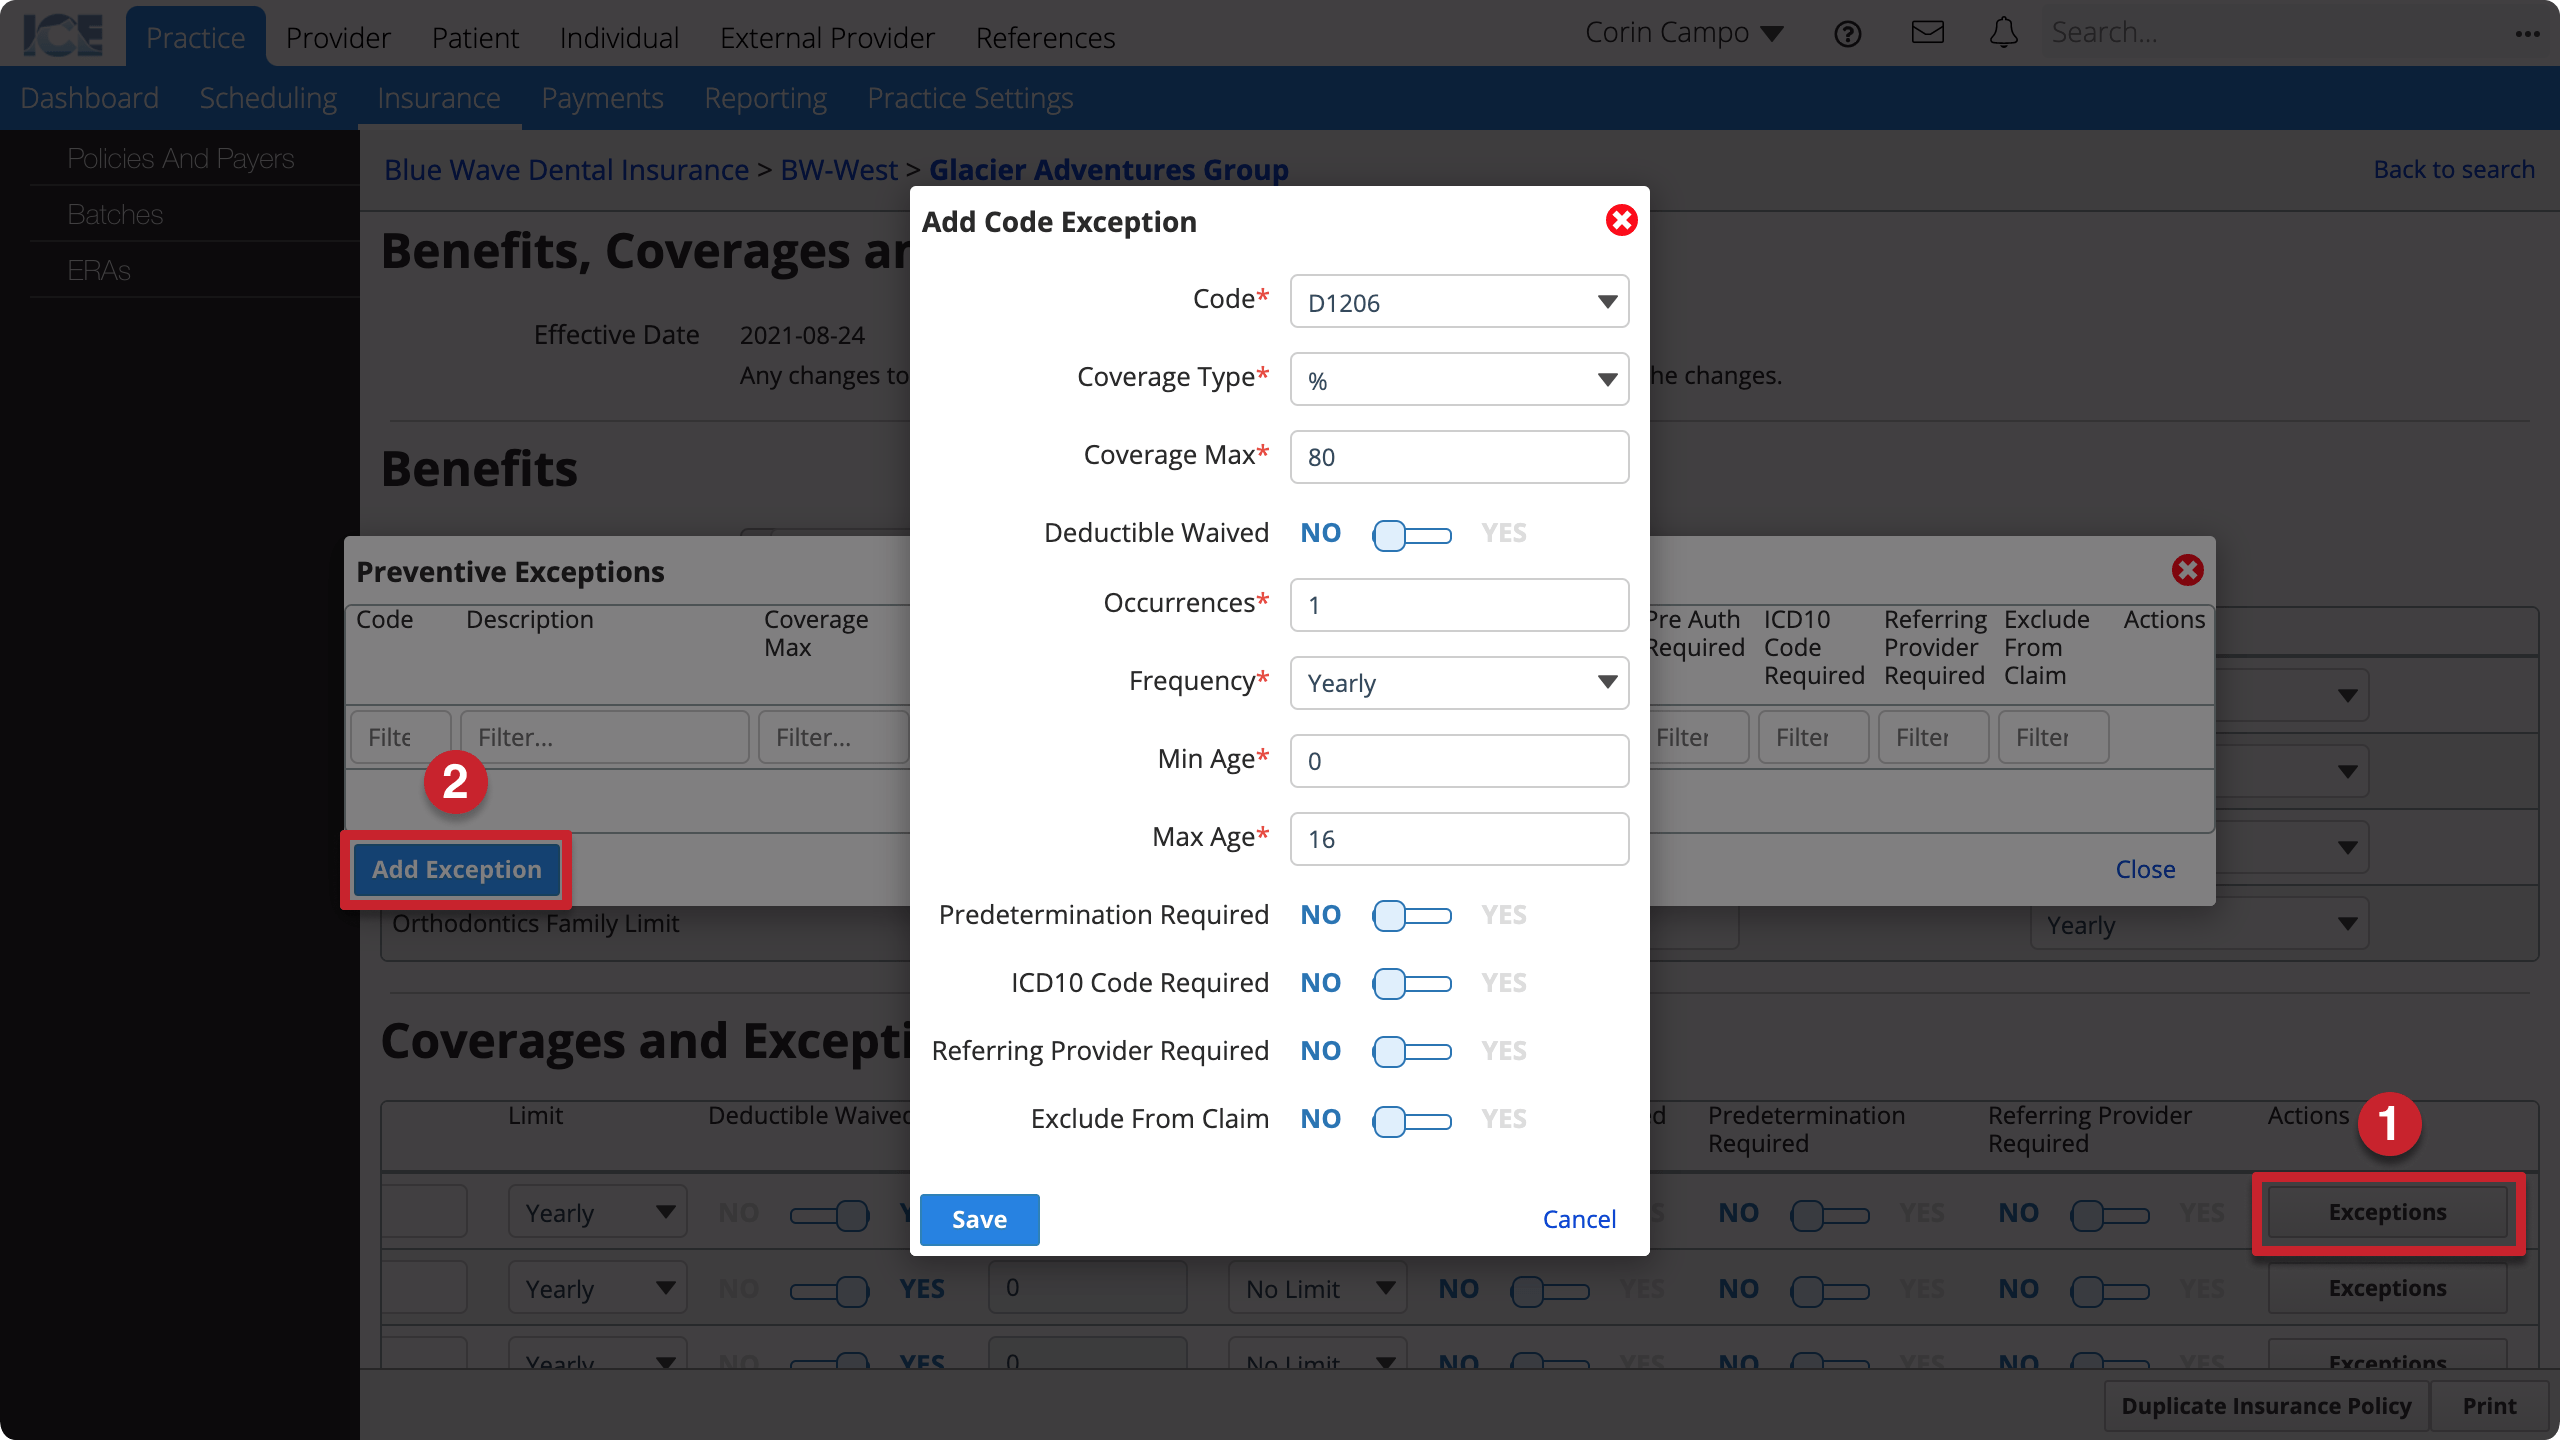
- Code: What procedure code is this exception for?
- Coverage Type: Is coverage by percentage or amount?
- Coverage Max: What is the max coverage for this procedure?
- Deductible Waived: Is the deductible for this procedure waived?
- Occurrences: How many times can a patient be reimbursed for this procedure? Requires a frequency of yearly or lifetime.
- Frequency: If there is an occurrence limit, is it set yearly or for the patient's lifetime?
- Min Age: At what age does this policy start covering this procedure?
- Max Age: At what age does this policy stop covering this procedure?
- Predetermination Required: Does this policy require a predetermination claim for this procedure?
- ICD10 Code Required: Does this policy require an ICD10 diagnostic code submitted with this procedure?
- Referring Provider Required: Does this policy require a referring provider submitted with this procedure?
- Exclude From Claim: Should the system exclude this procedure from claims it generates for this policy?
- Select Save
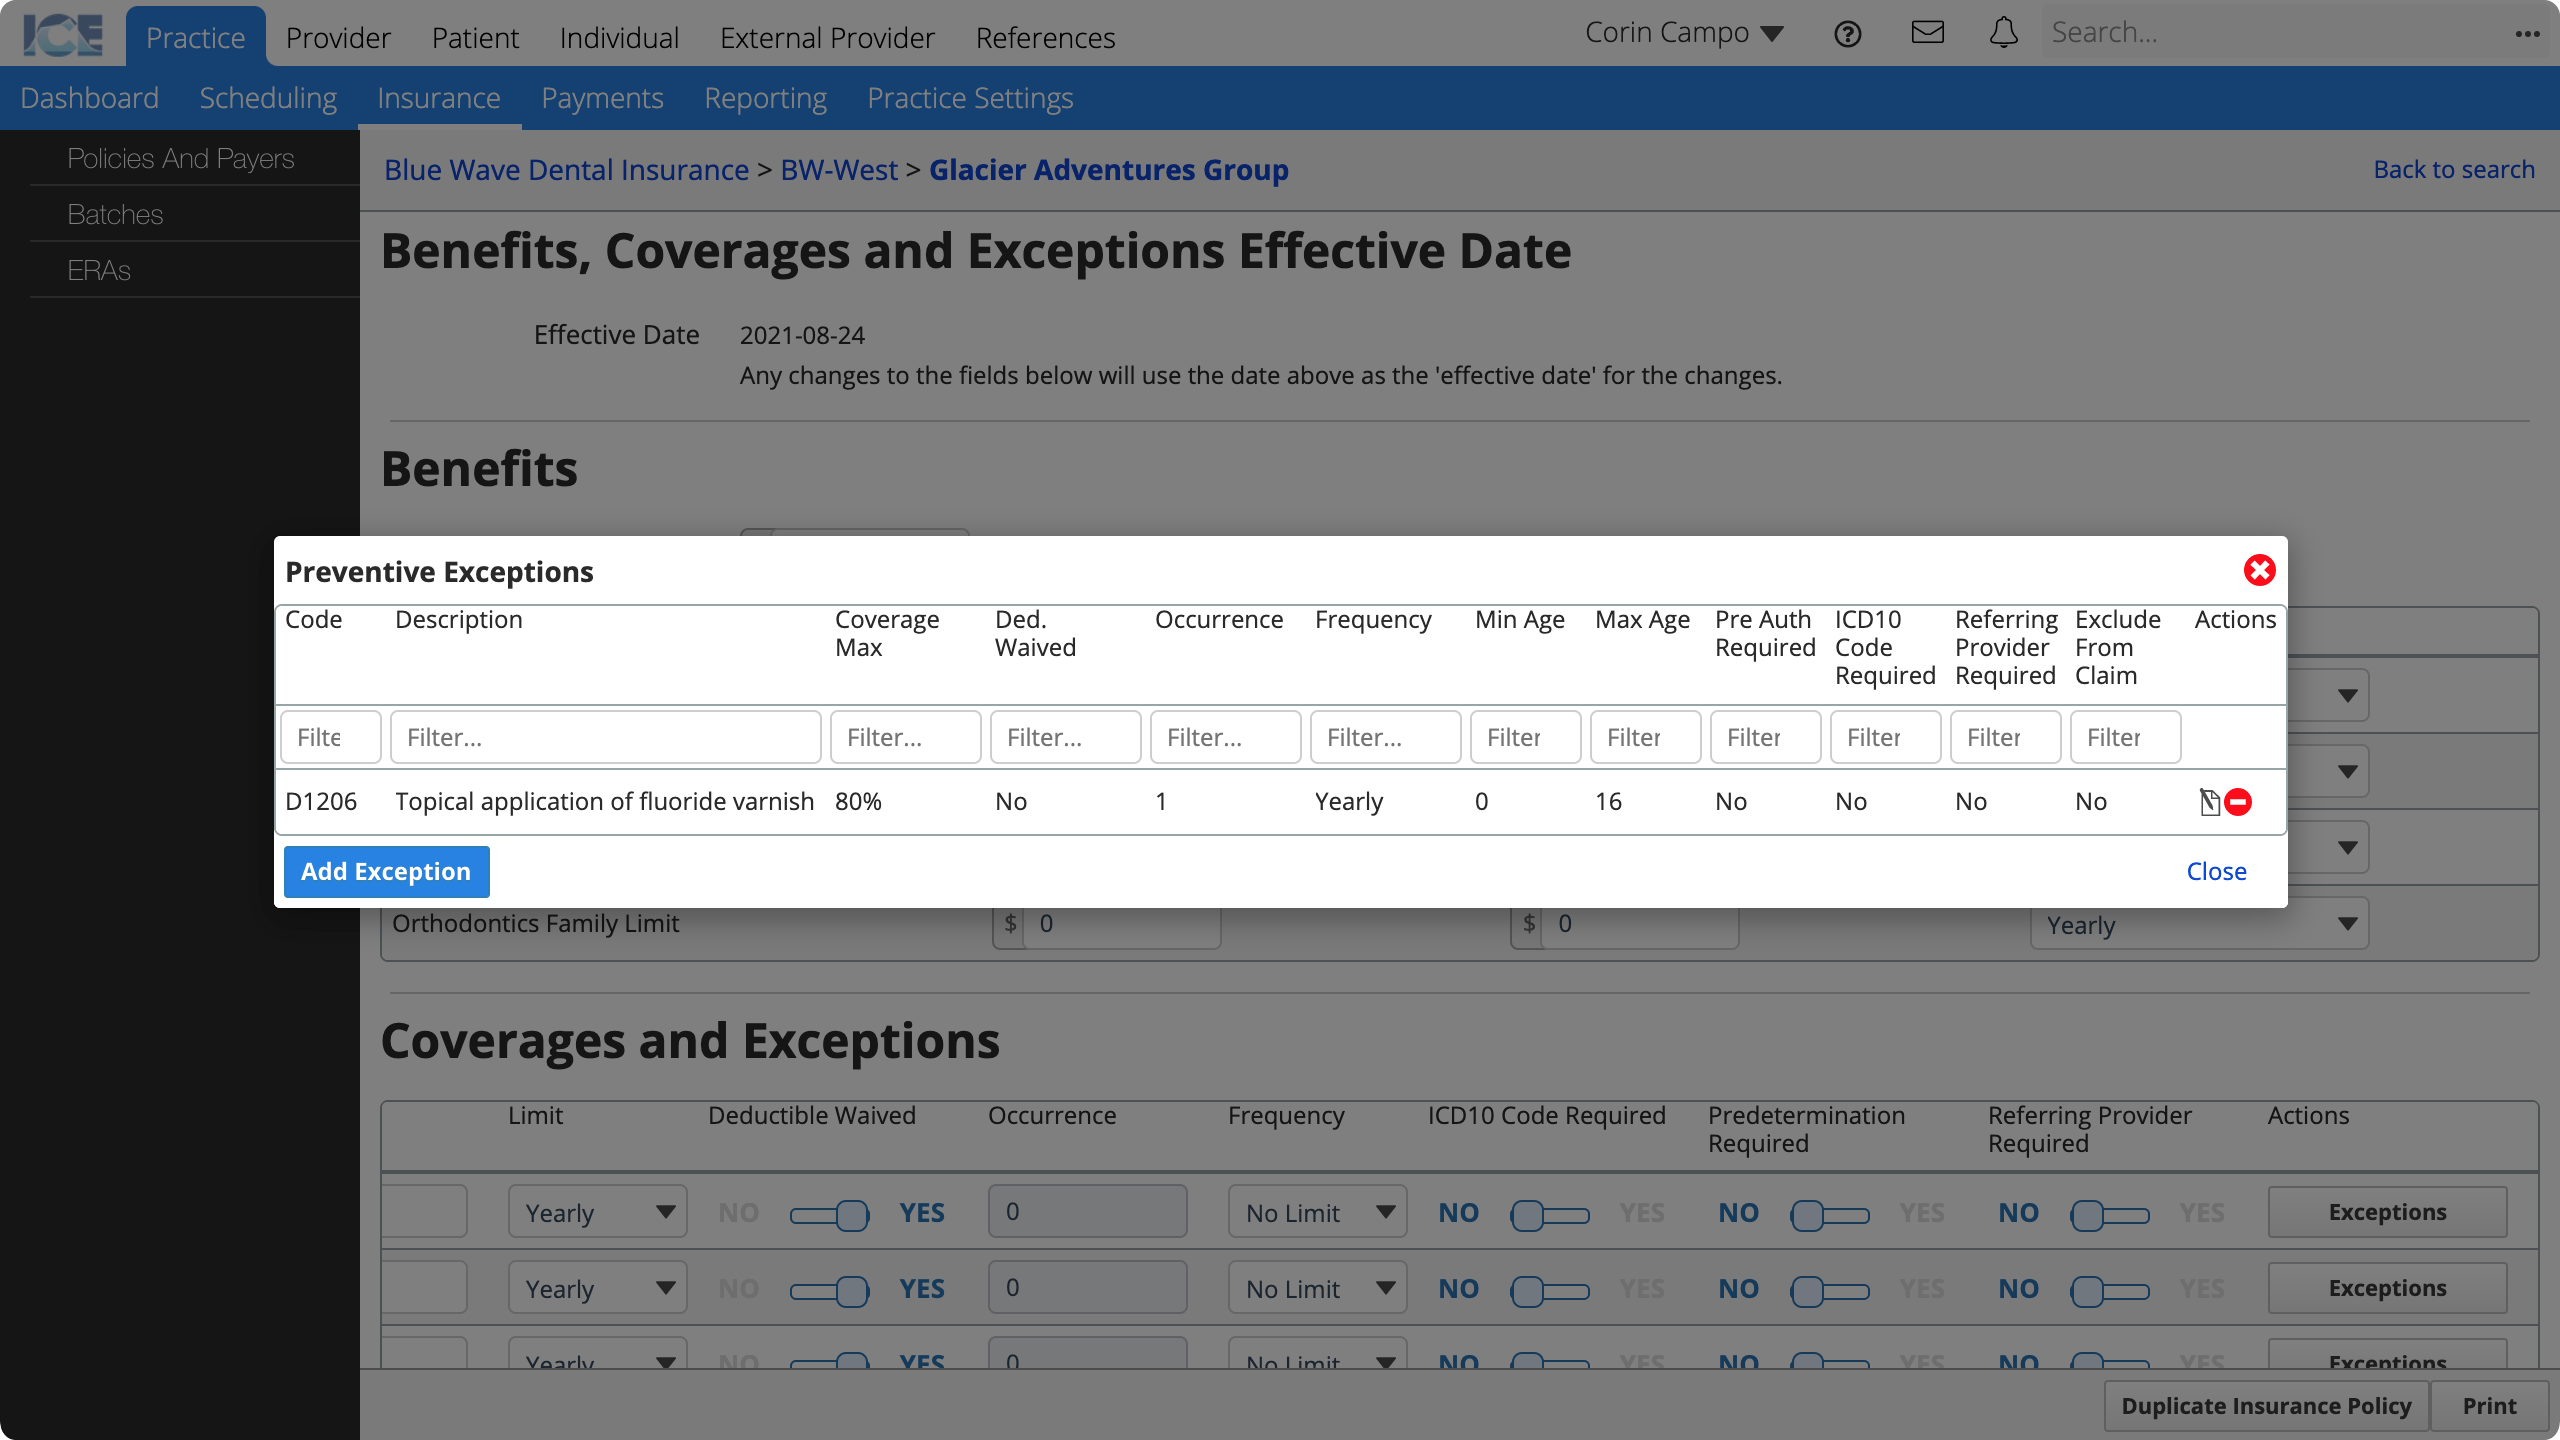
To edit an existing exception, select ![]() in the Actions column.
in the Actions column.
To remove an existing exception, select ![]() in the Actions column.
in the Actions column.
Add an employer to a policy
You can associate an employer with an insurance policy so that the policy is easier to find and identify in search.
- Go to Practice > Insurance > Policies and Payers
- Open the policy you want to configure
- For step-by-step instructions, see View a policy.
- Scroll down to Employer Details
- Search and select an employer from the Employer Search field
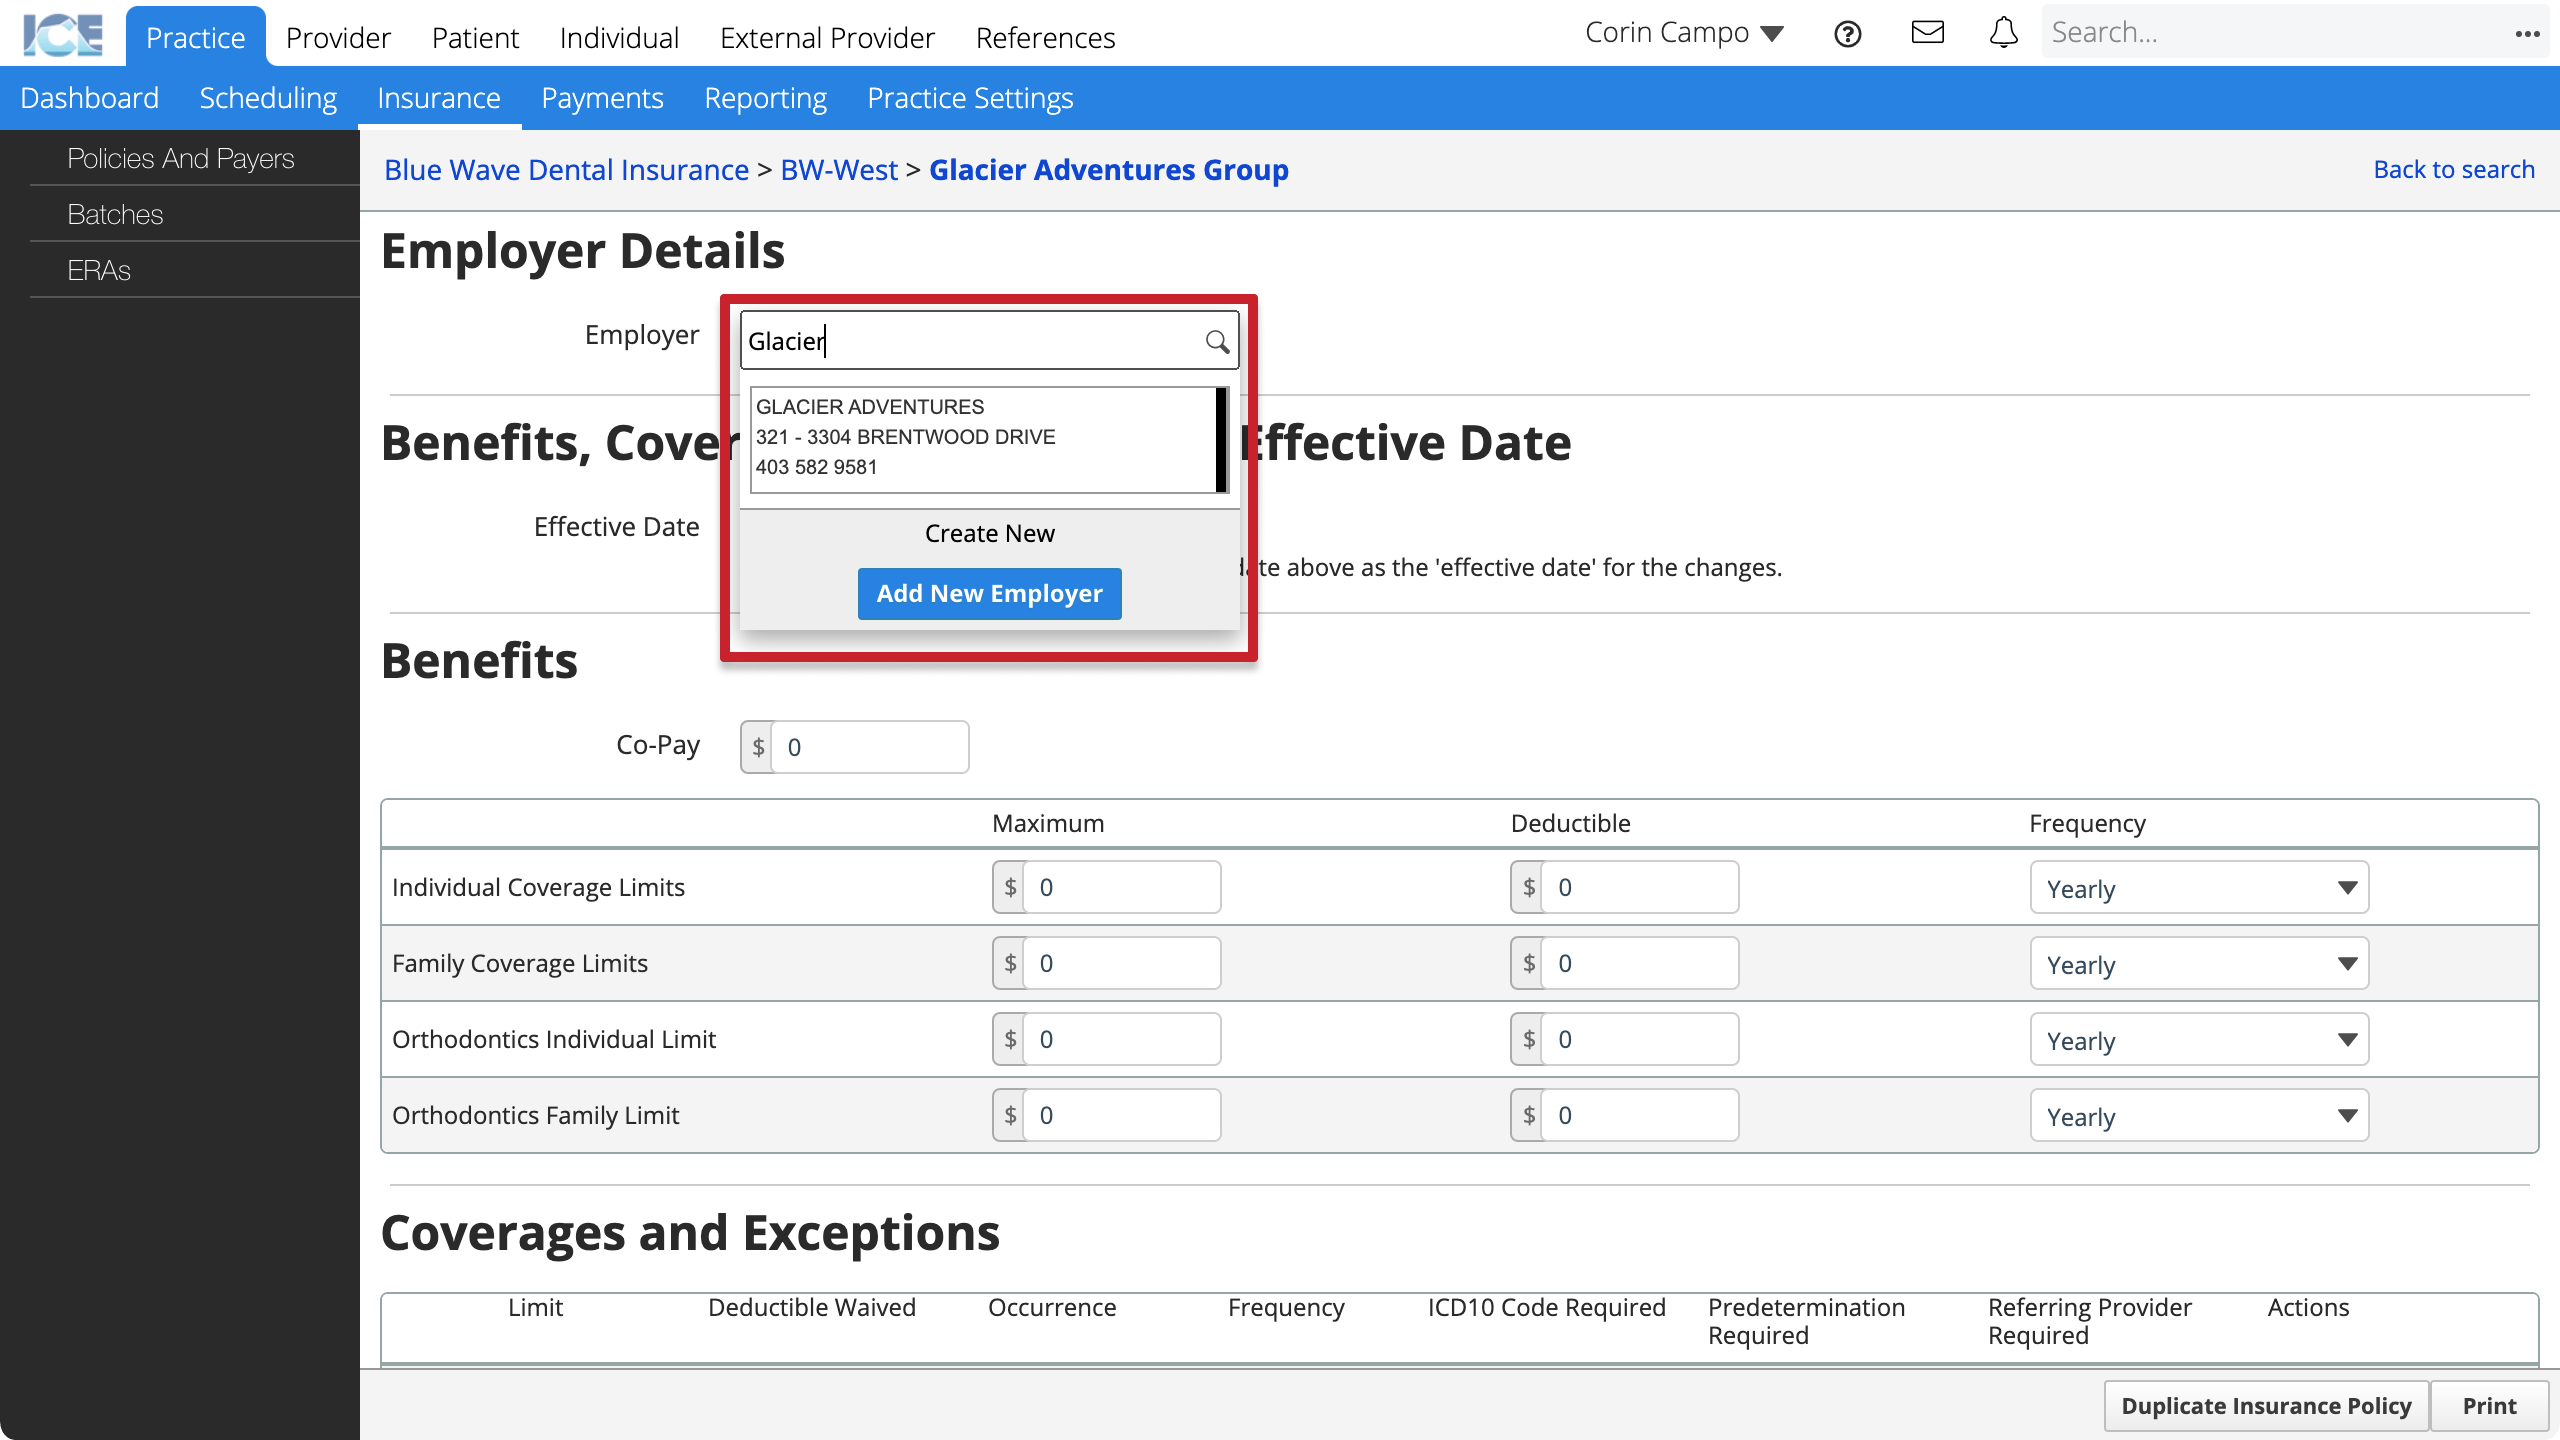
- If the employer doesn't have a record in the system:
- Select Add New Employer
- Enter the employer's name
- Select Save
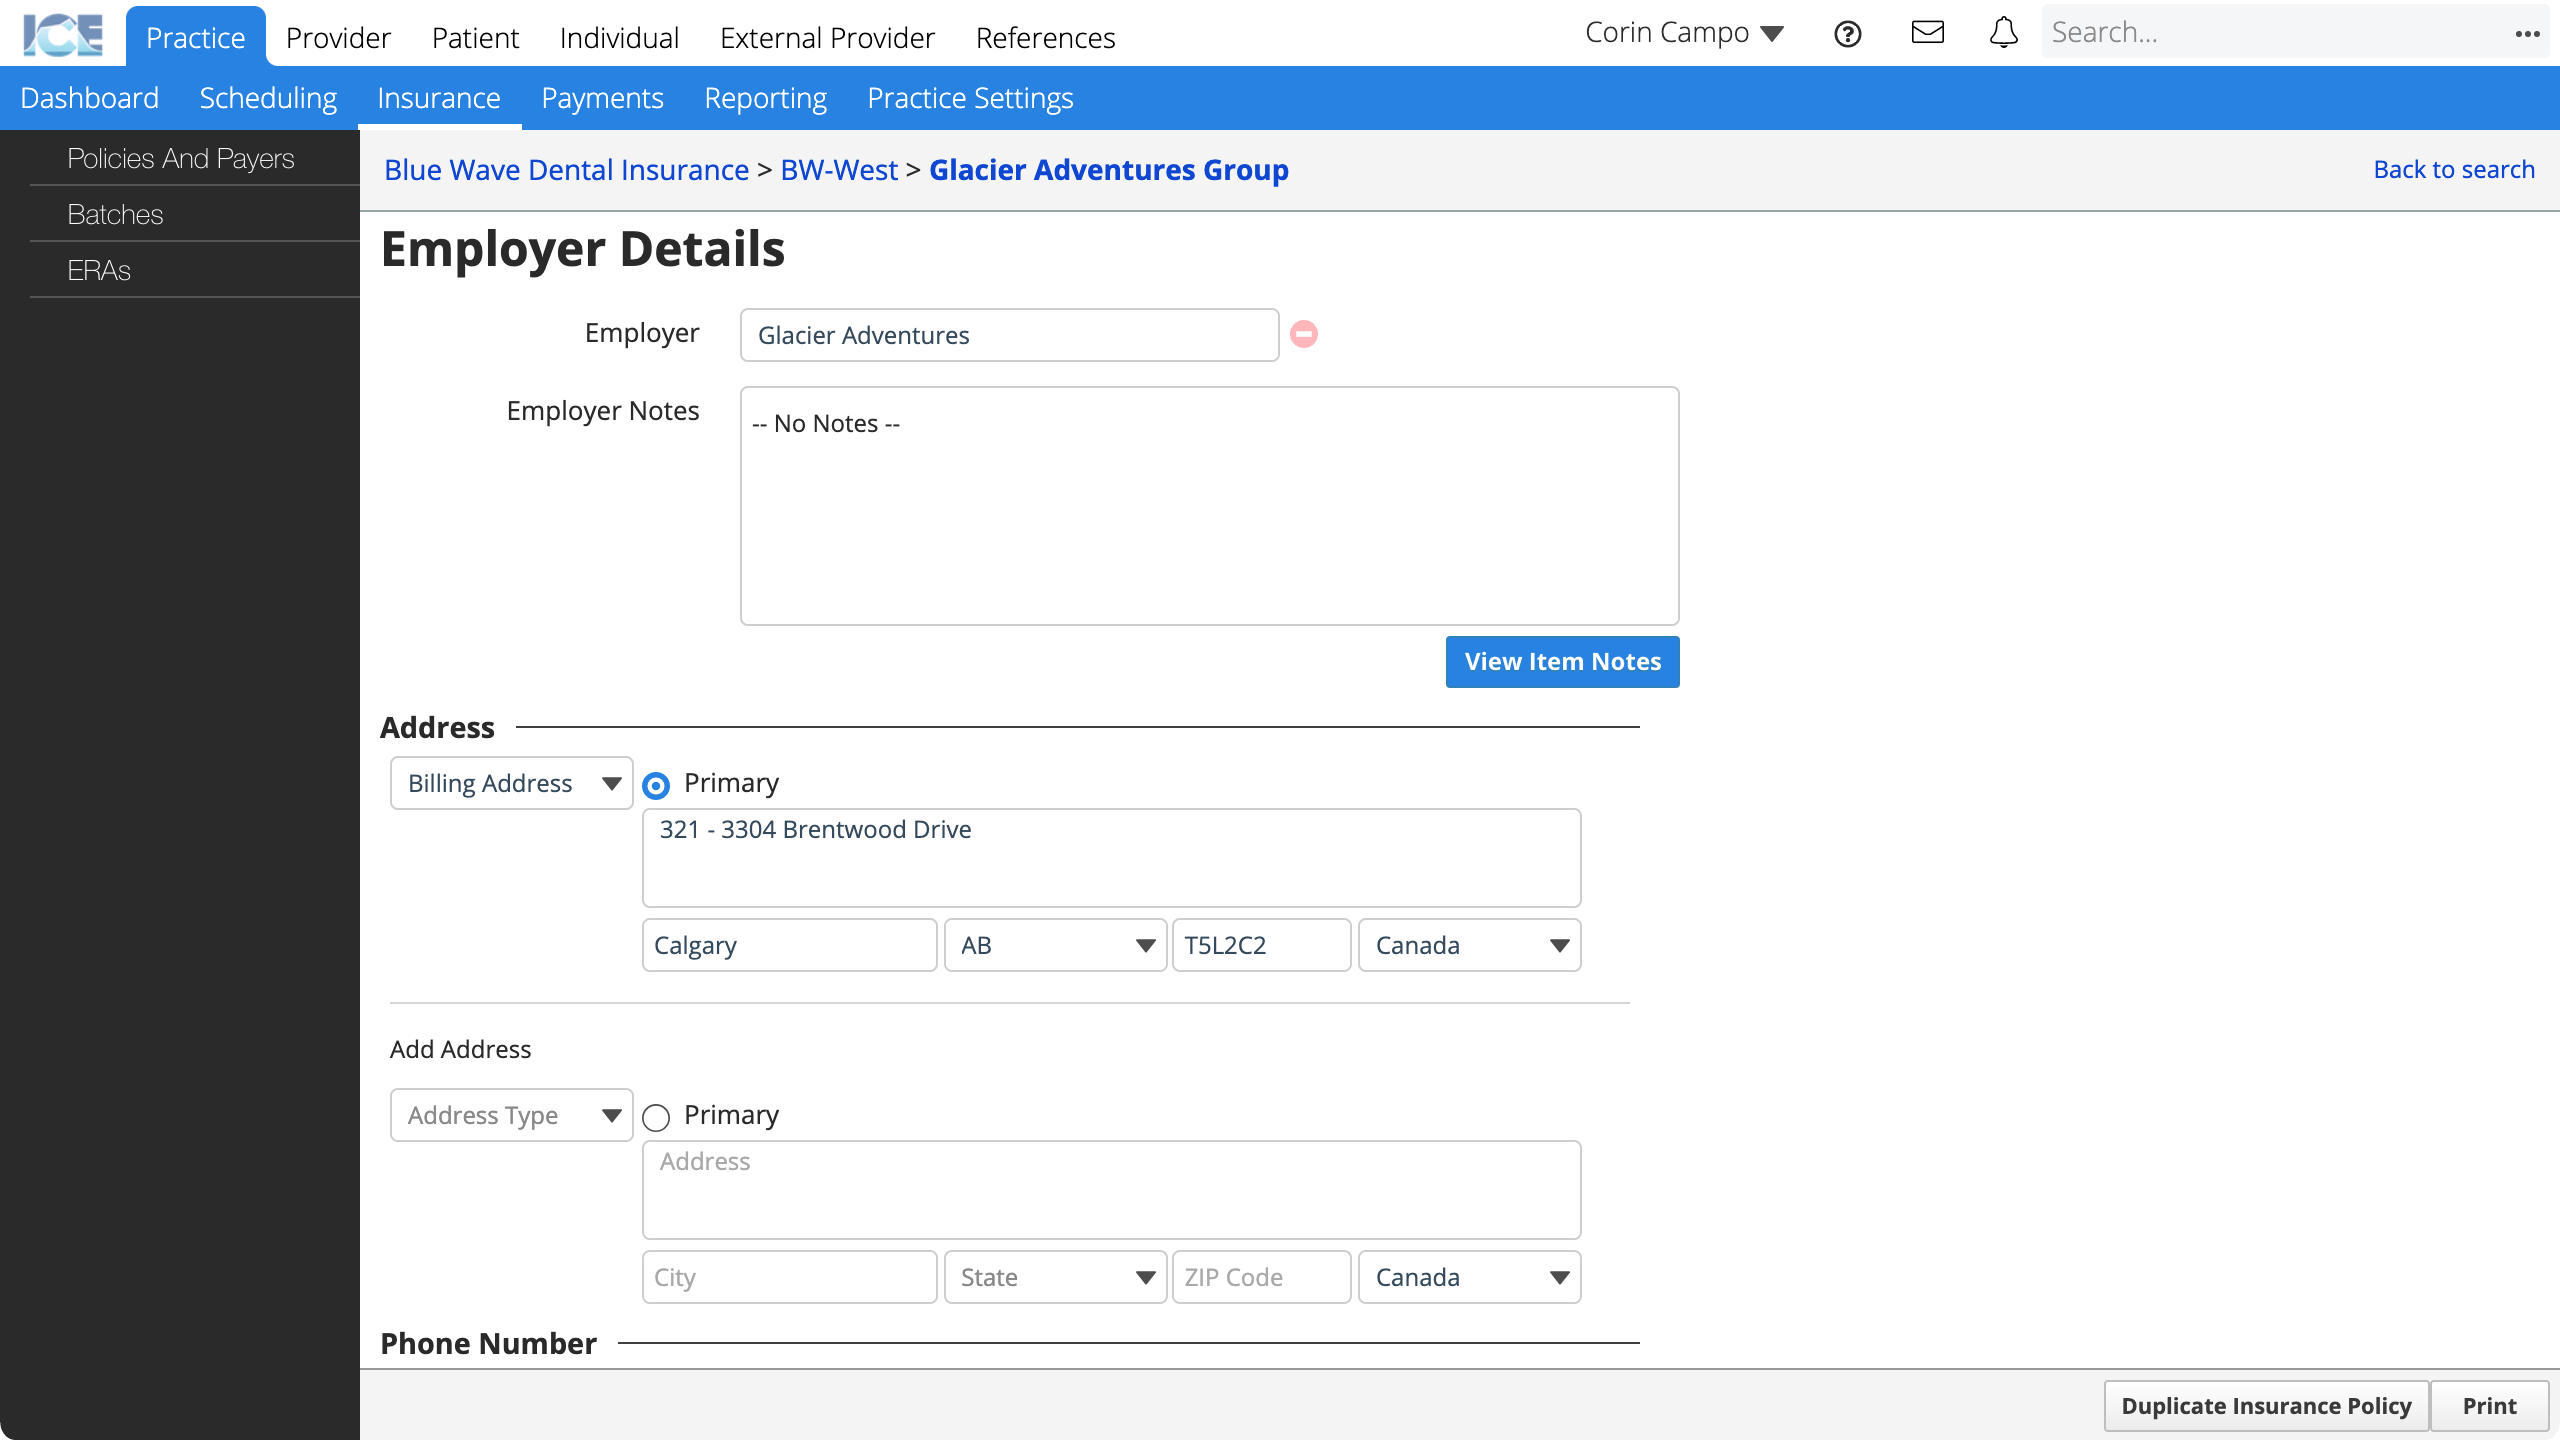
Now the employer is connected to the policy and you can view and edit address, phone, and email contact methods.
To remove an employer from a policy, select ![]() beside the employer's name.
beside the employer's name.
You can view and edit all employers from Practice Settings > Insurance. To learn more, see Practice settings: insurance
Duplicate a policy
If you already have a similar insurance policy for the same payer, you can reduce data entry by duplicating the existing policy and updating its details.
- Go to Practice > Insurance > Policies and Payers
- Open the policy you want to configure
- For step-by-step instructions, see View a policy.
- Select Duplicate Insurance Policy in the bottom-right corner
- Enter the required information
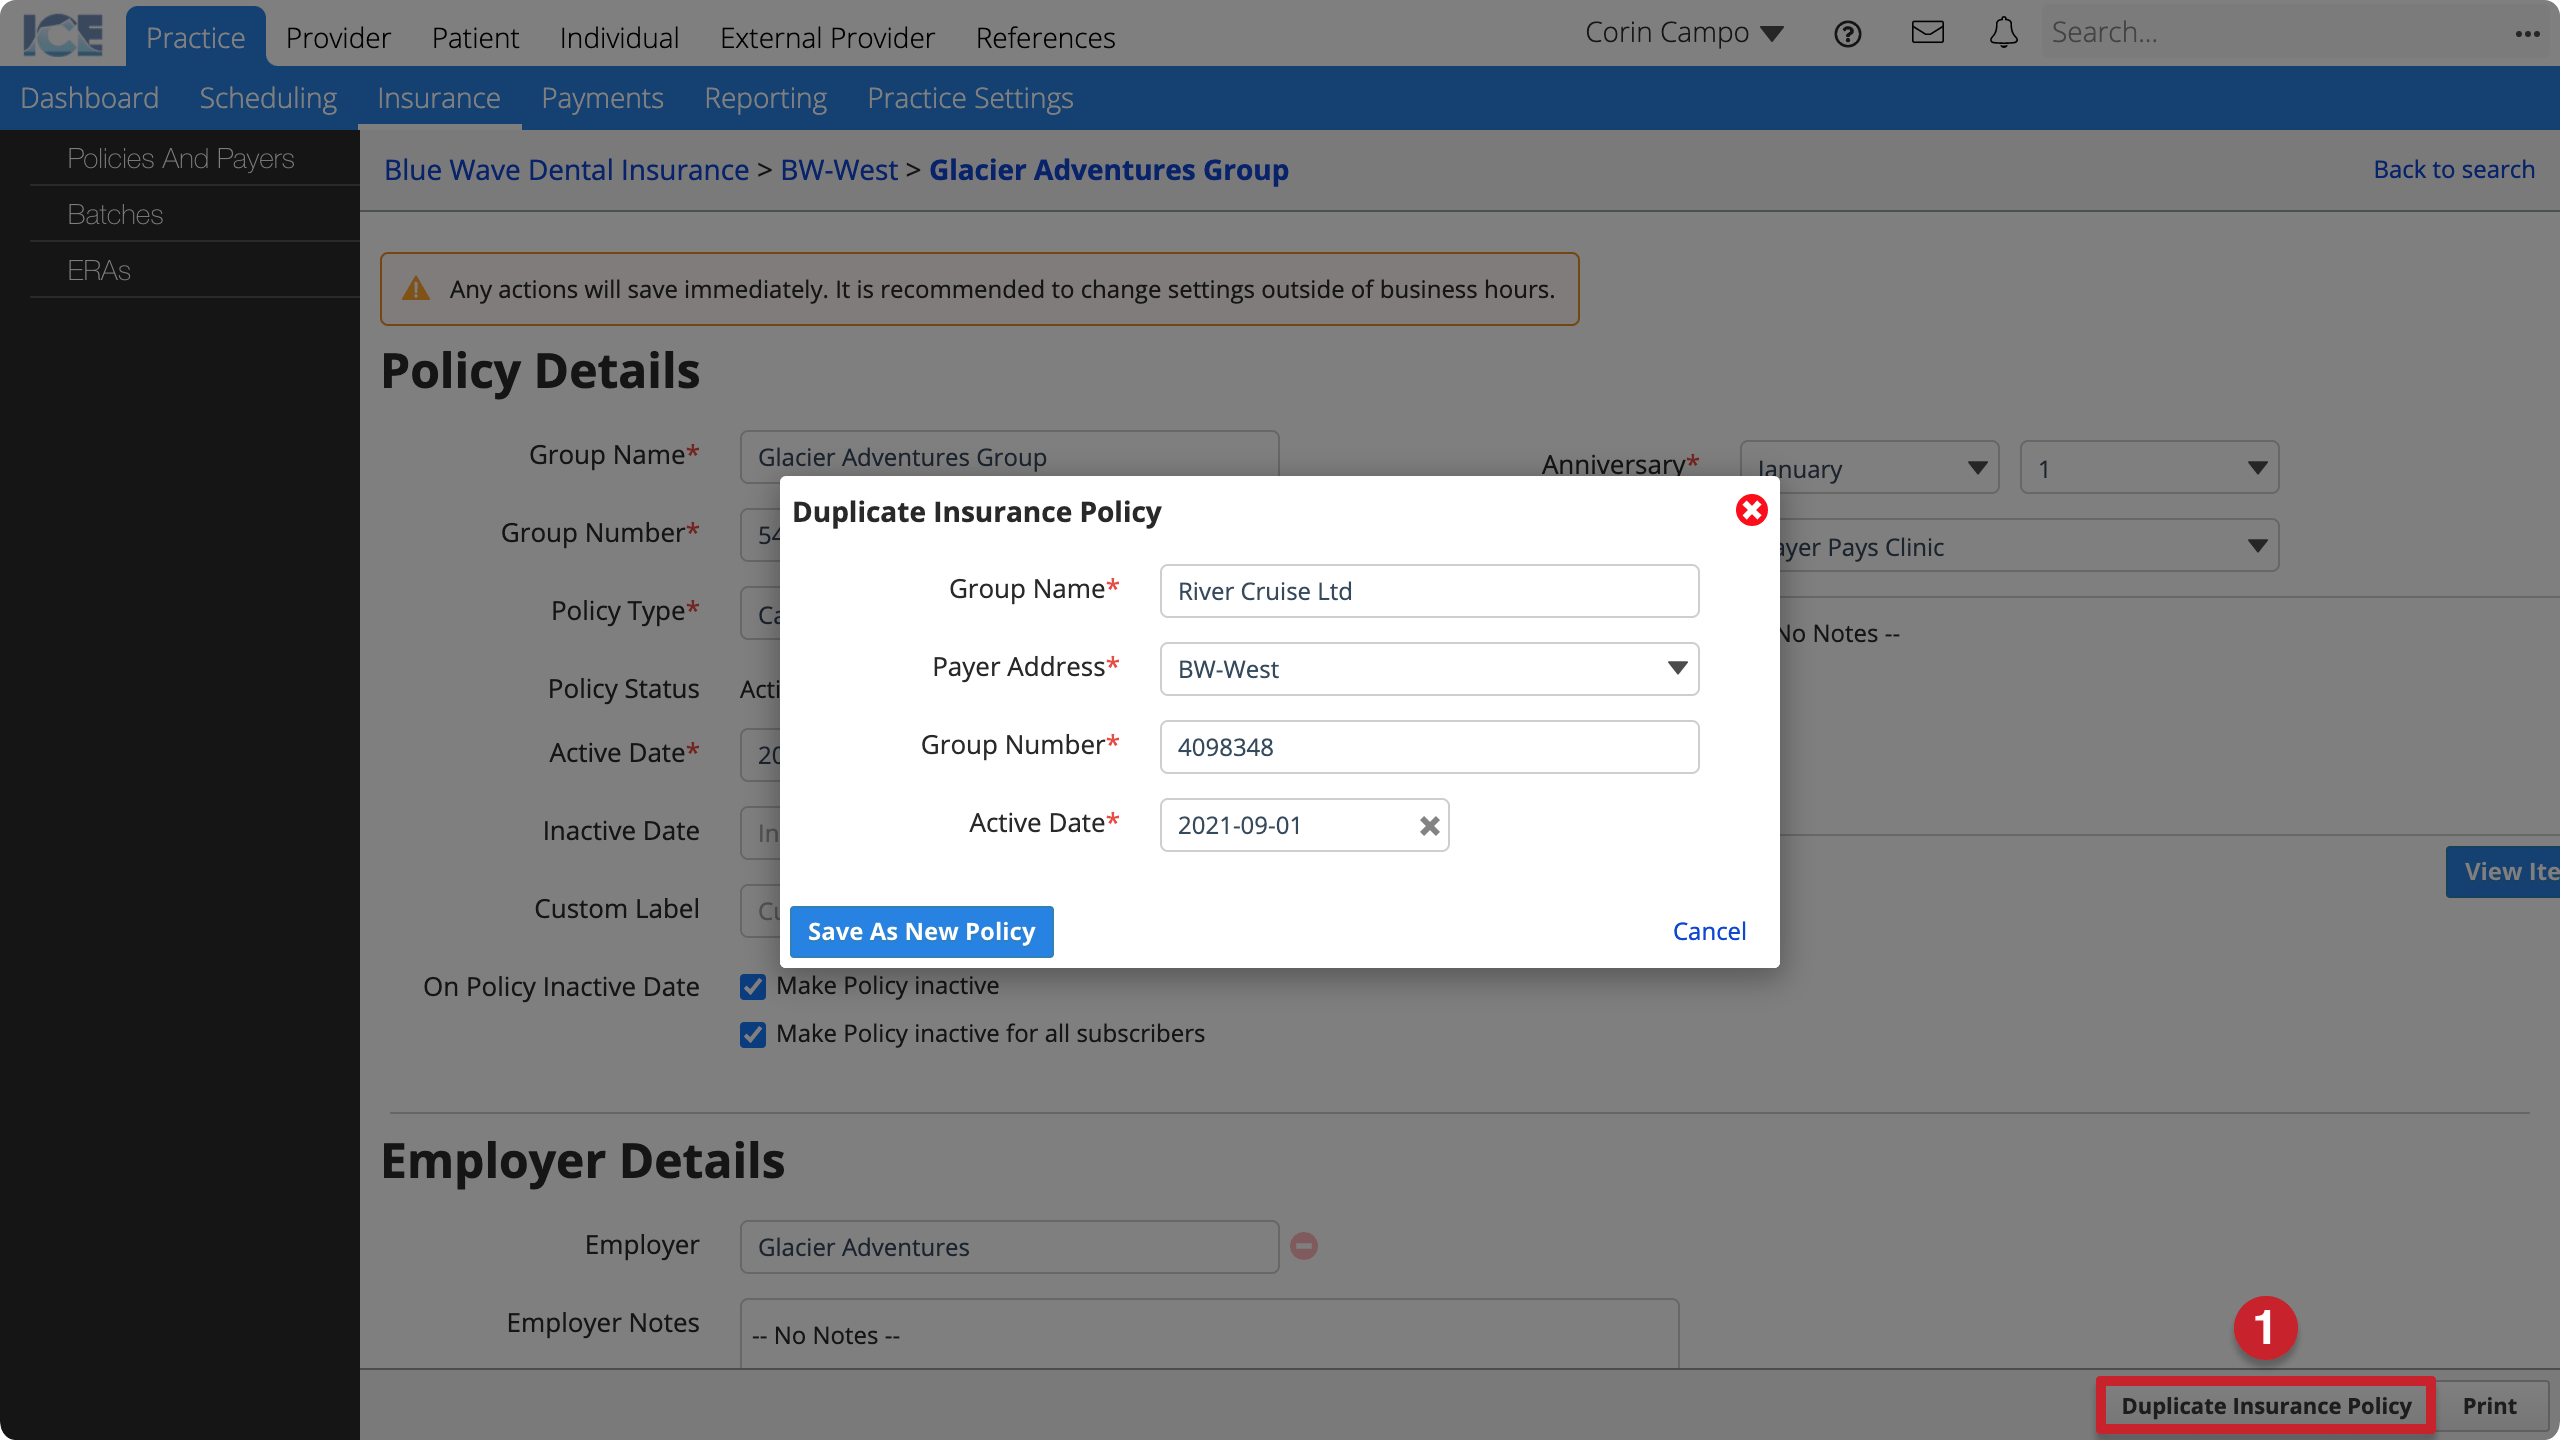
- Group Name: The policy's group name that appears on claims and throughout the system.
- Payer Address: Which of the payer's addresses does this policy belong to?
- Group Number: The policy's group number that appears on claims and throughout the system.
- Active Date: When is treatment eligible for coverage under this policy?
- Select Save as New Policy
- The policy's screen loads so you can:
- Update policy details.
- Add employer details to the policy.
- Configure the policy's benefits, coverages and exceptions.