Practice settings: financials
There are a number of Practice Settings that relate to various aspects of configuring your practice's financial tools and workflows. Go to Practice > Practice Settings > Financials to configure them.
If you are configuring settings that save automatically, consider making your changes outside of business hours in order to limit disruption to anyone actively using the system. Settings that save automatically are marked with an orange notice message.
Account Buttons
Change the titles, colors, and order of the account buttons displayed above the ledger in patient financials to better match how your practice works.
- Go to Practice > Practice Settings > Financials > Account Buttons
- Select
 under the Actions column to edit the title or color of an account button
- Select Save to save your changes, or Cancel to discard them.
- Select
 and drag the account button to its new location to change the order account buttons appear in financials
The system saves your changes automatically.
Administrative Charges
Administrative charges allow users to add charges to a patient record that are not tied to procedures in Charting. Administrative Charges are calculated as either specific dollar amounts or as a percentage of the patient's balance.
You can also use administrative charges for insurance non-patient payments, e.g., insurance payer interest payments, HMO payments, or physician adjustment payments.
To add a new administrative charge:
- Go to Practice > Practice Settings > Financials > Administrative Charges
- Select Add Administrative Charge
- Complete the required fields

- Code: The short description that appears when selecting a charge.
- Description: The longer description that appears on the ledger and transaction history.
- Payer Type: Is this charge against a patient or an insurance account?
- Price Type: Is this charge a specific dollar amount or a percentage calculated from the patient's outstanding balance?
- Only patient charges can be configured as a percentage.
- Default Amount: The value that is auto-filled when the charge is added. It can be edited.
- Status: Active charges appear for use in the system. Inactive charges cannot be used, but appear in historical references.
- Select Save
To edit an existing administrative charge, select ![]() in the Actions column.
in the Actions column.
Adjustment Code Groups
Adjustment Code Groups allow you to organize multiple adjustment codes into manageable groups.
To add a new adjustment code group:
- Go to Practice > Practice Settings > Financials > Adjustment Code Groups
- Select Add Adjustment Code Group
- Complete the required fields

- Code Group: The name of the code group that appears when adjusting a transaction in financials or when grouping adjustments in Practice Settings.
- Description: A longer description that only appears here in Practice Settings.
- Status: Active groups appear for use in the system. Inactive groups cannot be used.
- Select Save
To edit an existing adjustment code group, select ![]() in the Actions column.
in the Actions column.
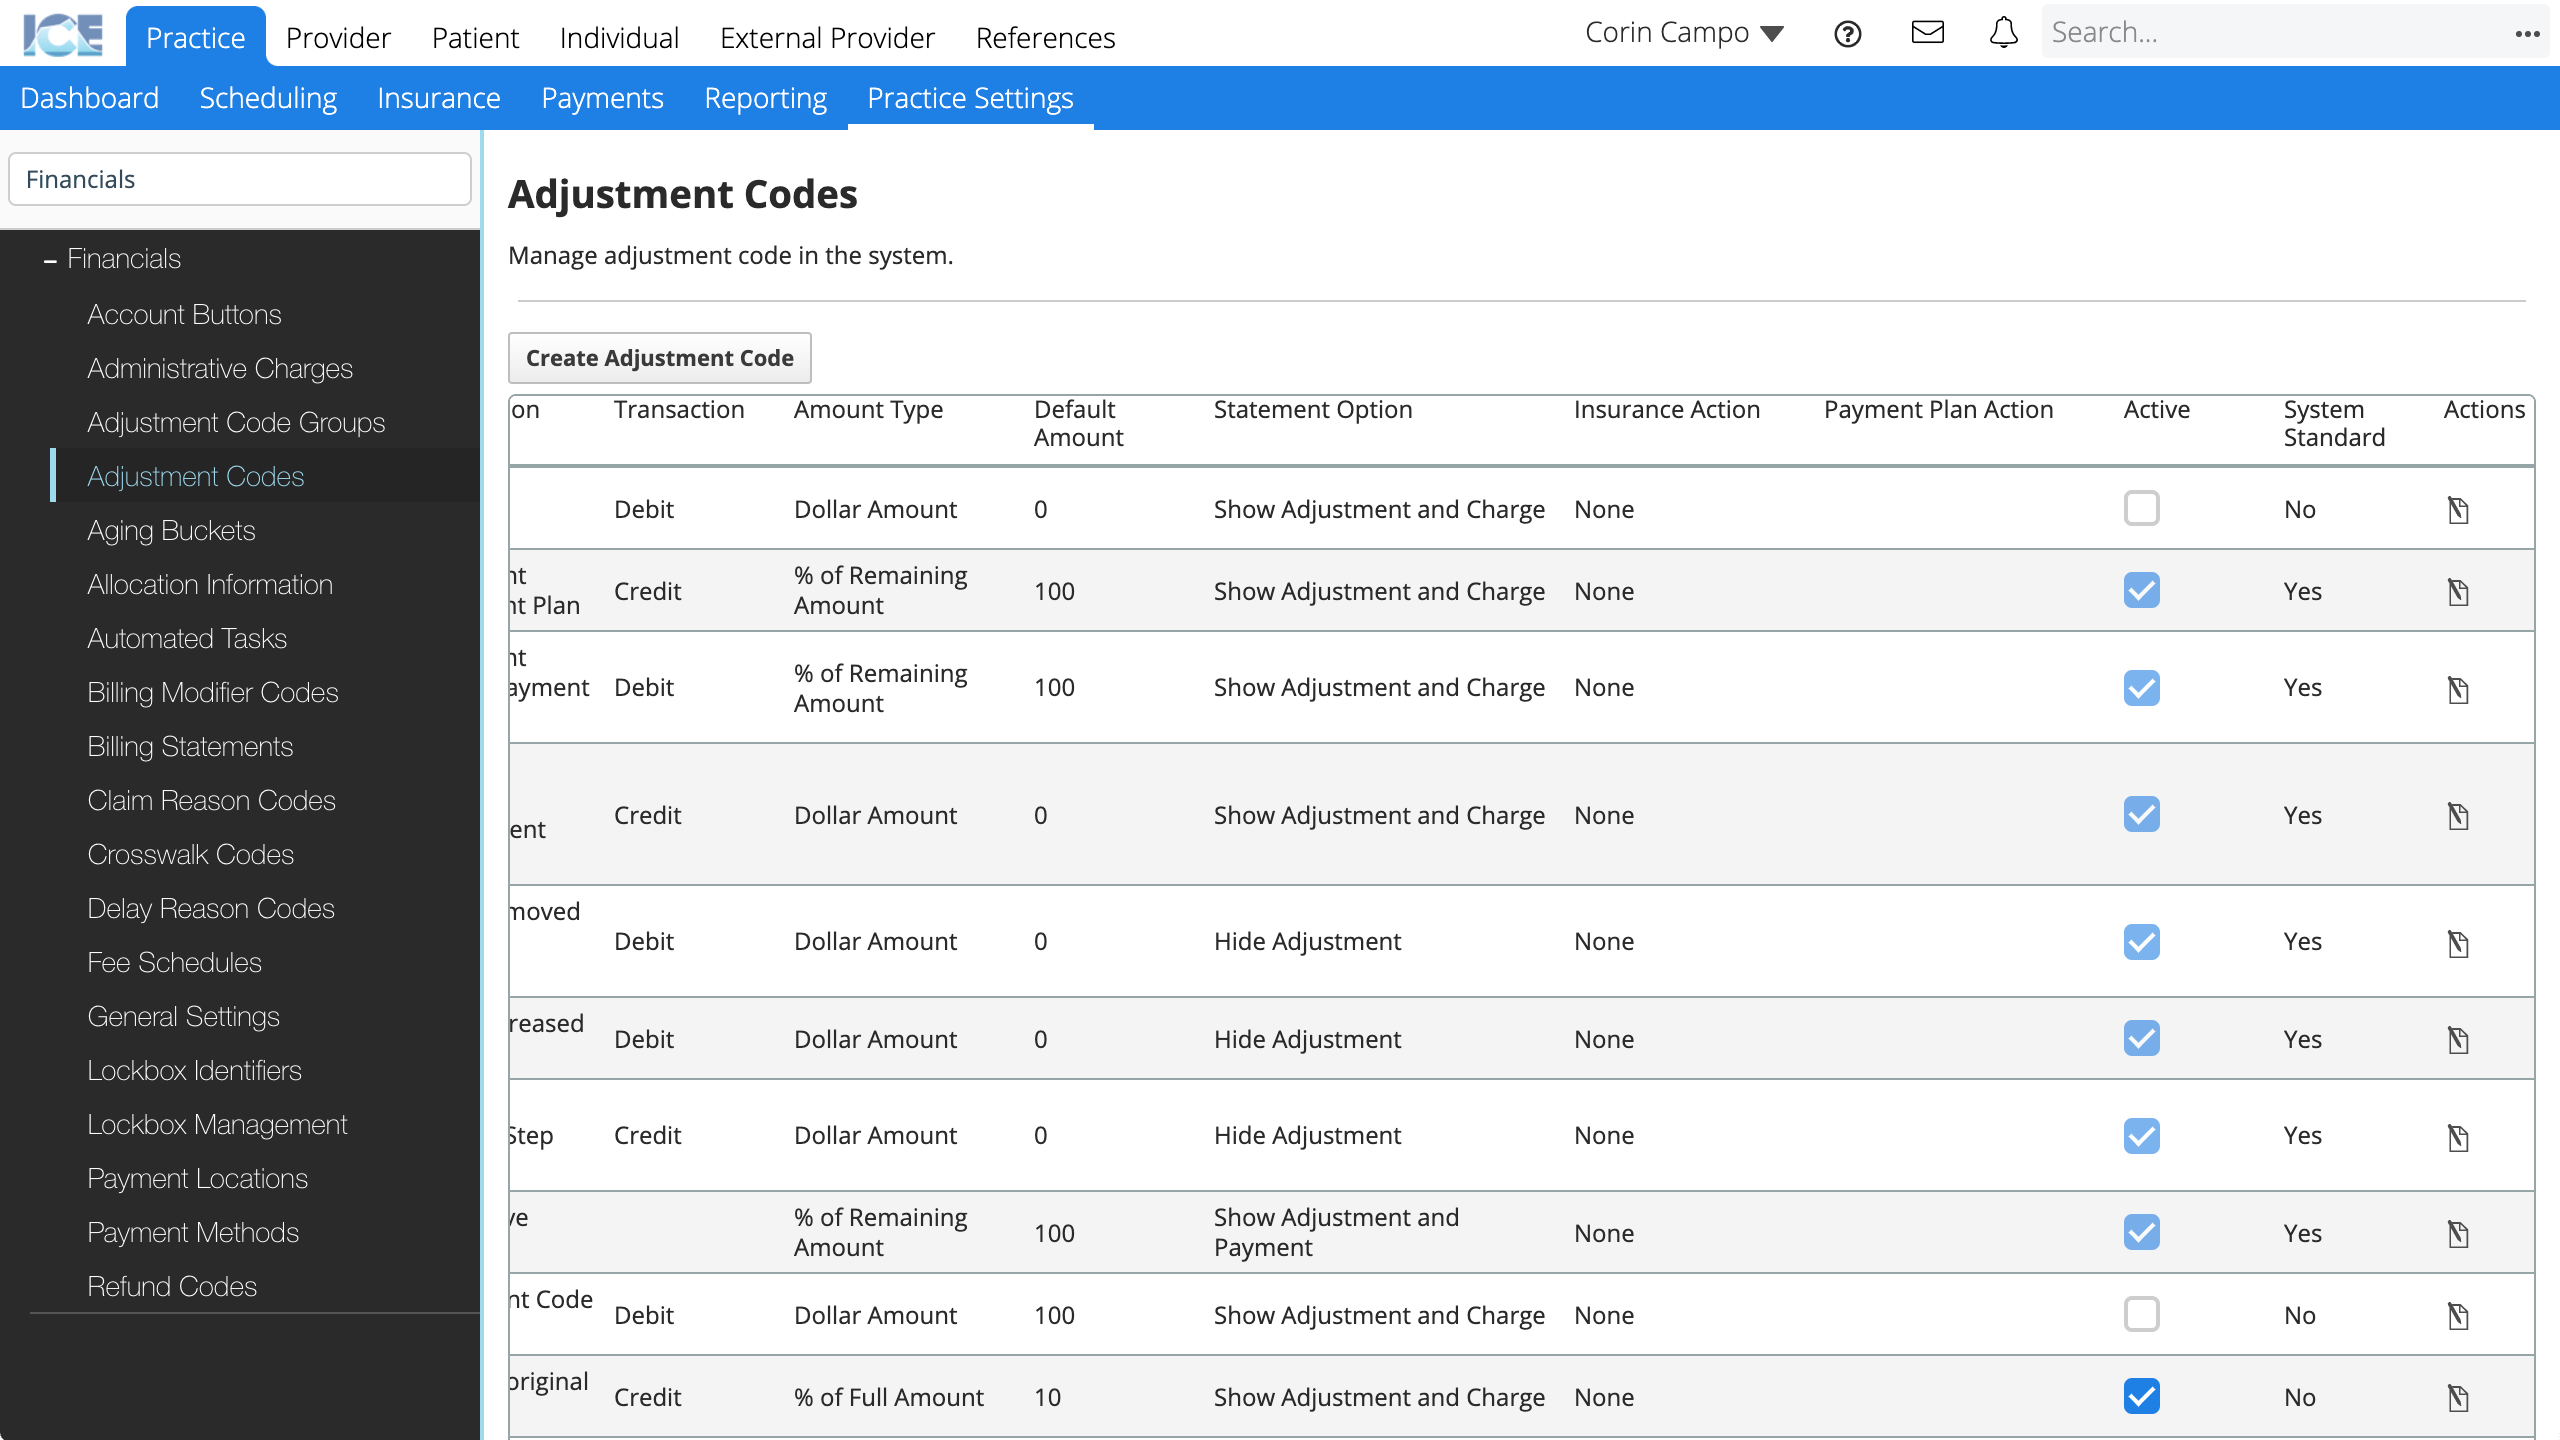
Adjustment Codes
When you want to add an adjustment to a financial record, you pick from a number of adjustment codes configured in Practice Settings.
Each code represents a certain type of adjustment. It has predefined settings to control how it affects a transaction and its default amount. Afterwards you can run reports on that adjustment code to see how often it is used, who uses it, and how much has been adjusted with it.
For example, a Writeoff adjustment would be a: charge adjustment type, that credits 100% of the remaining charge balance to the guarantor or insurance account in order to bring the balance of the charge to 0.
To add a new adjustment code:
- Go to Practice > Practice Settings > Financials > Adjustment Codes
- Select Add Adjustment Code
- Update the available fields

- Adjustment Type: Choose the type of adjustment you want this code to be. This choice affects the options below it: some fields may become greyed out and uneditable, some fields may have fewer options than are listed here.
- Charge: Adjust the amount of a charge.
- Payment: Adjust the amount of a payment.
- Charge Transfer: Transfer the balance of a charge between guarantor and insurance accounts.
- Payment Transfer: Transfer an unallocated balance of a payment between guarantor and insurance accounts.
- Used to enable Insurance Negative Payments during EOB processing of insurance overpayments that create credits for a patient.
- Used primarily as a system adjustment, not an adjustment staff would enter unless you need to track custom codes for insurance overpayments to patient credit.
- Work: Transfer work amounts between expected revenue and work done.
- Used to manage work done and expected revenue that is calculated at different times for step sets or orthodontic treatment plans.
- Used only as a system adjustment, not an adjustment staff would enter.
- Code Group: What adjustment code group does this adjustment belong with?
- This group appears as a drop-down selection option when you add an adjustment.
- Code: The short description that appears when you add an adjustment.
- Internal Description: The longer description that only appears inside the system on the ledger and transaction history.
- External Description: The longer description that only appears on statements generated for a patient.
- Statement Options: How do you want this adjustment and associated transaction to appear on patient statements? Options vary for charge and payment adjustments.
- Show Adjustment and Charge: Useful for showing discounts or interest charges on a patient statement.
- Hide Adjustment: Useful for fixing clerical errors if you want to show the charge but not the correction adjustment.
- Hide Adjustment and Charge: Useful for fixing clerical errors if the charge and correction should not appear on a statement. The adjustment must credit 100% of the remaining amount.
- Show Adjustment and Payment: Useful for showing how a payment was transferred between accounts.
- Show Intended Payment: Useful for fixing clerical errors if you want to show the payment but not the correction adjustment.
- For example, if a payment of $100 was incorrectly entered and then adjusted to $110, only show the $110 payment on the ad hoc statement.
- If the adjustment is posted on a separate day, and the statement is run with the range to only include the original transaction and not the adjustment with the transaction, that original payment transaction will appear on the statement.
- Insurance Action: Does this adjustment affect insurance workflows?
- None: This adjustment has no special impact on insurance workflows.
- (Charge) Contractual Adjustment: Used for EOB processing when a charge on a claim is adjusted because of a contractual agreement with an insurance payer.
- (Charge) Insurance Denial: Used for EOB processing when a charge is denied and needs to be re-submitted.
- (Charge Transfer) Crosswalk Code: Used for transferring a charge between medical and dental payers.
- Payment Plan Action: Does this adjustment update the ortho payment plan schedule during EOB processing?
- Note: Most adjustments should leave this unchecked. It is intended for speciality adjustments focused on ortho payment plans.
- If yes, this adjustment updates the values of scheduled charges on an orthodontic payment schedule, without affecting the overall cost on the plan.
- If no, the outstanding amount expected from the ortho payment plan charge must be written off or transferred to the patient or secondary insurance. This is the standard workflow for processing claims unrelated to ortho payment plans.
- For example, if insurance was expected to pay $200 on a payment schedule but paid $180, you could adjust the $20 with an "Updates ortho payment plan schedule" adjustment.
- This updates the charge on the payment schedule to be $180.
- You then have to edit the payment schedule to account for the missing $20.
- Either by rebalancing the remaining lines, or increasing the cost of the next charge.
- Insurance continues to owe that $20, it just can be charged at a later date on the plan, instead of being written off or transferred.
- Adjustments with this setting toggled Yes appear when EOB processing under the Adjustment Types column.
- They display "(O)" beside the code to indicate they are used for orthodontic payment plan related charges.
- Transaction: Does this adjustment decrease or increase what the account owes?
- Credit adjustments decrease what the account owes.
- Debit adjustments increase what the account owes.
- Amount Type: Is this adjustment a specific dollar amount or a percentage calculated from the adjusted transaction's full or remaining value?
- Default Amount: The value that is auto-filled when the adjustment is added.
- If this default is editable, the amount is also editable when you add the adjustment.
- Select Save
To edit an existing adjustment code, scroll to the far right of the table and select ![]() in the Actions column.
in the Actions column.
To remove an existing adjustment code, scroll to the far right of the table and uncheck the checkbox in the Active column. Active adjustment codes appear for use in the system. Inactive adjustment codes cannot be used, but appear in historical references.
Aging Buckets
Define the various Aging Buckets to use in your practice. You can create up to 10 buckets. You can also choose to always show aging buckets in Financials or only when there is an outstanding balance for the patient.
- Go to Practice > Practice Settings > Financials > Aging Buckets
- Toggle Always Show to Yes if you want to always show aging buckets in financials
- Toggle Always Show to No if you want to only show them when there is an outstanding balance for the patient

- To create a new aging bucket, select Create New Aging Bucket
- Complete the required fields

- Bucket Name: The name that appears on the bucket in Patient > Financials.
- Description: A longer description that only appears here in Practice Settings.
- Day Range: The day range used by this aging bucket. Ranges cannot overlap between buckets.
- Account Status: The status label that appears in the account summary in Patient > Financials and on the Patient Financials panel.
- General Comment: This comment is added to the notes field of an ad hoc statement generated for a patient when the statement shows charges in this aging bucket.
- If the statement includes charges in multiple aging buckets, the message from the oldest charges is displayed.
- Non Ortho Payment Plan Comment: This comment is added to the notes field of an ad hoc statement generated for a patient when the statement shows non-ortho payment plan charges in this aging bucket.
- Ortho Payment Plan Comment: This comment is added to the notes field of an ad hoc statement generated for a patient when the statement shows ortho payment plan charges in this aging bucket.
- Status: Active aging buckets are used in Patient > Financials and reporting. Inactive aging buckets only appear in Practice Settings.
- Color: Configure the color of the aging bucket and related account status.
- A preview of the bucket color is included in the aging bucket table.
- Select Save
To edit an existing aging bucket, scroll to the far right of the table and select ![]() in the Actions column.
in the Actions column.
Allocation Information
Allocation is designating some or all of a payment to a billed charge or procedure.
Currently the only option is allocation in real time, as soon as the payment is made. Allocations can be edited after a payment is recorded.
- Go to Practice > Practice Settings > Financials > Allocation Information
- Update the Select When field

- Real time is currently the only option.
The system saves your changes automatically.
Automated Tasks
You can configure automated tasks to process various financial related jobs.
The available tasks, their frequency, and the next 5 executions are displayed in the Financials Automated Tasks table.
- Go to Practice > Practice Settings > Financials > Automated Tasks
- Find the task you want to edit, select under the Actions column

- Complete the required details

- Frequency: End of month, Daily, Weekly, Monthly, or Yearly?
- Days: What day or days should this task run on?
- Options vary depending on your frequency choice.
- Time: At what time should this task be run?
- Select Save
Billing Modifier Codes
When you chart a treatment using a CPT medical code, you can track up to four billing modifier codes per CPT code by selecting the requirements popover for a procedure and choosing Billing Modifier Codes.
To add a new billing modifier code:
- Go to Practice > Practice Settings > Financials > Billing Modifier Codes
- Select Add Billing Modifier Code
- Complete the required fields

- Modifier Code: The code that appears in charting when selecting billing modifier codes from the requirements popover for a medical code
- Description: The longer description that appears in charting when selecting billing modifier codes from the requirements popover for a medical code.
- Active Date: The date when this code becomes active for use.
- Status: Active codes appear for use in the system. Inactive codes cannot be used, but appear in historical references.
- Select Save
To edit an existing billing modifier code, select ![]() in the Actions column.
in the Actions column.
Billing Statements
Billing statements provide a summary of the services provided to a patient for a defined amount of time. In Practice Settings, you can assign a letterhead to each clinic group so that statements look different depending on the clinic group they represent.
You can define separate letterhead settings for ad hoc statements and EDI statements.
You can generate ad hoc statements from the patient dashboard using the Files panel or from patient financials. To learn more about creating ad hoc statements, see Create an ad hoc statement.
- Go to Practice > Practice Settings > Financials > Billing Statements

- Statement Type: Confirm whether you want your statements to display items nested by charge or only listed by date
- Description Character Length: Set a character limit for the descriptions of charges, adjustments, and payments displayed on the statement
- Show Surfaces: Confirm whether you want to show procedure surfaces on your statements
- Generic Statement Message: Enter a generic statement message that appears on all statements, between the patient address and statement activity

- Select a letterhead from the drop-down menu to use for each clinic group in your practice

- To add a new letterhead template, go to Practice > Practice Settings > Practice Information > Letterhead Template.
- Toggle if you want to always use branding
- If you select no, the person generating a statement can decide whether or not to use branding each time.
The system saves your changes automatically.
Claim Reason Codes
Configure the available claim reason codes that appear on explanations of benefits (EOBs) that you may receive from insurance.
You can enter these codes during EOB processing and payment allocation in Practice > Payments > Batch Payments.
To add a new claim reason code:
- Go to Practice > Practice Settings > Financials > Claim Reason Codes
- Select Add Claim Reason Code
- Complete the required fields

- Reason Code ID: The short code that appears when EOB processing and allocating insurance payments.
- Group Code: The short code for the group of codes that this reason code belongs to. It also appears when EOB processing and allocating insurance payments.
- Short Name: A short description that appears when EOB processing and allocating insurance payments.
- Description: A longer description that appears when EOB processing and allocating insurance payments.
- Start Date: When does this code become effective and can be used when EOB processing?
- Status: Active claim reason codes appear for use in the system. Inactive claim reason codes cannot be used, but appear in historical references.
- Select Save
To edit an existing claim reason code, select ![]() in the Actions column.
in the Actions column.
Crosswalk Codes
Configure crosswalk codes used to crosswalk a charge from medical to dental codes, or dental to medical codes, in order to submit an insurance claim to another insurance payer using a different code set.
You can enter these codes during EOB processing and payment allocation in Practice > Payments > Batch Payments or when transferring a charge between dental/medical insurance payers in Patient > Financials.
The original code and crosswalk code must be from different sets, i.e., CDT (dental) to CPT (medical).
To add a new crosswalk code:
- Go to Practice > Practice Settings > Financials > Claim Reason Codes
- Select Add Claim Reason Code
- Complete the required fields

- Original Code: What code are you going to crosswalk?
- The original code and crosswalk code must be from different sets.
- Submitted Code: A read-only description of the original code that is submitted during the crosswalk workflow.
- If the original code was a custom code, the mapped code appears here.
- Crosswalk Code: What code do you want to crosswalk the original code to?
- The original code and crosswalk code must be from different sets.
- CW Submitted Code: A read-only description of the submitted code.
- If the crosswalk code was a custom code, the mapped code appears here.
- Start Date: When does this crosswalk code become effective and can be used?
- End Date: When can this crosswalk code no longer be used?
- Leave blank if there is no end date.
- Select Save
- After a crosswalk code is saved, you can only edit the end date.
- Original Code: What code are you going to crosswalk?
To edit an existing crosswalk code, select ![]() in the Actions column. Only the end date can be edited.
in the Actions column. Only the end date can be edited.
Delay Reason Codes
Configure delay reason codes used when processing insurance claims in the electronic queue to explain why a claim was delayed past the timely filing constraint date.
You can enter these codes when processing the electronic claims queue in Practice > Insurance > Batches.
To add a new delay reason code:
- Go to Practice > Practice Settings > Financials > Claim Reason Codes
- Select Add Claim Reason Code
- Complete the required fields

- Reason Code ID: A short code that appears when processing electronic insurance claims.
- Description: A longer description that appears when processing electronic insurance claims.
- Status: Active delay reason codes appear for use in the system. Inactive delay reason codes cannot be used, but appear in historical references.
- Select Save
To edit an existing delay reason code, select ![]() in the Actions column.
in the Actions column.
Fee Schedules
To learn about creating fee schedules, setting new rates, and the fee schedule application order, see Practice settings: fee schedules.
General Settings
Change the financial general settings throughout your practice.
- Go to Practice > Practice Settings > Financials > General Settings
- Update the available settings

- Max Batch Size: What is the maximum size a payment batch can be in Practice > Payments > Batch Payments ?
- Billable State: Do procedures in your practice become billable charges when the procedure is In Progress, or Completed?
- If charges are only created from Completed procedures, you can still record pre-payments for In Progress procedures.
The system saves your changes automatically.
Lockbox Identifiers
You can receive insurance and patient payments through a lockbox in Practice > Payments > Batch Payments.
If you want to record patient payments with lockbox or batch details through the patient detailed payment screen instead of at the practice level, use the toggle identified below.
Recording patient payments that are part of a batch, from the detailed payment screen, can be helpful if you prefer that they are manually allocated on entry, instead of automatically by first-in, first out and then optionally edited afterwards.
- Go to Practice > Practice Settings > Financials > Lockbox Identifiers
- Toggle to display or hide the lockbox identifiers in the patient detailed payment screen

- Toggling to ON adds Lockbox, Batch #, Transaction #, and Deposit Date, fields to the:
- Payment details window. Useful for viewing the details of a batch payment from Patient > Financials.
- Detailed patient payment window.
- Since patient payments added to a batch from Practice > Payments are automatically allocated first-in, first-out, this can be helpful if you prefer that patient payments in a batch are manually allocated from the detailed payment screen, instead of having their allocation updated after being entered from Practice > Payments.
- A batch must be created in Practice > Payments > Batch Payments before you can enter a payment to that batch from the Patient > Financials detailed payment screen.
The system saves your changes automatically.
Lockbox Management
Add the details of each lockbox your practice uses. Lockboxes are used when processing batch payments that have been deposited into a lockbox. To learn more, see Batch payments overview.
To add a new lockbox:
- Go to Practice > Practice Settings > Financials > Lockbox Management
- Select Add Lockbox
- Complete the required fields

- Name: The short description that appears when you select a lockbox from the drop-down menu when processing a payment.
- Description: A longer description that only appears here in Practice Settings.
- Select Save
The new lockbox is now available. If you no longer want a lockbox to appear as an option, edit the lockbox and set its status to Inactive.
Payment Locations
Define the payment locations you can select when recording a payment. You can configure payment locations to only accept certain payment methods.
To configure the available payment methods, go to Practice Settings > Financials > Payment Methods.
To add a new payment location:
- Go to Practice > Practice Settings > Financials > Payment Locations
- Select Add Payment Location
- Complete the required fields

- Name: The name of the payment location that appears when entering a payment.
- Description: A longer description that only appears here in Practice Settings.
- Type: Is this payment location a Cash Drawer, a Credit Card Processor, or a Lockbox?
- Status: Active payment locations appear for use in the system. Inactive payment locations cannot be used, but appear in historical references.
- Available Payment Types: What payment methods can be collected at this location?
- Available Workstations: If your practice uses Workstations, which workstations are able to use this payment location?
- To not restrict payment locations by workstation, leave the select workstations table empty.
- Select Save
To edit an existing payment location, select ![]() in the Actions column.
in the Actions column.
Payment Methods
Define the payment methods you can select when recording a payment. Acceptable payment methods can vary based on the payment location.
Go to Practice > Practice Settings > Financials > Payment Locations to configure which payment methods can be accepted at each payment location.
To add a new payment method:
- Go to Practice > Practice Settings > Financials > Payment Methods
- Select Add Payment Methods
- Complete the required fields

- Name: The name of the payment method that appears when entering a payment.
- Description: A longer description that only appears here in Practice Settings.
- Status: Active payment methods appear for use in the system. Inactive payment methods cannot be used, but appear in historical references.
- Select Save
To edit an existing payment method, select ![]() in the Actions column.
in the Actions column.
Refund Codes
You can use refund codes when generating a refund for a patient or insurance. They are useful for describing the circumstances of a refund.
To add a new refund code:
- Go to Practice > Practice Settings > Financials > Refund Codes
- Select Add Refund Code
- Complete the required fields

- Code Name: The short description that appears when processing a refund and picking a refund code from the drop-down menu.
- Code Description: A longer description that appears in transaction history and the patient record.
- Helpful to provide more detail about the type of refund that was processed.
- Status: Active refund codes appear for use in the system. Inactive refund codes cannot be used, but appear in historical references.
- Select Save
To edit an existing refund code, select ![]() in the Actions column.
in the Actions column.